Здравствуйте админ, хочу у Вас спросить, каким образом можно добавить файл в ISO образ операционной системы Windows? Почему собственно говоря спрашиваю, на моём ноутбуке установлена Windows 8 Single Language, а я хочу установить Windows 8.1 Профессиональная 64-bit Rus, при установке выходит ошибка «Введенный ключ продукта не соответствует ни одному из образов Windows», происходит это потому, что в БИОСе UEFI ноутбука вшит ключ заводской Windows 8 Single Language. Прочитал Вашу статью Как переустановить Windows 8 на ноутбуке, в ней Вы советуете добавить в образ ISO винды файлы EI.cfg и PID.txt – это дополнительные файлы конфигурации, используемые Windows в процессе установки для указания ключа продукта и выпуска Windows!
То есть я понял, что если я добавлю в ISO образ Windows 8.1 Профессиональная 64-bit Rus файлы EI.cfg и файл идентификатора продукта PID.txt, то профессиональная восьмёрка установится мне на ноутбук, также при установке Windows 8.1 не нужно будет вводить ручками ключ продукта, так как он прописан в файле PID.txt! Но как мне добавить эти файлы в ISO образ Windows?
Как добавить файл в ISO образ
Друзья, во первых, если Вы имеете установочный диск с Windows 8.1 Профессиональная 64-bit, то сначала нужно сделать из него образ, это Вы можете сделать по нашей статье Как создать ISO образ диска.
Если ISO образ винды готов, то для добавления в него файлов можно использовать программу UltraISO, она самая надёжная в этом отношении. С помощью этой программы можно добавлять любые файлы в любой образ ISO, будь-то образ операционной системы или любой другой образ.
Сайт программы http://www.ezbsystems.com/ultraiso/download.htm.

Скачиваем и запускаем установку программы.

К сожалению программа платная, но имеет пробный период работы, но опять же, от этого не легче, так как в триальном режиме программа не даст Вам работать с образами весом более 300 МБ.


Главное окно программы. Файл->Открыть.

В открывшемся окне проводника находим наш образ Windows 8.1 Профессиональная 64-bit выделяем его левой мышью и жмём Открыть.

В левой нижней части этого окна находим папку с нашими файлами EI.cfg и PID.txt. Данные файлы будут отображены в правой части окна. В нашем случае копировать файлы EI.cfg и PID.txt нужно в папку sources, заходим в неё двойным щелчком левой мыши.

Выделяем файлы, которые мы собрались копировать левой мышью и перетаскиваем в верхнюю часть окна программы UltraISO в папку sources.

Файлы скопированы, остаётся только создать образ заново.
Оригинальный файл ISO трогать не будем, создадим его ISO копию с уже добавленными файлами. Назовём новый образ Windows 8.1 Профессиональная 64-bit. Файл->Сохранить как

Вводим новое имя Windows 8.1 Профессиональная 64-bit и жмём Сохранить

Происходит сохранение нашего образа ISO под другим именем Windows 8.1 Профессиональная 64-bit

Всё, новый ISO образ готов.
Вот таким простым способом мы добавили нужные файлы в образ ISO операционной системы. Точно таким же способом Вы можете добавить любые файлы в любой ISO образ! Кстати, теперь Windows 8.1 Профессиональная 64-bit при установке не будет просить ввести ключ, так как он прописан в скопированном файле конфигурации PID.txt.

В данной статье рассмотрим как добавить нужный нам файл в ISO образ, после чего обратно соберём ISO.
Итак, ISO образ лежит на рабочем столе:

Теперь создадим файл ei.cfg. Для начала создаём текстовый документ (Блокнот). В который пишем следующие три строчки:

После чего нажимаем на вкладку «Файл», выбираем «Сохранить как». Кодировку ставим UTF-8, затем в графу «Имя файла» пишем ei.cfg и Нажимаем «Сохранить», так у нас появится файл, который будем вставлять в образ, а текстовый документ можно удалить:

Теперь, для того чтобы внедрить этот файл в ISO образ, понадобится редактор ISO. Воспользуемся AnyBurn. Можно скачать само приложение, либо скачать его портативную версию, которая запускается прямо из папки и не требует установки. В нашем примере качаем портативную версию:

После загрузки, открываем архив, выбираем папку подходящую по разрядности нашей системы и перетаскиваем её на «Рабочий стол»:

Программа выглядит следующим образом, после открытия:

Выбираем «Изменить содержимое файла-образа», после чего в открывшемся окне указываем какой файл нужно отредактировать:

Нажимаем «Далее» и в следующем окне нужно добавить наш созданный файл в папку sources:

Для этого нажимаем на кнопку вверху «Добавить», находим наш созданный файл и опять нажимаем «Добавить»:

Затем нажимаем «Далее», в следующем окне немного изменяем имя (так как два файла с одинаковыми именами существовать не могут), нажимаем «Создать»:

Ждём завершения создания:

После завершения создания нажимаем «Готово» и на рабочем столе можно заметить второй, отредактированный файл, ISO.
С помощью данной программы вот так просто можно добавить файл в ISO образ Windows.

0
![]()
Earlier last week, we discussed about a fantastic online tool to generate and download unattend.xml file that we use while performing unattended or silent Windows 10/8.1/7 installation. The tool also lets you generate Config.xml file required to perform unattended Microsoft Office installation.
NOTE: This guide works great on Windows 10, Windows 8.1 and Windows 7.
After generating and downloading the unattend.xml file, I had to add the XML file in the bootable Windows ISO file and test the same using a virtual machine before writing about the handy tool.
As you likely know, editing a bootable Windows ISO isn’t a very straight-forward procedure if you don’t want to shell out a premium for paid applications. While there are dozens of free software around to create, burn and mount ISO files, a quick web search reveals that there is not even a single free program for Windows to edit bootable ISO files.
Those of you who want to add files to bootable Windows ISO files without purchasing a premium software can follow the given below instructions to edit your bootable ISO file. Since we don’t have a free program to directly edit the bootable ISO image file to add files, we need to first extract the ISO file, add files and then create a bootable ISO image again using a free application called ImgBurn.
Include files in bootable ISO image
Following are the steps that you need to follow in order to edit a bootable ISO to add files in Windows.
Step 1: If you haven’t installed a file archiving program, please visit this page to download 7-Zip (free) and install the same. If you’re using any other file compression tool such as WinRAR or WinZip, you don’t need to install 7-Zip.
Step 2: Navigate to the location where your bootable ISO file is located, right-click on it, click 7-Zip, click Extract files and then select a new folder in your preferred location to save contents of the ISO file. If you’re using WinRAR or WinZip, simply right-click on the ISO file to see Extract option.
Step 3: Once the contents of the ISO have been extracted, simply copy the file(s) that you would like to include in the ISO file.
Step 4: Now, we need to create a bootable ISO file out of those extracted files. In order to do so, we need to download and install another free program called ImgBurn.
Visit this page to download ImgBurn (free) and then run the setup file to install the same.
Step 5: Launch ImgBurn, click Create image file from files/folders option.
Step 6: Switch to the Advanced tab (see picture). Click on the Bootable Disc tab that appears when you click on the Advanced tab.
Step 7: Next, click on the small browse icon that appears next to the Source box and browse to the new folder containing the contents of your extracted ISO file plus the newly added files.
Once done, select a location to save the bootable ISO file that you’re going to build in a couple of minutes. To do so, simply click the browse icon next to the Destination box and then browse to the location where you want to save the ISO and then enter a name for the new ISO file.
Step 8: Under Bootable Disc tab, select the option labeled Make Image Bootable, select Emulation type as None (Custom), and then type 8 in the box next to Sectors To Load. If in case, you’re working on Vista ISO, please enter 4.
Step 9: Finally, click the small browse icon that appears next to the Boot Image box and browse to the Boot folder located in the newly created folder where you have saved extracted ISO file contents. Select the file labeled etfsboot.com file and then click the Open button.
Step 10: Click the Build button to start the process of building your bootable ISO image file. Click Yes or OK when you see the following three dialog boxes to continue building the ISO file.
That’s it!
Welcome back, my name is Fabian, as always we share everything we know of value to our audience and this will be no exception, stay until the end of the content to be with the latest trends we have prepared for you. As we told you last week, we read all the comments and create trending content for you, so if you haven’t already, leave us your email and we’ll keep you updated. Without wasting any more time, I hope you read all the content and see yourself in the next relevant Clomatica content.
Earlier last week, we discussed a great online tool to generate and download the unattend.xml file that we use during the automatic or silent installation of Windows 10 / 8.1 / 7. The tool also allows you to generate the configuration file . xml required to run unattended Microsoft Office installation.
NOTE: This guide works perfectly on Windows 10, Windows 8.1 and Windows 7.
After generating and downloading the unattend.xml file, I had to add the XML file to the Windows bootable ISO file and test it using a virtual machine before writing the handy tool.
As you probably know, changing a bootable Windows ISO is not a very simple procedure if you don’t want to shell out a premium for paid apps. While there are dozens of free software for creating, burning, and mounting ISO files, a quick web search reveals that there is not a single free program for Windows to edit bootable ISO files.
Those of you who wish to add files to Windows bootable ISO files without purchasing premium software can follow the instructions provided below to edit the bootable ISO file. Since we don’t have a free program to directly edit the bootable ISO image file to add files, you must first extract the ISO file, add files, and then re-create a bootable ISO image using a free application called ImgBurn.
Include the files in the bootable ISO image
Below are the steps to follow to change a bootable ISO to add files on Windows.
Step 1: If you don’t have a file archiving program installed, visit this page to download 7-Zip (free) and install it. If you are using any other file compression tool such as WinRAR or WinZip, there is no need to install 7-Zip.
Step 2: Navigate to the location where the bootable ISO file is located, right-click on it, click 7-Zip, click Extract Archive, then select a new folder in your preferred location to save the contents of the file. ISO file. If you are using WinRAR or WinZip, right click on the ISO file to bring up the Extract option.

Step 3: Once the contents of the ISO have been extracted, simply copy the files you want to include in the ISO file.

Step 4: Now, we need to create a bootable ISO file from those extracted files. To do this, we need to download and install another free program called ImgBurn.
Visit This Page to download ImgBurn (free) and then run the setup file to install it.
Step 5: Start ImgBurn, click Create image files from files / folders option.

Step 6: It will happen Advanced paper (see image). Click on boot disk tab displayed when the file is clicked Advanced language.

Step 7: Then click on the small navigation icon that appears next to the file font and go to the new folder which contains the contents of your extracted ISO file plus the newly added files.
Once done, select a location to save the bootable ISO file that you will create in a couple of minutes. To do this, simply click the Browse icon next to the Destination box, then select the location where you want to save the ISO, then enter a name for the new ISO file.
Step 8: On the Startup Disk tab, select the option labeled Make the image bootableTo select type of emulation What None (custom)and then write 8 in the box next to Sectors to load. If in case, you are working in ISO View, enter 4.

Step 9: Finally, click on the small navigation icon that appears next to the file. boot image box and go to the file Start folder located in the newly created folder where you saved the contents of the extracted ISO file. Select the marked file etfsboot.com file and then click To open button.

Step 10: Click on To build to start the process of creating the bootable ISO image file. Click Yup or OK when the following three dialogs appear to continue creating the ISO file.


That’s all!

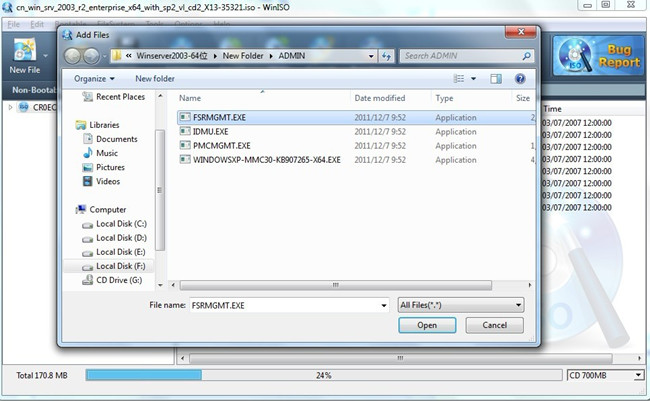
Add files to ISO: WinISO as the ISO editor, can help you handle your daily work very well. WinISO owns the ability to add any CD/DVD/Blu-ray Disc image file formats with the perfect interface quality and amazing speed.
Step 1: Getting Started
Free Download WinISO from our official website and install it. It will just take you several seconds.
Step 2: Open File
After WinISO is running, click the «Open File» button to open an ISO image file.
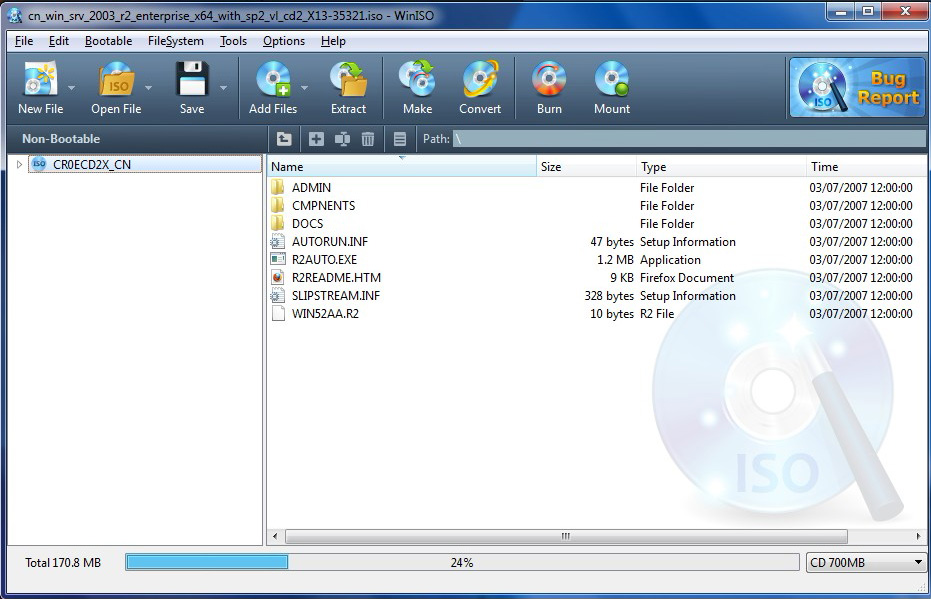
Step 3: Click «Add»
Click the «Add Files» button to add file(s), choose the file you need and then press “Open” or you can drag and drop file(s) or directories from Windows Explorer into WinISO. Press «Ctrl + files or directories (you need)» can add mixed files and directories at a time.
Step 4: Save
Click the «Save» button on the toolbar to save the file.

Now, your addition is completely successful.
For more guides, please take closer look here:
System Requirement
- Windows XP/2003/Vista/Windows 7 or above
- CPU 1.0GHz above
- 512MB memory
- At least 100MB hard disk space
- CD/DVD/Blu-ray Disc Drive (Optional)
WinISO Standard 6:
