The display language you select changes the default language used by Windows features, such as Settings and File Explorer.
-
Select Start > Settings > Time & language > Language & region.
-
Choose a language from the Windows display language menu, or, next to Preferred languages, select Add a language to install the one you want if it isn’t listed.
Learn more about managing language settings
The display language you select changes the default language used by Windows features, such as Settings and File Explorer.
-
Select Start > Settings > Time & Language > Language.
-
Choose a language from the Windows display language menu, or, under Preferred languages, select Add a language to install the one you want if it isn’t listed.
Learn more about managing language settings
To manage all aspects of the input and display language settings on your Windows 11 PC, use the following methods.
To switch the keyboard layout you’re using, press and hold the Windows key and then repeatedly press the Spacebar to cycle through all your installed keyboards. (If this doesn’t do anything, it means you have only one installed.)
You can also select the language abbreviation in your taskbar then choose the language or input method you want to use.
Note: In the input field, press the Windows logo key + period (.) to access the Emoji & more keyboard, if your language supports it.
If you can’t find the keyboard layout you want, you may have to add a new keyboard.
Adding an input language lets you set a language-preference order for websites and apps, as well as change your keyboard language.
-
Select the Start > Settings > Time & language > Language & region.
-
Select the language that has the keyboard you want, then select Options.
-
Select Add a keyboard and choose the keyboard you want to add. If you don’t see the keyboard you want, you may have to add a new language to get additional options. If this is the case, go on to step 4.
-
Return to the Language settings page, go to Preferred languages, then select Add a language.
-
Choose the language you want to use from the list, then select Next.
-
Review any language features you want to set up or install, and select Install.
«Add a keyboard» shortcut
The display language you select changes the default language used by Windows features like Settings and File Explorer.
-
Select Start > Settings > Time & language > Language & region.
-
Choose a language from the Windows display language menu.
«Change your display language» shortcut
If a language is listed under Preferred languages but doesn’t appear on the Windows display language list, you’ll first need to install its language pack (if it’s available).
-
Select Start > Settings > Time & language > Language & region.
-
In Preferred languages, select Add a language, enter the language you want, then select Next.
-
Select Download from the Download language pack option.
-
After the language pack is installed, select Back.
-
Choose a language from the Windows display language menu.
«Install a language pack» shortcut
If you receive an «Only one language pack allowed» or «Your Windows license supports only one display language» message, you have a single language edition of Windows 10. Here’s how to check your Windows 10 language edition:
-
Select Start > Settings > About, and then go to the Windows specification section.
-
If you see Windows 11 Home Single Language next to Edition, you have a single language edition of Window 11, and you can’t add a new language unless you purchase an upgrade to either Windows 11 Home or Windows 11 Pro.
Upgrade to Windows 11 Home or Windows 11 Pro
-
Select Start > Settings > Time & language > Language & region.
-
Under Preferred languages, select the language you want to remove, and then select Remove.
-
To remove an individual keyboard, select the language (see step 2), select Options, scroll down to the Keyboards section, select the keyboard you want to remove, and select Remove.
To manage all aspects of the input and display language settings on your Windows 10 device, use the following methods.
To switch the keyboard layout you’re using in Windows 10, press and hold the Windows key and then repeatedly press the Spacebar to cycle through all your installed keyboards. (If this doesn’t do anything, it means you have only one installed.)
You can also select the language abbreviation on the far right of the taskbar and then choose the language or input method you want to use.
Note: In the input field, press Windows +period (.) to access the emoji keyboard, if your language supports this.
If you can’t find the keyboard layout you want, you may have to add a new keyboard.
Adding an input language lets you set a language-preference order for websites and apps, as well as change your keyboard language.
-
Select the Start button, then select Settings > Time & Language > Language.
-
Under Preferred languages, select the language that contains the keyboard you want, and then select Options.
-
Select Add a keyboard and choose the keyboard you want to add. If you don’t see the keyboard you want, you may have to add a new language to get additional options. If this is the case, go on to step 4.
-
Return to the Language settings page, and select Add a language.
-
Choose the language you want to use from the list, and then select Next.
-
Review any language features you want to set up or install, and select Install.
«Add a keyboard» shortcut
Some languages require additional language features
For some languages to work properly, you need an admin on your PC to install the language features. Here’s a list of the languages that are affected:
-
Microsoft IME – Primary keyboard of Japanese
-
Microsoft Pinyin – Primary keyboard of Chinese (Simplified, China), Primary keyboard of Chinese (Simplified, Singapore)
-
Microsoft Wubi – Secondary keyboard of Chinese (Simplified, China), Secondary keyboard of Chinese (Simplified, Singapore)
-
Microsoft Bopomofo – Primary keyboard of Chinese (Traditional, Taiwan), Secondary keyboard of Chinese (Traditional, Hong Kong SAR), Secondary keyboard of Chinese (Traditional, Macao SAR)
-
Microsoft ChangJie – Secondary keyboard of Chinese (Traditional, Taiwan), Secondary keyboard of Chinese (Traditional, Hong Kong SAR), Secondary keyboard of Chinese (Traditional, Macao SAR)
-
Microsoft Quick – Secondary keyboard of Chinese (Traditional, Taiwan), Primary keyboard of Chinese (Traditional, Hong Kong SAR), Primary keyboard of Chinese (Traditional, Macao SAR)
-
Bangla Phonetic – Secondary keyboard of Bengali (India)
-
Gujarati Phonetic – Secondary keyboard of Gujarati
-
Hindi Phonetic – Secondary keyboard of Hindi
-
Kannada Phonetic – Secondary keyboard of Kannada
-
Malayalam Phonetic – Secondary keyboard of Malayalam
-
Marathi Phonetic – Secondary keyboard of Marathi
-
Odia Phonetic – Secondary keyboard of Odia
-
Punjabi Phonetic – Secondary keyboard of Punjabi (Gurmukhi)
-
Tamil Phonetic – Secondary keyboard of Tamil (India)
-
Telugu Phonetic – Secondary keyboard of Telugu
The display language you select changes the default language used by Windows features like Settings and File Explorer.
-
Select the Start button, then select Settings > Time & Language > Language.
-
Choose a language from the Windows display language menu.
«Change your display language» shortcut
If a language is listed under Preferred languages but doesn’t appear on the Windows display language list, you’ll first need to install its language pack (if it’s available).
-
Select the Start button, then select Settings > Time & Language > Language.
-
Choose a language from the Add a language list under Preferred languages, and then select Options.
-
Select Download from the Download language pack option.
-
After the language pack is installed, select Back .
-
Choose a language from the Windows display language menu.
«Install a language pack» shortcut
If you receive an «Only one language pack allowed» or «Your Windows license supports only one display language» message, you have a single language edition of Windows 10. Here’s how to check your Windows 10 language edition:
-
Select the Start button, select Settings > About, and then scroll down to the Windows specification section.
-
If you see Windows 10 Home Single Language next to Edition, you have a single language edition of Window 10, and you can’t add a new language unless you purchase an upgrade to either Windows 10 Home or Windows 10 Pro.
Upgrade to Windows 10 Home or Windows 10 Pro
-
Select the Start button, then select Settings > Time & Language > Language.
-
Under Preferred languages, select the language you want to remove, and then click Remove.
-
To remove an individual keyboard, select the language in question (see step 2), select Options, scroll down to the Keyboards section, select the keyboard you want to remove, and click Remove.
Need more help?
Want more options?
Explore subscription benefits, browse training courses, learn how to secure your device, and more.
Communities help you ask and answer questions, give feedback, and hear from experts with rich knowledge.
Find solutions to common problems or get help from a support agent.
Reading time
4 min
Views 6.6K
Read this article to find out how to change the language of Windows 10 interface without having to reinstall it, what system languages can be installed and what settings should be modified for that purpose.
Introduction
In Windows 10, people usually choose the preferred language for the entire operating system when they install it. However, if the language settings were wrong, or people have to use computing devices with certain language preferences, there are some settings to be modified in order to bring them in line with your personal likings.
So if you ever need to change language preferences in Windows 10, this can be done in a quick and easy way with the help of the Settings app and without having to reinstall the operating system.
In today’s article, we will show you how to change the default display language into any other, including doing it for new and existing user accounts.
How to change the default display language in Windows 10?
If you have to move to a different region or you need to use a display language different from the default choice, or the initial language settings for the computing device have been wrong, there is absolutely no point in reinstalling Windows 10. All you need is to modify a couple of system settings to enjoy the experience of using your operating system in the right language.
Disable language synchronization
If you are using a Microsoft account, the language settings will apply to all devices linked to such account. If you plan to change regional and language settings for one computer only, you need to disable synchronization of such settings before you proceed.
This is how you disable language sync in Windows 10.
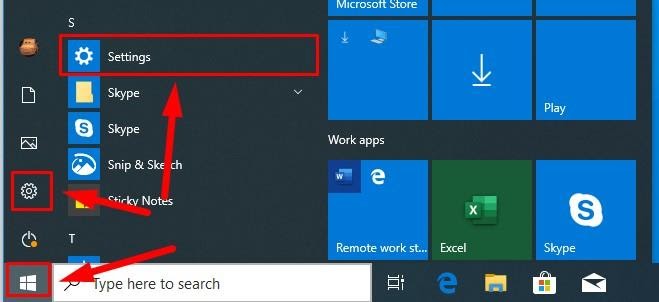
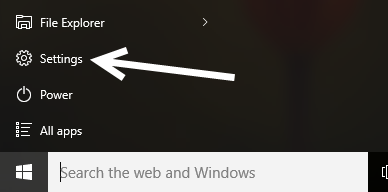
Open the main system application, Settings. You can do it in any way you prefer. For example, click on the Start button in the lower left corner of your desktop, on the Taskbar, and open the main Windows menu. Use the scroll bar or the mouse wheel to search the list of all programs and applications installed on this computer and find the line Settings, or click on the Settings button in the left side of the user menu, and the application will open.
In the main Settings window, scroll down if necessary and choose the tab Accounts.

In the left panel, go to Sync your settings.
In the right panel, find the section Individual sync settings and the line Language preferences, then set the slider to the Off position (disabled).

When these steps are taken, you can start changing language settings for the copy of Windows 10 installed on this computer, without worrying that this can affect similar settings in other linked devices.
The steps to take if you want to change the display language
To change the display language of your Windows 10, you should close all running applications and do what is described below.
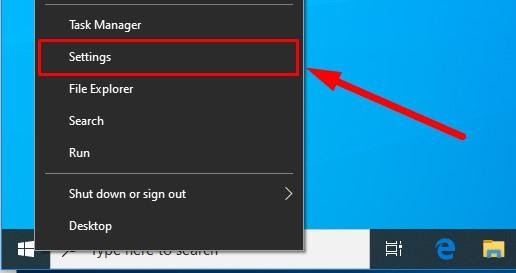
Use any method you prefer to open the Settings application. For example, right-click on the Start button that you can find on the Taskbar, in the left lower corner of the desktop, or press the key sequence Windows + X instead to open the context menu, and select the line Settings. The application will start immediately.
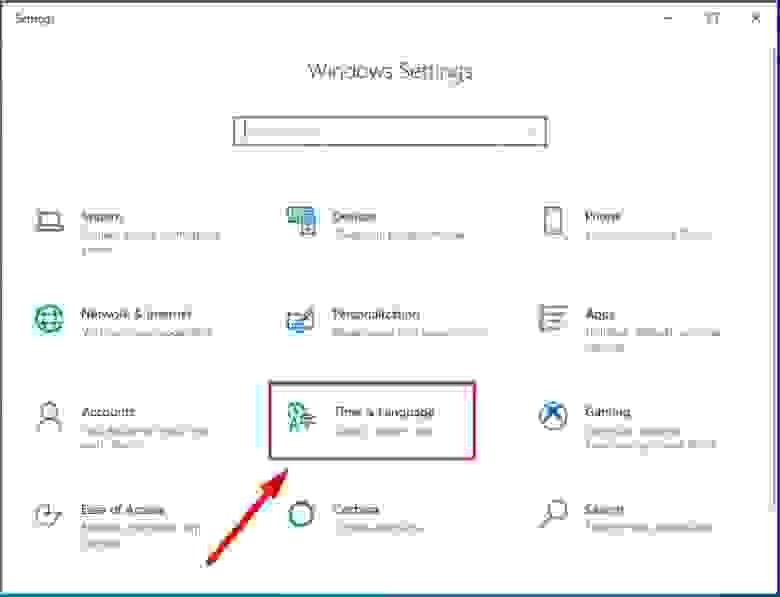
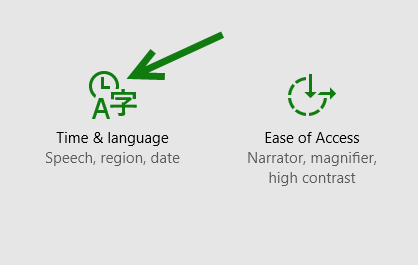
Use the scroll bar or the mouse wheel to navigate the Settings window, and find the tab Time and language.
In the left panel, go to Language.
Now look to the right and find the section Preferred languages, where you can prioritize language settings, and click on the button Add a preferred language, with a + (plus) symbol on it.
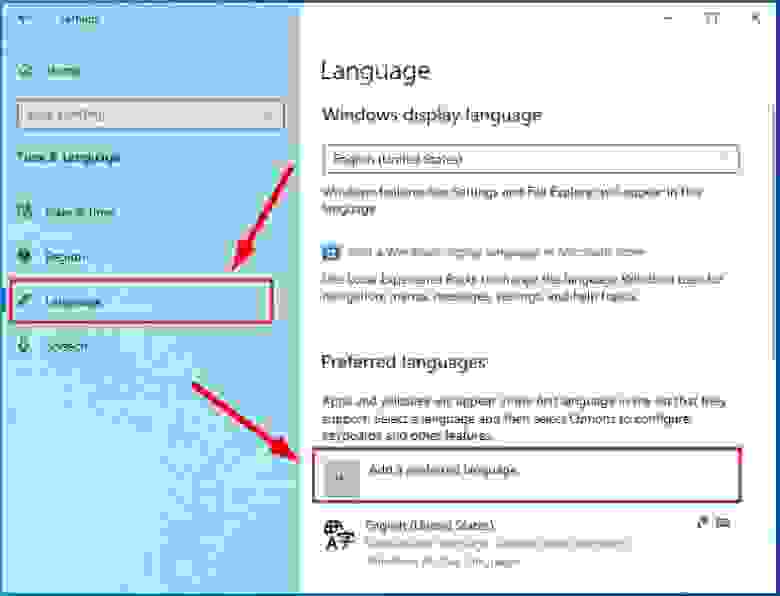
In the new window Choose a language to install use the scroll bar or the mouse wheel to find the language you need, or start typing its name in the search field above.
Choose the language pack you are planning to use in Windows 10 from the list.

When the language is chosen, hit Next.
In the next page Install language features check the box for Install language pack to confirm your choice (the box with the tick will become blue, i.e. active).
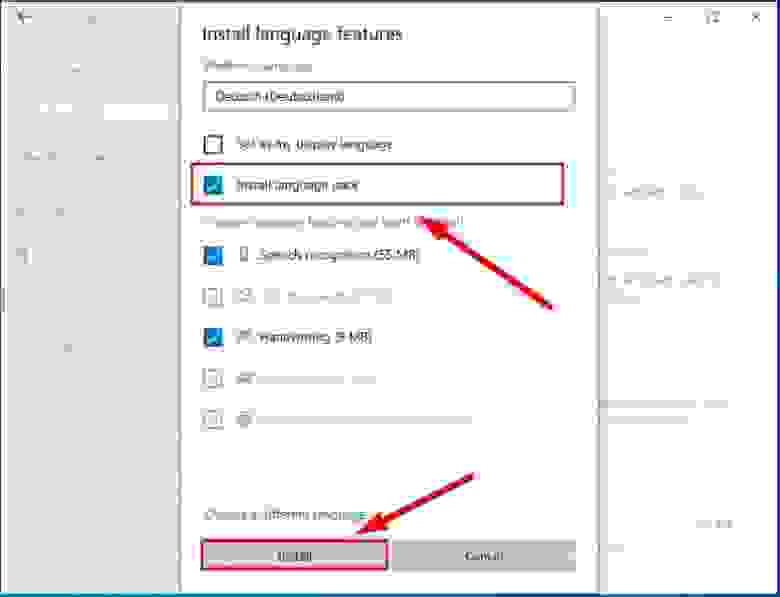
Click Install below.
Changes will take effect after the language package is installed, which usually takes several minutes only. In some cases, restarting your Windows 10 may be required, and then the corresponding language settings will apply to all system elements. The changes will affect the sign-in screen, the Settings app, Windows Explorer, desktop, all applications, preferred browsers and websites you visit. From now on, they will use the new language by default. Besides, Windows 10 may suggest reviewing your current privacy settings.
Changing region settings
If you change the display language for Windows 10 because you move to a different region, then regional settings should be modified too.
Changing them in Windows 10 is easy enough: just follow the steps below.
Open the main system application, Settings, using any way you prefer. For example, press the keyboard shortcut Windows + I to access the app directly.
In the main window of the Settings app, find and select the tab Time and language.
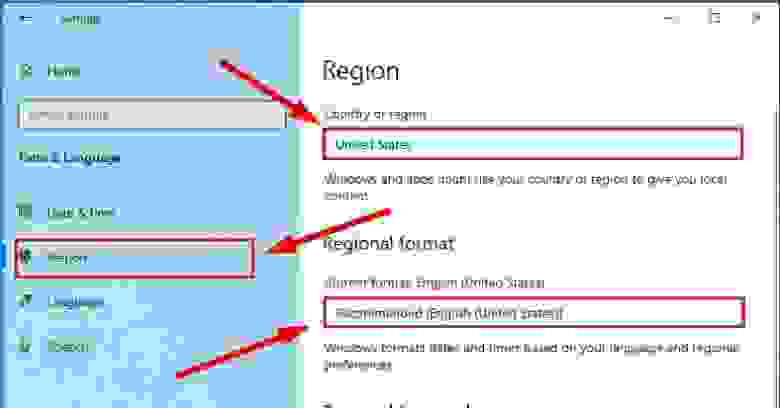
In the left panel, select Region.
In the right panel, find the section Region and use the nested menu Country or region to specify your new location if it differs from the current settings.
In the section Regional format use another nested menu to select proper formats to display date and time in Windows, if these differ for your time and region.
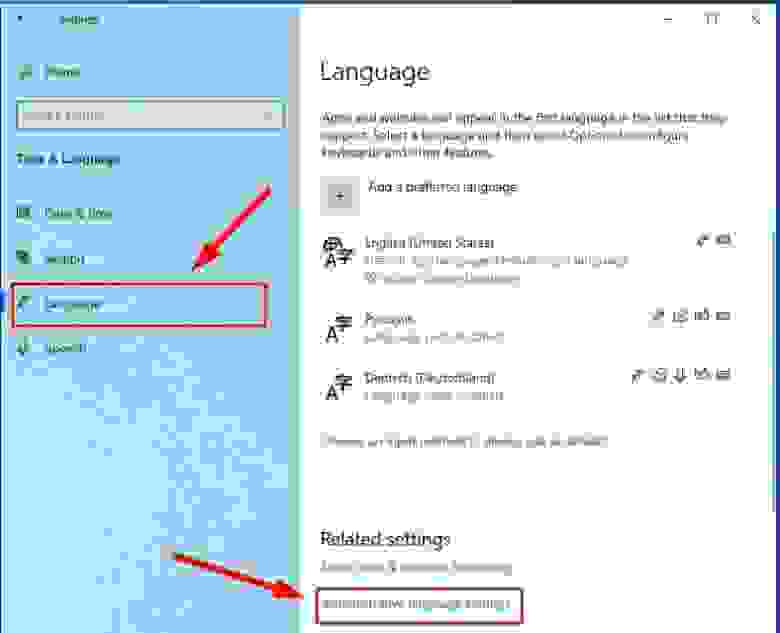
Now look at the left panel and jump to the tab Language again.
Use the scroll bar or the mouse wheel to find the section Related settings and click on the link Administrative language settings.
In the new pop-up Region window, jump to the tab Administrative and in the section Welcome screen and new user accounts hit the button Copy settings.
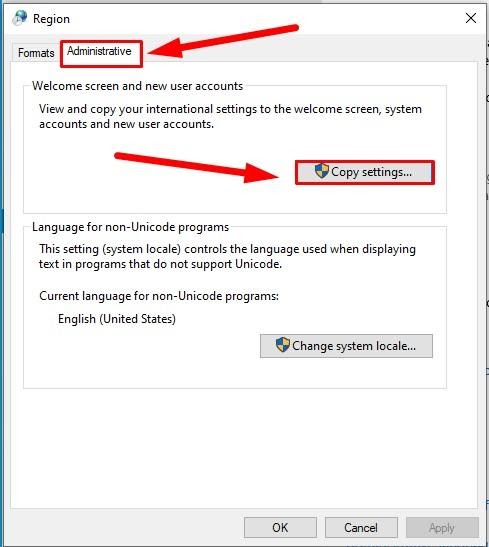
The new window will show you corresponding screen and account settings. In the section Copy your current settings to check the boxes for each option: Welcome screen and system accounts and New user accounts.
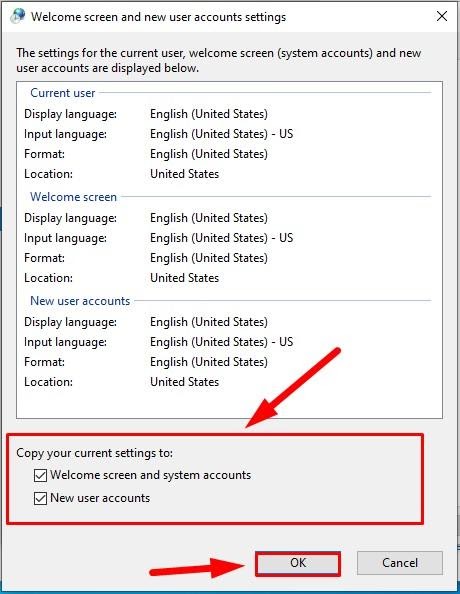
Click ОК.
Click ОК one more time, and then restart the computer.
After all these steps, your computer will display proper regional settings specified according to your physical location.
Most of the time, people don’t change or install additional languages regularly for their personal needs. This opportunity to change language packs quickly is more often required in small or large companies that need to deal with customers having various language preferences.
Besides, this option would be useful for people who have to move to a different region and would like their regional settings to comply. Another scenario is buying a computer from another country when the required configuration is not available locally.
Also, you should remember that modifying language settings may disable some functions like Cortana because this service is not supported in certain regions.
Conclusion
Preferred display language is one of the easily customizable things in the operating system. If you ever need to change the language settings, use one of the methods described here to replace the language pack currently used by Windows 10 without having to reinstall it.
See the full article with all additional video tutorials. If you still have any questions, please ask in a comments. Also visit our Youtube channel, there are over 400 video tutorials.

If you ever want to change the display language of Windows 10 or want to add additional languages to use in documents, the steps in this tutorial will help you.
First Method: Using the Settings app
1. Click the Windows logo to open the Start menu, and select Settings from the there.
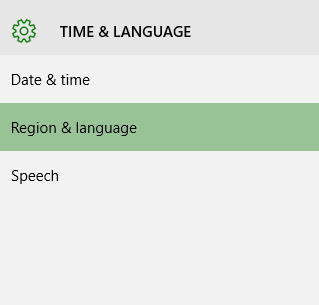
2. In the pop-up Settings window, select the Time & language option.
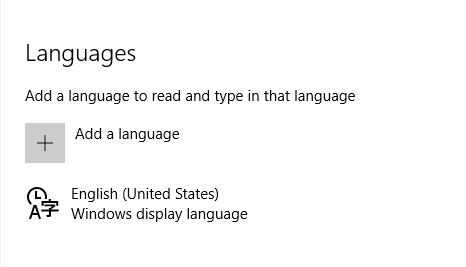
3. Select the Region & language option on the left side.
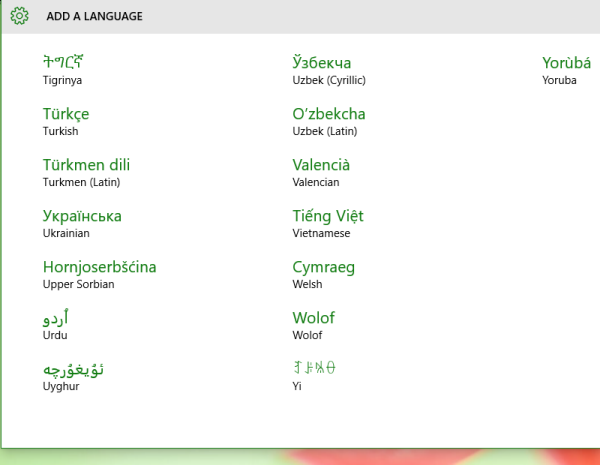
4. On the right side, you will see several options. Find Languages, and click Add a language.
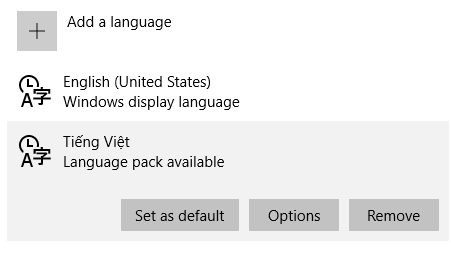
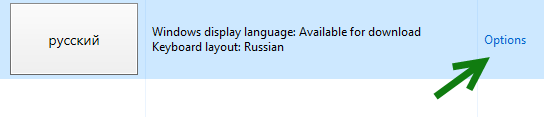
5. Scroll through the list of available languages, and select the one you need. Once selected, the language will be added to the system automatically.
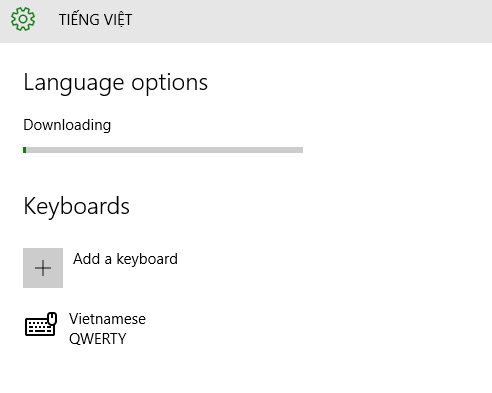
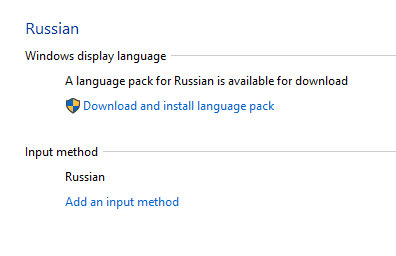
6. When you come back to the language list, select the newly added language, and set it as the system’s default language if you want. For languages that come with a “Language pack available” option, you will need to download the pack first. To do so, click the Options button.
7. At the top of the Language options page, click Download to proceed. In this section, you also have an option to add a special keyboard designed for that language (if available). The QWERTY keyboard is added by default for you.
Second Method: Using the Control Panel
If you prefer the traditional way to add a language as in Windows 7 and Windows 8, here are the steps for you.
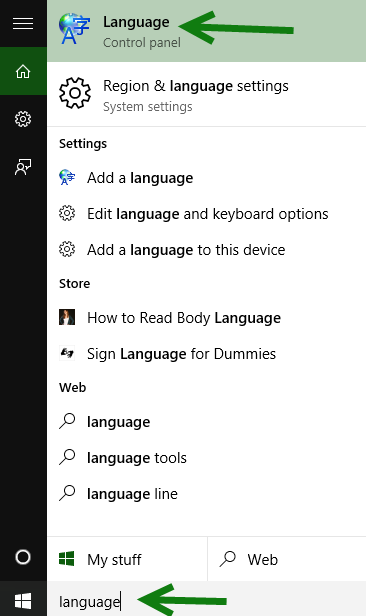
1. In Windows 10, the quickest way to visit the Language settings of the Control Panel is to type Language in the search box on the taskbar.
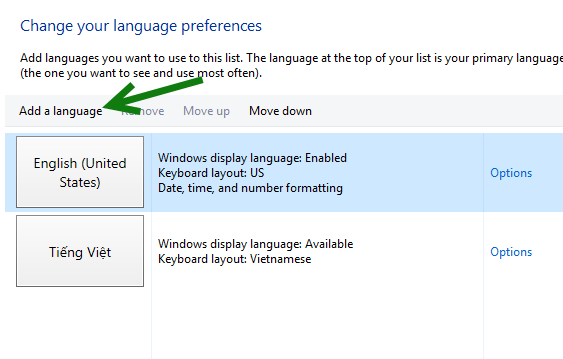
2. Similar to the steps above, click Add a language.
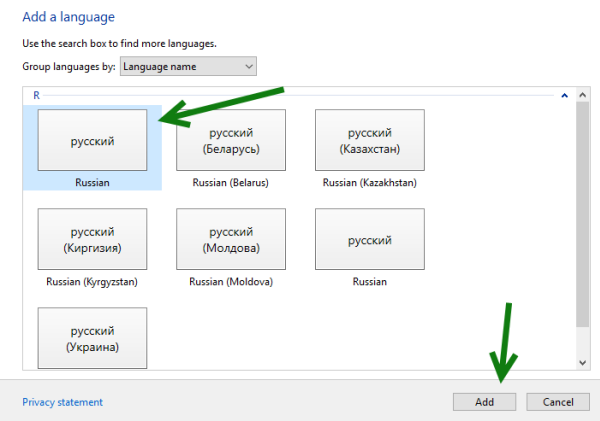
3. Use the search box at the top right to find the language you want, select it, and click Add.
4. If you want to display all system text in the new language, you will need to download the language pack in Options. If you only want to use the keyboard input, this step is not necessary.
5. Finally, click Download and install language pack. The system will display all text in the new language when you boot the system.
Читайте, как изменить язык интерфейса Windows 10 без переустановки. Какой язык системы можно установить и что для этого нужно, какие настройки необходимо изменить.

Содержание
- Введение
- Как изменить язык системы по умолчанию в «Windows 10»?
- Отключение языковой синхронизации
- Непосредственная процедура изменения языка системы
- Изменение настроек региона
- Заключение
- Вопросы и ответы
- Комментарии
Введение
В «Windows 10» пользователи обычно выбирают приоритетный язык по умолчанию для всей системы непосредственно в процессе установки операционной системы. Однако, если были выбраны неправильные языковые настройки или пользователи вынуждены задействовать компьютерные устройства, предварительно настроенные в соответствии с определенными языковыми критериями, то потребуется приложить некоторые усилия и исправить заданные настройки, если они отличатся от личных предпочтений.
Поэтому, если возникла необходимость изменить языковые настройки «Windows 10» на собственном компьютере, пользователи могут быстро выполнить такую процедуру воспользовавшись возможностями приложения «Параметры», не используя операцию полной переустановки операционной системы.
В данном руководстве по управлению настройками «Windows 10» мы расскажем, как изменить язык системы, заданный по умолчанию, на любой другой по выбору пользователя, в том числе для существующих и новых учетных записей.
Перейти к просмотру

Как добавить язык, изменить клавиши переключения или перевести интерфейс Windows 🇷🇺 🇺🇦 🇺🇸
Как изменить язык системы по умолчанию в «Windows 10»?
Если пользователи вынуждены переехать в другой регион, присутствует потребность использовать, отличный от установленного, язык интерфейса или изначально в устройстве было задана неверная языковая конфигурация, то абсолютно нет необходимости заново переустанавливать «Windows 10». Пользователям предстоит всего лишь изменить несколько настроек программной платформы, чтобы установить правильный язык операционной системы.
Отключение языковой синхронизации
Если пользователи используют учетную запись «Microsoft», то примененные языковые настройки будут синхронизироваться между всеми подключенными устройствами. В случае, если планируется изменить региональные и языковые настройки только для одного компьютера, то необходимо отключить возможность синхронизации данных настроек перед внесением каких-либо изменений.
Чтобы отключить языковую синхронизацию в операционной системе Windows 10 пользователям предстоит выполнит следующий алгоритм пошаговых действий.
-
Откройте системное приложение «Параметры». Для активации приложения можно воспользоваться различными способами. Например, нажмите на кнопку «Пуск», расположенную на «Панели задач» в нижнем левом углу рабочего стола, и откройте главное пользовательское меню «Windows». Используя ползунок полосы прокрутки или колесо управления ручного манипулятора (компьютерной мыши) отыщите и выберите, в перечне установленных на компьютерном устройстве приложений и программ, раздел «Параметры», или нажмите на кнопку «Параметры», находящуюся в левой боковой панели пользовательского меню, и искомое приложение будет запущено незамедлительно.

-
Используя бегунок полосы прокрутки или колесо компьютерной мыши отыщите, на главной странице окна приложения, и выберите вкладку «Учетные записи».

-
В левой боковой панели ответственной вкладки перейдите в раздел «Синхронизация ваших параметров».
-
Затем в правой панели окна в разделе «Синхронизация отдельных параметров» отыщите, при помощи колеса ручного манипулятора или ползунка полосы прокрутки, строку «Настройки языка», и установите соответствующий переключатель в положение «Откл.» (отключено).


Произведя данные шаги, пользователи теперь могут приступить к изменению языковых настроек операционной системы «Windows 10» не опасаясь, что они окажут влияние на аналогичные настройки других связанных устройств.
Непосредственная процедура изменения языка системы
Чтобы изменить язык интерфейса операционной системы «Windows 10», пользователям необходимо закрыть все запущенные активные приложения и выполнить, представленный далее, последовательный алгоритм действий.
-
В соответствии с личными предпочтениями каждого пользователя, используйте либо ранее представленный способ, либо любой из множества методов, доступных в операционной системе «Windows 10», и осуществите запуск приложения «Параметры». Например, нажмите совместно комбинацию клавиш «Windows + X» или щелкните правой кнопкой мыши по кнопке «Пуск», расположенной на «Панели задач» в нижнем левом углу экрана, и откройте меню «Опытного пользователя», в котором выберите, из перечня доступных системных приложений, искомый раздел «Параметры». И указанное приложение будет мгновенно запущенно.

-
Воспользуйтесь для перемещения по вкладкам приложения «Параметры» колесом управления компьютерной мыши или ползунком полосы прокрутки, чтобы отыскать и выбрать вкладку «Время и язык».
-
На странице отмеченной вкладки перейдите в левой боковой панели окна в раздел «Язык».
-
Теперь в правой панели окна отыщите раздел «Предпочитаемые языки», ответственный за установку приоритетов пользовательских языковых конфигураций системы, и нажмите на кнопку «Добавьте язык», содержащую помимо текстового названия дополнительный слагаемый символ «+» (плюс).

-
Во всплывающей панели «Выберите язык для установки» отыщите вручную, посредством колеса управления компьютерной мыши или бегунка полосы прокрутки, требуемый образец языка или введите искомый вариант в поисковой строке.
-
Выберите языковой пакет, который планируете использовать в «Windows 10», из списка доступных образцов или представленного результата службы поиска.
-
После выбора приоритетного образца нажмите на кнопку «Далее».
-
На следующей странице «Установка языковых компонентов» установите индикатор выбора («галочку») в ячейке строки «Установка языкового пакета и соответствующего языка интерфейса Windows», подтверждая ее выбор (ячейка станет окрашенной в активный синий цвет).
-
Нажмите на кнопку «Установить» в нижней части окна.


Изменения вступят в силу после завершения установки пакета языка, и весь процесс может занять несколько минут. В некоторых случаях может возникнуть необходимость осуществить перезагрузку операционной системы «Windows 10», по завершению которой, конфигурация языкового пакета будет применена ко всем элементам системы. Изменение в обязательном порядке затронет экран входа в систему, приложение «Параметры», проводник файлов «Windows», рабочий стол, приложения, браузер и веб-сайты, которые вы посещаете. Теперь они будут использовать новый язык по умолчанию. Кроме того, в зависимости от новых введений, «Windows 10» может предложить пользователям пересмотреть заданные настройки конфиденциальности.
Изменение настроек региона
Если пользователи меняют язык интерфейса системы «Windows 10», потому что находятся в другом регионе, то отдельно также необходимо обновить и соответствующие настройки регионального представления.
Чтобы изменить заданные настройки региона в операционной системе «Windows 10» пользователям потребуется выполнить пошаговую последовательность действий.
-
Используя любой предпочитаемый способ откройте системное приложение «Параметры». Например, выполните совместное нажатие комбинации клавиш «Windows + I» и добейтесь мгновенного запуска соответствующего приложения.
-
В списке доступных вкладок, представленных на главной странице окна приложения «Параметры», отыщите и выберите, из доступных вариантов, вкладку «Время и язык».
-
В левой боковой панели ответственной страницы окна выберите раздел «Регион».
-
В правой панели окна в одноименном разделе «Регион» используйте раскрывающееся меню ячейки «Страна или регион», чтобы указать свое новое географическое местоположение, если оно отличается от текущих настроек.
-
Затем в разделе «Формат региона» также используйте раскрывающееся меню, чтобы выбрать правильные форматы для отображения значений дат и времени в «Windows», если они отличаются от вашего региона.
-
Теперь в левой боковой панели повторно выполните переход в раздел «Язык».
-
Применяя ползунок полосы прокрутки или колесо управления компьютерной мыши отыщите раздел «Сопутствующие параметры» и нажмите на текстовую ссылку «Административные языковые параметры».
-
В новом всплывающем окне «Регион» во вкладке «Дополнительно» в разделе «Экран приветствия и учетные записи новых пользователей» нажмите на кнопку «Копировать параметры».

-
В новом окне будут отображены соответствующие настройки параметров экрана и учетных записей. В разделе «Копировать текущие параметры в» установите индикатор выбора («галочку») в каждой из ячеек строк «Экран приветствия и системные учетные записи» и «Новые учетные записи пользователей» соответственно.

-
Нажмите на кнопку «ОК».
-
Повторно нажмите на кнопку «ОК» еще раз, а затем полностью перезагрузите систему.


После выполнения описанных действий на вашем компьютере отобразятся правильные настройки региона, указанные в соответствии с пользовательским физическим местоположением.
Как правило, пользователям для личных целей нет необходимости регулярно менять или устанавливать дополнительные языки. Такая возможность изменения языковых пакетов обычно бывает полезной и часто востребованной в небольших и крупных организациях, работающих с пользователями, которые могут иметь разные языковые предпочтения.
Кроме того, данная функция будет полезна при переезде пользователей в другой регион и желании соответствовать локальным настройкам. Или при покупке нового компьютера из другой страны, потому что данная конфигурация устройства не доступна локально.
Также необходимо учитывать, что при изменении языковых настроек пользователи могут лишиться отдельных функций, например, Cortana, поскольку в некоторых регионах услуги цифрового помощника не поддерживаются.
Перейти к просмотру
🥇 Топ БЕСПЛАТНЫХ программ для ⚕️ восстановления удаленных данных для Windows в 2020
Заключение
Персональные компьютерные устройства, благодаря своим заложенным возможностям, позволяют полноценно быть задействованными для исполнения множества разнообразных высоко затратных и трудоемких процессов.
Огромную помощь, в ежедневной эксплуатации и безошибочном функционировании компьютеров, оказывает универсальная, рассчитанная на широкое применение на разнообразных видах модельных образцов вычислительных устройств, операционная система «Windows», доступная, на сегодняшний день, в новейшей своей версии «Windows 10».
Система не только полноценно раскрывает весь возможный потенциал компьютерного устройства, но и позволяет пользователям изменять свои разнообразные настройки, максимально устанавливая конфигурацию системы в соответствии с индивидуальными предпочтениями каждого конкретного пользователя.
Одним из доступных параметров, персонально изменяемым, является установка нового приоритетного языка интерфейса. И если соответствующая необходимость возникнет, то пользователи, используя представленные способы, смогут без переустановки операционной системы быстро заменить языковой пакет «Windows 10», применив, из предлагаемых на выбор множества доступных образцов, нужный вариант.