- Remove From My Forums
-
Question
-
Hi
I cant seem to get Windows 2012 R2 adprep /forestprep to run on my Windows 2012 DC.
Adprep detected that the supplied or default user is not a member of the following group: Enterprise Admins group and Schema Admins group.
[Status/Consequence]
Adprep has stopped without making changes.
[User Action]
Verify the user is a member of Enterprise Admins group and Schema Admins group.I am running as Administrator and Administrator is a member of the Enterprise Admins group and Schema Admins group.
Any idea what is going wrong?
Answers
-
Hi,
In Windows Server 2012, Adprep.exe is integrated into the AD DS installation process and runs automatically as needed. For example, when you install the first domain controller that runs Windows Server 2012 into an existing domain and forest, then adprep
/forestprep and adprep /domainprep automatically run and report the results of the operations.In Windows Server 2012, there is only one 64-bit version of Adprep.exe. It can be run remotely from any server that runs a 64-bit version of Windows Server 2008, Windows Server 2008 R2, or Windows Server 2012. The computer where you run it can be either
domain-joined or in a workgroup.More details about ADPREP in Windows 2012, please refer to the below article:
http://blogs.technet.com/b/activedirectoryua/archive/2013/02/05/adprep-in-windows-server-2012.aspx
Hope this helps.
TechNet Subscriber Support
If you are
TechNet Subscription
user and have any feedback on our support quality, please send your feedback
here
Cataleya Li
TechNet Community Support
-
Proposed as answer by
Monday, September 23, 2013 7:15 AM
-
Marked as answer by
Yan Li_
Tuesday, September 24, 2013 3:08 AM
-
Proposed as answer by
-
Thanks all for your responses.
It turns out that I was running adprep from powershell as administrator, when i logged into the DC as administrator and ran adprep it worked. Not sure why this was the case.
After running adprep i tried to upgrade the DC from 2012 to 2012 R2, the upgrade failed saying that adprep /forestprep had not been run, I rebooted DC reran adprep got message saying update had already been applied.
Finally managed to get it working by installing AD on a 2012 R2 VM and promoting it to DC, this completed the relevant updates and allowed me to update DC to 2012 R2
-
Marked as answer by
Yan Li_
Tuesday, September 24, 2013 3:08 AM
-
Marked as answer by

В этой статье мы поговорим о процедуре обновления домена с версии Windows Server 2008 R2 до Windows Server 2012 с последующим понижением роли старого контроллера домена до рядового сервера AD.
Итак, что имеется:
- Домен Active Directory как минимум с одним контроллером домена на Windows Server 2008 R2
- Уровень леса и домена AD должен быть как минимум Windows Server 2003
- Дополнительный рядовой сервер домена с Windows Server 2012 , который в дальнейшем станет контроллером домена (как включить сервер в домен подробно описано в статье Как включить Windows в домен).
- Учетная запись с правами администратора домена, схемы и леса.
Прежде чем добавлять новый контроллер домена на Windows 2012 необходимо обновить схему домена и леса. Классически подготовка и повышение уровня домена осуществлялась вручную с помощью утилиты Adprep.exe. В документации новой серверной платформы от Microsoft указано, что при повышении первого сервера с Windows Server 2012 до уровня контроллера домена, повышение уровня домена происходит автоматически при установке роли AD DS на первый сервер Windows 2012 в домене. Так что, теоретически, для подготовки домена ничего делать не нужно.
Однако, предпочтительнее контролировать результат такого ответственного процесса, как обновление схемы. Выполним процедуру обновления схемы вручную.
Обновление схемы AD до Windows Server 2012 с помощью adprep
Для обновления схемы нам понадобится утилита adprep.exe, взять которую можно в каталоге \support\adprep\ на диске с дистрибутивом Windows Server 2012. Данная утилита бывает только 64-разрадной (утилиты adprep32.exe больше не существует), соответственно, запустить ее можно будет только на 64 разрядном контроллере домена.
Необходимо скопировать утилиту на текущий DC с ролью Schema Master (Хозяин схемы) и в командной строке с правами администратора выполнить команду подготовки леса к установке нового DC на Windows Server 2012:
adprep /forestprep

Версия схемы Active Directory в Windows Server 2012 — 56.
Далее обновим схему домена:
adprep /domainprep
Далее осталось дожидаться окончания репликации изменений в схеме по всему лесу и проверить существующие контроллеры домена на наличие ошибок. Если все прошло хорошо – продолжаем. Пришла пора развернуть контроллер домена на Windows Server 2012.
Установка контроллер домена на Windows Server 2012
Первой интересной новостью является тот факт, что знакомой администраторам утилиты DCPROMO, позволяющей добавить или удалить контроллер домена в AD больше не существует. При ее запуске появляется окно, в котором сообщается, что мастер установки Active Directory Domain Services перемещен в консоль Server Manager.

Что ж, откроем консоль Server Manager и установим роль Active Directory Domain Services (Внимание! Установка роли автоматически не означает тот факт, что сервер стал контроллером домена, роль нужно сначала настроить)

После окончания установки роли появится окно, в котором сообщается, что сервер готов стать контроллером домена, для чего нужно нажать на ссылку “Promote this server to domain controller” (далее мы рассмотрим только значимые шаги мастера создания нового контроллера домена).

Затем нужно указать, что данный контроллер домена будет добавлен в уже существующий домен (Add a domain controller to an existing domain), указать имя домен и учетную запись из-под которой будет проводится операция.

Затем укажите, что данный контроллер домена будет содержать роли GC (Global Catalog) и DNS сервера. Также укажите пароль восстановления DSRM (Directory Services Restore Mode) и, если необходимо имя сайта, к которому будет относиться данный контроллер домена.

В разделе “Paths” указываются пути к базе Active Directory (NTDS), файлам логов и каталогу SYSVOL. Учтите, что данные каталоги должны находиться на разделе с файловой системой NTFS, тома с новой файловой системой Windows Server 2012 — Resilient File System (ReFS) – использовать для этих целей нельзя! 
По окончании работы мастера установки роли AD DS, сервер нужно перезагрузить. После перезагрузки вы получаете новый контроллер домена с ОС Windows Server 2012.
Удаление старого контроллера домена на Windows Server 2008 R2
Прежде, чем понизить роль старого контроллера домена с Windows Server 2008 R2 до рядового сервера, нужно перенести все FSMO роли на новый контроллер домена .
Процедура переноса ролей FSMO с одного контролера домена на другой нами уже рассматривалась, подробнее с ней можно познакомится в статье Передача ролей FSMO в Active Directory. Процедуру можно осуществить через графический GUI (проще) или из командной строки с помощью утилиты ntdsutil
После передачи роли FSMO PDC Emulator, необходимо настроить синхронизацию времени на новом контроллере домена с внешним сервером (с которым время синхронизировалось ранее). Подробно процедура настройки синхронизации времени на PDC описана в статье: Синхронизация времени с внешним NTP сервером в Windows 2008 R2 . Формат команды примерно такой (ntp_server_adress – адрес NTP сервера):
w32tm /config /manualpeerlist:ntp_server_adress /syncfromflags:manual /reliable:yes /update
После того, как все роли FSMO перенесены на новый DC Windows Server 2012, убедитесь, что домен работает корректно: проверьте прохождение репликации AD, журналы DNS и AD на наличие ошибки. Не забудьте в настройках сетевой карты на новом сервере в качестве предпочтительного DNS сервера указать собственный адрес.
Если все прошло корректно, можно понизить роль старого контроллера домена 2008 R2 до рядового сервера домена. Это можно сделать, запустив на нем мастер DCPROMO, и указать, что данный сервер более не является контроллером домена. После того, как данный сервер станет рядовым сервером, его можно полностью отключить.
Данная утилита всё также лежит по пути x:\support\adprep в файлах дистрибутива. Просто сейчас (начиная с Windows Server 2012) процесс поднятия функционального уровня домен/леса интегрирован в GUI и нет необходимости выполнять его через утилиту adprep.
Adprep.exe это инструмент командной строки, который расширяет схему Active Directory и обновляет разрешения, необходимые для подготовки леса и домена к работе с контроллерами домена на ОС Windows Server 2008 и выше
Повысить уровень работы леса вы сможете после того, как обновите все ваши КД до необходимых версий. Это можно сделать через оснастки Active Directory Domains and Trusts или Active Directory Users and Computers, или с помощью PowerShell (Set-ADDomainMode)
Работает — но ввиду того, что отсутствует возможность через dcpromo делать промоушн домена, а только через Server Manager\Powershell — там есть проверка необходимости forest prep\domain prep и мастер предупредит, что нужно это сделать и сделает сам в процессе.
 Как известно — ничего вечного нет, все меняется, особенно в такой отрасли как IT. Развернутая один раз инфраструктура постоянно развивается, расширяется, совершенствуется и наступает момент когда в вашу Active Directory требуется ввести контроллер домена под управлением более поздней версии операционной системы.
Научиться настраивать MikroTik с нуля или систематизировать уже имеющиеся знания можно на углубленном курсе по администрированию MikroTik. Автор курса, сертифицированный тренер MikroTik Дмитрий Скоромнов, лично проверяет лабораторные работы и контролирует прогресс каждого своего студента. В три раза больше информации, чем в вендорской программе MTCNA, более 20 часов практики и доступ навсегда.
Казалось бы — в чем проблема? Но, как показывает практика, проблемы возникают, во многом от того, что системные администраторы слабо владеют теорией и откровенно путаются в данном вопросе. Поэтому самое время разобраться в том, что такое схема AD и какое отношение она имеет к нашему случаю.
Схемой AD называется описание всех объектов каталога и их атрибутов. По существу схема отражает базовую структуру каталога и имеет первостепенное значение для его правильного функционирования.
Новые версии ОС и содержат новые объекты и атрибуты, поэтому для их нормального функционирования в качестве контроллеров домена нам потребуется обновить схему.
Вроде бы понятно, но не совсем, поэтому перейдем к распространенным ошибкам и заблуждениям.
- Обновление схемы необходимо для включения в домен ПК под управлением более новых версий ОС Windows. Это не так, даже самые последние версии Windows могут вполне успешно работать в домене уровня Windows 2000 без обновления схемы. Хотя, если вы все-таки обновите схему, то ничего страшного не произойдет.
- Для включения в домен контроллера под управлением более новой ОС требуется повысить уровень работы домена (леса). Это тоже не так, но в отличие от предыдущего случая, данная операция сделает невозможным использование контроллеров домена под управлением ОС ниже, чем режим его работы. Поэтому в случае ошибки вам придется восстанавливать вашу структуру AD из резервной копии.
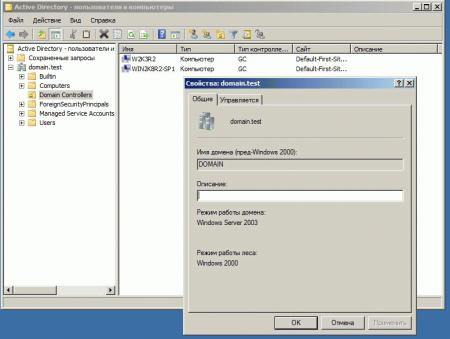
Также заострим ваше внимание на режиме работы леса и домена. Домены входящие в лес могут иметь различные режимы работы, например один из доменов может работать в режиме Windows 2008, а остальные в режиме Windows 2003. Схема работы леса не может быть выше, чем схема работы самого старого домена. В нашем примере режим работы леса не может быть выше, чем Windows 2003.
При этом более низкий режим работы леса никак не мешает использовать более высокий режим работы в домене, все что для этого требуется — это обновить схему.
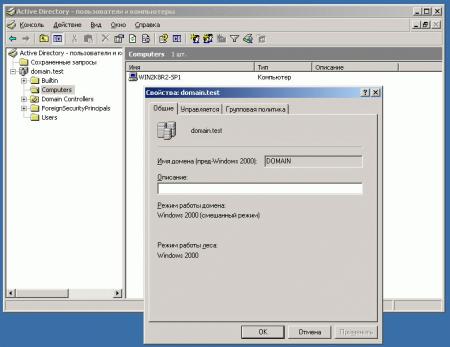
Ознакомившись с теорией, перейдем к практическому примеру. Допустим у нас есть домен уровня Windows 2000 (смешанный режим) — самый низкий уровень AD — в котором имеется контроллер под управлением Windows 2003, а наша цель — создать новый контроллер взамен вышедшего из строя.
Новый сервер работает под управлением Windows 2008 R2. Заметьте, у нас не возникло никаких сложностей по включению данного сервера в существующий домен.
 Однако при попытке добавить новый контроллер домена мы получим ошибку:
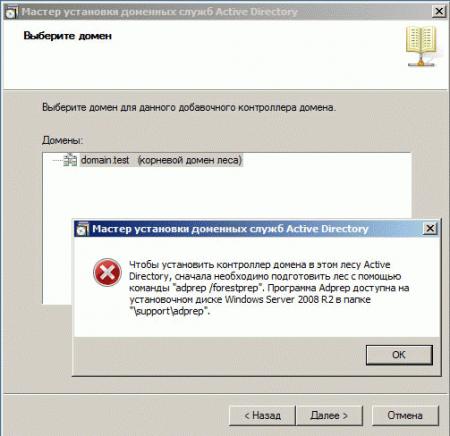 Для успешного включения контроллера под управлением более новой версии ОС нам потребуется обновить схему леса и схему домена. Исключение составляет Windows Server 2012, который при добавлении нового контроллера домена произведет обновление схемы самостоятельно.
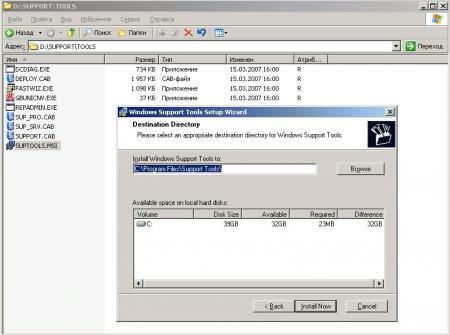
Для обновления схемы используется утилита Adprep которая находится в папке \support\adprep на установочном диске Windows Server. Начиная с Windows Server 2008 R2 эта утилита по умолчанию 64-разрядная, при необходимости использовать 32-разрядную версию следует запускать adprep32.exe.
Для выполнения обновления схемы данная утилита должна быть запущена на Хозяине схемы. Чтобы узнать какие из контроллеров имеют необходимую нам роль FSMO воспользуемся командой:
netdom query FSMOВ Windows 2008 и новее данная утилита установлена по умолчанию, а в Windows 2003 ее нужно установить с диска из директории \support\tools
 Результатом вывода данной команды будет перечисление всех ролей FSMO и контроллеров имеющих данные роли:
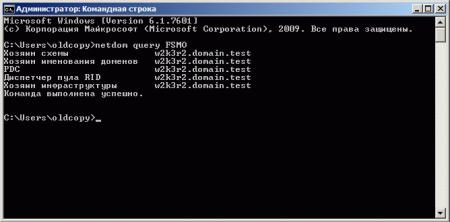
В нашем случае все роли находятся на одном контроллере, поэтому копируем папку \support\adprep на жесткий диск (в нашем случае в корень диска C:) и приступаем к обновлению схемы леса. Для успешного выполнения операции ваш аккаунт должен входить в группы:
- Администраторы схемы
- Администраторы предприятия
- Администраторы домена, в котором находится хозяин схемы
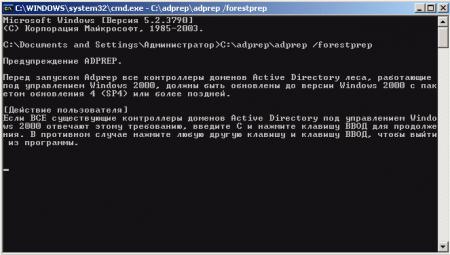
Чтобы обновить схему леса выполните команду:
C:\adprep\adprep /forestprepОзнакомьтесь со стандартным предупреждением и продолжите нажав C, затем Enter.
 Начнется процесс обновления схемы. Как видим ее версия изменится с 30 (Windows 2003) до 47 (Windows 2008 R2).
 После обновления схемы леса следует обновить схему домена. Перед этим следует убедиться что домен работает как минимум в режиме Windows 2000 (основной режим). Как помним, у нас домен работает в смешанном режиме, поэтому следует изменить режим работы домена на основной или повысить его до Windows 2003. Так как в данном домене у нас нет контроллеров под управлением Windows 2000, то наиболее разумно будет повысить режим домена.
Для успешного обновления схемы домена выполняем команду:
C:\adprep\adprep /domainprepИ внимательно читаем выводимую информацию. Обновляя схему домена с уровня Windows 2000 или Windows 2003 необходимо выполнить изменение разрешений файловой системы для групповых политик. Данная операция производится один раз и в дальнейшем, например обновляя схему с уровня 2008 на 2008 R2, выполнять ее нужно. Для обновления разрешений объектов GPO введите команду:
С:\adprep\adprep /domainprep /gpprepВ версиях AD начиная с Windows 2008 появился новый тип контроллеров домена: контроллер домена только для чтения (RODC), если вы планируете развернуть такой контроллер, то вам нужно подготовить схему. Вообще мы рекомендуем выполнить данную операцию вне зависимости от того, собираетесь вы в ближайшее время устанавливать RODC или нет.
Данную операцию можно выполнить на любом контроллере домена, однако вы должны входить в группу Администраторы предприятия и Хозяин именований должен быть доступен.
C:\adprep\adprep /rodcprepНа этом обновление схемы AD можно считать законченной и приступать к развертыванию нового контроллера домена. После обновления схемы данная операция проходит без каких-либо затруднений.
 Как видим, обновление схемы домена, будучи правильно спланировано не вызывает каких либо затруднений, однако в любом случае следует помнить, что это необратимая операция и иметь под рукой необходимые резервные копии.
Дополнительные материалы:
- Службы каталогов. Часть 1 — Общие понятия
- Службы каталогов. Часть 2 — Реализации служб каталогов
- Службы каталогов. Часть 3 — Структура Active Directory
- Active Directory — от теории к практике. Часть 1 — общие вопросы
- Active Directory — от теории к практике. Часть 2 — разворачиваем доменную структуру
- Active Directory — от теории к практике. Часть 3 — настройка DHCP
- Active Directory — от теории к практике. Часть 4 — перенос учетных записей в домен
- Настраиваем высокодоступный DHCP-сервер в Windows Server 2012
- Быстрое развертывание Active Directory с отказоустойчивой конфигурацией DHCP
- Синхронизация времени Active Directory с внешним источником
- Обновление схемы Active Directory
- Управление ролями FSMO при помощи Ntdsutil
- Управление ролями FSMO с помощью PowerShell
- Восстанавливаем доверительные отношения в домене
- Очистка метаданных контроллера домена в Active Directory
Научиться настраивать MikroTik с нуля или систематизировать уже имеющиеся знания можно на углубленном курсе по администрированию MikroTik. Автор курса, сертифицированный тренер MikroTik Дмитрий Скоромнов, лично проверяет лабораторные работы и контролирует прогресс каждого своего студента. В три раза больше информации, чем в вендорской программе MTCNA, более 20 часов практики и доступ навсегда.
In this article, I have documented the steps I took to update our two domain controllers to Server 2012 R2 from Server 2008 R2. While this can be considered a tutorial, it is more a reflection of what I did during my migration process. This guide assumes you have already made backups of your environment, all Windows Active Directory Domain Controllers in the forest are running Server 2003 or later, and we will be recycling (reusing) the same two servers you deployed. Last, Microsoft strongly recommends we do a clean install and not directly upgrade each server, so we will decommission a DC, reinstall windows, and then redeploy the DC until the entire environment has been upgraded.
- Prepare the AD Schema for Server 2012 R2
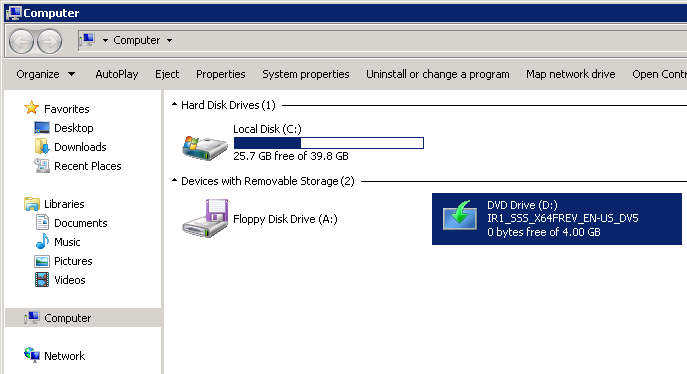
- Mount the Server 2012 R2 installation disk on one of your Domain Controllers

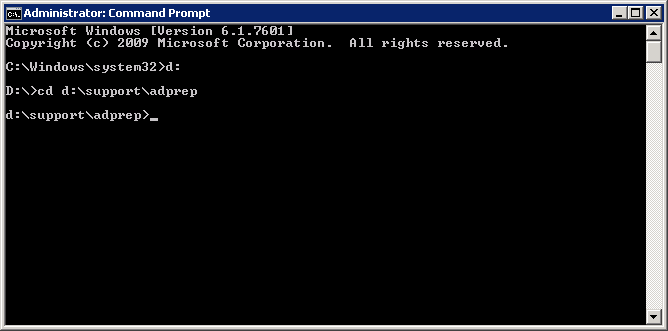
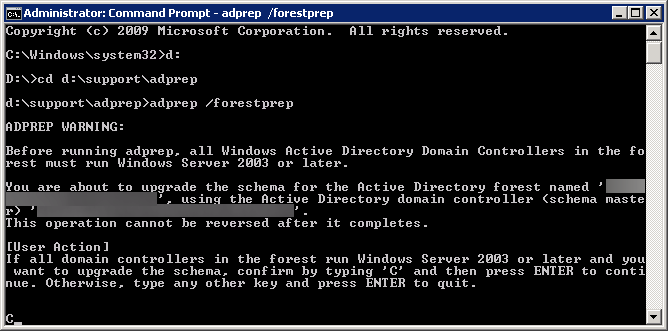
- Open up a command prompt with Administrative Privileges and navigate to the /support/adprep folder on the installation media.
- Click Start, type cmd, right click select Run as administrator

- Execute the command: d:
- Execute the command: cd d:\support\adprep

- Click Start, type cmd, right click select Run as administrator
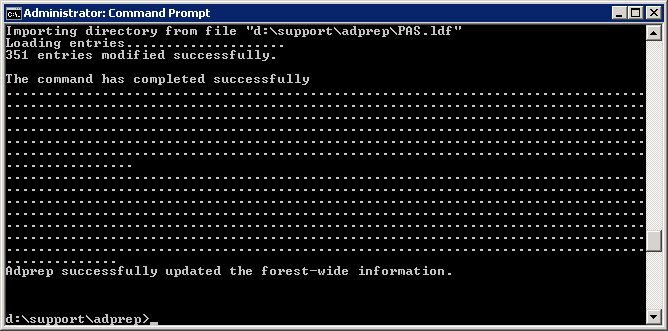
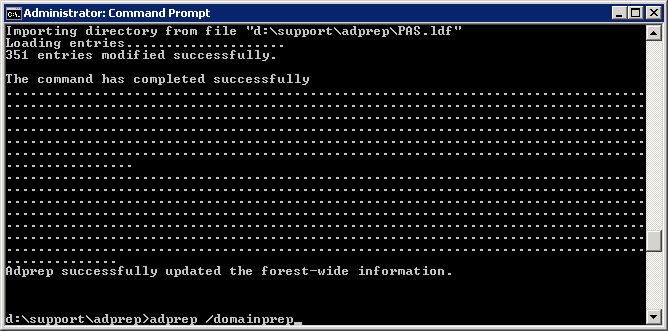
- Execute the following command (don’t close out of this until after we verify the schema version in an upcoming step):
- adprep /forestprep
- Type the letter C and press the enter key to begin the process
- Execute the following command:
- adprep /domainprep
- adprep /domainprep
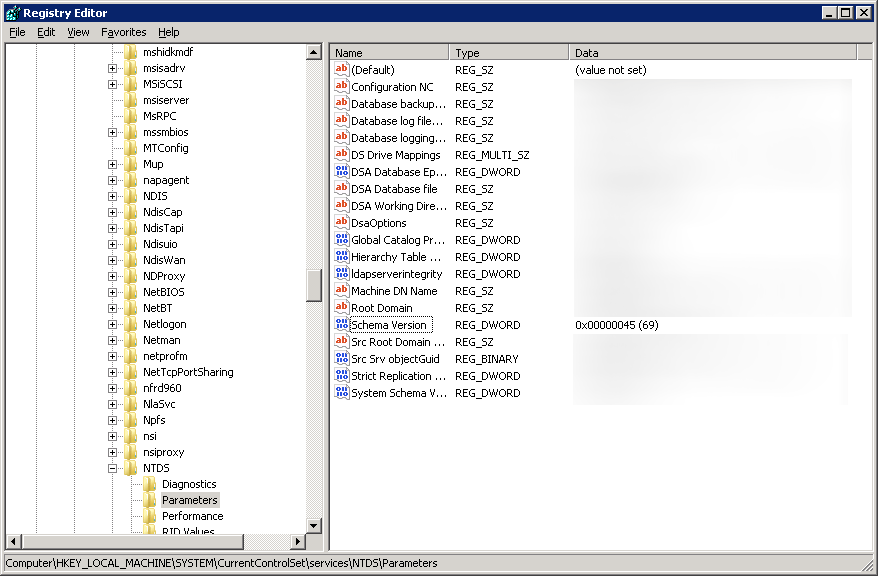
- Verify the schema version has been updated
- Click Start and search for regedit

- Click Start and search for regedit
- Open up regedit and navigate to Computer\HKEY_LOCAL_MACHINE\SYSTEM\CurrentControlSet\services\NTDS\Parameters
- Verify the Schema Version value matches the last entry shown in your upgrade results. In my case, the Schema Version should be 69.

- Mount the Server 2012 R2 installation disk on one of your Domain Controllers
- Demote and decommission secondary domain controller
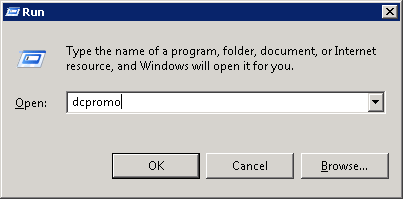
- Click Start, Run…

- Type dcpromo and click OK

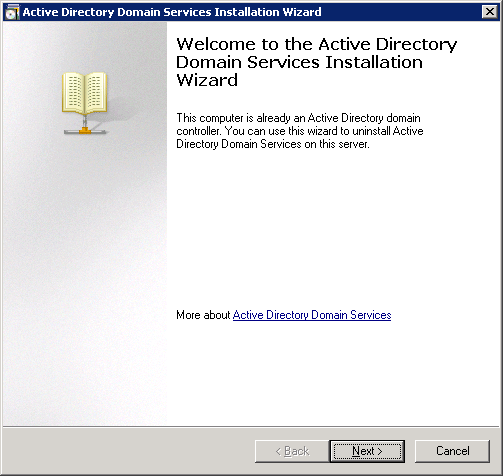
- Click Next > on the Welcome page

- If the domain controller has the global catalog service, make sure your primary DC also has the service enabled and click OK. This can be done by opening up Active Directory Sites and Services and viewing the services for each domain controller.

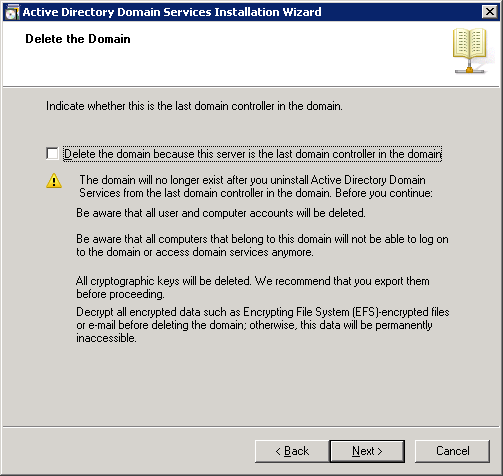
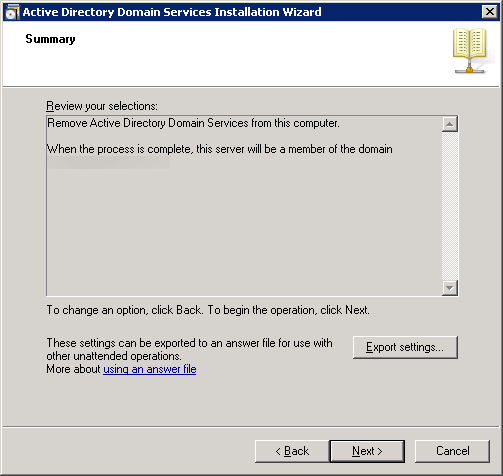
- Make sure the Delete this domain because this server is the last domain controller in the domain is UNCHECKED, and click Next >
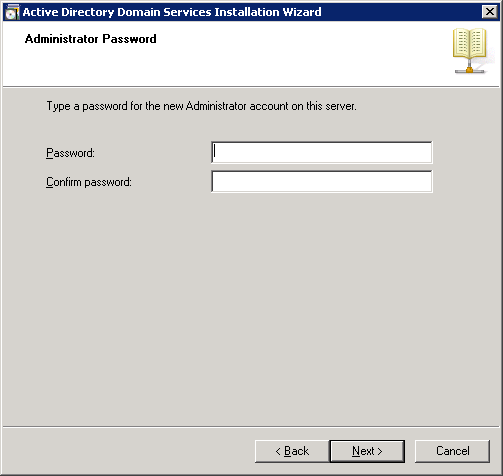
- Type in a new password to be used for the Local Administrator account the machine will contain after it is demoted.
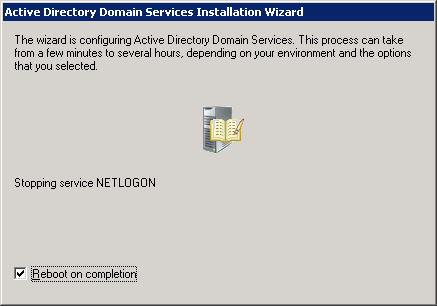
- Click Next > on the Summary page
- Check the Reboot on completion box to restart the server after the service has been removed

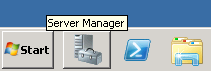
- Log back into the DC upon reboot and open up Server Manager

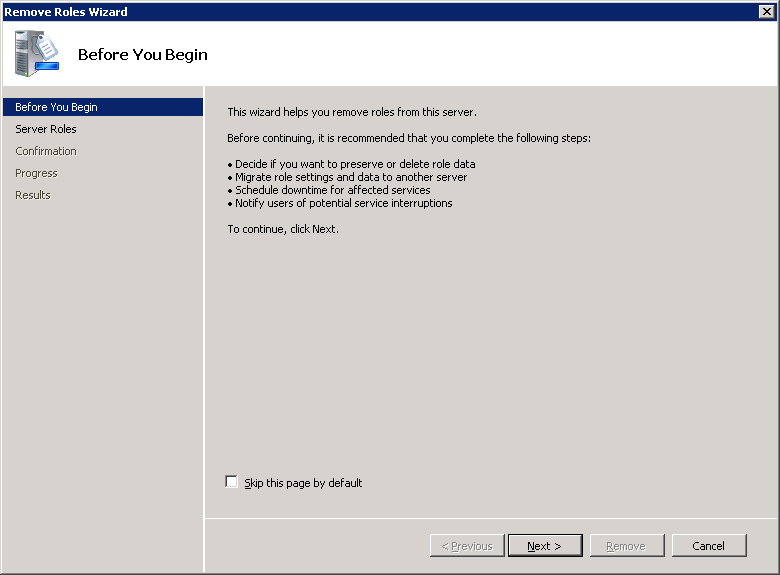
- In Roles Summary, click Remove Roles

- Click Next > on the Before You Begin page

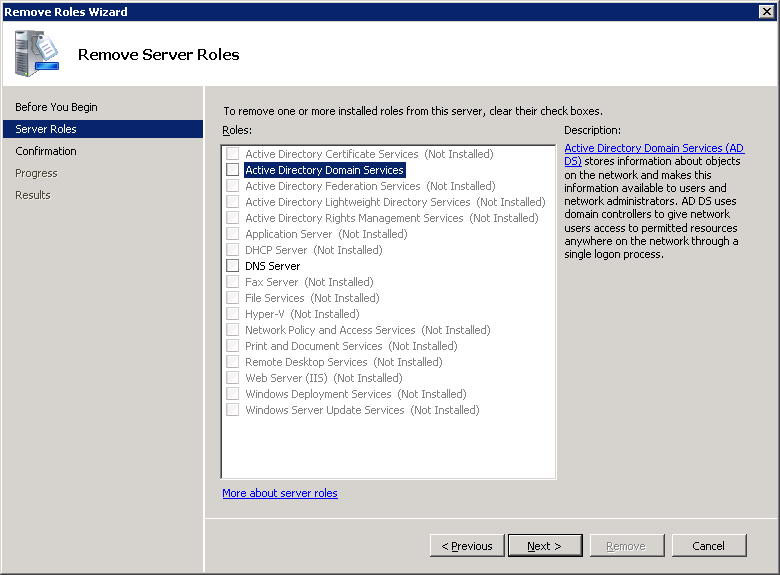
- Uncheck Active Directory Domain Services and DNS Server (if the role is installed) and click Next >
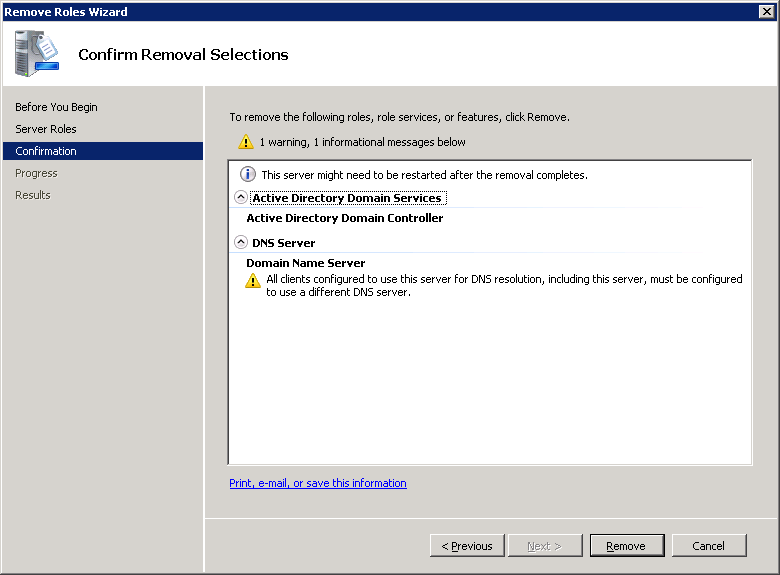
- Click Remove
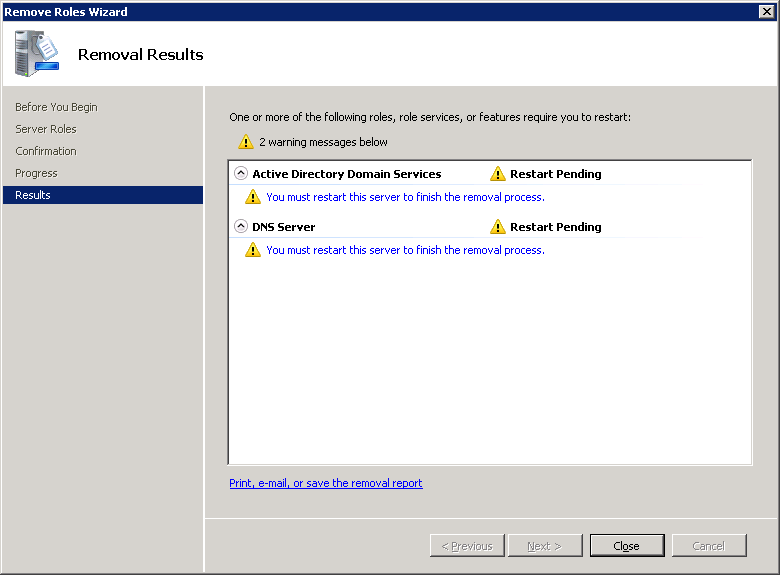
- Click Close
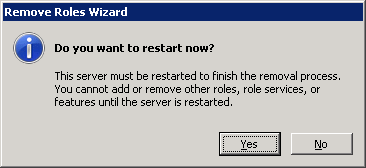
- Select Yes on the Do you want to restart now? dialog box

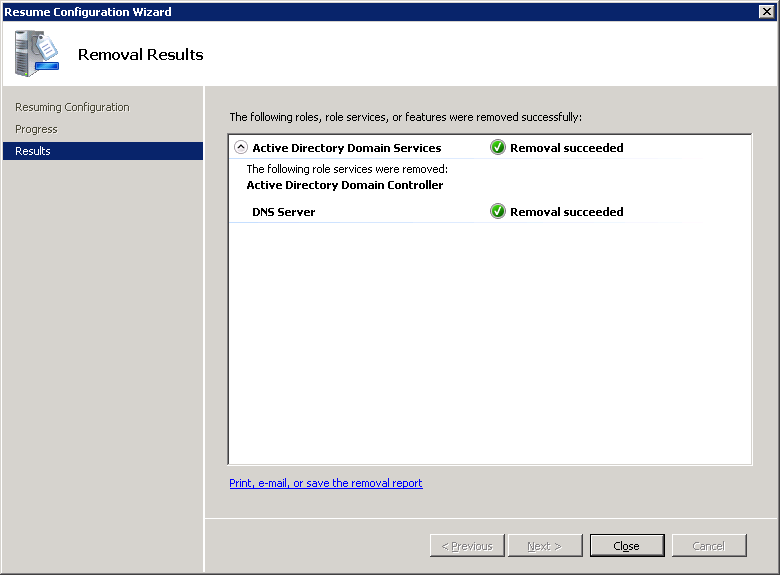
- Log back into the DC upon reboot and you should greeted by a Removal Results window. Let the process finish and select Close upon removal success.
- Disjoin the machine from the domain
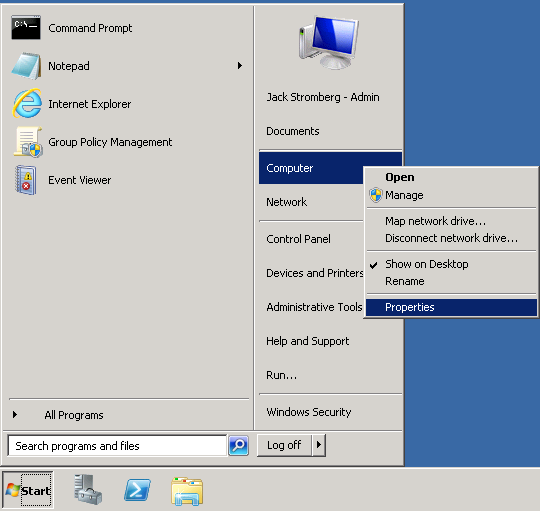
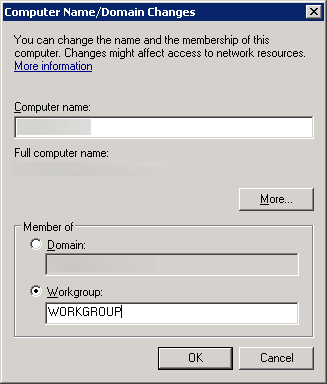
- Click Start, right click Computer, select Properties

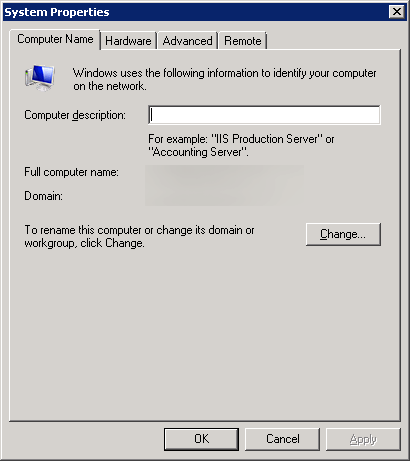
- Click Change settings

- Click Change… on the System Properties page

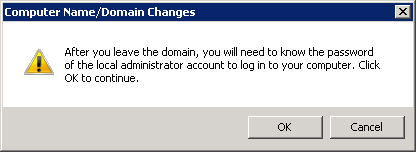
- Check Workgroup, type in a workgroup name, and click OK

- Click OK on the warning dialog

- Click OK on the Welcome to the workgroup dialog

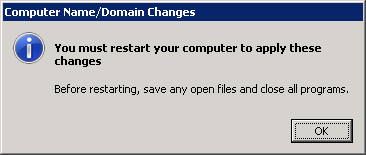
- Click OK on the restart dialog

- Click Close on the System Properties window
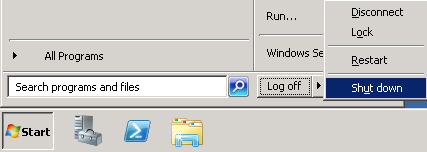
(oops, forgot to make a screenshot!) - Click Restart Later on the Microsoft Windows dialog box
- Shutdown the machine

- Click Start, right click Computer, select Properties
- Format the decommissioned machine, reinstall a clean copy of Server 2012 R2, and join the machine to the domain.
- Click Start, Run…
- Add first Server 2012 R2 Domain Controller
- At this point, you should have one Server 2008 R2 Domain Controller and a blank Server 2012 R2 machine joined to the domain ready for the Active Directory services. If you are at this point, continue on, if not, you might want to read back a couple steps and see where things ventured off course.
- Start Server Manager on your new Server 2012 R2 machine.

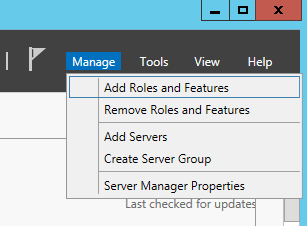
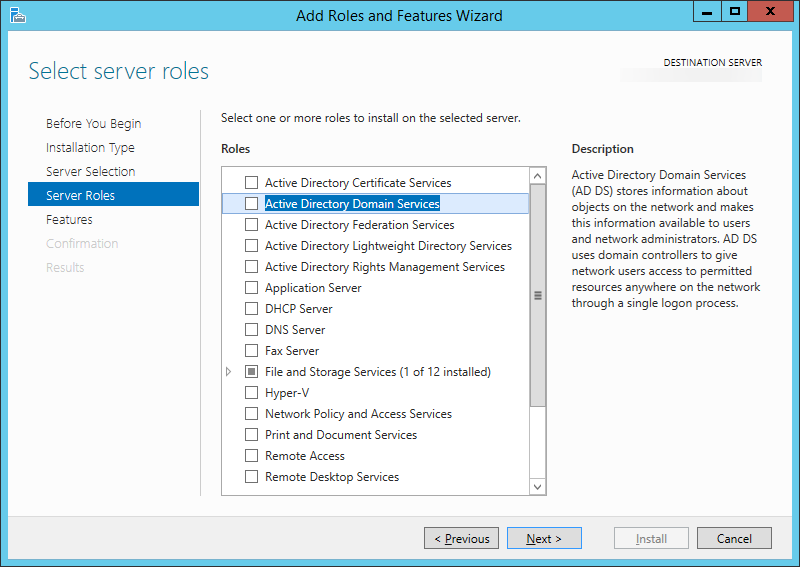
- Select Manage in the top right and select Add Roles and Features

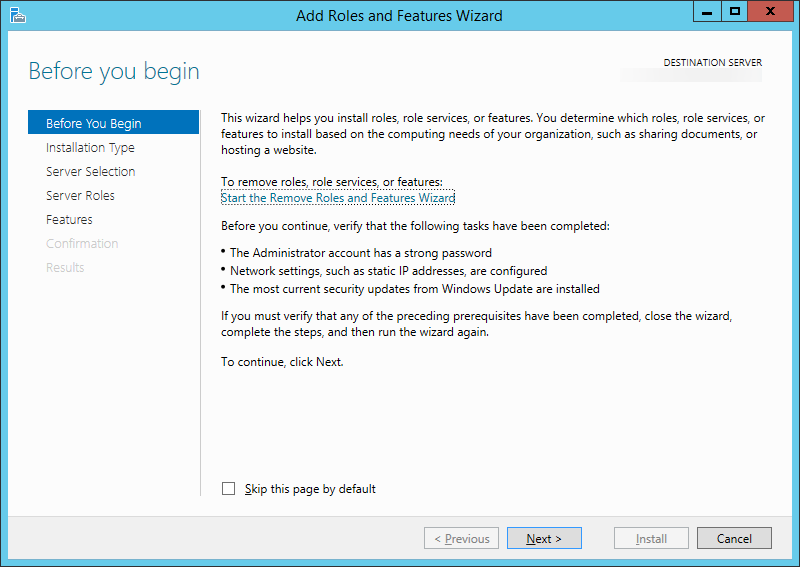
- Click Next > on the Before you begin screen

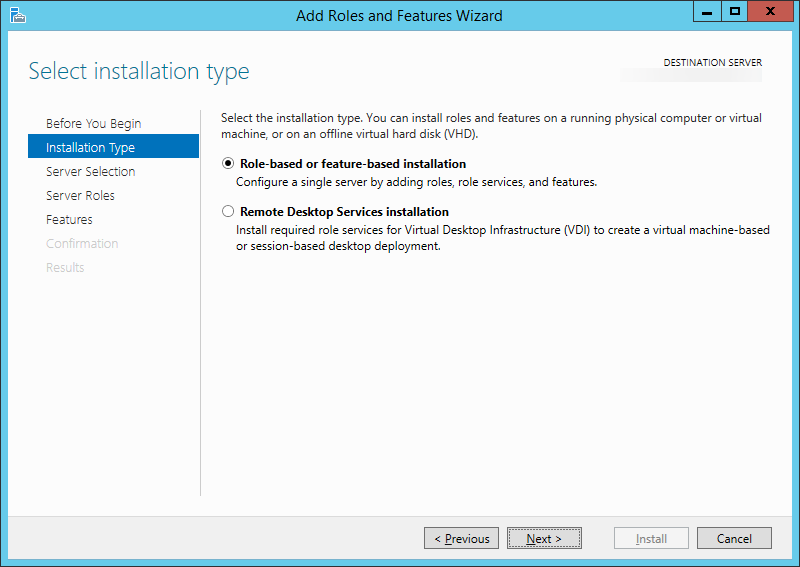
- Click Next > on the Select installation type screen
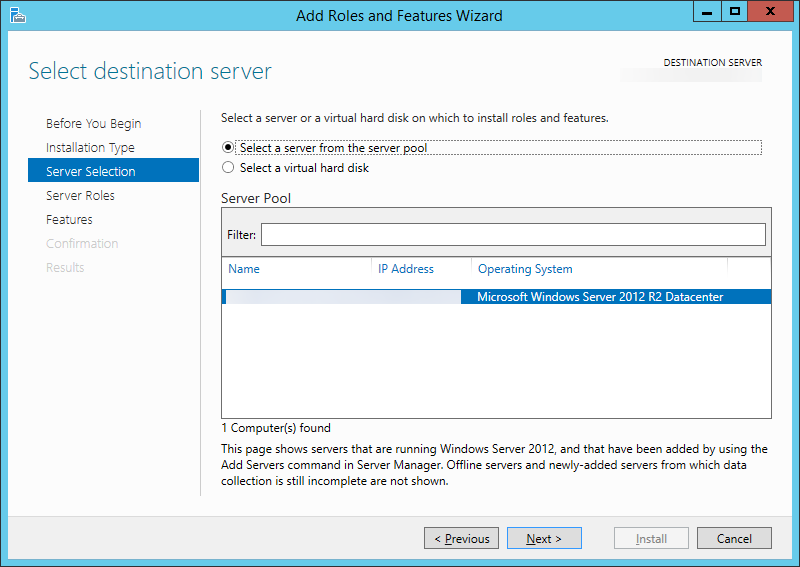
- Ensure your new server is selected and click Next >
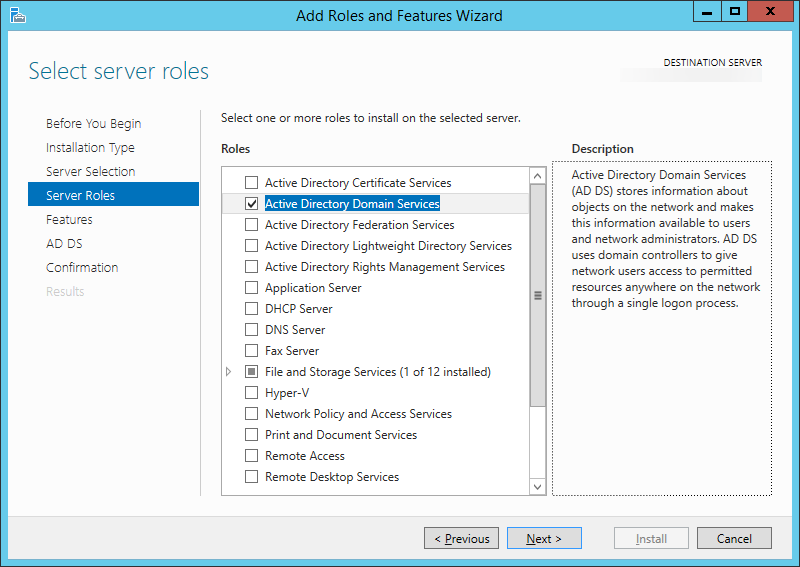
- Check the box next to Active Directory Domain Services
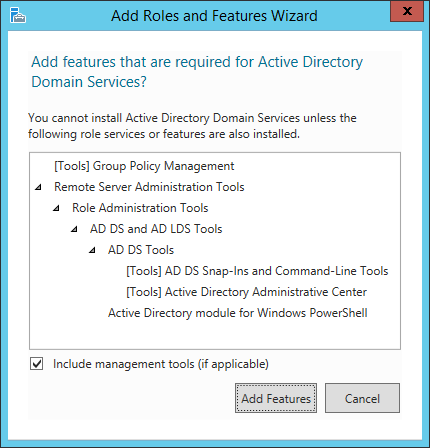
- On the Add features that are required for Active Directory Domain Services? dialog, click the Add Features button

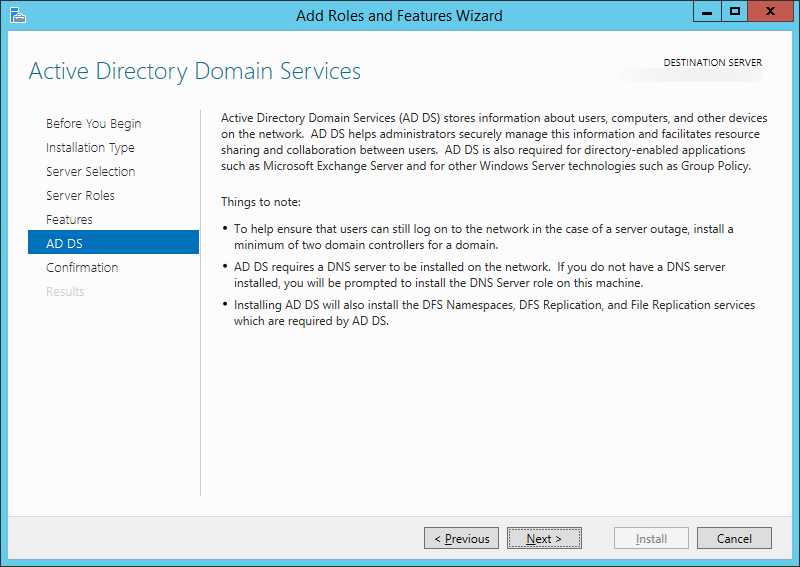
- Click Next >
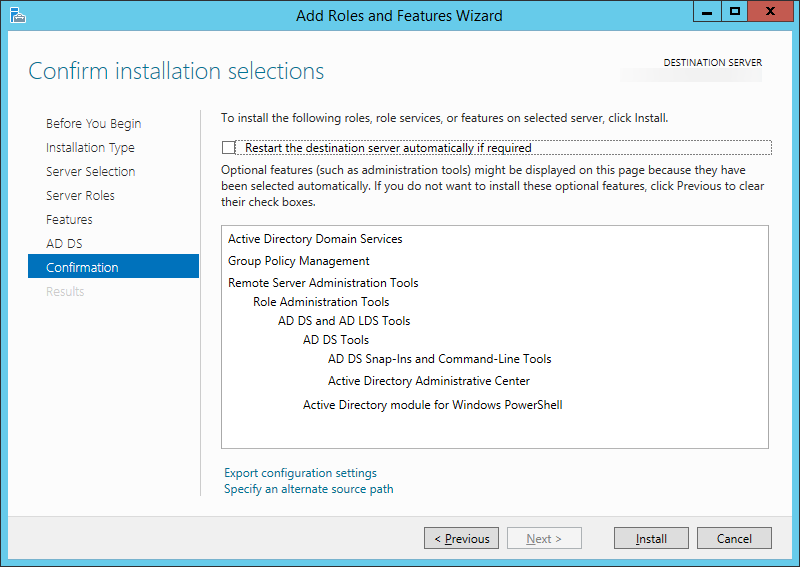
- Click Next >
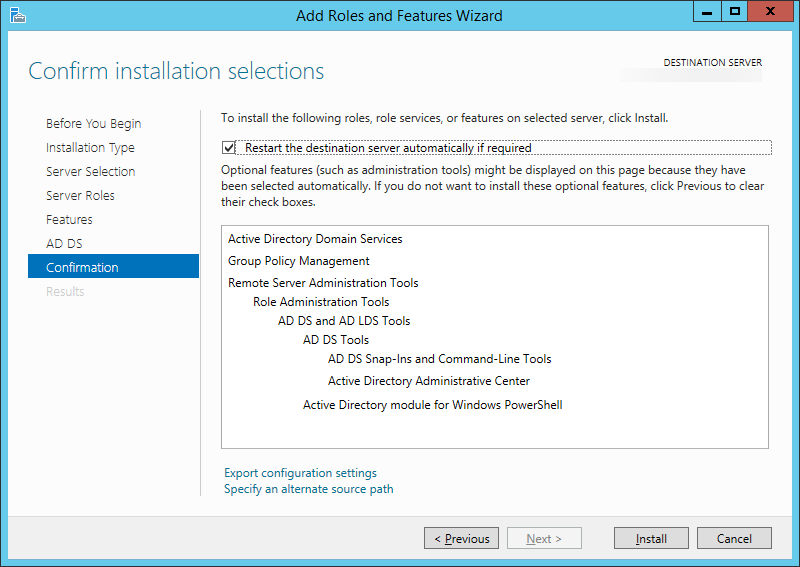
- Check the box that says Restart the destination server automatically if required
(Click Yes on the restart dialog if it pops up)
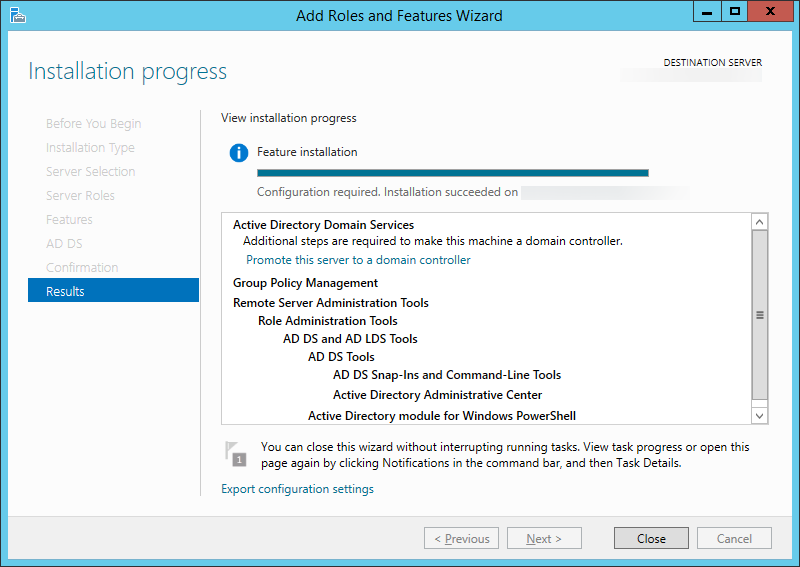
- Click the Install button
- Once the install is done, click the Close button
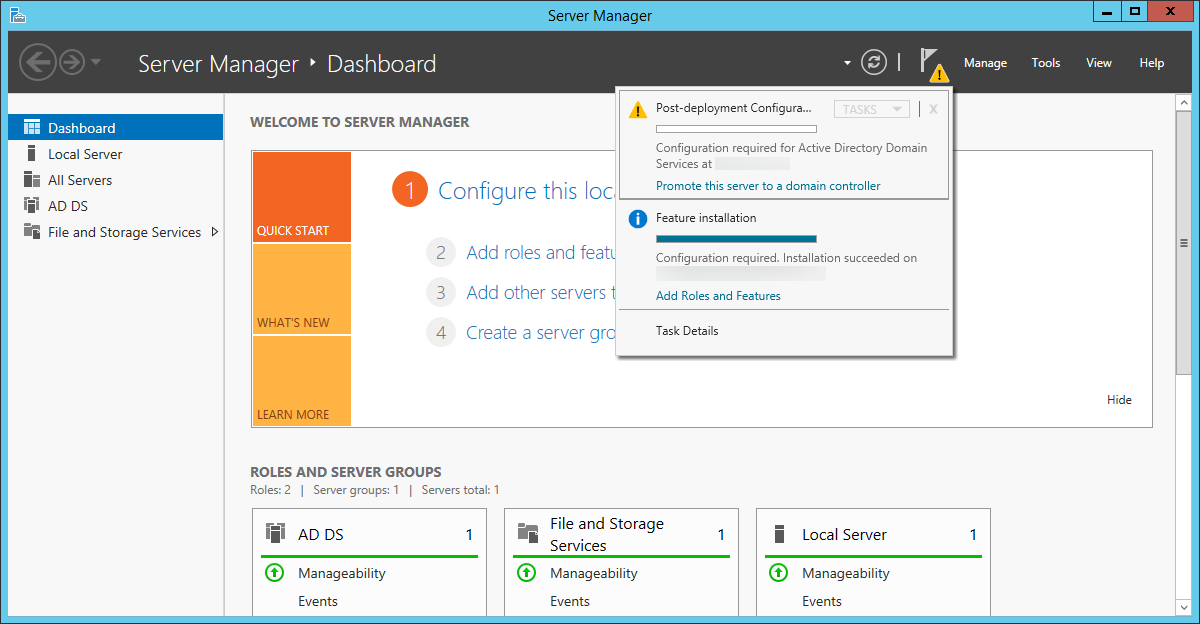
- Next, head back to the Server Manager screen and select the warning icon with the flag; then select Promote this server to a domain controller.

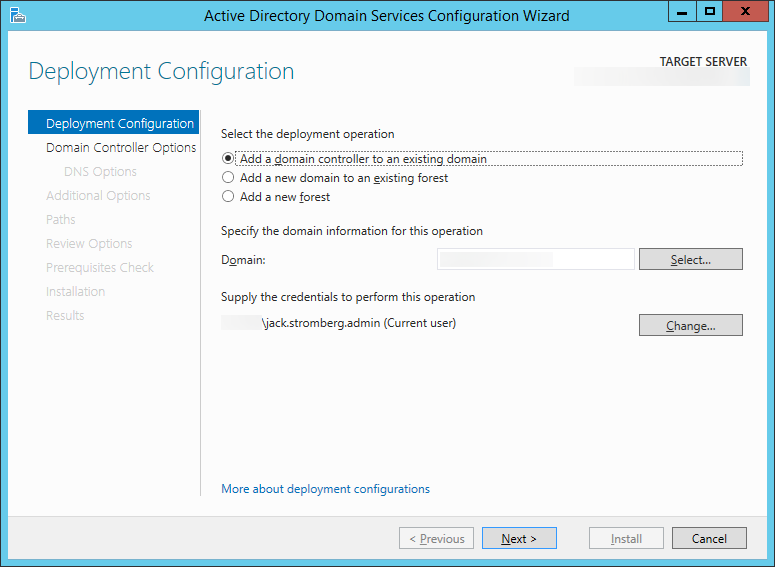
- On the Deployment Configuration page, make sure Add a domain controller to an existing domain is checked and hit Next >

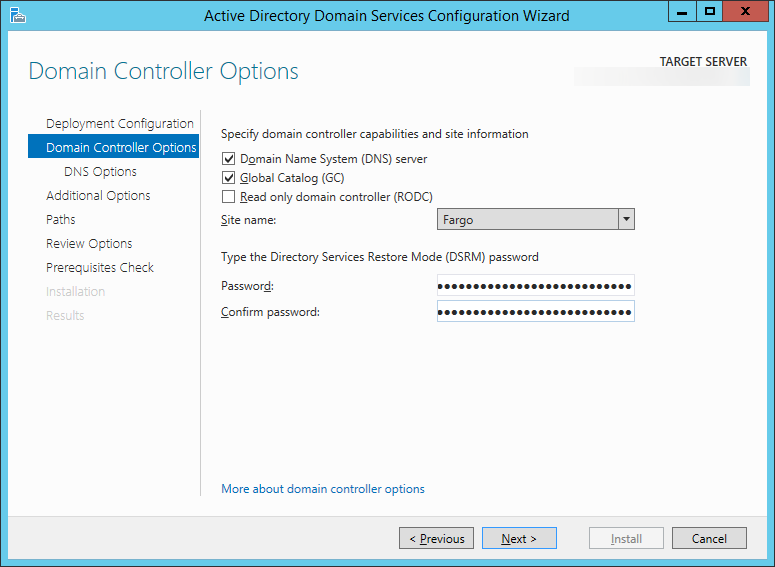
- Check Domain Name System (DNS) server, Check Global Catalog (GC), and uncheck Read only domain controller (RODC). Enter a strong password to be used to access Directory Services Restore Mode and click Next >
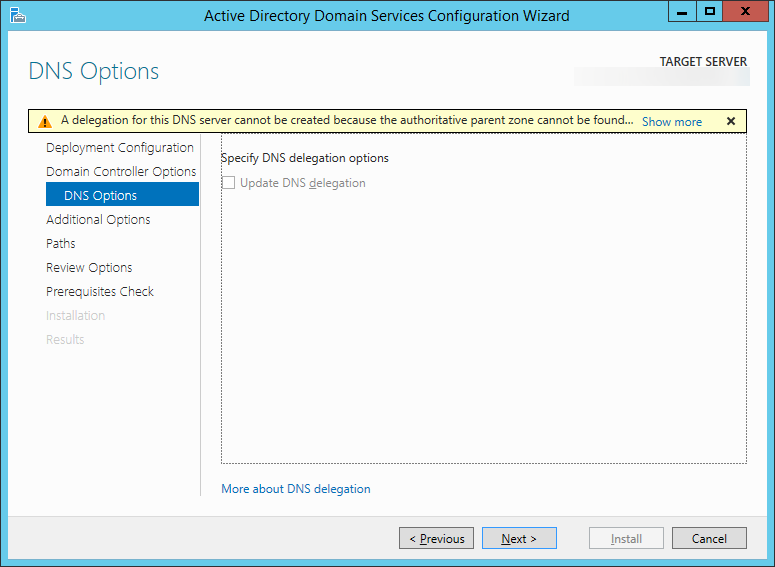
- Click Next > on the DNS Options page
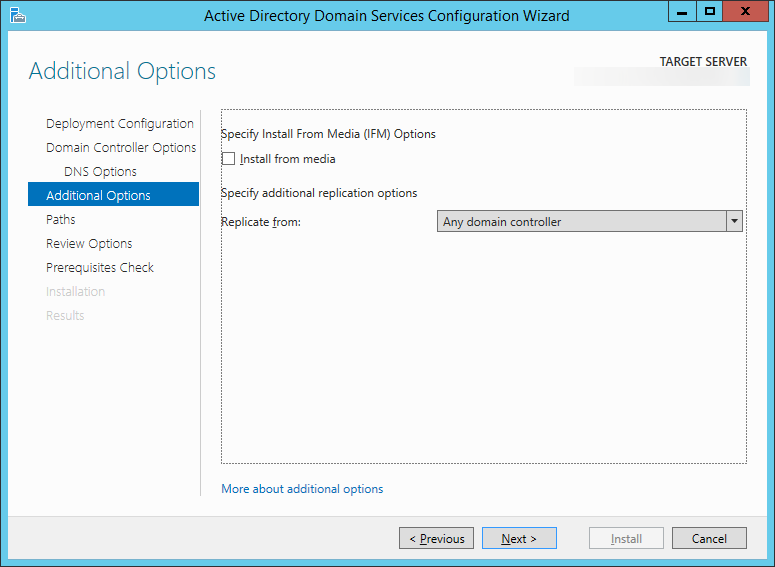
- Click Next > on the Additional Options page, or if you would like, you can manually select a domain controller to replicate data from and then hit Next >.
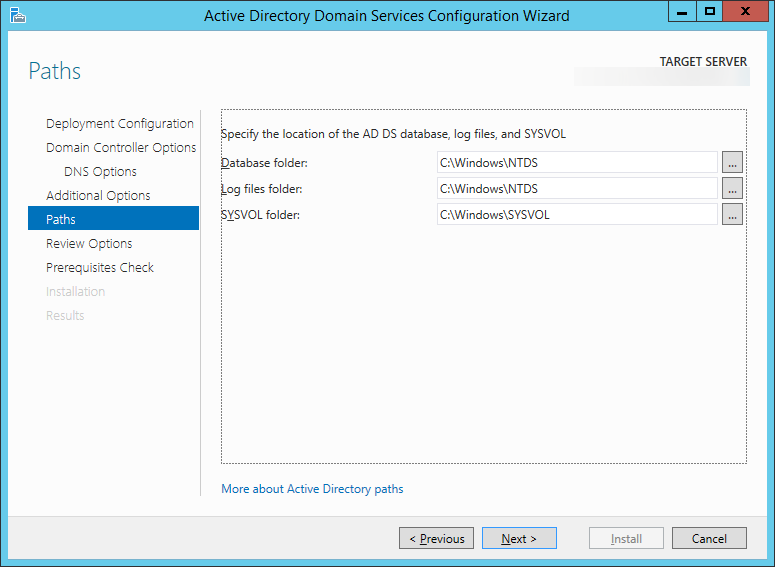
- Click Next > on the Paths page
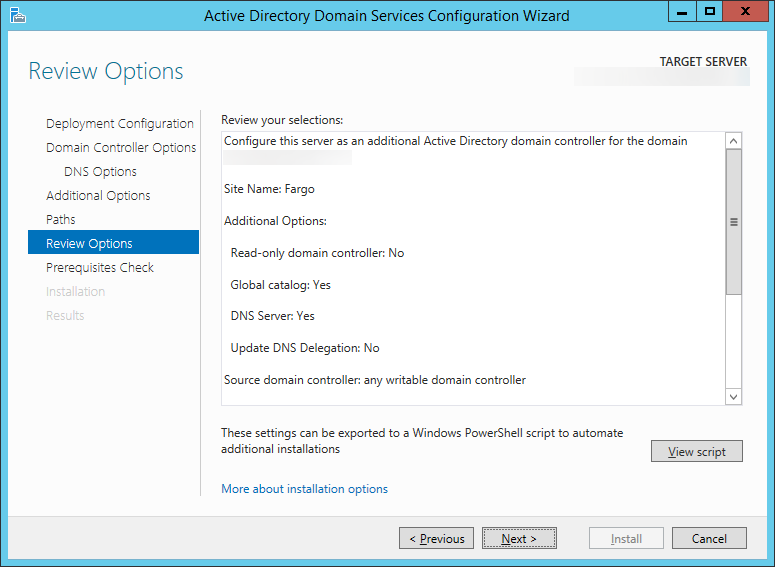
- Click Next > on the Review Options page
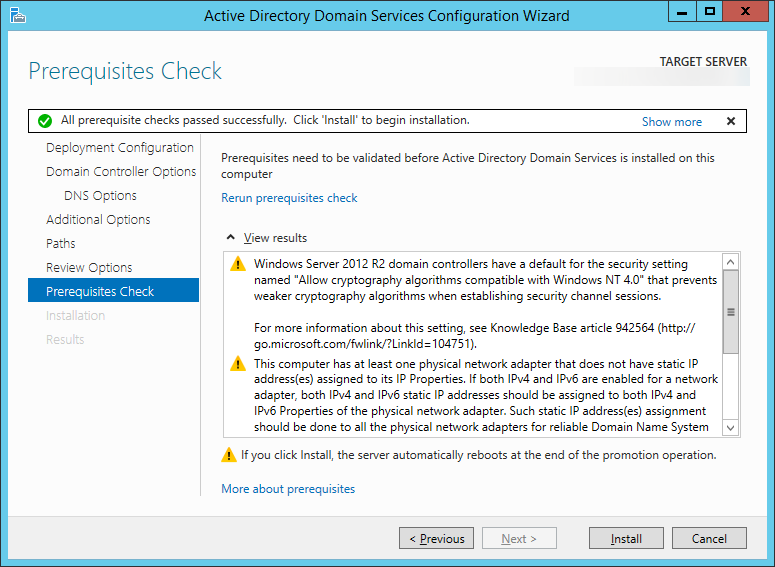
- Click Install on the Prerequisites Check page
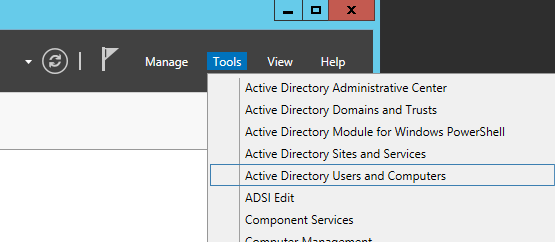
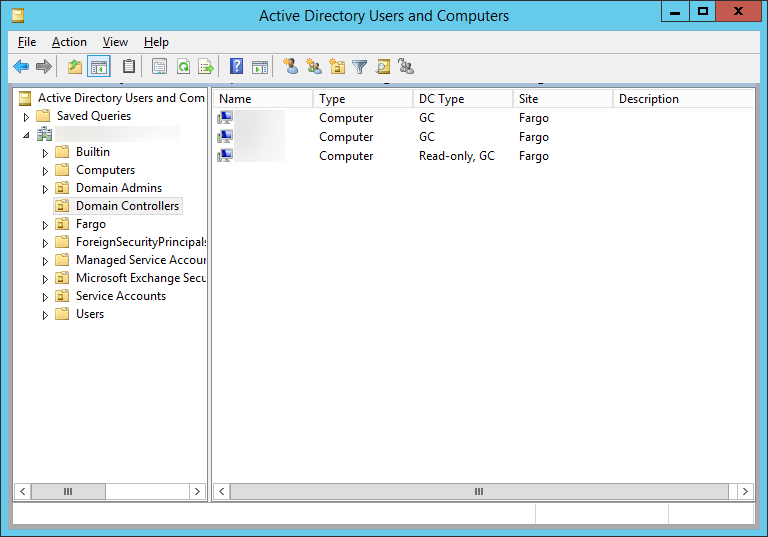
- Once the domain controller reboots after installation, open up Server Manager and select Tools, Active Directory Users and Computers

- Expand your Domain and select Domain Controllers; ensure your new machine shows up here.

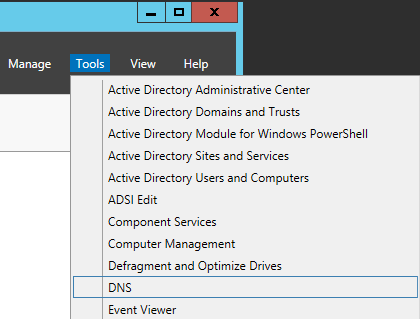
- Next, verify DNS works properly
- Go back to Server Manager, select Tools, DNS

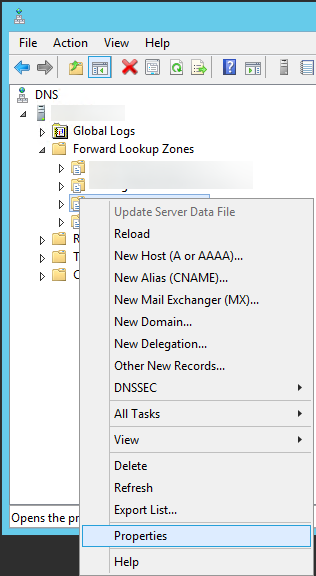
- Expand your server, Forward Lookup Zones, and right click on your domain name and select Properties

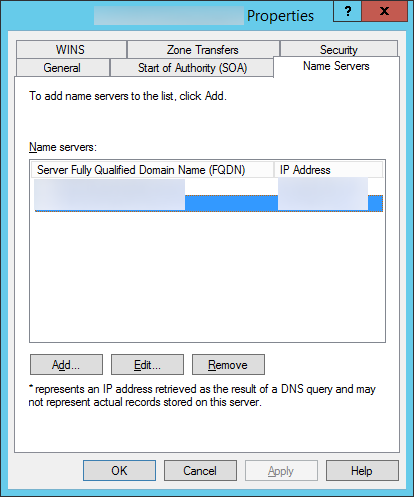
- Select the Name Servers tab and ensure all DCs are listed

- Go back to Server Manager, select Tools, DNS
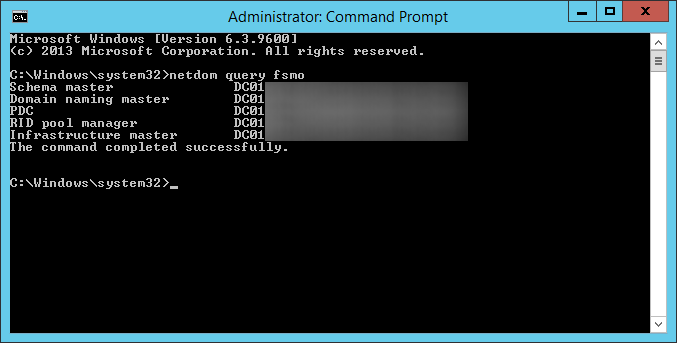
- Next, we need to verify the FSMO (Flexible Single Master Operations) roles are stored on our other server 2008 DC
- On the new Server 2012 R2 DC we joined, open up a command prompt with administrative privileges.

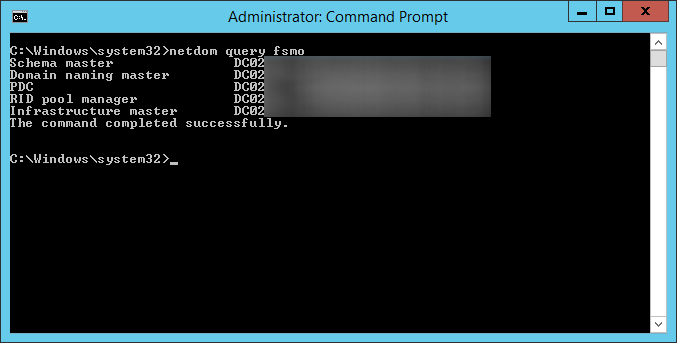
- Execute the following command to verify FSMO roles are on our 2008 DC:
netdom query fsmo

- On the new Server 2012 R2 DC we joined, open up a command prompt with administrative privileges.
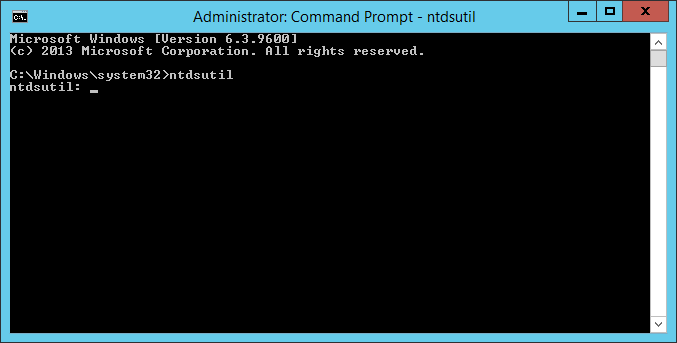
- Next, we need to transfer the FSMO roles from our primary DC to our new one
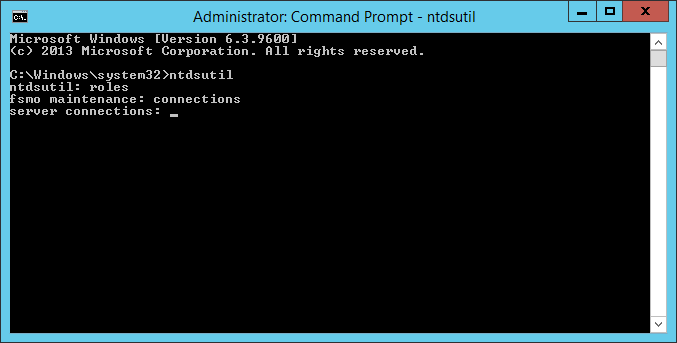
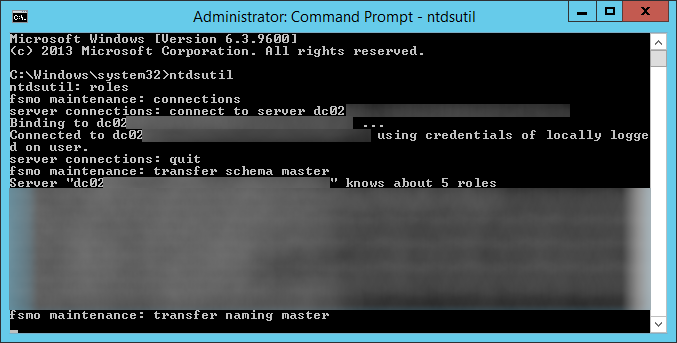
- Execute the following command using the same command prompt in the previous steps: ntdsutil
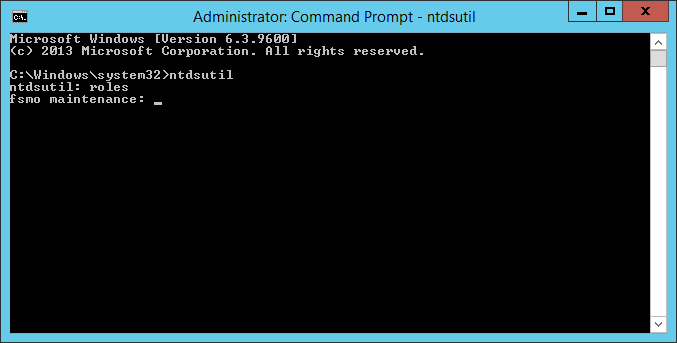
- Type roles when prompted and hit enter
- Type connections when prompted and hit enter
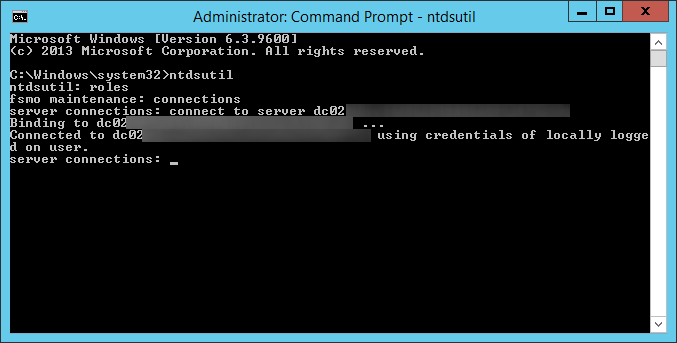
- Type connect to server server2012DC.mydomain.com, where server2012DC is the new DC we just deployed, when prompted and hit enter
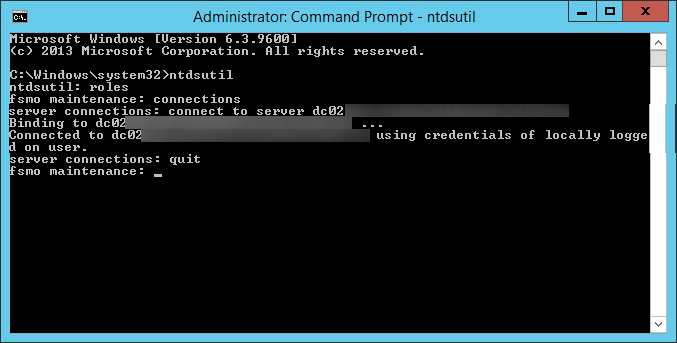
- Type quit and hit enter
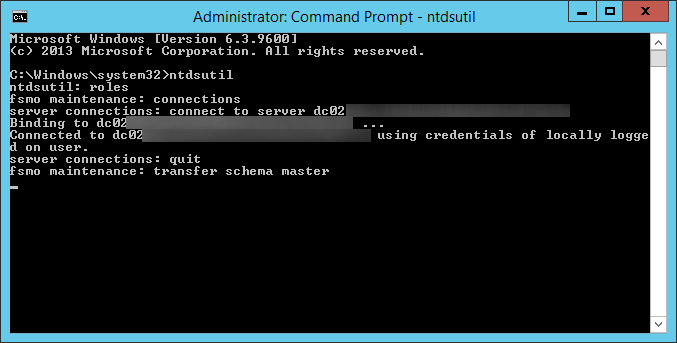
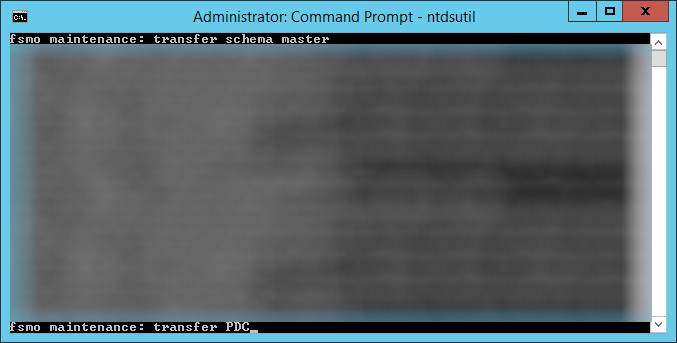
- Type transfer schema master and hit enter
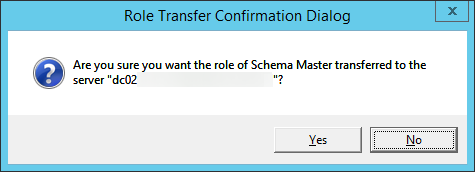
- Click Yes on the Role Transfer Dialog for the Schema Master role

- Type transfer naming master and hit enter
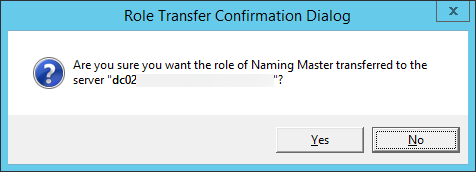
- Click Yes on the Role Transfer Confirmation Dialog for the Naming Master role

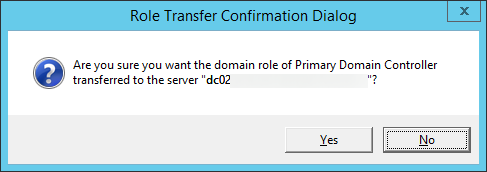
- Type transfer PDC and hit enter
- Click Yes on the Role Transfer Configuration Dialog for the Primary Domain Controller role

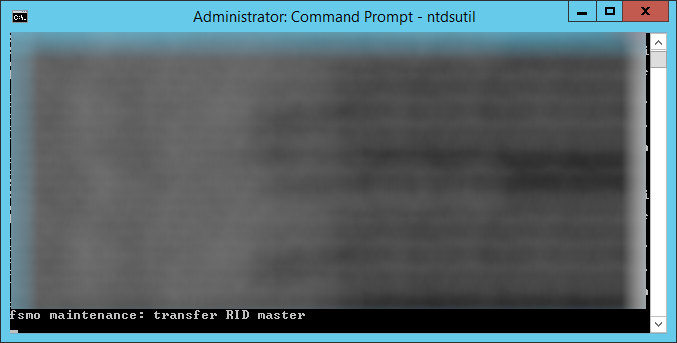
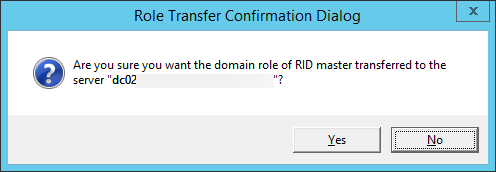
- Type transfer RID master and hit enter
- Click Yes on the Role Transfer Configuration Dialog for the RID master role

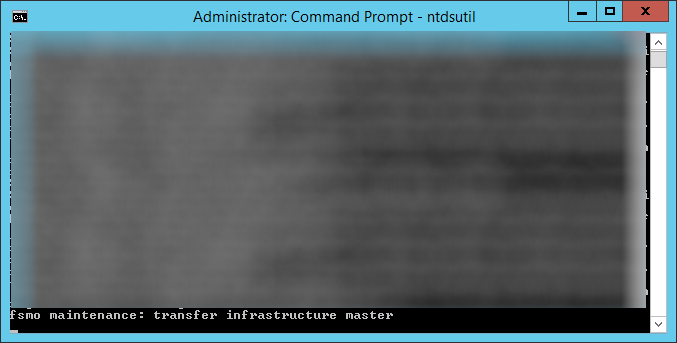
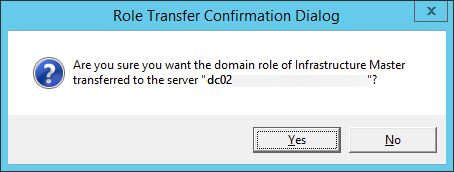
- Type transfer infrastructure master and hit enter
- Click Yes on the Role Transfer Configuration Dialog for the Infrastructure Master role

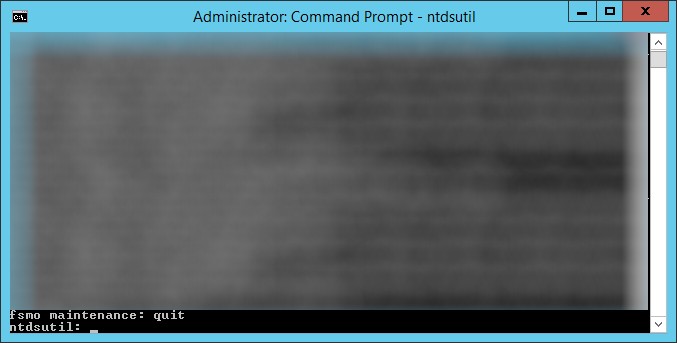
- Type quit and hit enter
- Type quit and hit enter
- Execute the following command to ensure the FSMO services are on the new Server 2012 R2 machine: netdom query fsmo
- Execute the following command using the same command prompt in the previous steps: ntdsutil
- At this point, you should have a Server 2012 R2 DC with the FSMO roles and a secondary 2008 R2 Domain Controller. If not, please go back and complete the steps to get to this point.
- Optional Step: After upgrading the first DC, you may want to reconfigure the machine to keep its time in sync with an external source. To do this, please follow my guide here: http://jackstromberg.com/2013/10/configuring-external-time-source-on-your-primary-domain-controller/
- Next, decommission the last Server 2008 R2 domain controller that used to function as the primary DC.
- Follow the same instructions in Step 2 above called Demote and decommission secondary domain controller
- Next, add the machine back to the domain
- Follow the same instructions in Step 3 above called Add first Server 2012 R2 Domain Controller
- At this point, your environment should be up and running with Windows Server 2012 R2! You can optionally transfer the FSMO roles back to your «primary» DC that you had before, or continue on with the roles left on the current DC.


Notes
Official information on removing a domain controller from the domain can be found on Microsoft’s website here: http://technet.microsoft.com/en-us/library/cc771844(v=ws.10).aspx