Как правило, эта ошибка возникает после установки нового оборудования или приложений, несовместимых с вашим компьютером. Далее приведены некоторые возможные решения.
-
Перезапустите компьютер, нажав кнопку «Пуск» и выбрав «Выключение» > «Перезапуск». Во время запуска быстро нажмите клавишу F8 на клавиатуре несколько раз. Когда откроется страница «Дополнительные параметры меню загрузки», с помощью клавиш со стрелками выберите пункт «Безопасный режим», а затем нажмите клавишу ВВОД.
-
Проверьте, удается ли открыть значки недавно установленных устройств или программного обеспечения. Если не удается, удалите их.
-
Убедитесь, что программное обеспечение компьютера обновлено до последней версии. Нажмите кнопку «Пуск» , а затем в поле поиска рядом с кнопкой «Пуск» введите «Центр обновления Windows» и в списке результатов выберите пункт «Проверка наличия обновлений». В меню «Параметры» нажмите кнопку «Проверка наличия обновлений» . Когда все будет готово, перезапустите компьютер, нажав кнопку «Пуск» и выбрав элементы «Выключение» > «Перезапуск».
-
Перейдите на веб-сайт изготовителя, чтобы установить последнюю версию драйвера.
Дополнительные сведения можно найти в разделе «Устранение ошибок «синий экран»»
Нужна дополнительная помощь?
Нужны дополнительные параметры?
Изучите преимущества подписки, просмотрите учебные курсы, узнайте, как защитить свое устройство и т. д.
В сообществах можно задавать вопросы и отвечать на них, отправлять отзывы и консультироваться с экспертами разных профилей.
25.02.2016
Просмотров: 16616
При обновлении до Windows 10 или при чистой установке системы, может возникнуть синий экран смерти с обозначением ошибки BAD POOL HEADER. Появляется она, зачастую, в тех случаях, когда на жёстком диске не хватает памяти.

Как же исправить ошибку BAD POOL HEADER в Windows 10 и вернуть работоспособность системе?
Читайте также: Чёрный экран при загрузке Windows 10
Содержание:
- Причины ошибки BAD POOL HEADER
- Способы исправления ошибки в Windows 10
Причины ошибки BAD POOL HEADER
Ошибки BAD POOL HEADER и BAD POOL CALLER возникают при установке Windows 10, когда на винчестере не хватает свободного места. Однако среди других причин этой неполадки стоит выделить:
- Повреждение драйверов, неправильная конфигурация;
- Конфликт драйверов с новым оборудованием;
- Повреждение реестра;
- Поражение системы вирусным ПО;
- Ошибка 0х019, которая свидетельствует о неисправности жёсткого диска;
- Антивирус и блокировка им процесса обновления системы;
- Повреждения или нехватка оперативной памяти.
Синий экран смерти с обозначением ошибки BAD POOL HEADER в Windows10 можно исправить несколькими способами.
Способы исправления ошибки в Windows 10
В первую очередь, при возникновении ошибки BAD POOL HEADER в Windows10, разработчики рекомендуют перезагрузить ПК или выполнить откат к последней, более удачной конфигурации. Для этого при перезагрузке системы, стоит нажать «F8» и выбрать нужное действие.
Также стоит отключить ранее установленное оборудование (если таково было установлено) и удалить весь новый софт. Рекомендуется установить все обновления.
Если же рекомендации разработчиков не помогли решить проблему BAD POOL HEADER в Windows10, стоит выполнить следующие операции.
Запускаем командную строку с правами Администратора и проверяем систему на наличие ошибок. Задаём команду «chkdsk C: /f», где С – диск с операционной системой, а F – это команда для исправления ошибок.

После проверки перезагружаем систему.
Также стоит отключить быстрый старт системы. Для этого переходим в «Панель управления» и выбираем «Электропитание».

Переходим в раздел «Изменить настройки».

После жмём «Изменить настройки, которые в данный момент недоступны». Здесь снимаем отметку «Включить быстрый запуск…».

Перезагружаем систему.
Если же в Windows 10 возникла ошибка BAD POOL CALLER, стоит отключить антивирус или удалить его вообще. Как показывает практика, именно антивирус вызывает данную ошибку. После его удаления стоит перезагрузить систему и запустить обновление системы.
Have you ever heard of the blue screen of death in Windows? If you have heard of it then you know that the blue screen of death (BSOD) is an unwelcome sight.

If you haven’t heard of BSODs, here’s a hint: Blue Screens Of Death often appear when Microsoft Windows encounters a critical error from which it can’t recover. It is usually a result of low-level software (or drivers) crashing or faulty hardware.
The Bad Pool Header (Bad Pool Header Error 0x00000019) is a common blue screen of death error on Windows, including Windows 10. But don’t worry it can be fixed!
Follow these simple methods in this article to fix the bad pool header blue screen error (0x00000019).
Jump to:
- Temporarily disable your third-party antivirus
- Disconnect external devices
- Undo recent changes using system restore
- Restart your computer in safe mode
- Run Windows Memory Diagnostic Tool to Test your RAM
- Disable Fast Startup
- Update drivers
- Clean Windows Registry
- Perform a clean boot
- Reset your PC
- Perform a Clean Windows Install
What is the Bad Pool Header Error
Bad pool header is often related to memory management issues. To understand what the bad pool header error message is (x00000019) let’s make it a little more meaningful.
‘Pool’ is the tool your OS uses to allocate memory. ‘Header’ is the tool that ensures that the Windows API (application programming interface) is properly addressed.
BAD POOL HEADER error message is a signal that your PC is having memory management issues. The memory issues can be software or hardware-related.
This error restarts or shuts down your computer to prevent any damage to your system. This is why when this error occurs, you find a message stating “Windows has been shut down to prevent damage to your computer”.
What causes bad pool header error?
The Bad Pool Header with error code 0x00000019 is one of the many Blue Screen of Death (BSOD) Errors that occur when Windows experience a problem with memory allocation.
The bad pool header errors can occur due to software or hardware related issues such as:
- Corrupted or incompatible device driver,
- Failing storage drive,
- Bad sectors,
- RAM errors or faulty HDD/SDD
- Faulty hardware
- Outdated drivers.
- Virus infection.
- Corrupted or damaged Windows system files.
Here is a case example:
My Windows Pc has been taking 30 minutes or so to start. I’ve tried repairing it several times but nothing seems to work and now I’m getting a blue screen that says «bad pool header». How do I fix a bad pool header error?
How how to fix bad pool header error
The following tools and methods can often help fix bad pool header errors and get Windows up and running again.
Solution #1: Temporarily disable your third-party antivirus
If you recently installed third-party antivirus software, it could be causing the bad pool header error. Or any update on the antivirus software can also cause the issue.
Many users have reported that temporarily disabling the antivirus software can help fix bad pool header errors. If this solves the problem and then in the next reboot (without disabling the software) you see the problem again, you can consider uninstalling the antivirus software.
Note: There is no need to worry about your Windows 10 Pc’s safety because it has the built-in Windows Defender guard to keep malware at bay if you have no other antivirus software.
Solution #2: Disconnect external devices
Connected external devices or peripherals might be interfering with your PC operating system. Disconnect or unplug such peripherals as flash drives, USB hubs, external hard drives, printers, webcams, etc. You may leave the mouse and/or keyboard.
Disconnect these external devices then restart the computer and check if you still receive the BAD POOL HEADER error. If the problem is resolved, you’ll know that one of the peripherals is damaged or faulty, thus causing the problem.
You can test them one by one to identify the specific external device and replace it.
Solution #3: Undo recent changes using system restore
System Restore can help you undo recent changes to your computer’s system files that might have caused the bad pool header error. System Restore won’t affect your files, such as photos, documents, or email.
To conduct system restore:
- On the search button type System Restore.
- In the list of results, click System Restore (create a restore point on Windows 10). (If you’re prompted for an administrator password or confirmation, type the password or provide confirmation).
- Under the «Protection Settings» section, select the main «System» drive, and click the Configure button.

- Select the option of Turn on system protection > Click Apply then click OK.


Once you complete the steps, Windows will create a restore point automatically when applying a new update or when specific system changes are made.
Any program or application, including malicious programs, that you may have installed unintentionally, will be removed from the system after the system restore.
Solution #4: Restart your computer in safe mode
Safe mode starts Windows in a limited state and starts only the basic files and drivers necessary to run Windows. This can help you troubleshoot any software problems on your PC.
For instance, if you have a program that runs as soon as you start Windows and can’t be shut down when you start Windows in safe mode, you’ll be able to uninstall it.
To start your computer in safe mode:
- Remove all peripherals and external drives
- Next, click the Start button
- Hold the shift key and click Restart.
- Click the option Troubleshoot and then Advanced options.
- In the Advanced options” click Start-up Settings > Restart
- In the list of boot options choose option 4, [enable safe mode]
- Select an option by pressing one of the numbers or function keys F4, F5 or F6
In this mode, the operating system will be started with the bare minimum of installed drivers, and only the main Windows functions are used.
You’ll then log on to your computer with a user account that has administrator rights, and you’ll see the words Safe Mode in the corners of your screen.
To exit safe mode, restart your computer and let Windows start normally, then see if the problem has been sorted.
Solution #5: Run Windows Memory Diagnostic Tool to Test your RAM
A faulty or damaged RAM could cause a bad pool header error.
You can test the state of your PC’s RAM through the Windows Memory Diagnostic.
To check RAM with Windows Memory Diagnostic Tool:
- Press Windows + S
- In the search box type Memory Diagnostic.
- Click Windows Memory Diagnostic.
- Close all the programs and then click ‘Restart now and check for problems (recommended)’.

- Windows Memory Diagnostic Tool will start automatically. The testing process and results will be displayed on the screen. You can act on the errors that are found (if any).

Solution #6: Disable Fast Startup
Fast startup is a useful Windows feature (including Windows 10) that provides faster boot times on startup.
The Fast startup feature may be the reason for the bad pool header error and disabling it may fix the problem. To disable fast startup:
- Go to Search and type «power«.
- Click power & sleep settings or «Choose power plan» depending on your OS
- Then click additional power settings (in windows 10)
- Then click “Choose what the power button can do”

- Click “Change settings that are currently unavailable” and then uncheck the “Turn on fast startup (recommended)” option (if it is enabled).

- Click “Save changes” to effect the changes made and see if the bad pool header eros has been fixed.


Solution #7: Check and Update device drivers
A damaged, outdated, or corrupted device driver can cause hardware errors, which can then lead to the «bad pool header» error.
Since drivers are a bridge between the hardware and the OS, lack of communication between the OS and the hardware due to issues on drivers, may either crash to protect other vital components of the system.
To update the device drivers:
- Start the system (Safe Mode)
- Right-click the start button > locate and open Device Manager.
- In the Device Manager, locate Disk drive then right-click on it and choose Uninstall Driver.

- Restart Windows and the drivers will be reinstalled from Windows updates.
- Alternatively, you may choose to update the drivers manually. Just right-click on the drive in Device Manager then choose Update Driver. You can do this for all the drivers.

Note: Ensure, all drivers are in the Device Manager updated before you proceed.
Solution #8: Clean Windows Registry
If your registry is corrupted it may be the cause of the Bad Pool Header screen. You need to check to clean the windows registry to ensure that there are no corrupted files.
Note: editing the registry files is a procedure to be carried out only by an advanced user. If you are not skilled, you may damage your system beyond repair.
Alternatively, you can use special software to modify your Windows Registry.
Solution #9: Perform a clean boot
Performing a clean boot on your Windows 10 operating system can also help fix bad pool header errors. A clean boot also starts Windows with a minimal set of drivers and startup programs like safe mode.
This way you can eliminate software conflicts, which occur when you install an update or a program, or when you run an incompatible program in Windows.
A clean boot helps to disable all third-party applications and services so that you can ascertain if any of them is causing the bad pool header error.
To perform a clean boot:
- Open search and type «system configuration» or run MSConfig and click Ok
- Open the System Configuration desktop app. Another way to access System.

- Select “Selective startup” then unmark «Load startup items».
- Go to the «Services» tab and mark the «Hide all Microsoft services» checkbox. This will hide Microsoft apps and services (because you need to disable only third-party applications).
- Click «Disable all» > then click Apply > then click Ok to save the changes and exit system config.
- Windows will inform you that you need to restart the computer to apply the changes. Choose if you want to restart now or manually later.


Solution #10: Reset your PC
Your Windows OS might need a fresh start to fix the Bad Pool Header error.
To reset your PC in Windows 10,
- Click Start > Go to the Settings > select Update & security
- Navigate to Reset this PC then Get started
- If your data is very important, choose to keep your files, otherwise, you can choose to remove everything, or to restore factory settings.
Note: the last two options imply wiping your files off your PC. you can back up your files in the cloud for instance before resetting your PC.
Solution #11: Replace hardware or Perform a Clean Windows Install
If you haven’t had the luck to fix the bad pool header there are two things left to do: replace your HDD/SSD hardware or perform a clean OS install. These seem to be the last resort.
Wrapping up
We hope your Windows 10 memory issues have been solved and you have fixed the bad pool header with error code 0x00000019.
Fed up with your slow PC? Tired of waiting for Windows to startup? Want a new Windows OS? Take a look at the most common reasons behind poor performance and the best ways to deal with Windows issues here.
Next read
> Fix “Windows Update components must be repaired” Error on Windows 10
> Fix “We can’t sign into your account” Error on Windows 10
> Fixed: “There is a problem with this Windows installer package” error
Синий экран смерти встречается пользователям Windows не так уж редко. Коды ошибок, с которыми мы сталкиваемся, могут быть самыми разными. Но все они сигнализируют о неполадках операционной системы. Одна из них — Bad pool header. Давайте разберемся, что это за проблема и как ее можно исправить.
Причины появления
Bad pool header связана с ошибкой пула при выделении памяти – физической или виртуальной. Она сигнализирует о том, что поставленное вами ПО или оборудование требует ресурсов больше, чем способна выделить Windows.
Самыми частыми источниками являются:
- Недостаточный объем винчестера, в том числе и наличие множества повреждений.
- Нехватка оперативной памяти вследствие ее малого объема изначально или повреждений плашек.
- Проблемы с оборудованием. Оно или просто не функционирует с вашим ПК, или драйвера поставлены неправильно.
- Вирусы.
- Непорядок в системных файлах или в реестре.
- Неправильно выполненное обновление. Некоторые антивирусные программы могут заблокировать процесс обновления в самый его разгар. В этом случае Windows будет работать некорректно.
Если у вас наблюдается нехватка памяти из-за малого объема ПЗУ или ОЗУ – здесь мы помочь не сможем. Вам надо провести апгрейд своего компьютера. А вот повреждения попробовать исправить можно. Для оперативной памяти используйте программу Memtest86.
Memtest86
Если с оперативной памятью все в порядке, просканируйте диск на ошибки. В случае, когда компьютер грузится, вызовите командную строку от имени администратора через «Выполнить» (WIN+R). Если же ПК зависает, вам придется зайти в безопасном режиме (в 7 версии) или при загрузке (если это 10-ка) вызывать ее. Давайте рассмотрим оба варианта.
Bad pool header Windows 7 — как исправить?
До версии 8 вход в режим безопасности Windows осуществлялся очень просто. При перезагрузке нажимайте F8 и далее выбирайте в меню «Безопасный режим с поддержкой командной строки».
Далее произойдет обычная загрузка ПК, и в системе вы сможете вызвать командную строку. Нажмите WIN_R и введите cmd.
Закройте ВСЕ файлы и папки. Должно остаться только черное окно как на скриншоте. Введите команду chkdsk /f /r. Она позволит проверить весь жесткий диск на наличие ошибок (ключ /f) и вдобавок еще и отсканирует системные файлы (ключ/r). Если диск все же чем-то занят, то вы увидите следующее сообщение:
Согласитесь (нажмите Y) и перезагрузите ПК. Сразу же при его загрузке начнется сканирование. Хотим предупредить, что процесс это долгий, так что запаситесь терпением.
Ошибка Bad pool header — как исправить в Windows 10?
Проблема Bad pool header 0x00000019 при загрузке Windows 7 решается просто. А вот в 10-ке вход в безопасный режим усложнили. Сейчас для этого требуется установочный диск или накопитель с восстановлением системы. Вообще, он создается заранее. Если вы не обзавелись таким, создайте его на другом компьютере. Вам даже не понадобится искать ПК с Windows 10. Этот инструмент есть и в 7-й версии.
После того, как вы обзавелись нужным накопителем, загружайте компьютер. Как только появится черный экран, входите в БИОС (F2 или DEL – обычно написано внизу). Для ноутбуков варианты могут быть разные. Например, Леново имеет отдельную кнопку.
В БИОСе вам необходим раздел загрузки – BOOT. В нем измените загрузочной устройство, сохраните и выйдите. Например, флешка.
Следующий вход в систему будет осуществляться уже с флеш-устройства. Вы увидите установочный экран Windows. Нажимайте внизу «Восстановление системы».
Далее последовательно выбирайте:
- Поиск и устранение неисправностей.

- Дополнительные параметры

- Командная строка

- И далее произведите все те же действия, что были описаны ранее для исправления ошибки Bad pool header посредством команды chkdsk.


Вход в безопасный режим в Windows 10
Для всех остальных вариантов исправления синего экрана смерти Bad pool header вам понадобится на этом этапе выбрать не командную строку, а «Параметры загрузки». Это позволит зайти в систему в безопасном режиме, чтобы начать дальнейшую борьбу Bad pool header. Нажмите кнопку «Перезагрузить».
И выберите шестой вариант (F6).
Теперь начнется загрузка ОС.
Код ошибки bsod bad pool header – качаем обновления
Как уже говорили ранее, сбой при установке обновлений может вызвать такую проблему. После того, как вам удалось загрузиться, зайдите в параметры.
Выберите обновление и безопасность.
И проверьте наличие.
После установки перезагрузитесь. Если проблема была в этом, bad pool header пропадет и не будет вас беспокоить.
Stop 0x00000019 bad pool header Windows 7 или 10 – вирусы
После входа в безопасный режим в любой версии, обновите антивирусные базы и проверьте свой ПК. Вам нужна глубокая проверка. Например, в Avira это делается следующим образом:
- Найдите в трее значок и нажмите на него.

- Далее нажмите «Сканировать».

Ваша система будет вылечена от вирусов, если таковые имелись.

Исправляем bad pool header откатом системы
Последний вариант – откат системы до точки восстановления. Он поможет, если вы установили ПО или оборудование, которое вызвало конфликт. Надо вернуться назад, до момента инсталляции. Здесь возможны два варианта для Windows 10:
- Зайти в безопасном режиме и пройти следующими этапами: Пуск – Параметры – Восстановление – Запуск восстановления системы.
- При загрузке с установочного диска на этапе «Дополнительные параметры» (После выбора диагностики) выбрать «Восстановление системы».

В обоих случаях вы попадете в мастер восстановления. Здесь выполняйте следующие действия:
- Нажмите «Далее»

- Выберите точку восстановления.

- Если вы затрудняетесь, проверьте какое ПО будет затронуто и соотнесите эту информацию с тем, что было изменено последним до появления ошибки.
- Если данные совпадают с вашим анализом, нажмите «Закрыть» и вернитесь в окно восстановления.Например, на скрине видно, что основные изменения касались драйвера видеокарты NVidia. После их обновления и стала появляться ошибка bad pool header.

- Кликайте «Далее».
- Готово.


После восстановления все изменения будут удалены, и система вернется в нормальное состояние.
Все вышеперечисленные действия относятся и к системе Windows 8. Она очень близка к 10-ке. Только «Параметры» приходится искать в меню «Пуск».
Надеемся, что наши инструкции помогут вам избавиться от ошибки bad pool header.
Отличного Вам дня!
We have gotten some complaints about the Bad Pool Header Windows 10 issue where you are unable to properly boot your system or sometimes this error can also prevent you from installing an update or a new fresh install of Windows. There have also been cases where the Bad Pool Header Windows 10 BSOD has occurred and in this article, we will be looking into fixing this issue completely.

Make sure to follow all the steps carefully and to read through the reasons due to which the error is triggered in the first place. Also, start by implementing the solutions one-by-one until one of them fixes the issue for you.
What Causes the Bad Pool Header Windows 10 Error?
After going through all of the fixes that are commonly used to get rid of this problem, we came to the conclusion that the following must be the primary reasons behind its occurrence.
- Antivirus Issue: Sometimes the Antivirus that you are using on your computer might be preventing System files from loading properly due to which the Bad Pool Header Windows 10 Issue is being triggered. Therefore, we suggest that you try to temporarily disable the Antivirus and then check to see if that fixes the issue.
- Outdated Drivers: If the Drivers installed on your computer have been outdated, you will run into the error sometimes if there are incompatibility issues with the hardware. Therefore we strongly suggest that following the steps below, you try to update all the outdated drivers and then check to see if doing so fixes the errors.
- Damaged System Files: Sometimes, certain system files on your computer might get damaged due to which the Bad Pool Header Windows 10 BSOD can occur. Therefore, you can perform certain scans and check to see and repair the damaged files.
- Recently Installed Updates: If you installed updates before this issue started occurring, it is vital that you try and ensure that the update isn’t causing this issue. Therefore, we strongly suggest that you try and uninstall the recently installed updates.
- Fast Startup Feature: If the Fast Startup Feature on your computer has been enabled, it is suggested that you try and turn it off temporarily as mentioned below and check to see if doing so fixes the error message because it can sometimes prevent the Windows from recovering from an error.
- Registry Issue: If the Windows registry has acquired some bugs or is configured incorrectly, the Bad Pool Header Windows 10 Issue might be seen while installing an update or while performing simple tasks. Therefore, we suggest that you try and repair your registry as mentioned in the solutions below.
Now that we have taken you through almost all the possible reasons behind its occurrence, you can finally start implementing the solutions.
Before You Start:
You should start off by unplugging all your external devices, such as USB’s External drives or other Peripherals. Once everything is disconnected check if the error vanishes now. Secondly, try resetting your PC. For this type in “Reset this PC” in the Cortana search bar and hit the “Enter” key, in the following window select “Get Started” and next follow the on-screen instructions to reset your PC. Resetting your PC will delete any apps and settings you’ve made/installed but your files will be kept safe.
How to fix the bad pool header error windows 10 issue:
Fix 1: Disable Your Anti-Virus Temporarily
Try disabling your Anti-Malware software if you have any installed, if you use Windows 10 then you can turn OFF the already built-in Anti-Virus known as the Windows Defender. For this follow the steps below:
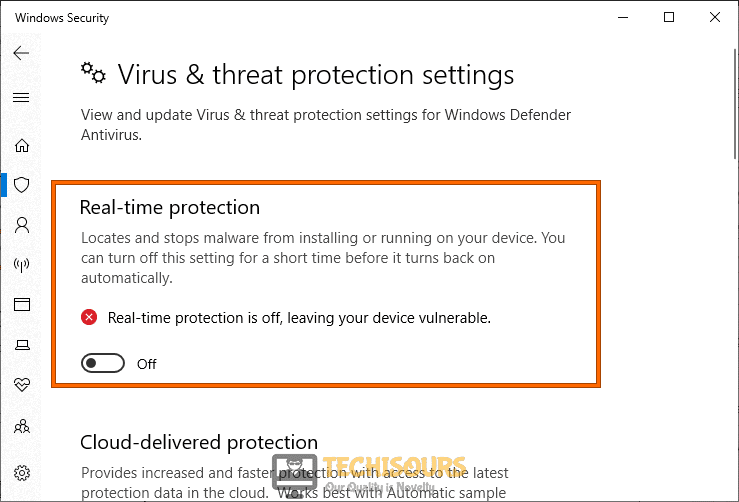
- In the search bar near the Start menu type in “Virus and Threat Protection” and press “Enter”, when the new window opens up click on “Manage Settings” under Virus & Threat Protection Settings.

Virus and Threat protection - In the following window turn the “Real-Time Protection” OFF using the toggle button.

Disable Real-time protection

Fix 2: Check For Updates
If you’re connected to the internet always make sure new updates are downloaded and installed completely to avoid any errors on your system. To do so follow these steps:
- In the search bar type in “Check For Updates” and press “Enter”, in the pop-up Windows Update tab click on the “Check For Updates” button and wait for Windows to look for Updates online.

Check For Updates - If any updates are found they will be “Downloaded” and “Installed” automatically.
- When your system gets updated then check to see if the bad pool header windows 10 dell error got resolved.

Fix 3: Update Drivers
You can also manually update your device drivers by following this method:
- In the search bar near the Start menu type in “Device Manager” and press “Enter”, when the Device Manager window opens up look for a “Yellow Exclamation Mark” near any of the devices.

Typing in Device Manager - If you see a Yellow mark, expand that “Device Section” and right-click on the troublesome device. From the drop-down menu then select “Update Driver” to look for the updates automatically.

Fix 4: Check Your Disk For Bad Sectors
The Bad Pool Header error commonly occurs with memory-related issues, so its good to take a look at your hard drive:
- Press the “Window + S” keys together on your keyboard and in the search bar type in “cmd”. When the results show up right-click on Command Prompt and select “Run As Administrator”.

Run Command Prompt - Inside the Command Prompt window type in the following command and press “Enter”:

chkdsk.exe /f /r
- Once the Command is executed close the command prompt window and “Restart” your PC and most probably bad pool header error windows 10 issue gets settled.
Fix 5: Diagnose Your RAM
Memory issue can also mean issues with your Random Access Memory or RAM. In order to diagnose it go through these steps:
- Open up the “RUN” dialog box using the “Window + R” keys simultaneously on your Keyboard, in the RUN prompt type in “mdsched.exe” and press “Enter”.

Typing in “mdsched.exe” - In the new window click on “Restart Now and Check For Problems”, the program will now start looking for errors in your RAM, so you need to stay patient in this step.

Restart now and check for problems - Once the test is over your PC will “Restart”, after the restart press the “Window + X” keys on your keyboard and then select “Event Viewer” from the drop-up menu.
- In the Event Viewer window select “Windows Logs” in the left pane and then move on to select “System”, in the right pane. Then click on “Find” from the right window pane and type in “MemoryDiagnostic” in the search bar.
- Now you will be shown the results for the “RAM Tests” and most probably after running the RAM test the bad pool header windows 10 update issue would be rectified.


Fix 6: Disable the Indexing Service
Disabling the Indexing Service sometimes solves the bad pool error on Windows, In order to disable this service proceed with these steps:
- Press the “Window + R” keys on your keyboard to open up the “RUN” dialog box, in the RUN prompt type in “services.msc” and press “Enter”.

Typing in “services.msc” - In the pop-up Services window scroll down in the list to locate “Indexing Service” or “Windows Search”, once located right-click on it and select “Properties”.
- Then change the “Startup Type” to “Disabled” and press the “Stop” button below. Apply all the changes made and then click on “OK”.

Disable the Indexing Service


Fix 7: Run the Windows Update Troubleshooter
- On your keyboard press the “Window + I” keys together to open up “Settings”, in the Settings window click on “Update and Security” and then select “Troubleshoot” in the left menu.

Choose Update and Security - In the Troubleshoot menu click on “Additional Troubleshooters” and then select the “Windows Update Troubleshooter” from the left pane.
- Then click on “Run Troubleshooter” to start the process and after completion hopefully the stop code bad pool caller issue would be rectified.

Fix 8: Run the SFC Scan
- Press the “Window + R” keys on your keyboard and type in “cmd” in the Run dialog box, in order to open up an “Admin cmd” press the “Ctrl + Alt + Enter” keys after typing in cmd.
- In the Command Prompt window type in the following command and hit the “Enter” key:
sfc /scannow
Fix 9: Run the DISM Scan
- Open up the “Command Prompt” window and then type in the below command and press “Enter” to execute it:
DISM /Online /Cleanup-Image /RestoreHealth
The DISM and SFC scan help fix corrupt system configuration files.
Fix 10: Uninstall Recently Installed Programs
If you’ve started experiencing the issue after installing a new program recently then try uninstalling the application to check if it’s the culprit:
- Open up the “RUN” dialog box using the “Window + R” keys together, in the search bar then type in “appwiz.cpl” and press “Enter”.
Typing “appwiz.cpl” - In the pop-up Programs and Features window scroll down through the list and locate the program you wish to “Uninstall”, once you locate the app right-click on it and select “Uninstall” from the drop-down menu.

Fix 11: Uninstall Recent Updates
If the error started showing up after installing a new Windows Update recently, you can try uninstalling it using the method below:
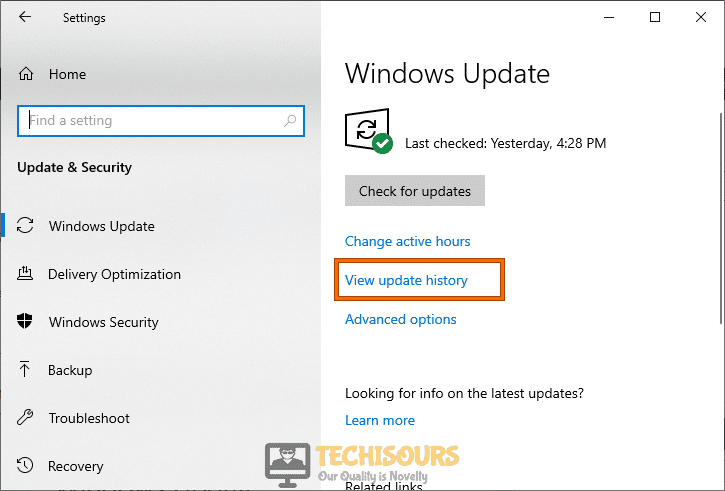
- Using the Windows search bar type in “Check For Updates” and press “Enter”, in the new Update window select “View Update History”.

View update history - Next, select the “Uninstall Updates” option in the new window and afterward check to see if the error got fixed.
Fix 12: Disable Fast Startup On Your PC
- In the Windows search bar type in “Power and Sleep Settings” and press “Enter”, in the new window select “Additional Power Settings” in the right pane.

Typing Power and Sleep Settings - Then in the following window click on “Choose What the Power Button Does” in the left vertical menu, at the top now click on “Change Settings That Are Currently Unavailable”.

Change settings that are currently unavailable - Next, uncheck the box in front of “Turn On Fast Startup (Recommended)”.
- Once done save your changes made, close the window, and most probably the bad pool header windows 10 BSOD issue would be resolved.


Fix 13: Perform A Clean-Boot Hardware
- In the search bar type in “Device Manager” and press “Enter”, when the Device Manager window opens up expand the section for “Display Adapters”.
Typing in Device Manager - Then right-click on your adapter and select “Disable Device”.
- Repeat the same for the following devices as they are not important. This will help in ruling out any hardware related issues:
Display Adapters

Sound, video and game controllers

Network Adapters

USB Devices and controller (Please don’t disable this if you are using USB keyboard or Mouse or Wireless Keyboard or mouse)

DVD/CD-ROM drives

Modems  Ports
- Once all devices are disabled “Restart” your PC and start enabling the devices one by one again, enable one device at a time, and then restart your PC and afterward check for the error.
Fix 14: Boot Into Safe Mode
Safe Mode is a Windows Boot mode that loads the Windows in a clean state, it helps us boot into Windows without any third-party apps running in the background. In order to boot into safe mode implement these steps:
- Restart your computer using the Start Menu, as soon as the restart process starts start spamming the “F8 Key” on your keyboard.
- When the Boot menu occurs select “Safe Mode” and then press “Enter”.
If the error does not appear in safe mode that means that a third-party app on your PC is causing the error and needs to be uninstalled.
Fix 15: Perform A Clean Boot
You can also perform a Clean boot to check for problematic software and drivers by following the procedure listed below:
- In the Windows search bar type in “MSConfig” and press “Enter”, in the System Configuration window select “Selective Startup”, now make sure to uncheck the “Load Startup Items” check box.

Typing in “Msconfig” - Then click on the “Services” tab at the top and checkmark the box in front of “Hide All Microsoft Services”, once all Microsoft services are hidden click on “Disable All” in the right.

Hide all Microsoft services - Apply all the changes made and click on “OK”. Afterward, “Restart” your computer to boot into a Clean state mode.


Fix 16: Clean Windows Registry
Manually interfering with the Windows Registry values can cause permanent damage to your Windows, and for these reasons, we will use a third-party application to do the work for us. We recommend using “Auslogics Registry Cleaner”, as it is a free tool that offers full cleanup of corrupt registry errors.
Fix 17: Use System Restore
- In the search bar near the Start menu type in “Create A Restore Point”.

Create a Restore Point - In the System Properties window click on “System Restore”, then select a restore point when your PC was working fine. Once you select the date hit the “Next” button.
- Next, follow the on-screen instructions to complete the process and after completion of the process most probably the windows 10 BSOD bad pool header issue would be rectified.

Fix 18: Perform A Clean Windows Install
If none of the solutions indexed above worked for you, all you are left to do now is to make a new Clean Installation of Windows on your computer and if you’re not a computer geek and doesn’t know how to perform this by yourself we’ll recommend you to hire a technician for that.
Hopefully, the methods listed above will help you get over the error easily but if the error continues to stay then feel free to Contact Us here.

Alan is a hardcore tech enthusiast that lives and breathes tech. When he is not indulged in playing the latest video games, he helps users with technical problems that they might run into. Alan is a Computer Science Graduate with a Masters in Data Science.