Symptoms
Consider the following scenario:
-
You attach a storage device that has more than four partitions to a computer that has the Unified Extensible Firmware Interface (UEFI) mode enabled.
-
You insert a Windows 7 or a Windows Server 2008 R2 installation DVD into a drive of the device, and then you start the computer from the DVD.
-
You receive the following message during the startup process, and then you press a key:
Press any key to boot from CD/DVD
In this scenario, you receive an error message that resembles the following:
Boot failed.
Cause
This issue occurs because the boot manager compares two device signatures incorrectly. These device signatures are the Extensible Firmware Interface (EFI) device signature that is in the extended boot record (EBR) and the device signature that is in the master boot record (MBR).
Resolution
To prevent this problem, integrate this hotfix into the Windows 7 installation media or into the Windows Server 2008 R2 installation media. Then, reinstall Windows 7 or Windows Server 2008 R2.
To integrate this hotfix, first extract the contents of the hotfix. Then, replace the files in the \efi\microsoft\boot folder on the Windows installation media with the updated versions that were extracted.
Note You cannot use the Deployment Image Servicing and Management (DISM) command line tool to integrate this hotfix because the updated files are not in the Install.wim file.
Hotfix information
A supported hotfix is available from Microsoft. However, this hotfix is intended to correct only the problem that is described in this article. Apply this hotfix only to systems that are experiencing the problem described in this article. This hotfix might receive additional testing. Therefore, if you are not severely affected by this problem, we recommend that you wait for the next software update that contains this hotfix.
If the hotfix is available for download, there is a «Hotfix download available» section at the top of this Knowledge Base article. If this section does not appear, contact Microsoft Customer Service and Support to obtain the hotfix.
Note If additional issues occur or if any troubleshooting is required, you might have to create a separate service request. The usual support costs will apply to additional support questions and issues that do not qualify for this specific hotfix. For a complete list of Microsoft Customer Service and Support telephone numbers or to create a separate service request, visit the following Microsoft Web site:
http://support.microsoft.com/contactus/?ws=supportNote The «Hotfix download available» form displays the languages for which the hotfix is available. If you do not see your language, it is because a hotfix is not available for that language.
Prerequisites
To apply this hotfix, you must be running a 64-bit version of Windows 7 or Windows Server 2008 R2.
Registry information
To use the hotfix in this package, you do not have to make any changes to the registry.
Restart requirement
You do not have to restart the computer after you apply this hotfix.
Hotfix replacement information
This hotfix does not replace a previously released hotfix.
File information
The global version of this hotfix installs files that have the attributes that are listed in the following tables. The dates and the times for these files are listed in Coordinated Universal Time (UTC). The dates and the times for these files on your local computer are displayed in your local time together with your current daylight saving time (DST) bias. Additionally, the dates and the times may change when you perform certain operations on the files.
Windows 7 and Windows Server 2008 R2 file information notes
Important Windows 7 hotfixes and Windows Server 2008 R2 hotfixes are included in the same packages. However, hotfixes on the Hotfix Request page are listed under both operating systems. To request the hotfix package that applies to one or both operating systems, select the hotfix that is listed under «Windows 7/Windows Server 2008 R2» on the page. Always refer to the «Applies To» section in articles to determine the actual operating system that each hotfix applies to.
For all supported x64-based versions of Windows 7 and of Windows Server 2008 R2
|
File name |
File version |
File size |
Date |
Time |
Platform |
|---|---|---|---|---|---|
|
Cdboot.efi |
6.1.7600.20754 |
440,320 |
13-Jul-2010 |
13:58 |
Not applicable |
|
Cdboot_noprompt.efi |
6.1.7600.20754 |
440,320 |
13-Jul-2010 |
13:58 |
Not applicable |
|
Efisys.bin |
Not applicable |
1,474,560 |
13-Jul-2010 |
13:58 |
Not applicable |
|
Efisys_noprompt.bin |
Not applicable |
1,474,560 |
13-Jul-2010 |
13:58 |
Not applicable |
Workaround
To work around this issue, disconnect the device that has multiple partitions from the computer before you install Windows 7 or Windows Server 2008 R2. Reconnect the drive after the installation is complete.
Status
Microsoft has confirmed that this is a problem in the Microsoft products that are listed in the «Applies to» section.
More Information
This is one of two hotfixes that are required to fully address this issue. If you are experiencing this issue, you should also apply the fix that is documented in the following Microsoft Knowledge Base article:
982929 «Boot failed» error when you start a UEFI-enabled computer from a Windows 7 or Windows Server 2008 R2 installation DVD (Package 1)
Reference resources
947024 How to create an ISO image for UEFI platforms for a Windows PE CD-ROM for Windows Server 2008
For more information about software update terminology, click the following article number to view the article in the Microsoft Knowledge Base:
824684 Description of the standard terminology that is used to describe Microsoft software updates
Steps to add the hotfix to an x64-bit version of installation media
You must have the Windows 7 or the Windows Server 2008 R2 Windows Automated Installation Kit (WAIK) or OEM Preinstallation Kit (OPK) installed to create the installation media. To do this, follow these steps:
-
Copy the Windows installation DVD to your hard disk (C:\bin).
-
Make the customizations as needed.
-
Create a temporary folder C:\hotfix.
-
Use the following command to extract the hotfix CAB file Windows6.1-KB2223832-x64.cab:
expand Windows6.1-KB2223832-x64.cab –F:* c:\hotfix\Note This command extracts files to the C:\hotfix\efi\microsoft\boot folder.
-
Copy the following files from the C:\hotfix\efi\microsoft\boot folder to the C:\bin\efi\microsoft\boot folder to replace the existing files:
-
Cdboot.efi
-
Cdboot_noprompt.efi
-
Efisys.bin
-
Efisys_noprompt.bin
Note The Efisys.bin file is used with Oscdimg.exe to create the ISO image. To create the ISO image, you must have the Etfsboot.com file. The Etfsboot.com file is a part of the WAIK and the OEM OPK tools, and it is installed with these tools.
-
-
Run the following command to create the ISO:
Oscdimg -m -o -u2 -udfver102 -bootdata:2#p0,e,bC:\<path of the Etfsboot.com file under the Drive C>\etfsboot.com#pEF,e,bC:\hotfix\efi\microsoft\boot\efisys.bin C:\BIN C:\x64_2k8r2.iso
For more information about how to create an ISO, click the following article number to view the article in the Microsoft Knowledge Base:
947024 How to create an ISO image for UEFI platforms for a Windows PE CD-ROM for Windows Server 2008
-
Burn C:\x64_2k8r2.iso to a DVD.
Need more help?
Want more options?
Explore subscription benefits, browse training courses, learn how to secure your device, and more.
Communities help you ask and answer questions, give feedback, and hear from experts with rich knowledge.
При запуске ПК (обычно это лэптопы от «Lenovo», «HP», и «Acer») пользователь может столкнуться с ошибкой загрузки операционной системы, сопровождающейся сообщением «Default Boot Device Missing or Boot Failed». Обычно это сигнализирует об аппаратных проблемах с жёстким диском ПК, а также с рядом неверных настроек жёсткого диска, имеющихся в БИОСе. Ниже я разберу суть данной проблемы, а также поясню, как её исправить на вашем компьютере.
Содержание
- Причины возникновения ошибки
- Как исправить ошибку Default Boot Device Missing or Boot Failed
- Заключение
Причины возникновения ошибки
В переводе текст указанного сообщения звучит как «Использующееся по умолчанию загрузочное устройство отсутствует или загрузка не удалась». Также в сообщение обычно содержится рекомендация задействовать сподручное средство восстановления, после чего выбрать необходимую загрузку.
Дисфункция обычно появляется в ситуации, когда загрузочная область или системные файлы на винчестере ПК были повреждены по различным причинам (сбой питания ПК, некорректное выключение компьютера и так далее).
Фактором, вызывающим «Boot Device Missing», могут являться неверные настройки БИОСа. В частности, может быть неправильно выставлена последовательность устройств при загрузке. Некорректно установлен режим загрузки, или действующие на тот момент настройки БИОСа были сброшены к заводским.
Может быть полезно: Your PC/Device needs to be repaired в Windows 10 — что делать?
Как исправить ошибку Default Boot Device Missing or Boot Failed
Чтобы избавиться от ошибки «Default Boot Device Missing» на вашем компьютере рекомендую выполнить следующее:
- Просто выключите, а затем включите ваш PC. Если ошибка имеет случайную природа – она исчезнет;
- Проверьте, чтобы из ПК были отключены ранее подключённые внешние устройства (флешки, сторонние жёсткие диски и др.);
- Проверьте плотность подключения шлейфов ПК к винчестеру. Этот совет актуален в случае стационарных ПК, у которых соответствующие шлейфы могут отойти от разъёмов на материнской плате и жёстком диске;
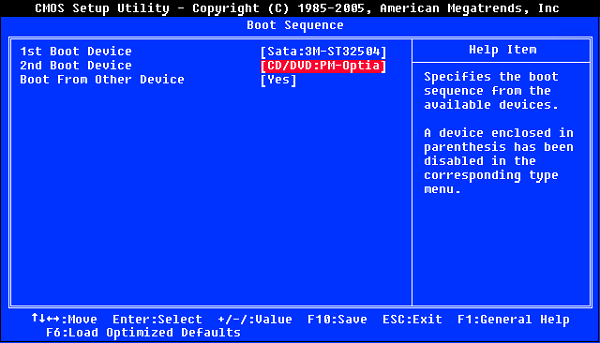
- Корректно проранжируйте устройства загрузки. Перейдите в настройки вашего БИОСа (при включении ПК быстро жмите на F2, F10, Del или Escape). Там найдите настройки последовательности загружаемых устройств, и убедитесь, что жёсткий диск вашего ПК указан первым. При необходимости, установите его первым, и, сохранив изменения, (обычно с помощью нажатия на F10), перезагрузите ваш компьютер;

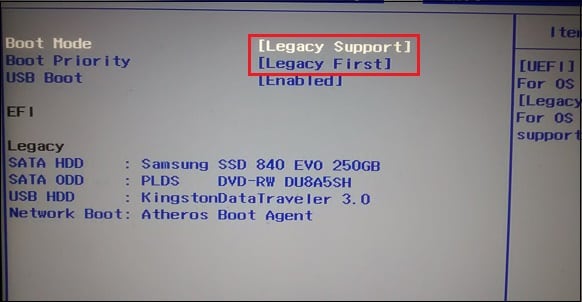
Убедитесь, что первым в очереди загрузки установлен жёсткий диск - Установите режим загрузки ПК на «Legacy Support». Выполните вход в БИОС отмеченным выше способом, найдите там опцию «Boot Mode», и установите её значение «Legacy Support». Сохраните изменения (F10), после чего перезагрузите PC;

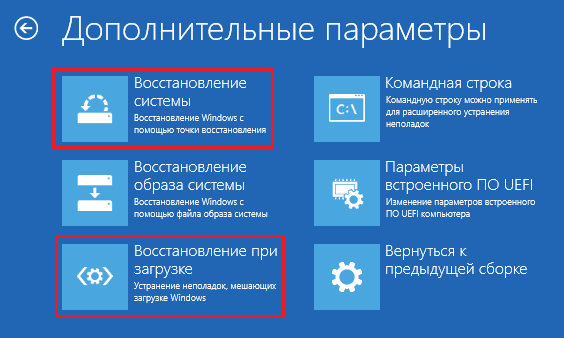
- Используйте опцию системного восстановления. Для реализации данного способа необходимо иметь загрузочную флешку с инсталляционной версией установленной на вашем ПК операционной системы. Загрузитесь с данной флешки, выберите там язык и время, и нажмите на «Далее». На следующем экране внизу слева выберите «Восстановление системы», и на следующем экране — «Восстановление при загрузке» (или альтернативное «Восстановление системы»). Будет произведено восстановление системы, и ошибка «Boot Failed» будет исправлена;

- Сделайте основной раздел вашего диска активным. Ошибка «Boot Failed» может быть вызвана неактивным статусом основного раздела вашего жёсткого диска. Для решения проблемы boot failed загрузитесь с инсталляционной флешки вашей ОС, выберите режим восстановления (как было указано чуть выше), и в нём запустите командную строку. Затем последовательно наберите следующие команды:
diskpart
select disk 0
Диском под номером 0 обычно является диск, на котором установлена ваша ОС Виндовс. Для вывода на экран полного списка дисков наберите в командной строке команду list disk.
Далее наберите:
list partition
select partition 1 — (1 – это ваш основной раздел);
active
Перезагрузите ваш PC.
Заключение
Ошибка «Default Boot Device Missing or Boot Failed» обычно вызвана сбоем загрузки жёсткого диска ПК, а также рядом некорректных настроек БИОСа. Воспользуйтесь приведёнными выше советами, позволяющими эффективно решить проблему «Boot Failed» на вашем компьютере.
Опубликовано Обновлено
Updated by
Cici on Aug 31, 2023
Keynotes:
- Discover 6 proven solutions to resolve «Default Boot Device Missing or Boot Failed» errors and restore seamless booting on Lenovo, Acer.
- Use EaseUS Partition Master for efficient MBR rebuilding, partition wiping, and other features to address boot issues.
- Master troubleshooting techniques like boot order adjustment, active partition setting, and Windows Startup Repair to fix the «Default Boot Device Missing or Boot Failed» error.
Does the error message «Default Boot Device Missing or Boot Failed» appear regularly on your Lenovo or Acer screen? If so, you are in the correct location.
The stability of your gadgets is necessary for continued productivity in today’s age of contemporary computing. Unexpected faults might still annoy you in this fast-paced technological environment, though. One such frequent issue is the «Default Boot Device Missing or Boot Failed» error, which can put a stop to our computer activities.
But don’t worry; EaseUS will expose the underlying reasons for this error on Windows 10/11 and provide helpful tips on correcting this.
To solve the boot problem on Lenovo or Acer laptops quicker, we will give six tried-and-tested solutions before we delve into the root causes. Check the table below; you will know the efficiency and difficulty of each solution:
| Solution | Efficiency | Difficulty |
|---|---|---|
| Change Boot Order and Boot Mode | High — This is the most likely cause and the most immediate solution. | ⭐ |
| Set the Primary Partition Active | Medium — Set up the active partition by mounting the media. | ⭐⭐⭐ |
| Rebuild the MBR for the Boot Hard Disk | High — Directly resolves boot disk errors. | ⭐⭐ |
| Run Windows Startup Repair | Medium — Boot Repair Guide simply checks for problems. | ⭐⭐⭐ |
| Run SFC to Repair the Boot File | Medium — SFC can fix faulty boot files, but not as good as using specialized tools. | ⭐⭐⭐ |
| Wipe the Hard Disk and Reinstall the Operating System | High — This is the final solution to the problem. | ⭐ |
If you know the reasons that caused the error, you can jump directly to the corresponding solution. Otherwise, check the step-by-step guide in turn.
Solution 1. Change Boot Order and Boot Mode
Set the proper hard disk as the initial boot device to make sure your machine boots up without issue. To access the BIOS settings and change the boot sequence and mode as needed, follow these steps:
Step 1. To access BIOS Setup, restart your computer and press the corresponding functional key (F1, F2, or F12, depending on what your device supports).
Step 2. Verify that the main menu includes a listing for your boot hard disk.
Step 3. If recognized, use the arrow keys to go to the «Boot menu» and select the boot disk as the first choice.
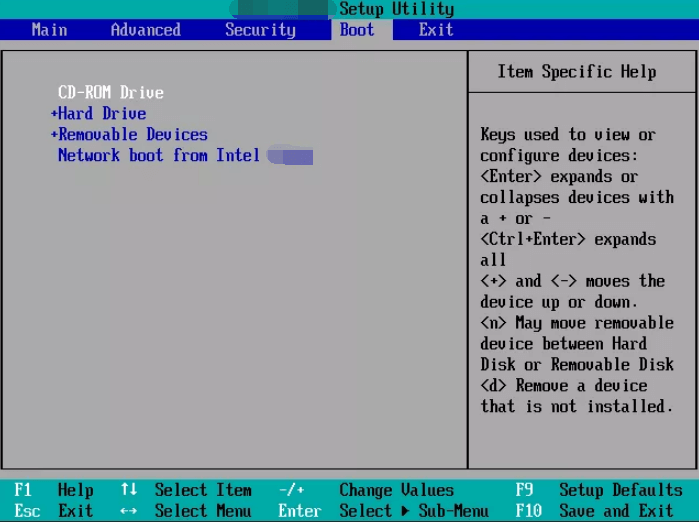
Step 4. Select the proper boot mode depending on the kind of system (Legacy for MBR or UEFI for GPT).
Step 5. Press F10 to save changes and leave BIOS.
Your system should now successfully boot up. Restart your laptop or computer afterward to see whether the boot failure or missing default boot device problem has been resolved.
Try the next one if this one seems unsuccessful.
Note: If you want to boot your laptops from USB, changing the boot order is the necessary step. If you want to know the detailed guide, click the buttons:
Solution 2. Set the Primary Partition Active
A boot failure occurs if the main partition holding Windows is not marked as active. To fix the «Default Boot Device Missing or Boot Failed» issue, make sure the primary partition is active. But before you start, please create Windows installation media.
Here’s how you can do it:
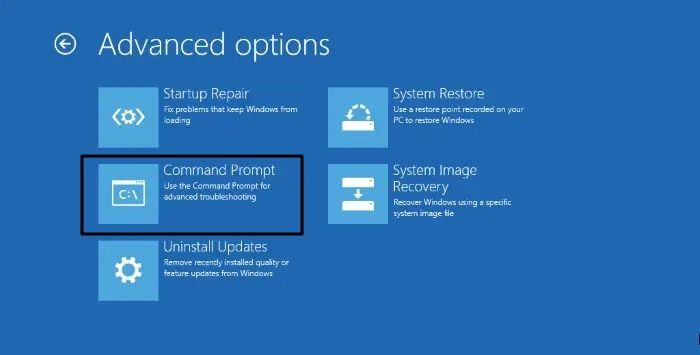
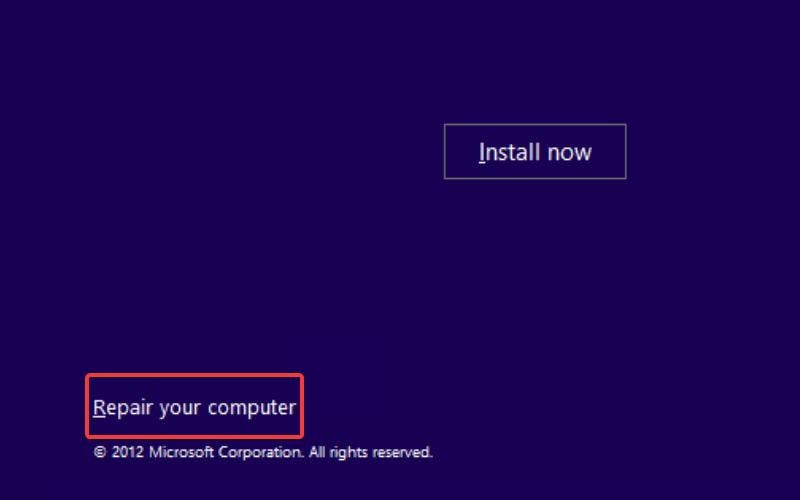
Step 1. Use Windows installation media (USB or DVD) and boot your computer.
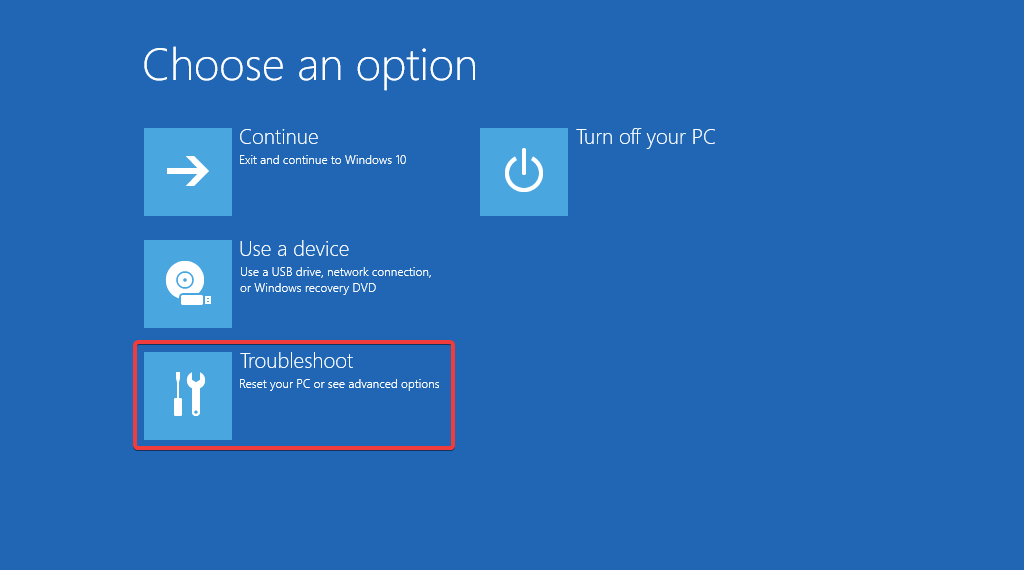
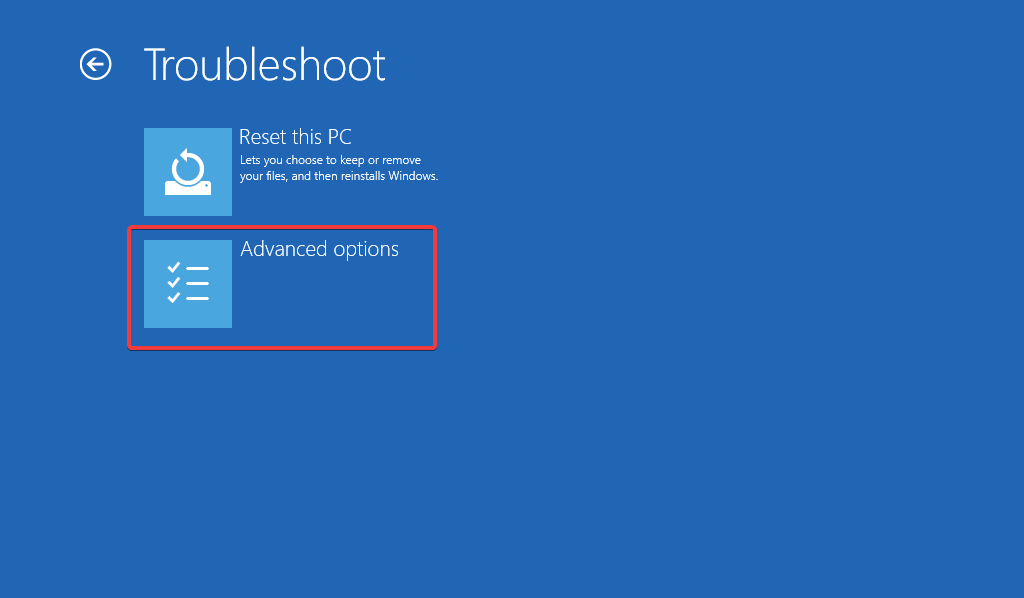
Step 2. Now select the «Repair your computer» option, then «Troubleshoot,» and access «Command Prompt.»
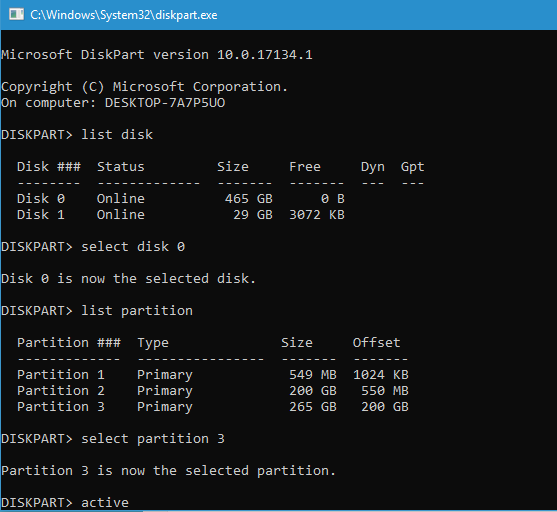
Step 3. Type the «diskpart» command and press enter.
Step 4. Type the «list disk» command to identify your hard disk (e.g., Disk 0).
Step 5. Select your disk with the «select disk X» command (replace X with your disk number).
Step 6. Type the «list partition» or «list volume» command and press enter to view available partitions.
Step 7. Now choose the primary partition (e.g., partition 1) with the «select partition X» command.
Step 8. Type «active» and press Enter.
Step 9. Close the Command Prompt, disconnect the installation media, and restart your system.
Check if this solution has helped you solve the issue.
Also read: The System Cannot Find Any Bootable Devices
Solution 3. Rebuild the MBR for the Boot Hard Disk
Rebuilding the MBR for the boot hard disk is crucial, as the MBR contains essential information for loading the operating system. When corrupted, it leads to the «Default Boot Device Missing or Boot Failed» error.
EaseUS Partition Master, however, can help you quickly fix this issue. It is a potent third-party tool made to solve MBR-related boot problems. It quickly resolves master boot code issues with its «Rebuild MBR» tool, offers a user-friendly interface, and creates a WinPE bootable disk for simple access and control of computer disks/partitions.
Step 1. Create a WinPE bootable disk
- Launch EaseUS Partition Master, and click «Bootable Media» on the toolbar. Select «Create bootable media».
- Click «Next» to finish the process.

Step 2. Boot EaseUS Partition Master Bootable USB
- Connect the bootable USB or CD/DVD to your PC.
- Press F2 or Del when you restart the computer to enter the BIOS screen. Set and boot your computer from «Removable Devices» or «CD-ROM Drive». And then EaseUS Partition Master will run automatically.
Step 3. Rebuild MBR
- Click «Toolkit» and choose «Rebuild MBR».

- Select the disk and the type of MBR. Then, click «Rebuild».

- After that, you can see «MBR has been successfully rebuilt on Disk X».

Following these steps, you may easily rebuild MBRs, restore your system, and say goodbye to the «Default Boot Device Missing or Boot Failed» problem by downloading EaseUS Partition Master. As a full-featured tool, it can also help resolve a lot of problems, such as:
- The computer has rebooted from a bugcheck
- Fix can’t delete files from sd card
- Fix Dell no bootable devices found
If you have any problems related to disks, computer startup, etc., you can ask EaseUS Partition Master for help.
Hopefully, this solves your problem, but if not, try the next solution and run Windows Startup Repair.
Solution 4. Run Windows Startup Repair
Still having the issue at hand? The solution is a Windows startup repair. This technique simplifies resolving the «Default Boot Device Missing or Boot Failed» problem. Just follow the steps given below:
Step 1. Start your computer from the Windows installation CD or DVD.
Step 2. Select the keyboard input, language, time, and currency format before clicking «Next.»
Step 3. To troubleshoot, click «Repair your computer» and «Troubleshoot.»
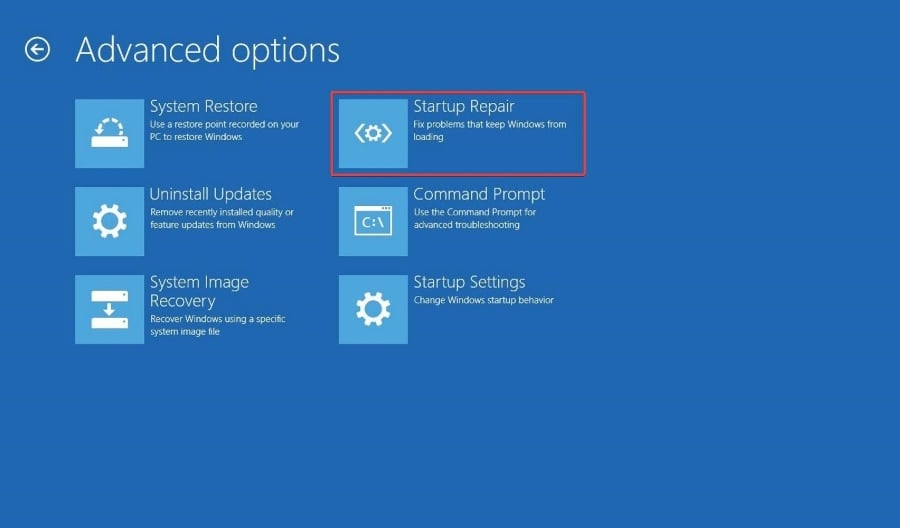
Step 4. Select «Startup Repair» in the Advanced Settings window to fix boot issues.
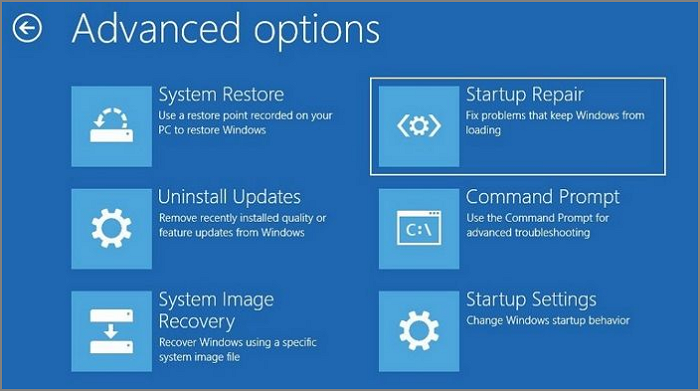
Check to see whether the problem is now resolved.
Solution 5. Run SFC to Repair the Boot File
Use the SFC command to deal with faulty boot files and resolve the «Default Boot Device Missing or Boot Failed» problem if Startup Repair fails.
Follow these steps:
Step 1. Start Windows using the installation CD or DVD, choose «Repair your computer,» then «Troubleshoot,» and finally, «Command Prompt.»
Step 2. Run the «sfc /scannow /offbootdir=c: /offwindir=c:windows» command.
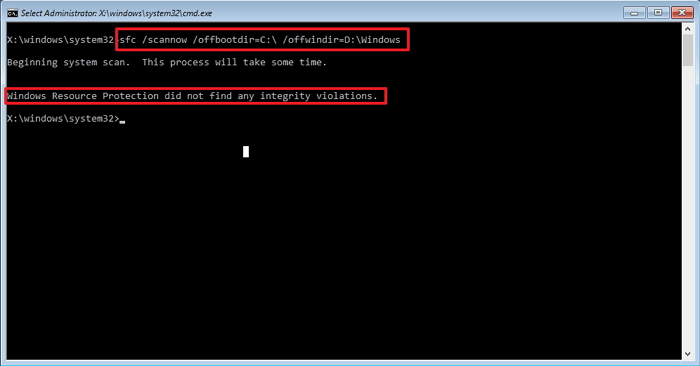
If this solution doesn’t work for you, try the next one.
Solution 6. Wipe the Hard Disk and Reinstall the Operating System
To reclaim control of your system, you must discover a long-lasting solution to the «Default Boot Device Missing or Boot Failed» problem. Any underlying problems causing the boot failure can be resolved by deleting unnecessary files and starting afresh.
EaseUS Partition Master can maximize your system’s performance and easily handle any boot-related issues. To ensure that no partition data can be recovered, its «Wipe Partition» option permanently deletes all partition data.
Here are the steps you need to follow:
We’ve set two options for you to wipe data. Choose the one you need.
Option 1. Wipe Partition
- Right-click the partition you want to erase data from, and choose «Wipe».
- In the new window, set the time for which you want to wipe your partition, then click «OK».
- Click the «Execute 1 Task(s)» button in the lower right corner, check the changes, then click «Apply».
Option 2. Wipe Disk
- Select the HDD/SSD. And right-click to choose «Wipe Disk».
- Set the number of times to wipe data. (You can set to 10 at most.) Then Click «OK».
- Click «Execute 1 Task(s)» and then click «Apply».
After erasing the hard disk, you can reinstall the operating system.
Further Reading:
Why the Default Boot Device Missing or Boot Failed?
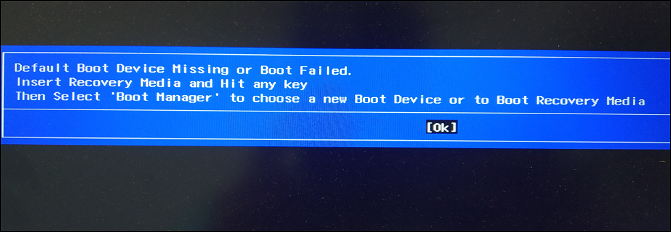
Various users have expressed frustration that their computers won’t boot when they turn them on. Instead, their Windows device shows a blue «Default Boot Device Missing or Boot Failed» screen. When a computer or laptop cannot locate or load the Windows boot files, it will display this error.
If you’re one of those dealing with this annoying issue, you need to be aware of the causes listed below:
- Incorrect boot order or sequence.
- Incorrect BIOS configuration.
- Hard drives malfunction.
- Damaged or missing boot files.
- Issue with the Boot Configuration Data (BCD) or Master Boot Record (MBR).
- Broken or disconnected data cables.
- Wrong updates or upgrades to the operating system.
Whatever your reason for that startup error, you can find the right solution in this article. If you found this guide helpful, you can click the social buttons below to share it with others in need.
Conclusion
Congratulations! Now that you are prepared, you can deal with the frustrating «Default Boot Device Missing or Boot Failed» issue. The Rebuild MBR function of EaseUS Partition Master has distinguished itself as a trustworthy ally in dealing with boot-related problems among these potent tools.
This user-friendly companion makes disk and partition administration simple, enabling you to quickly return your device to uninterrupted functioning.
So why do you still wait? With confidence in EaseUS Partition Master’s capacity to help you on your computing journey, embrace these solutions easily and solve the «Default Boot Device Missing or Boot Failed» error.
FAQs About Default Boot Device Missing or Boot Failed.
Have any further questions? Don’t look elsewhere! Here are some FAQs for your reference:
1. How to fix the default boot device missing or boot failed on a Lenovo laptop?
You can use BIOS settings for this.
Step 1. Reboot and access BIOS Setup (F1/F2).
Step 2. Verify the correct boot hard drive under the Main menu.
Step 3. Set it as the first boot option under the Boot menu.
Step 4. Choose Legacy or UEFI boot mode.
Step 5. Save changes and exit (F10).
Restart your laptop, and the issue should be resolved.
2. What causes the boot errors on a laptop?
Incorrect boot sequences, BIOS settings, failed hard drives, missing boot files, and problems with the Master Boot Record (MBR) or Boot Configuration Data (BCD) are all possible causes of boot faults.
3. How to fix the boot manager on a laptop?
You can use Windows Startup Repair:
Step 1. Start Windows using the installation disk.
Step 2. Select «Repair your computer,» followed by «Troubleshoot,» and then «Startup Repair.»
Step 3. To have Windows try an automated repair, follow the instructions on the screen.
Установка Windows при помощи дистрибутива, записанного на съемные носители в виде USB-флешек, обычно проблем не вызывает даже у самого неподготовленного пользователя. Однако иногда можно встретить ситуации, когда на экране появляется сообщение о том, что загрузка вроде бы стартует, но через некоторое время выдается уведомление о невозможности выполнения такого действия (Boot Failed). При загрузке с флешки такая ситуация может возникать по нескольким причинам. Что это за причины, и каковы основные методы устранения сбоев подобного рода, читайте далее.
Boot Failed при загрузке с флешки: в чем причина появления сбоя?
Причин, вызывающих невозможность старта загрузчика, может быть достаточно много, но в основном сбои при попытке загрузки со съемного накопителя происходят по вине того, что:
- флешка содержит неподдерживаемую файловую систему;
- в настройках первичной системы указан некорректный тип загрузки;
- накопитель поврежден;
- на носителе повреждены или отсутствуют необходимые для загрузки файлы.
Вирусы в расчет не берем, поскольку на загрузку с носителя они, как правило, не оказывают никакого действия, если только они уже не обосновались на флешке и не оказали на нее пагубного воздействия.
Ошибка Boot Failed: проблема неправильного форматирования носителя
Итак, основной проблемой возникновения сбоев при старте со съемных накопителей считается неправильно выполненное предварительное форматирование, когда пользователь создавал носитель самостоятельно (например, с использованием инструментария командной строки), а не в какой-то автоматизированной программе. Если у вас появляется ошибка Boot Failed при загрузке с флешки, необходимо обратить внимание на ее формат.
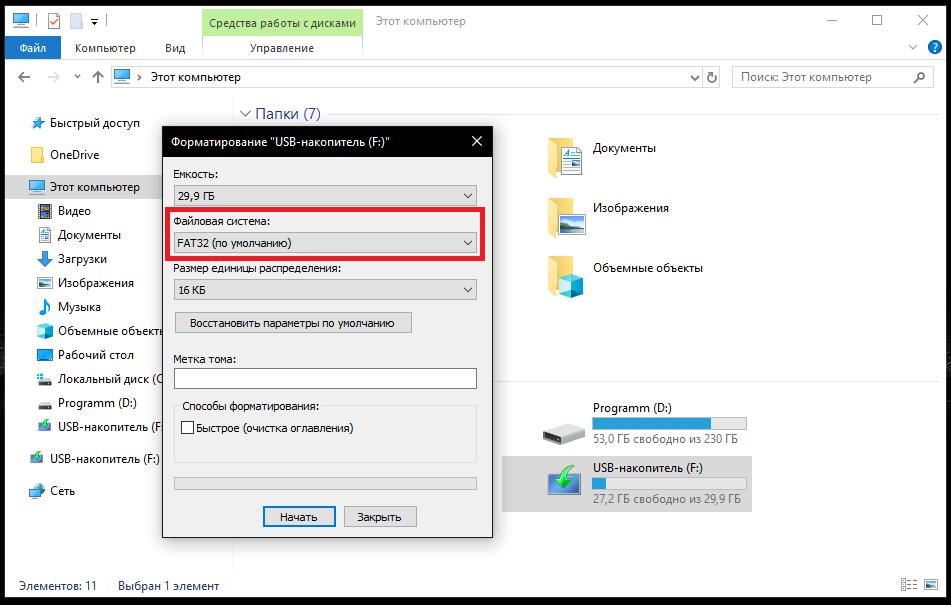
Важно понимать, что в случае наличия на компьютере или ноутбуке первичной системы UEFI носитель в обязательном порядке должен быть отформатирован в FAT32, и использовать файловую структуру NTFS нельзя ни под каким предлогом. Точно так же и наоборот. Если у вас есть дистрибутив с 64-битной Windows 7, загрузку с флешки для первичной системы BIOS желательно производить с файловой системой NTFS.
Изменение параметров первичной системы ввода/вывода
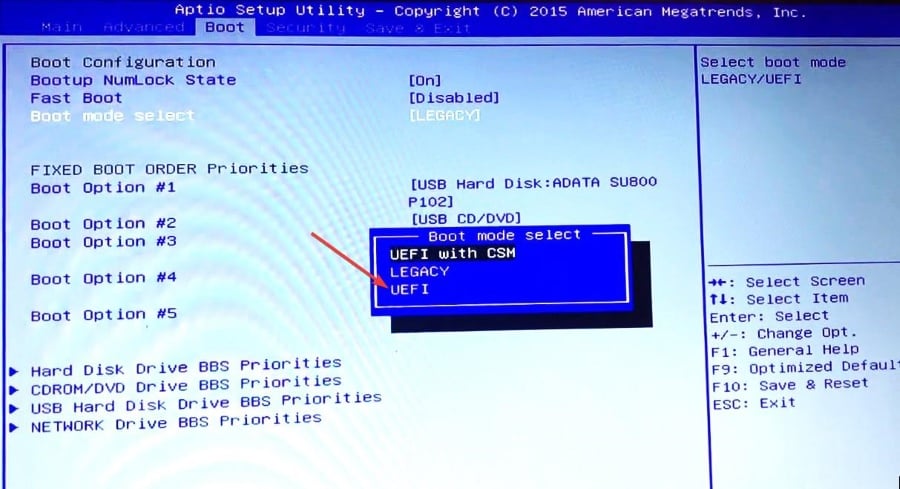
Впрочем, не исключается и то, что в самой первичной системе некоторые важные параметры, влияющие на распознавание съемного устройства и старт с использованием загрузчика, который на нем записан, установлены неправильно. Чаще всего ошибка Boot Failed при загрузке с флешки появляется именно при использовании первичных систем BIOS, в которых некорректно выставлен режим загрузки (Boot). Его следует попытаться изменить.
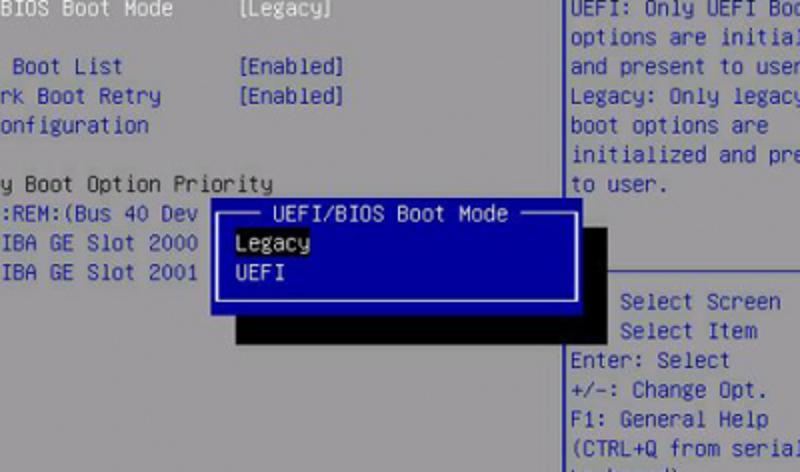
Если старт не происходит в режиме UEFI, смените его на Legacy и наоборот. По завершении действий с настройками не забудьте выставить флешку первой в списке используемых для загрузки устройств и сохранить измененные опции при выходе.
Некорректно созданный или поврежденный носитель
Вполне возможно, что старт со съемного устройства оказывается невозможным только из-за того, что присутствующие на носителе файлы повреждены.

В такой ситуации наилучшим решением станет повторная запись информации на накопитель, но использовать для этого лучше всего автоматизированную утилиту Rufus, которая при выборе пользователем записываемого образа с дистрибутивом или средой восстановления определит требуемый тип форматирования.
Кроме того, совершенно естественно выглядит ситуация, когда и сама флешка может быть банально повреждена или оказаться нерабочей. Перед записью и использованием носитель необходимо проверить в работающей системе, а при выявлении проблем произвести, например, восстановление работы контроллеров, используя для этого утилиты от производителя устройства или универсальные программы наподобие D-Soft Flash Doctor. Если даже с их применением результат окажется нулевым, в качестве кардинальной меры можете выполнить низкоуровневое форматирование, которое позволит привести носитель, так сказать, в заводское состояние.
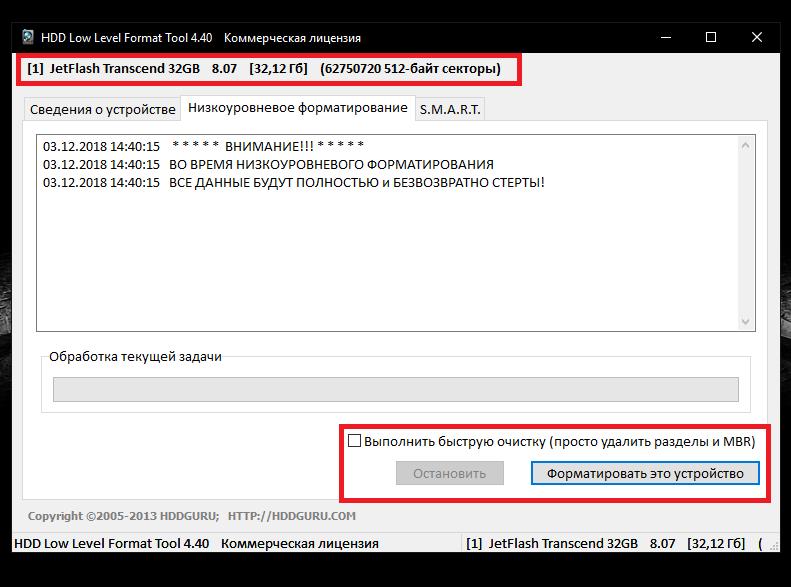
Для выполнения таких операций максимально эффективной оказывается программа HDD LLFT, в которой процесс форматирования занимает всего лишь пару минут.
Другие причины
Это были основные проблемы, которые можно встретить при попытке старта со съемного носителя. Однако не стоит забывать и о самих файлах образов, которые вы пытаетесь записать на флешку. В случае загрузки их с неофициальных ресурсов в Интернете или при использовании каких-то кастомных сборок часто можно наблюдать отсутствие некоторых важных компонентов, отвечающих за корректный запуск загрузчика. В этом случае при загрузке будет сообщено, что компонент не найден. Поэтому скачивайте файлы только из проверенных источников, но даже загруженные объекты иногда не помешает просканировать на предмет наличия потенциальных угроз.
Примечание: если в первичной системе активирована функция безопасной загрузки (Secure Boot), иногда ее бывает необходимо отключить (если это возможно).
Make sure you disconnect any USB device before starting your PC
by Loredana Harsana
Loredana is a passionate writer with a keen interest in PC software and technology. She started off writing about mobile phones back when Samsung Galaxy S II was… read more
Updated on
- The default boot device missing or boot failed error signifies that your computer is unable to locate a device to boot from.
- This can happen due to problems like incorrect boot sequence, misconfigured BIOS, and damaged boot files.
- Alter the BIOS settings and activate the primary partition to resolve the default boot device missing or boot failed error on Levono and Acer laptops.
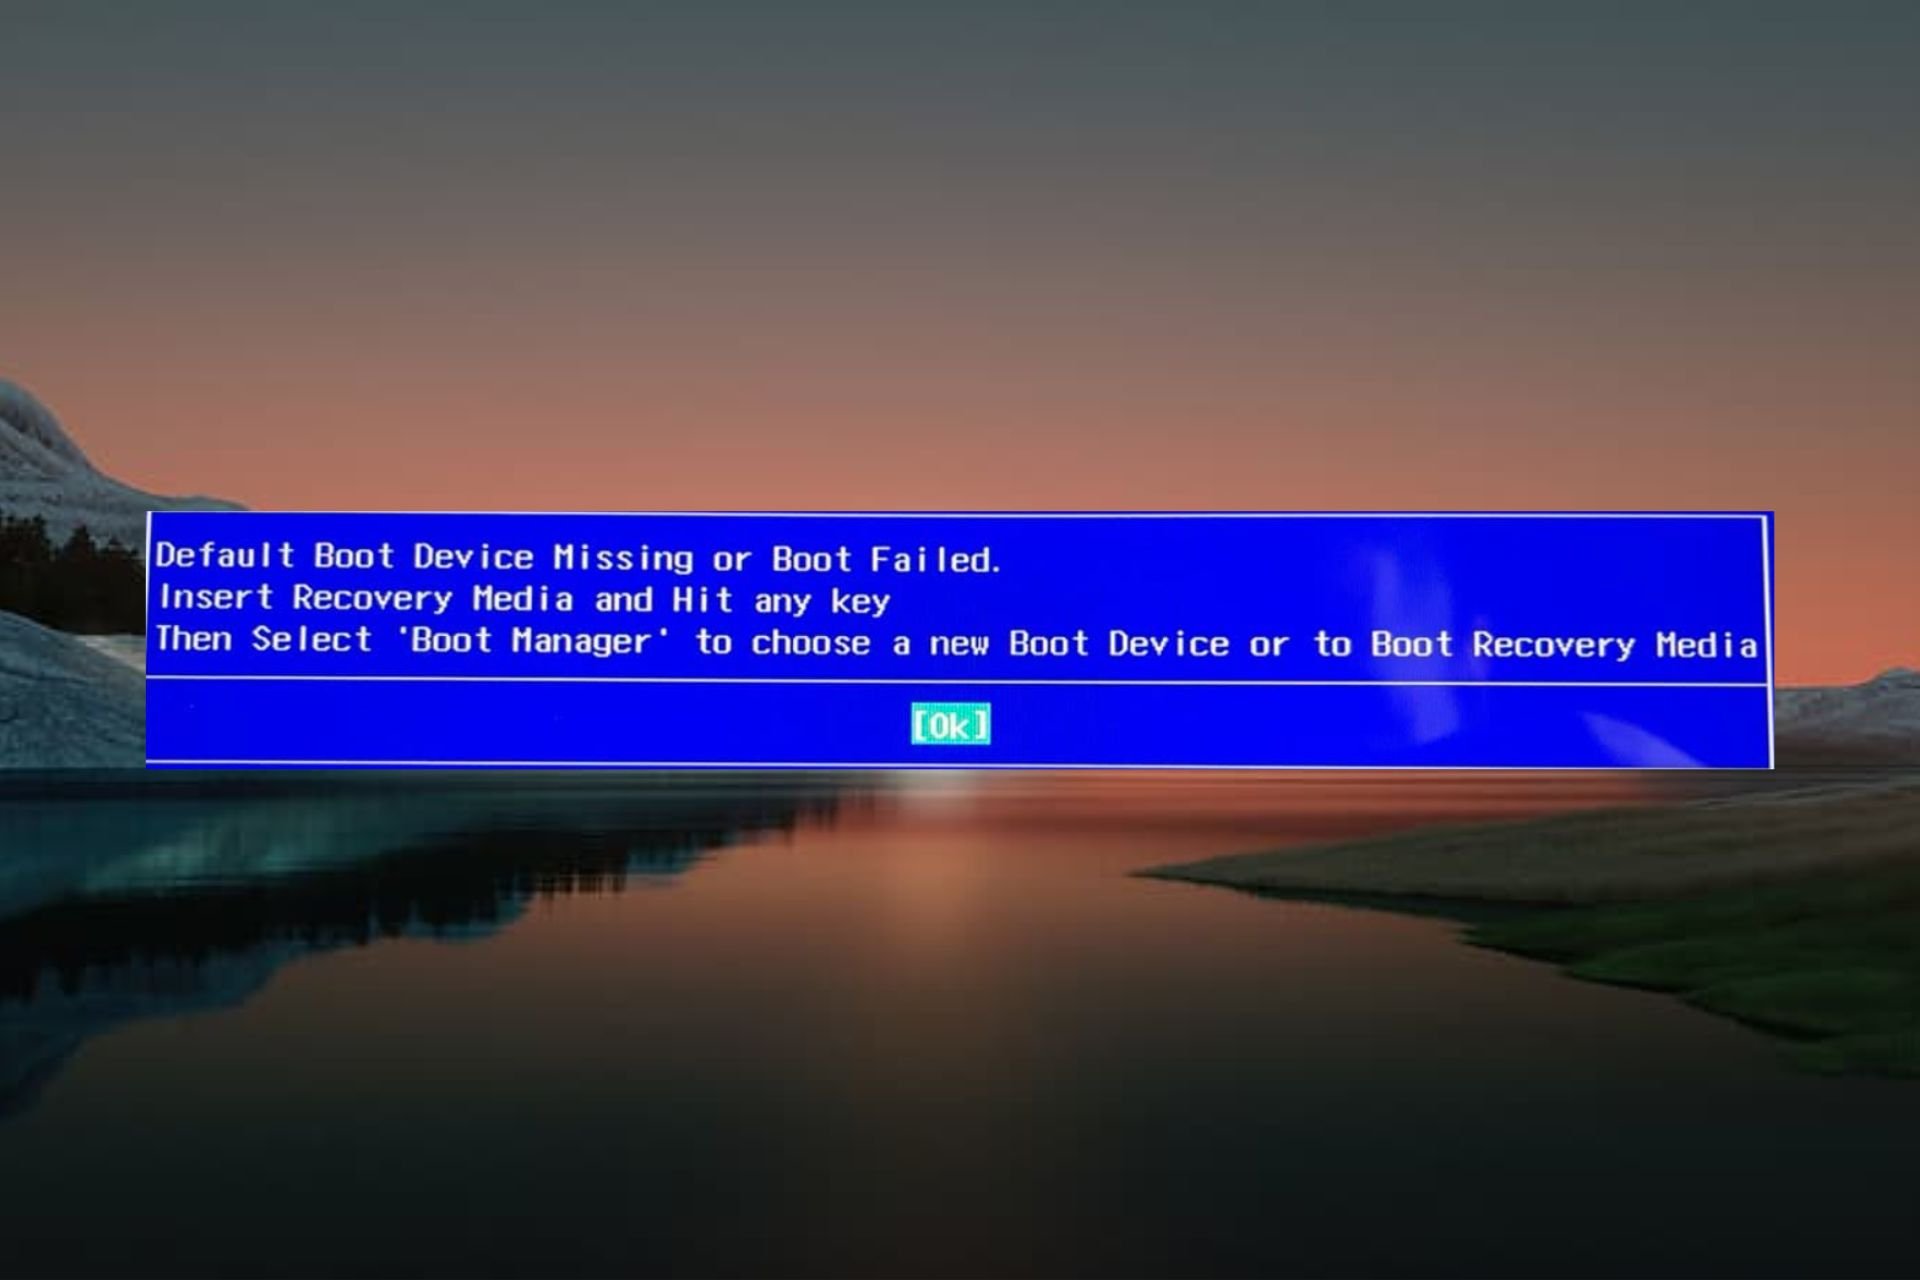
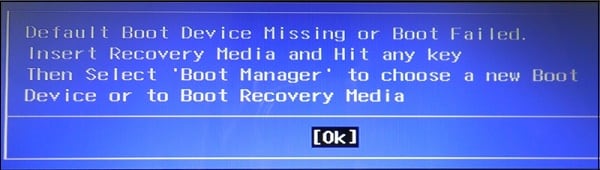
When the Lenovo or Acer laptop cannot detect the boot device on startup, it displays the Default Boot Device Missing or Boot Failed. Insert Recovery Media and Hit any key, Then Select Boot Manager to choose a new Boot Device or to Boot Recovery Media message instead of the startup screen.
If you are encountering this error on your PC, follow this guide to fix it.
What causes the default boot device missing or boot failed error?
If you see the default boot device missing or boot failed error during system boot, one or more of the following is likely to be the cause:
- SATA cable – Defective or broken SATA cables cannot set up a successful connection.
- Power supply – Insufficient power supply is a prevalent reason that can also set off several errors like the one at hand.
- Incorrect boot sequence or boot order – If the BIOS settings are incorrect, the default boot device missing error is inevitable.
- Inactive primary partition – If the primary boot partition is inactive, you may face the cause of the default boot device missing or boot failed error on Lenovo/Acer laptops.
- Unsupported hard disk drive – A defective, unsupported, or corrupt hard drive can also trigger this error. You can employ health check software to identify if there is a problem with HDD.
Fortunately, you can fix the non-bootable Lenovo/Acer device by implementing the reliable fixes below.
How we test, review and rate?
We have worked for the past 6 months on building a new review system on how we produce content. Using it, we have subsequently redone most of our articles to provide actual hands-on expertise on the guides we made.
For more details you can read how we test, review, and rate at WindowsReport.
How do I fix the default boot device missing error in Lenovo/Acer?
Before employing the methods listed below:
- Be mindful to disconnect any USB media from your PC. This is essential because, in such a scenario, your system will boot from the USB instead of the boot drive.
1. Change Boot Order and Boot Mode
- Restart your computer and immediately press the F10 or F12 key to access the BIOS settings.
- Navigate to the Boot menu in the Boot Setup window and check whether the Boot Hard Drive is detected. If yes, then set it as the priority using arrow keys.

- Next, select Boot Mode and set it as UEFI instead of LEGACY.

- After this, press F10 to save changes, exit BIOS and reboot your PC normally.
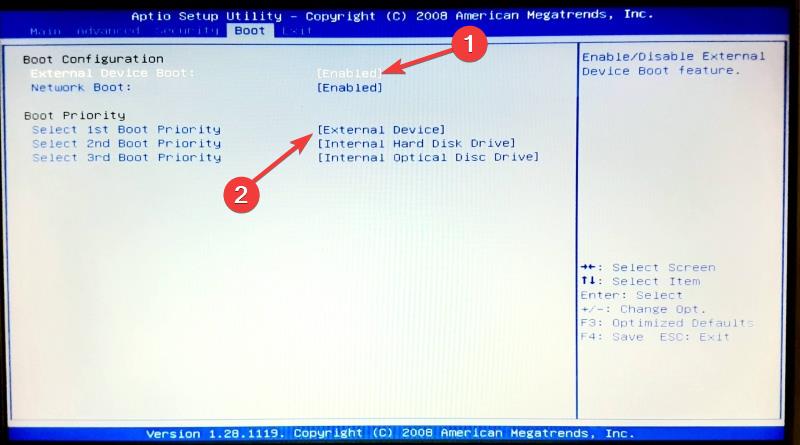
Incorrect boot order and boot mode prevent Windows from booting successfully. Changing the BIOS settings can resolve this startup error in Lenovo and Acer devices.
2. Activate the primary partition
- Boot your PC from the Windows installation media. If you don’t have one, refer to this guide to create Windows Installation Media with UEFI support.
- Select Repair your computer from the next screen.

- Next, select Troubleshoot.

- Choose Command Prompt from the Advanced options window.
- Type or paste the following commands one by one and press the Enter key.
diskpart
list disk
select disk 0
list partition
select partition 1
active
- When the current partition is marked as active, exit the command prompt window.


It is essential to set the primary partition as active otherwise, you will get the default boot device missing or boot failed error upon startup. You can also refer to this guide to rebuild the boot partition on Windows.
- Fix: Monitor is Stuck at 60Hz on Windows 11
- How to Type Accents on Windows 11
3. Run Startup Repair
- Insert the Installation media and boot your PC.
- Provide the necessary information and press the Next button.
- Select the Repair your computer option from the next screen.
- Next, choose Troubleshoot.
- Select Advanced options.

- Choose the Startup Repair option from the Advanced options window.


Now Startup Repair will scan your PC to diagnose the problem and resolve it. When the repair is completed, restart your computer, and hopefully, you will no longer get the default boot device missing or boot failed error.
If you get stuck in an automatic repair loop on Windows, the methods provided in this guide will help you deal with it.
4. Change the Store Controller Mode

NOTE
Changing the Storage controller mode may cause a loss of data. You are advised to back up or clone the disk before attempting this solution.
- Reboot your computer and immediately press the F10 or F12 key to access the BIOS Setup screen.
- Switch to the Storage tab using the right arrow key, select Storage Options using the downward arrow, and press the Enter key.

- Use the arrow key to select SATA Configuration and set Configure SATA as AHCI.

- Finally, press the F10 key to save changes and reboot your PC as you normally would.
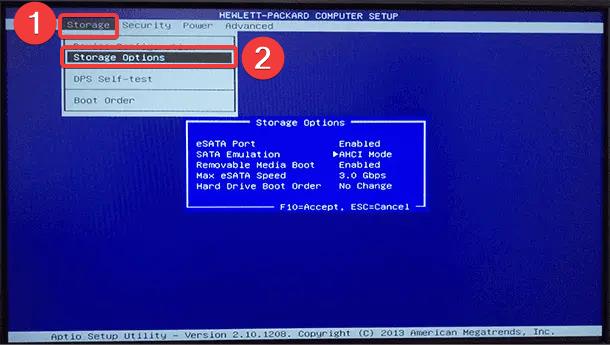
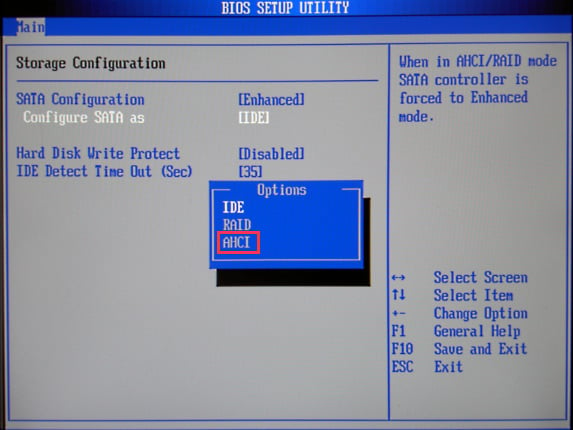
Incorrect SATA emulation settings can cause errors of different sorts, including the default boot device missing or boot failed error during Windows PC startup.
You can try these methods to fix the default boot device missing or boot failed error on Acer/Lenovo laptops and those of other brands. If you get the ACPI BIOS error on Windows PC, try the solutions provided in this guide.
If you have any questions or suggestions, let us know in the comments section below.
![]()