Asus RT-N16 — SOHO роутер 2010 года с гигабитным Ethernet и 802.11N модулем. Роутер основан на Broadcom BCM47xx SOC.
Обратите внимание, что OpenWrt не устанавливаются через Web-интерфейс. Как вариант можно рассмотреть использование для установки OpenWRT из Web-интерфейса DD-WRT или Tomato. Подробную информацию о резервном копировании, прошивке и восстановлении можно прочитать на странице роутера Asus WL-500g, большая часть относится и к RT-N16.
Asus RT-N16 имеет систему отказоустойчивости, как и DLink DIR-600.
Windows
FRU
netsh interface ip set address name=“Local Area Connection” static 192.168.1.2 255.255.255.0
TFTP
Не забудьте вернуть настройки ПК обратно:
netsh interface ip set address name=“Local Area Connection” source=dhcp
Откройте LuCI и начните базовую настройку.
Linux
Ubuntu |
sudo apt-get install tftp |
Fedora |
sudo yum install tftp |
sudo ifconfig eth0 192.168.1.2
tftp 192.168.1.1 |
mode binary |
put openwrt-brcm47xx-squashfs.trx |
Mac
Переведите маршрутизатор в режим восстановления (см. выше).
MacOS имеет встроенный TFTP-клиент, к которому вы можете получить доступ через командную строку/терминал. Вы можете попробовать этот способ и следовать инструкциям для обновления прошивки из Linux.
Либо вы можете найти “Asus” в App Store и загрузить их утилиту восстановления прошивки, которая будет чем-то похожа на Windows и чем-то похожа на Linux по конфигурации интерфейса.
Обновление через веб-интерфейс
Обновление через консоль
Поскольку эта часть одинакова для всех, читайте здесь.
Порты 1-4 для LAN, 0 — для WAN. Обратите внимание, что порты коммутатора противоположны тем, что указаны на устройстве. Например, порт 1 — это LAN4 и т.д. Порт 8 является внутренней связью с процессором. Not sure what happened to 5-7 but it’s assumed they’re just not wired out to anything.
| Порт | VLAN порт |
|---|---|
| Процессор | 8 |
| Интернет (WAN) | 0 |
| LAN 1 | 4 |
| LAN 2 | 3 |
| LAN 3 | 2 |
| LAN 4 | 1 |
Если Вы забыли пароль, испорчен один из стартовых скриптов или поврежден JFFS раздел, то Вы можете попасть в систему через специальный безопасный режим OpenWRT.
Загрузка в безопасном режиме
Что можно делать в безопасном режиме?
Внимание: корневая файловая система безопасного режима — это раздел, смонтированный в режиме ‘только чтение’. Для перехода в нормальный режим запустите mount_root и делайте необходимые изменения. Запустите mount_root теперь.
После окончания работы в безопасном режиме отключите и включите роутер.
Если вы хотите самостоятельно скомпилировать: Target System (Broadcom BCM947xx/953xx) Target Profile (Broadcom SoC, all Ethernet, BCM43xx WiFi (wl, proprietary))
| Архитектура: MIPS |
| Производитель: Broadcom |
| Загрузчик: CFE |
| SOC: Broadcom BCM4718 ( MIPS 74KTM ) |
| Процессор: Broadcom BCM4716 chip rev 1 ( MIPS 74K V4.0 480 MHz ) |
| ПЗУ: MACRONIX MX29GL256EHTI2I-90Q |
| Размер ПЗУ: 32 МБ |
| ОЗУ: 128 МБ |
| Беспроводной адаптер: Broadcom BCM43xx 802.11b/g/n (интегрированный) |
| Сетевой адаптер: Broadcom bcm53115skfbg |
| USB-порт: есть, 2 x 2.0 |
| Serial: есть |
| JTAG: есть |
Если wl0 не управляет WLAN LED, но Wi-Fi работает правильно, то можно попробовать следующий рецепт (взято отсюда):
nvram set sb/1/leddc=0x5A000A |
nvram set wl0gpio7=8 |
nvram commit |
При использовании открытого драйвера brcmsmac включить индикацию светодиодов для Wi-Fi можно, отредактировав файл /etc/config/system :
config led wlan_led
        option name 'WLAN'
        option sysfs 'bcm47xx:blue:wlan'
        option trigger 'netdev'
        option dev 'wlan0'
        option mode 'link tx rx'
Внимание: это аннулирует Вашу гарантию!
Чтобы подключиться к последовательному порту вам нужен PL2303 USB To RS232 TTL адаптер. Например, такой.
Соединять адаптер с разъёмом RT-N16 нужно следующим образом: RX→TX, TX→RX, GND→GND. Vcc не используется. Далее открываете какой-нибудь терминал или его эмулятор, например, PuTTY, и выставляете скорость 115200 baud, передачу данных — 8 bit, no parity (8N1).
Драйвера для windows:
http://www.prolific.com.tw/US/ShowProduct.aspx?p_id=225&pcid=41
Для подключения из windows используйте PuTTY. Номер COM-порта адаптера можно посмотреть в диспетчере устройств.
Для подключения из Linux используйте терминал/эмулятор терминала.
Если после отключения и повторного включения питания маршрутизатор перестал подавать признаки жизни (даже светодиоды не светятся), то, возможно, дело в каком-то отработавшем свой срок службы конденсаторе. Разбираете роутер. Далее ищете конденсаторы недалеко от гнезда питания (см фото). Если среди них есть вздувшиеся, то им необходима замена на конденсаторы соответствующей ёмкости. Номинальная ёмкость конденсатора на фото — 680 мкФ и напряжение — 16В. Но вполне подходит конденсатор на 1000 мкФ и 25 В. После замены вдувшихся конденсаторов маршрутизатор, как правило, начинает работать без каких либо проблем и сброса настроек.


Здравствуйте, мои маленькие любители портативной микроэлектроники. Сегодня мы попробуем приобщить к прекрасному беспроводной роутер Asus RT-N56U — установить на него open source-прошивку OpenWRT.
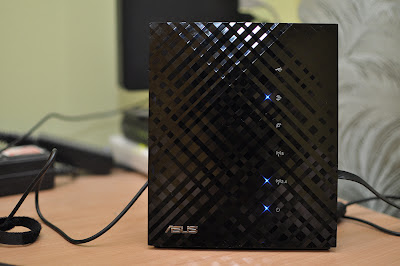 |
| Asus RT-N56U aka Black Diamond. |
Данный маршрутизатор на текущий момент является одним из флагманов среди устройств для домашнего пользования. Судите сами: обладая 500 МГц процессором, 128 Мб ОЗУ, пятью (4 LAN + 1 WAN) 1Гб/сек портами, двухдиапазонным WiFi-радиомодулем на 2.4 ГГц и 5ГГц, аппарат может удовлетворить потребности любого самого взыскательного пользователя. Черт, да я на днях выбросил здоровенный девятилетний системник с чуть более мощным процессором и чуть менее объемистой оперативной памятью (тут не будем вдаваться в подробности и сравнивать MIPS и x86). Выглядит роутер тоже очень круто — рифленая поверхность, оригинальный дизайн индикаторов и форма. Если смотреть с левой стороны, кажется, будто корпус вообще плоский.
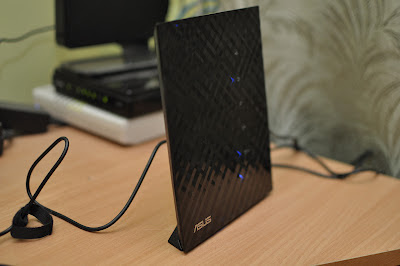 |
| Вид сбоку. |
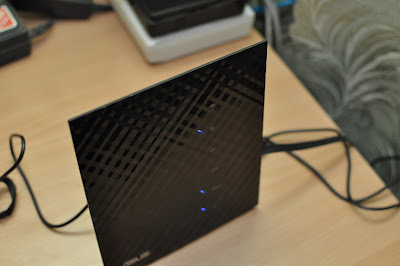 |
| Вид сверху. |
Ну а что же в программном плане? Официальную прошивку оценить не могу, у меня она прожила ровно до того момента, когда я проверил, что аппаратная часть как-то работает. Роутер обладает мощнейшим железом, так почему не попробовать превратить его в домашний мини-сервер? Два USB-порта позволят подключить накопитель и, например, веб-камеру. Можно качать торренты, запустить легкий веб-сервер, VPN-сервер для своих нужд.
И вот мы подходим к основному сюжету сегодняшнего поста. Хороший функциональный сервер можно поднять силами проекта OpenWRT. Это Линукс, урезанный и оптимизированный для установки на маломощные системы. Есть доступ по SSH, есть поддержка бинарных пакетов (opkg) наподобие того же apt. Есть опциональный GUI. В общем, проект очень интересный. Предвосхищая развязку, скажу, что до конца прошивку завести я не смог. Итак, с чем же я столкнулся, и чему посвятил пару-тройку длинных вечеров? Само собой, для всех манипуляций понадобится установленный Линукс, в нем все делается легко и непринужденно.
- Поддержка самого устройства чуть более чем никакая. В тамошней вики есть посвященная модели крайне немногословная страничка. Но это ладно, нас больше должно интересовать, насколько хорошо поддерживается чипсет, что обеспечивает функции устройства.
- Заливать прошивку напрямую через tftp сначала не вышло. Совершенно случайно выяснилось, что нужно а) выключить роутер, б) запустить заливку, в) включить роутер, удерживая кнопку reset на задней панели. Сразу после старта в таком режиме роутер начинает медленно мигать индикатором питания и ненадолго открывает «окно», в которое и надо толкать прошивку. В репозитории OpenWRT есть скрипт trunk/scripts/flashing/flash.sh, которому нужно первым параметром передать путь к прошивке, а вторым — слово «asus», чтобы инициировать специальный механизм опроса. Такой же механизм используется официальной утилитой Asus Firmware Restoration: хост, на котором запущено приложение, пытается скачать спецпакет с 192.168.1.1, и если адрес откликнулся, отправляет ему прошивку. Хосту нужно предварительно выставить адрес, например, 192.168.1.2. В общем, скрипт облегчает процесс.
- Заставить работать USB не вышло тоже. Сначала. Даже если установить все необходимые модули ядра, при втыкании флешки в выводе logread царит тишина. Оказалось, что есть некоторое количество патчей, которые не применяются ни при make menuconfig, ни при make. Нужно запустить make kernel_menuconfig, патчи применятся, появится окно для конфигурирования Linux-ядра, которое можно тут же и закрыть.
- А вот запустить радиомодуль не получилось совсем. Режим на 5 ГГц (mode=11na в /etc/config/wireless) не запускался вообще, мотивируя отсутствием поддержки со стороны драйвера. Ну это скучно, а вот с режимом 2.4 ГГц было много интереснее. hostapd запускался абсолютно без ошибок и бодро рапортовал о поднятии точки доступа. Которую не видело ни одно устройство. Внимание мое привлекло txpower=0dBm в выводе iwconfig. Оказалось, ребята сломали инициализацию мощности передатчика. Вот человек предлагает решать эту проблему, даже предлагает патчи, но дело не двигается. Мол, лучше не будем делать никак, чтоб ни у кого не работало, чем сделаем плохо, но чтоб заработало хоть как-то. Феерично, в общем. Патч из первого сообщения по вышеуказанной ссылке я применил, слегка видоизменив: вместо максимальной мощности поставил фиксированные 20 дБ. Вывод iw list показал, что да, теперь с мощностью порядок. Но вот точка доступа так нигде и не появилась. Я перепробовал разные комбинации параметров disabled и hidden в конфиге, разные режимы, разные каналы — ничего не помогло. Ну а без WiFi такой роутер вовсе не нужен.
Итого, Asus нынче не торт. Разочаровал. Надо было брать Netgear WNDR3800, поддержка для коего несравнимо лучше (3700 в ссылке не опечатка, 3800 — это та же модель, но с увеличенными вдвое объемами flash- и оперативной памяти). Замены домашнему Debian-x86 серверу пока не получилось. Поставил популярную прошивку от Padavan и думаю, куда двигаться дальше.
Вообще, заметил, что ковыряться со всякими железками стало уже не так интересно-увлекательно, как раньше. Иногда хочется просто, чтоб оно поскорей заработало. Наверное, так и рождаются маколюбы…
…зато в комплекте, чтобы не было особенно обидно, идет совершенно волшебный черный плоский (!) ethernet-кабель.
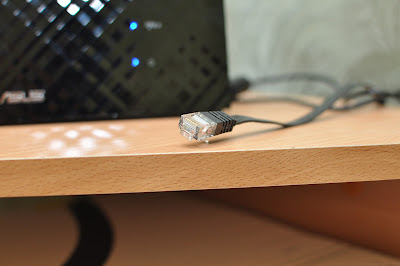 |
| Внезапно — плоский ethernet-кабель. |
Актуализация прошивки роутера Asus может значительно улучшить его функциональность и безопасность. Однако стандартная прошивка не всегда обеспечивает все необходимые возможности. В таких случаях многие пользователи обращаются к OpenWRT — свободной операционной системе, специально разработанной для беспроводных маршрутизаторов и точек доступа.
OpenWRT предлагает более широкий спектр функций, улучшенную гибкость конфигурации и, возможно, возможность управления веб-интерфейсом. Это открытая прошивка, которую разрабатывает сообщество и постоянно обновляет. Установка OpenWRT может быть небольшим вызовом, но следуя подробной инструкции и советам, вы сможете успешно настроить свой роутер Asus.
Перед тем, как начать процесс, важно отметить, что установка OpenWRT может изменить настройки вашего роутера и потребует определенных навыков в сетевой конфигурации. Будьте внимательны при выполнении инструкций и сохраните резервные копии важных данных перед началом процесса.
Содержание
- Прошивка OpenWRT на роутер Asus
- Подробная инструкция:
- Шаг 1: Подготовка
- Шаг 2: Установка прошивки OpenWRT
- Шаг 3: Настройка и использование OpenWRT
- Полезные советы
Прошивка OpenWRT на роутер Asus
Процесс прошивки OpenWRT на роутер Asus весьма прост и не требует особых навыков. Вам понадобятся следующие инструменты и материалы:
| Инструменты | Материалы |
|---|---|
| Компьютер или ноутбук | Роутер Asus |
| Кабель Ethernet | OpenWRT-прошивка |
| Программа PuTTY или аналогичная | Ноутбук или компьютер с доступом в Интернет |
Вам необходимо скачать OpenWRT-прошивку для вашей модели роутера Asus. Это можно сделать на официальном сайте проекта OpenWRT. Найдите нужную прошивку, загрузите ее на компьютер или ноутбук.
Подключите роутер Asus к компьютеру с помощью кабеля Ethernet. Убедитесь, что у вас есть доступ к Интернету.
Запустите программу PuTTY на компьютере и введите IP-адрес вашего роутера Asus для подключения. Если IP-адрес устройства неизвестен, вы можете узнать его, подключившись к роутеру через командную строку вашей операционной системы и введя команду «ipconfig» или «ifconfig».
В окне PuTTY введите логин и пароль для доступа к управлению роутером. Обычно логин – «root», пароль – «admin». Если вы не меняли эти данные, оставьте поля пустыми и нажмите Enter.
После успешного подключения к роутеру введите следующую команду для установки OpenWRT-прошивки:
«opkg update && opkg install luci»
Процесс установки может занять некоторое время. После его завершения введите команду «reboot», чтобы перезагрузить роутер.
После перезагрузки роутера вам станет доступен веб-интерфейс управления OpenWRT. Введите IP-адрес роутера в адресную строку браузера и нажмите Enter.
Теперь вы можете начать настройку OpenWRT и использовать его возможности по своему усмотрению. При необходимости вы всегда сможете вернуться к оригинальной прошивке от Asus.
Прошивка OpenWRT на роутер Asus – отличный способ расширить возможности вашего устройства и получить больше контроля над сетью. Следуя нашей инструкции, вы без проблем сможете установить OpenWRT на свой роутер Asus и наслаждаться новыми функциями и настройками.
Подробная инструкция:
Шаг 1: Подготовка
Перед установкой OpenWRT важно выполнить некоторые подготовительные шаги:
- Ознакомьтесь с поддерживаемыми моделями роутеров Asus и выберите подходящую прошивку OpenWRT.
- Скопируйте все важные данные с роутера, так как процесс установки прошивки потребует полного сброса настроек.
- Удалите все подключенные устройства к роутеру и отключите его от сети.
Шаг 2: Установка прошивки OpenWRT
Теперь перейдем к установке OpenWRT на ваш роутер Asus:
- Загрузите прошивку OpenWRT для вашей модели роутера с официального сайта OpenWRT.
- Подключите компьютер к роутеру с помощью Ethernet-кабеля.
- Откройте веб-интерфейс роутера в браузере, введя IP-адрес роутера (обычно 192.168.1.1) в адресную строку.
- Войдите в веб-интерфейс, используя логин и пароль по умолчанию (обычно admin/admin).
- Перейдите в раздел «Обновление ПО» или «Мaintenance» и выберите загруженный файл прошивки OpenWRT.
- Начните процесс установки прошивки и дождитесь его завершения.
Шаг 3: Настройка и использование OpenWRT
Поздравляем! Теперь ваш роутер Asus работает под управлением прошивки OpenWRT. Вот несколько полезных советов по настройке и использованию OpenWRT:
- Изучите документацию по OpenWRT, чтобы понять все возможности данной прошивки.
- Настройте безопасность вашей сети, включив защиту паролем на вход в веб-интерфейс и настройками файрволла.
- Установите необходимые пакеты и расширения для вашего роутера, чтобы получить дополнительные функции.
- Используйте встроенные инструменты мониторинга сети, чтобы отслеживать использование ресурсов и производительность вашей сети.
Теперь у вас есть все необходимые знания, чтобы успешно прошить ваш роутер Asus с помощью OpenWRT. Удачи в использовании новых возможностей и функций, которые открывает перед вами данная прошивка!
Полезные советы
При прошивке роутера Asus на OpenWRT есть несколько полезных советов, которые помогут вам успешно выполнить эту задачу:
| 1. | Перед началом прошивки, обязательно создайте резервную копию текущей конфигурации роутера. В случае возникновения проблем, вы сможете быстро восстановить прежние настройки. |
| 2. | Перед установкой OpenWRT, проверьте совместимость выбранной прошивки с вашей моделью роутера Asus. Неправильная прошивка может привести к неработоспособности устройства. |
| 3. | Помните, что прошивка OpenWRT полностью заменяет оригинальную прошивку вашего роутера. Если вы планируете вернуться к оригинальной прошивке в будущем, убедитесь, что вы имеете альтернативный способ восстановления. |
| 4. | Перед прошивкой, внимательно ознакомьтесь с документацией OpenWRT и инструкцией прошивки, чтобы не допустить ошибок. При необходимости, обратитесь за помощью к сообществу OpenWRT. |
| 5. | Убедитесь, что ваш роутер подключен к источнику питания и стабильной сети. Не отключайте роутер и не разрывайте соединение в процессе прошивки, чтобы избежать повреждения устройства. |
| 6. | После прошивки, рекомендуется выполнить сброс настроек роутера до заводских значений и настроить его заново, чтобы избежать конфликтов и проблем. |
| 7. | Не забывайте про регулярные обновления прошивки OpenWRT. В новых версиях могут быть исправлены ошибки, повышена производительность и добавлены новые функции. |
Следуя этим полезным советам, вы сможете успешно прошить роутер Asus на OpenWRT и наслаждаться всеми преимуществами этой прошивки.
Installing OpenWrt on your Asus RT n56u router is an easy process that can be done in just a few steps. All you need is a computer with an internet connection, a TFTP client, and the latest version of OpenWrt.
Before you get started, make sure your router is powered off and all cords are disconnected from it. You will also need to know the IP address of your router which can usually be found in the router’s settings.
Step 1: Download OpenWrt
The first step to installing OpenWrt is to download the latest version of the firmware from OpenWrt’s website. Make sure to download the correct version for your router model.
Step 2: Set up TFTP
Next, you need to set up a TFTP server on your computer. This is a server program that will allow your router to connect and download the new firmware. If you are using Windows, we recommend using Tftpd32, which can be downloaded for free. Once you have installed the program, open it and enter the IP address of your router in the “Host IP” field. Then click “Start”.
Step 3: Upload Firmware
Now that you have your TFTP server set up, you can upload the OpenWrt firmware to your router. To do this, open a command prompt and type “tftp -i [router IP] put [path to firmware]” (without quotes). Replace [router IP] with the IP address of your router and [path to firmware] with the path to the OpenWrt firmware file you downloaded earlier. Once this is done, the firmware will be uploaded to your router.
Step 4: Install Firmware
The last step is to install the firmware on your router. To do this, open a web browser and type in the IP address of your router. Then log in with the username and password (usually admin). Once logged in, go to the “Administration” tab and click “Firmware Upgrade”. Select the OpenWrt file you uploaded earlier and click “Upgrade”. The installation process may take a few minutes but once it’s finished, you should be able to access your new OpenWrt-powered router.
How to install Padavan firmware on ASUS RT n56u
Installing Padavan firmware on ASUS RT n56u router is a great way to get the most out of your router. Padavan firmware is an open-source alternative to the stock firmware that comes with your router, and it offers many more features and customization options. In this guide, we’ll show you how to install Padavan firmware on your ASUS RT n56u router.
Before You Begin
Before you begin installing the Padavan firmware, there are a few things you should do first:
1. Make sure your ASUS RT n56u router is up to date with the latest firmware from ASUS. You can download the latest firmware from the ASUS Support website.
2. Download the latest version of the Padavan firmware from the official Padavan website.
3. Disable any firewall or antivirus software that may be running on your computer, as these can interfere with the installation process.
4. Back up any settings you want to preserve from your current firmware, as they will not be preserved when installing Padavan.
Installing Padavan Firmware on Your Router
Now that you have all of the necessary files and settings ready, it’s time to install the Padavan firmware on your ASUS RT n56u router. Here’s what you need to do:
1. Connect your computer to your router via an Ethernet cable or wirelessly if you have a wireless connection enabled on your router.
2. Open a web browser and type in your router’s IP address (usually 192.168.1.1) into the address bar and press enter. This will bring up the configuration page for your router.
3. Log in using the username and password for your router (the default for ASUS routers is “admin” for both).
4. Once logged in, go to “Administration” and then “Firmware Upgrade”.
5. On this page, click “Choose File” and select the file of the Padavan firmware that you downloaded earlier from the official website (it should be a .bin file).
6. Once selected, click “Upload” and wait for the file to upload and install onto your router. This may take several minutes so be patient!
7. After the installation is complete, click “Reboot” and wait for your router to restart with the new Padavan firmware installed on it.
8. Once your router has finished rebooting, open a web browser again and type in 192.168.1.1 into the address bar again to access Padavan’s user interface where you can configure and customize it however you like!
Congratulations! You have now successfully installed Padavan firmware on your ASUS RT n56u router! Enjoy all of the
Does ASUS router support RTSP
The answer is yes! ASUS routers are designed with high-end features and a wide range of compatibility. This includes support for Real Time Streaming Protocol (RTSP). RTSP is an important streaming protocol that enables real-time streaming of audio and video over the internet.
ASUS routers are capable of supporting RTSP, allowing users to stream media from a variety of sources, including those on the Internet. This includes streaming from YouTube, Netflix, Hulu, and other popular streaming services. It also allows users to create their own private streams or access streams from other users.
ASUS routers are equipped with powerful hardware and software technologies that make them capable of supporting RTSP streaming. This includes support for 802.11ac Wi-Fi technology, which provides fast speeds for streaming media content. The routers also have advanced network security features including firewalls and VPNs to protect data in transit. Additionally, many ASUS routers come with a built-in USB port for connecting external storage devices, allowing users to stream media from their own personal collection.
In order to use RTSP with an ASUS router, users must first setup the router correctly. This includes setting up the wireless network, configuring the router’s settings correctly, and installing compatible firmware. Once this is done, users can then use the RTSP protocol to stream content across their network.
In conclusion, ASUS routers are capable of supporting Real Time Streaming Protocol (RTSP), allowing users to stream media from a variety of sources. To get started with RTSP streaming on an ASUS router, users must first set up the router correctly and install compatible firmware before they can begin streaming content across their network.
Which is better ONVIF or RTSP
ONVIF and RTSP are both communication protocols used in the surveillance industry. While they may seem similar on the surface, they serve different purposes and offer different advantages. It’s important to understand the differences between them in order to make the best choice for your system.
ONVIF stands for Open Network Video Interface Forum and is a global standard for interfacing with IP-based security systems. It provides a standardized method for communicating between IP-based security products from different manufacturers. This means that any device that is ONVIF compliant can communicate with another ONVIF compliant device, regardless of its manufacturer. This makes it much easier for users to integrate multiple devices into one system and get them all to work together harmoniously.
RTSP stands for Real Time Streaming Protocol and is used mainly as a way to stream audio and video data over a network. It is an application level protocol designed to control streaming media servers, such as VLC or QuickTime. RTSP allows clients such as media players to issue commands, such as play, pause, fast-forward, rewind, etc., to the streaming server. This is especially useful when it comes to providing video streams to multiple users at once, as each user can be given their own set of instructions.
When it comes down to choosing between ONVIF and RTSP, it really depends on what you need from your security system. If you’re looking for an easy way to integrate multiple devices from different manufacturers into one system, then ONVIF is definitely the better choice. However, if you’re looking for a way to stream audio and video data over a network, then RTSP is probably better suited for your needs. Ultimately, it’s best to consider your individual requirements before making a decision.
Which is better RTSP or RTMP
When it comes to streaming live video, the choice between RTSP (Real-Time Streaming Protocol) and RTMP (Real-Time Messaging Protocol) often comes up. Both protocols have their own advantages and disadvantages, so which one is better?
In general, RTSP is more suited for streaming live video, while RTMP is better for streaming pre-recorded video files. This is because RTSP has lower latency than RTMP and can support real-time streaming with minimal buffering. RTSP also supports adaptive bitrate streaming, meaning that the video quality can be adjusted automatically depending on the available bandwidth.
However, RTMP has its own advantages over RTSP. It is much easier to set up and configure than RTSP, making it popular for streaming pre-recorded videos or audio. Furthermore, it supports multiple file types including .flv, .swf and .mp4, allowing for a wider range of content to be streamed. Additionally, it has a higher data throughput rate than RTSP, allowing for larger video files to be streamed.
Ultimately, the best protocol depends on the use case. If you need to stream live video with low latency and adaptive bitrate streaming, then RTSP is the better choice. However, if you need to stream pre-recorded videos or audio with high data throughput rates then RTMP is the better option.
Is RTSP still used
Real Time Streaming Protocol (RTSP) is a network protocol that enables the delivery of streaming media over IP networks. It was initially developed by RealNetworks in 1996 and has since become an industry standard for streaming multimedia content. RTSP is a widely used protocol for controlling the delivery of audio and video over a network, and it is commonly used in streaming media applications such as VoIP, live streaming, webcasting, and video conferencing.
Despite its age, RTSP is still widely used today as a standard protocol for streaming media across the Internet. It is an important component of many streaming media services, including Apple’s QuickTime Streaming Server (QTSS) and Adobe’s Real-Time Messaging Protocol (RTMP). RTSP is also commonly used to control the delivery of video surveillance recordings from cameras to remote monitoring systems.
In addition to its use in streaming media applications, RTSP has also been adopted by some consumer electronics manufacturers to enable streaming of audio and video content from mobile devices to TVs or other connected devices. For example, Apple’s AirPlay technology uses RTSP to stream music and videos from iOS devices to compatible speakers or TVs. Similarly, Google’s Chromecast technology uses RTSP to stream videos from Android devices to TVs or other connected devices.
Although newer protocols such as WebRTC have been developed which offer improved performance and features, RTSP remains a popular choice for streaming multimedia content due to its wide adoption and compatibility with existing hardware and software solutions. As long as there is a need for streaming multimedia content over IP networks, RTSP will continue to be an important protocol for delivering that content.
What devices use RTSP
Real-time Streaming Protocol (RTSP) is a network control protocol designed for streaming media, such as audio and video, over the Internet. RTSP enables users to control media sessions between the end points of a multimedia session. It allows users to pause, fast-forward, rewind, and control the speed of streaming media.
RTSP is used by many different types of devices, including audio and video players, home automation systems, IP cameras, and other streaming media encoders. Some popular devices that use RTSP include TiVo, Apple TV, Roku, Chromecast, Xbox One, PlayStation 4, and Amazon Fire TV.
For audio streaming, RTSP can be used with Voice over IP (VoIP) systems to enable real-time audio streaming between two or more endpoints. RTSP can also be used with music streaming services like Spotify and Pandora.
For video streaming, RTSP is used with IP cameras to enable remote monitoring and recording of live video feeds. RTSP is also used for streaming live video from drones and other remote sources for surveillance applications.
For home automation applications, RTSP is used to control lights and appliances remotely. For example, many home automation systems use RTSP to allow users to turn on lights from their phones or tablets.
Finally, RTSP is also used in broadcasting applications such as digital signage and digital rights management systems. In these applications, RTSP is used to stream digital content from one device to another.
At some point, you may want to install OpenWrt on your Asus-RT-AX53U router. OpenWrt is an open-source operating system that replaces the f…
At some point, you may want to install OpenWrt on your Asus-RT-AX53U router. OpenWrt is an open-source operating system that replaces the firmware on your router, providing advanced features and better control over your network. However, the installation process can be daunting, especially for those who are not familiar with Linux and networking. In this guide, we will provide you with a step-by-step guide on how to install OpenWrt on Asus-RT-AX53U. We will cover everything from preparing your router to configuring your network.

Before we begin, it is important to note that installing OpenWrt on your router may void your warranty and may also cause issues with your network if not done correctly. Proceed with caution and make sure to follow the instructions carefully.
Preparing Your Router
The first step in installing OpenWrt on your Asus-RT-AX53U router is to prepare your router for the installation process. This involves downloading the necessary files and connecting to your router.
Step 1: Download the OpenWrt Firmware
The first thing you need to do is to download the OpenWrt firmware for your router. Go to the OpenWrt website and download the firmware for your specific router model. Make sure to download the stable release and not the development version. (https://openwrt.org/toh/asus/rt-ax53u)
Step 2: Connect to Your Router
Next, connect your computer to your Asus-RT-AX53U router using an Ethernet cable. Open a web browser and enter the IP address of your router (usually 192.168.50.1) into the address bar. Enter your login credentials to access the router’s settings.
Step 3: Enter the Firmware Upgrade Section
Once you are logged in, navigate to the firmware upgrade section of your router’s settings. This section may be called “Firmware Upgrade,” “System Upgrade,” or “Upgrade.”
Step 4: Flash the OpenWrt Firmware
In the firmware upgrade section, select the OpenWrt firmware file you downloaded earlier and click “Flash.” Wait for the installation process to complete. This may take several minutes, and your router may reboot during the process.
To install OpenWrt on your ASUS RT-AX53U router using SSH, follow these steps:
- Download the OpenWrt firmware file for your router from the OpenWrt website. Be sure to download the file with the correct version number for your router model. (https://openwrt.org/toh/asus/rt-ax53u)
- Connect your computer to the router using an Ethernet cable. Make sure that your computer is set to use a static IP address in the same subnet as your router.
- Launch an SSH client on your computer, such as PuTTY or Terminal.
- Connect to your router using the SSH protocol. The default username is «root» and the default password is «admin»/ if not worked, use the entered credentials upon setting up your router.
- Once you are connected, use the following command to upload the OpenWrt firmware file to the router:
[scp openwrt-VERSION-DEVICE-squashfs-sysupgrade.bin root@192.168.1.1:/tmp/]
Replace «VERSION» and «DEVICE» with the version number and device name of the OpenWrt firmware file you downloaded earlier.
- Once the file has been uploaded, use the following command to install the firmware:
[sysupgrade /tmp/openwrt-VERSION-DEVICE-squashfs-sysupgrade.bin]
- Wait for the firmware installation process to complete. This may take a few minutes.
- Once the installation is complete, you can access the OpenWrt web interface by opening a web browser and navigating to http://192.168.1.1.
Configuring OpenWrt
Now that you have successfully installed OpenWrt on your Asus-RT-AX53U router, it’s time to configure it. This involves setting up the basic network settings and installing additional packages.
Step 1: Connect to Your Router
Connect your computer to your router using an Ethernet cable. Open a web browser and enter the IP address of your router (usually 192.168.1.1) into the address bar. Enter your login credentials to access the router’s settings.
Step 2: Configure Your Network Settings
In the network settings section of your router’s settings, configure your basic network settings. This includes setting up your LAN IP address, subnet mask, and default gateway.
Step 3: Install Additional Packages
OpenWrt comes with a minimal set of packages installed. To add additional packages, navigate to the software section of your router’s settings. Here, you can search for and install additional packages, such as Luci, the OpenWrt web interface.
Step 4: Set Up Firewall and Security
OpenWrt comes with a built-in firewall that you can configure to enhance the security of your network. Navigate to the firewall section of your router’s settings to configure the firewall rules and settings.
Installing OpenWrt on your Asus-RT-AX53U router can be a great way to take control of your network and enhance its functionality. However, it is important to proceed with caution and follow the instructions carefully to avoid any issues. With this comprehensive guide, you should be able to successfully install and configure OpenWrt on your Asus-RT-AX53U router.
If you encounter any issues during the installation or configuration process, be sure to consult the OpenWrt documentation or reach out to the OpenWrt community for assistance. They can provide you with valuable support and advice to help you resolve any issues and make the most out of your OpenWrt installation.
In addition to the enhanced functionality and control that OpenWrt provides, it also comes with the benefit of being open-source software. This means that the source code is freely available for anyone to access and modify, and there is a large community of developers constantly working to improve and enhance the software. With OpenWrt, you have the ability to fully customize and optimize your network, tailoring it to your specific needs and preferences.
In conclusion, if you want to take control of your network and enhance its functionality, installing OpenWrt on your Asus-RT-AX53U router is a great option. Follow the steps outlined in this comprehensive guide, and you’ll be well on your way to a fully optimized and customized network. With OpenWrt, the possibilities are endless, and you’ll have the freedom to fully customize and optimize your network to meet your unique needs and preferences.