Go back to generic.flashing
TFTP is a very simple protocol; simple enough to be implemented in small boot loaders. The basic idea is as follows:
-
Router is powered on
-
Bootloader prepares startup of firmware code
-
For a few seconds it initializes the wired lan ports
-
It then either:
-
Behavior thereafter varies by boot loader
You must determine whether your hardware’s bootloader has a TFTP client or server to understand which section below applies to your device. Consult your specific model’s OpenWrt Wiki devicepage for details on necessary settings and the TFTP type offered if any.
This documentation will use example IP addresses according to RFC5737. Please consult your model’s wiki documentation for actual IP addresses specific to your device.
 Cleanup IP addresses as 192.168.1.x is common, but not universal. Use of RFC5737 might be more appropriate or just italic ipv4.x.y.z indicators.
If your device is of the type that has a boot loader with a TFTP client that tries to download an image in recovery mode, then you must run a TFTP server to host the new firmware.
Detailed instructions are given on the Setting up a TFTP server for TFTP Recovery/Install wiki page.
Move this section showing how to configure a TFTP server to tftpserver
RouterBoards have a TFTP and DHCP clients running in their RouterBoot bootloader.
See : Common Procedures for Mikrotik RouterBoard for details.
Bash script to set static IP address, run DHCP server and run TFTP server (exemple for Mikrotik).
Note: Don’t forget to change USER, NETDEV, IP/DHCP IP-range and file name/folder path for your needs.
#/bin/bash
USER=user
NETDEV=enp1s0
ip address flush dev $NETDEV
ip address add 10.1.1.10/24 dev $NETDEV
dnsmasq -i $NETDEV --dhcp-range=10.1.1.50,10.1.1.100 \
--dhcp-boot=openwrt-ar71xx-mikrotik-vmlinux-initramfs.elf \
--enable-tftp --tftp-root=/home/$USER/openwrt -d -u $USER -p0 -K --log-dhcp --bootp-dynamic
Move this section showing how to configure a TFTP server to tftpserver
For example the bootloader implementation of the DIR-300 redboot contains a TFTP client. Two steps:
-
first you install and start a TFTP server (or daemon) on your host and place the image(s) to be flashed in the <root directory> of this software (you may be required to do this as root).
Possible directories can be
Example:
sudo apt-get install tftpd-hpa tftp
sudo cp ~/uboot/arch/arm/boot/uboot.img /var/lib/tftpboot
-
Test the server:
  tftp localhost
tftp> get uboot.img
tftp> quit
  cmp /var/lib/tftpboot/uboot.img uboot.img
  # no output other then a prompt means it worked correctly
-
connect to the bootloader, and tell it to get the images on your harddisk via its TFTP client (in case of the DIR-300 you obtain a connection via telnet on the non-default port 9000). Example:
telnet 192.168.20.81 9000
Redboot> load uboot.img
go
-
after successful installation of OpenWrt, do not forget to deactivate the TFTP server again!
Move this section showing how to configure a TFTP server to tftpserver
In case of the xxx Step 3 from Example 1 above is not applicable. There is no console to login to, the bootloader will automatically try to get a firmware over TFTP from a pre-configured IP address at every boot.
Move this section showing how to configure a TFTP server to tftpserver
Note: TftpServer.app places a pleasing GUI on top of the native OSX tftpd. There’s a writeup of using TftpServer.app at tftpserver. If you prefer to use the command-line, read on…
OS X Lion comes with a tftpd but its disabled by default. Like most services in OS X, tftpd is controlled by launchctl.
The configuration with which the daemon is lauched is in /System/Library/LaunchDaemons/tftp.plist and the the identifier is com.apple.tftpd
before you make changes to the config run:
sudo launchctl unload -F /System/Library/LaunchDaemons/tftp.plist
then:
sudo launchctl load -F /System/Library/LaunchDaemons/tftp.plist
to stop tftpd run:
sudo launchctl stop com.apple.tftpd
to start tftpd run:
sudo launchctl start com.apple.tftpd
Here is an example config file that will work:
<?xml version="1.0" encoding="UTF-8"?>
<!DOCTYPE plist PUBLIC "-//Apple Computer//DTD PLIST 1.0//EN" "http://www.apple.com/DTDs/PropertyList-1.0.dtd">
<plist version="1.0">
<dict>
	<key>Label</key>
	<string>com.apple.tftpd</string>
	<key>ProgramArguments</key>
	<array>
		<string>/usr/libexec/tftpd</string>
		<string>-l</string>
		<string>-s</string>
		<string>/private/tftpboot</string>
	</array>
	<key>inetdCompatibility</key>
	<dict>
		<key>Wait</key>
		<true/>
	</dict>
	<key>InitGroups</key>
	<true/>
	<key>Sockets</key>
	<dict>
		<key>Listeners</key>
		<dict>
			<key>SockServiceName</key>
			<string>tftp</string>
			<key>SockType</key>
			<string>dgram</string>
		</dict>
	</dict>
</dict>
</plist>
Differences from the default include removing this, to enable the service:
<key>Disabled</key>
<true/>
Add this to the ProgramArguments array to make it log to /var/log/syslog.log
<string>-l</string>
Place the openwrt image file you want to serve in:
/private/tftpboot
Notice that even after running launchctl start com.apple.tftpd you will not see tftpd running when executing ps aux | grep tftpd because of the way launchctl works. tftpd is in fact not running but launchctl will launch it as soon as it is required.
In some cases, when the output on the serial console is grabbled you can still act on faith and executer the following commands, which will work in most cases:
setenv ipaddr 192.168.1.1
setenv serverip 192.168.1.100
tftpboot 0x80000000 openwrt-xxx-generic-xxx-squashfs-factory.bin
erase 0x9f020000 +0x332004
cp.b 0x80000000 0x9f020000 0x332004
boot.m 0x9f020000
tftpd on MacOS 10.4 «Tiger»
Move this section showing how to configure a TFTP server to tftpserver
tftpd works out-of-the-box also on the old 10.4. Maybe the tftp dir is not yet created but this is just a mkdir. Get a root shell and issue these commands:
bash-4.2$ sudo bash
Password:
bash-4.2# mkdir -p /private/tftpboot/
bash-4.2# cp /path/to/openwrt-image /private/tftpboot/
bash-4.2# launchctl load -F /System/Library/LaunchDaemons/tftp.plist
bash-4.2# ps axu|grep ftp
root     23494   0.0  0.0    27696    152  ??  Ss    4:34PM   0:00.00 launchctl load -F /System/Library/LaunchDaemons/tftp.plist
root     23496   0.0  0.0    38604      4  p3  R+    4:34PM   0:00.00 grep ftp
bash-4.2# launchctl start com.apple.tftpd
bash-4.2# ps axu|grep ftp
root     23494   0.0  0.0    27696    152  ??  Ss    4:34PM   0:00.00 launchctl load -F /System/Library/LaunchDaemons/tftp.plist
root     23498   0.0  0.0    27244    464  ??  Ss    4:34PM   0:00.01 /usr/libexec/launchproxy /usr/libexec/tftpd -i /private/tftpboot
root     23500   0.0  0.0    38604      4  p3  R+    4:34PM   0:00.00 grep ftp
bash-4.2# tftp 192.168.100.72   ### just testing
tftp> get openwrt-ar71xx-generic-hornet-ub-squashfs-sysupgrade.bin
Received 7270950 bytes in 2.7 seconds
tftp>
The basic procedure of using a tftp client to upload a new firmware to your router:
-
Unplug the power to your router
-
Plug the Ethernet connection from your computer (acting as tftp client) into a LAN port on your model. See your model’s OpenWrt wiki devicepage for details on which port to use
-
Start your tftp client on your computer
-
Give it the router’s address (specific to model and bootloader, see your model’s wiki page)
-
Set mode to octet/binary
-
Tell the client to resend the file until it succeeds
-
“put” the file
-
Plug-in your router while having the tftp client running and constantly probing for a connection
-
The tftp client will receive an ack from the bootloader and starts sending the firmware
The TFTP commands vary across different implementations. Here are some examples:
The network link must be up and established during power up. One way to ensure this happens is to use a switch or hub in-between your computer and the device you are flashing as this will leave the link established when you power off the device.
Another option is to disable network manager in Linux (or use a distro/LiveCD that doesn’t have it). Some commands that may disable it (depends on the distribution of Linux used):
Preparation Steps
-
Configure a static IP to match your *bootloaders* network
-
Preconfigure an ARP entry to increase your changes of catching the TFTP window
Using atftp
Using netkit’s tftp
Using curl
using tftpd-hpa
On Mac OS X, you should be able to flash the router with the command line tftp client, which behaves identically to netkit’s tftp above.
Some people have had problems with the command line tftp client, however, and recommend using MacTFTP Client instead:
Many Macs will disable the Ethernet card when the router is powered off and will take too long to re-enable the card, causing the TFTP transfer to fail with an “Invalid Password” error. Many people have had success if they manually configure their network card (in the “Ethernet” tab of “Built-in Ethernet” in System Preferences’ Network panel) to:
Alternatively, you can connect the router to the Mac via a hub or switch; see the troubleshooting section for more information.
There are multiple tftp clients that you can choose from.
TFTP command line client short Instructions
Note that some bootloaders do not respond to ICMP ping.
GUI TFTP clients
Don’t forget about your firewall settings, if you use one. It is best to run the “put” command and then immediately apply power to the router, since the upload window is extremely short and very early in boot.
| TFTP Error | Reason |
|---|---|
| Code pattern is incorrect | The firmware image you’re uploading was intended for a different model. |
| Invalid Password | The firmware has booted and you’re connected to a password protected tftp server contained in the firmware, not the bootloader’s tftp server. |
| Timeout | Ping to verify the router is online Try a different tftp client (some are known not to work properly) |
| Timeout | Ping to the router works NetworkManager (Linux) may still be running causing autosense. Try again with manual configuration. |
Some machines will disable the ethernet when the router is powered off and not enable it until after the router has been powered on for a few seconds. If you’re consistantly getting “Invalid Password” failures try connecting your computer and the router to a hub or switch. Doing so will keep the link up and prevent the computer from disabling its interface while the router is off.
Before you go searching for a hub to keep your link live, try setting your TCP/IP setting to a static IP (192.168.1.10; 255.255.255.0; 192.168.1.1 [gateway]) method instead of DHCP.
![]() If you can flash your router and after that it says “Boot program checksum is invalid” or “Invalid boot block on disk” on serial console try a different tftp client — atftp works well. This occurs with some netkit tftp packages and big firmwares.
If you can flash your router and after that it says “Boot program checksum is invalid” or “Invalid boot block on disk” on serial console try a different tftp client — atftp works well. This occurs with some netkit tftp packages and big firmwares.
Example
would this be better to just exist in specific model’s wiki pages?
should we create a page to list models with tftp support, noting which ones need the reset button trick?
On many routers, including the Asus WL-500g Premium v1 that I use, you flash an image by disconnecting power, press and hold down the reset button, and connect the power again. Wait a few seconds and the PWR LED will start to blink. Release the reset button. The device will now have a TFTP server running on 192.168.1.1.
Note that many TP-Link models are reported to support the same trick, including the TL-WR740Nv4, TL-WDR4300v1, TL-WDR3600v1, TL-WR842NDv1, TL-WR841NDv8, TL-WR841Nv11, TL-WR841Nv12, TL-MR3020v1, TL-MR3220v2, TL-MR3420v2, TL-WR940Nv2, TL-WR941NDv5, TL-WR1042NDv1 and possibly any other TP-Link model that has a recent firmware upgrade from the manufacturer. For a summary and ongoing experiments, see: http://bkil.blogspot.com/2014/12/hidden-tftp-of-tp-link-routers.html
You’ll have to use a Ethernet cable at this point. Connect it to LAN1-LAN4, not WAN. Configure your local machine on the 192.168.1.x/24 network, for example as 192.168.1.42. The router will use 192.168.1.1.
$ tftp 192.168.1.1
tftp> trace
Packet tracing on.
tftp> binary
tftp> put openwrt-brcm-2.4-squashfs.trx
sent WRQ <file=openwrt-brcm-2.4-squashfs.trx, mode=octet>
received ACK <block=0>
sent DATA <block=1, 512 bytes>
received ACK <block=1>
sent DATA <block=2, 512 bytes>
received ACK <block=2>
sent DATA <block=3, 512 bytes>
received ACK <block=3>
sent DATA <block=4, 512 bytes>
...
received ACK <block=4742>
sent DATA <block=4743, 512 bytes>
received ACK <block=4743>
sent DATA <block=4744, 512 bytes>
received ACK <block=4744>
sent DATA <block=4745, 0 bytes>
received ACK <block=4745>
Sent 2428928 bytes in 6.2 seconds
tftp> quit
$
Wait one minute and restart the box by disconnecting and reconnecting power. Some documentations claim that the device should restart by itself but I have never seen this happen, no matter how long I wait.
Check if your TFTP Server has sufficient access rights to files or directories.
U-Boots TFTP Client / tftpboot can complain with:
## Error: 'Access violation' (2), starting again!
From DD-WRT Wiki
Jump to: navigation, search
Contents
- 1 General
- 1.1 Special Asus TFTP Flashing Procedures
- 1.2 Special for Vista, Win7 and Win 2008
- 1.3 Special for Linksys WRT54GL Users
- 2 TFTP Tools
- 2.1 Windows
- 2.2 Linux
- 2.3 Mac OS X
- 3 Windows
- 3.1 Command Line
- 3.2 Linksys TFTP GUI
- 4 Mac OS X
- 5 Linux
- 5.1 Using atftp on Linux
- 6 If Something Goes Wrong
- 7 Related Links
[edit] General
This article describes how to do an initial flash or a TFTP recovery flash for your device.
- Unplug the router, get a TFTP client for the PC, and connect it via network cable to a router LAN port
- Set a fixed IP address on the PC with the same network as your router, e.g. Router: 192.168.1.1, PC: 192.168.1.2
- Get a known good DD-WRT release. Use the Supported_Devices, the device wiki, or the forum for recommended files.
- For recovering a bad flash, the OEM firmware might be required
- Use a mini build for 4+ MB flash devices (when possible) or micro build for 2 MB flash devices
- Setup the TFTP client, then start a continuous ping (-t switch is needed for this in Windows) to the router
- Plug in the router and start the TFTP client as soon as there is a TTL=100 ping response. The client should show transfer.
- TTL=64 means application code has been reached. If the router isn’t responding, it is soft-bricked (use OEM firmware)
- Read about timing problems below: TFTP flash#Special for Vista, Win7 and Win 2008
[edit] Special Asus TFTP Flashing Procedures
Some routers like the Asus WL-500xx series (WL-500G, WL-500G Premium, WL-500W, WL-500G Deluxe), need additional steps to perform a complete and proper initial flash. See this wiki page: Asus TFTP Flash
[edit] Special for Vista, Win7 and Win 2008
In order to catch the narrow window for TFTP flash, you should use platforms with simple TCP/IP implementations that don’t have CTCP implemented: Windows XP or Linux are reported to work, but some have reported significant problems with Vista, Windows 7 or Windows 2008.
- For more information see this posting
Edit: While some may have reported problems, CTCP is definitely not the issue, because it is disabled by default in Windows Vista and Windows 7. So unless people are specifically turning it on, it isn’t running. I personally just used TFTP on my router with no difficulties, although mine is a Netgear WNDR3700 that was waiting for a TFTP flash and didn’t have this race condition at boot as some of these routers seem to. But again, even if you have an issue it’s not CTCP. Check out the wikipedia article on CTCP for information on how to check if it is running and how to disable it (both are simple command line entries).
If having issues, try connecting a separate network switch between the PC and router, so the PC network port sees a connection before the router port is up. This should allow for a faster ping reply. Then follow the instructions as normal.
[edit] Special for Linksys WRT54GL Users
If the router seems to be bricked so that the power light is constantly blinking and pinging the router results in TLL=100 continuously, then there is still a great chance that tftp can help.
Firstly you must flash the router with the original firmware available at Linksys homepage www.linksys.com, since flashing it with DD-WRT probably won’t give any result at all. Then do a 30/30/30 and after that you can flash with DD-WRT Mini. The initial flashing can be done with only the mini version, perhaps later you can move on to bigger versions of it.
[edit] TFTP Tools
With TFTP, all of the information about the transfer is specified during the initial command/setup; there is very little client/server interaction compared with standard FTP.
[edit] Windows
- Windows XP command line TFTP client is by default enabled
- Vista and Win7 command line TFTP needs enabled:
- Control Panel -> Programs and Features -> Windows Features -> then check mark TFTP Client
- Windows GUI TFTP utilities:
-
- Simple TFTP Utility tftp2.exe
- — The server/IP address is that of the router being flashed.
- — Leave the password blank.
- — Navigate and select the firmware you wish to flash.
- — Set retries to a number between 10 and 99.
- Philippe Journin’s tftpd64 TFTP client (plus various servers: TFTP, DHCP, Syslog, and Log viewer)
- -Set the Server interface, Host IP, Local File, then click Put right after starting the router’s TFTP server
- -Download page also provides tftp32
- DrayTek Router Tools: This program will run all those pesky TFTP commands with a push of a button.
- ftp://ftp.draytek.com/Utility/Firmware%20Upgrade/ or https://www.draytek.com/products/utility/
- Linksys Firmware Auto-Upgrade utility https://www.linksys.com/us/support-article?articleNum=137928
[edit] Linux
- Ubuntu: install TFTP client with command sudo apt-get install tftp
- ATFTP: See install details for several different Linux flavors Using atftp on Linux as well as useage description and example below.
[edit] Mac OS X
- OS X ships with a command-line TFTP client.
connect 192.168.1.1
binary
rexmt 1
timeout 60
put dd-wrt.vXX_XXX.XXX
[edit] Windows
[edit] Command Line
This example is after a bricked update, using a Belkin f5d130uk (which has a bootloader built in, no need for redboot)
- ping the router permanently, by running in Start > Run:
ping -t 192.168.2.1 -t
and see if it is responding, e.g. like this
 64 bytes from 192.168.2.1: icmp_seq=1 ttl=64 time=2.90 ms
 64 bytes from 192.168.2.1: icmp_seq=2 ttl=64 time=0.264 ms
 64 bytes from 192.168.2.1: icmp_seq=3 ttl=64 time=1.44 ms
- reboot the router via web-if or powercycle (the ping response will stop)
- if you see the the first ping response again …
 From 192.168.2.1 icmp_seq=1 Destination Host Unreachable
 From 192.168.2.1 icmp_seq=2 Destination Host Unreachable
 64 bytes from 192.168.2.1: icmp_seq=3 ttl=128 time=2.90 ms
 64 bytes from 192.168.2.1: icmp_seq=4 ttl=128 time=3.50 ms
 64 bytes from 192.168.2.1: icmp_seq=5 ttl=128 time=0.90 ms
… you will have to start the tftp upload in binary mode immediately after the first pings responses. The TTL of the boot tftp server will be 100 or 128. It usually does 5 pings responses, after that it will boot the firmware in flash, this is the right time to flash (the TTL of DD-WRT is only 64). If the upload doesn’t work the first time, then you have to try the first steps again. you have to be very fast!  Maybe you will have to reset the device via reset button a few times to get the tftp boot working (Siemens, Belkin and similar hardware).
tftp -i 192.168.2.1 put dd-wrt.vXX_XXX.XXX
- wait a few seconds (be patient! don’t reset the router! keep waiting!) when the upload is successful, change your computer’s IP address to 192.168.1.10, and the router will start responding at 192.168.1.1 with DD-WRT
- user name: root, password: admin
- always do a hardware factory reset after the successful flashing!
[edit] Linksys TFTP GUI
Linksys has a GUI flash utility
- Special for Vista, Win7 and Win 2008
- In order to catch the narrow window for TFTP flash, you should use platforms with simple TCP/IP implementations that don’t have CTCP implemented: Windows XP or Linux are reported to work, but some have reported significant problems with Vista, Win7 or W2K8.
- For more information see this posting
Here are the setup and use instructions for the TFTP utility.
Both the Linksys original and a Linksys updated copy can be found here TFTP
- Set your computer hardware adapter to a static IP address within the same subnet as the router’s original firmware (ex…set a static of 192.168.11.10 if your router’s default IP address is 192.168.11.1). Set the net mask to 255.255.255.0.
- Start the TFTP utility.
- The Server/IP address is that of the router being flashed.
- Leave the password blank.
- Navigate and select the firmware you wish to flash.
- Set retries to 10.
- Now plug the ethernet cable from your computer into a LAN port of the router.
- Unplug the router, plug it back in, and immediately hit the Upgrade button on the TFTP utility.
- If the router does not flash immediately stop the attempts and vary the timing from when you plug the unit in to the time you hit the start button. I have had good luck flashing within the first 1/2 second of reapplying powering the device.
- Tip: ping the router continuously. Start > Run > ping -t 192.168.x.x -w 10. Power cycle the router (or tap the reset button) then press Upgrade as soon as you get the first ping reply.
- Once it flashes and you receive the Success message. Wait for a full 2 minutes while the new firmware flash configures itself. DO NOT power down the router!
- After the 2 minutes do a Hard reset or 30/30/30 on the router, then configure at 192.168.1.1 (DD-WRT’s default IP address). The default DD-WRT username/password is root/admin.
[edit] Mac OS X
OS X ships with a command-line TFTP client.
First, download the firmware file and put it in your user folder (/Users/yourusername/).
Then connect your computer directly to your router via ethernet. Go to System Preferences > Network. Click on «Ethernet» in the left panel and change «Configure IPv4» to «Manually». Then change «IP address» to 192.168.1.x (where x is any number between 2 & 255).
Then copy & paste the following text into a text editor:
 connect 192.168.1.1
 binary
 rexmt 1
 timeout 60
 put dd-wrt.vXX_XXX.XXX
Change the last line to the filename of the firmware file, which you just moved to your user folder. Copy the whole thing, including the line break after the last line.
Now open Applications > Utilities > Terminal. Enter:
tftp
A «tftp>» command prompt will appear. Now press the reset button on your router. On the tftp command line in Terminal, paste (Cmd+v) the text you copied. Since you copied the line break at the end, tftp will execute the command at the moment you paste it. Depending on your router, you may have to paste it multiple times to get the timing right.
If it works, you’ll see something like this:
 tftp> connect 192.168.1.1
 tftp> binary
 tftp> rexmt 1
 tftp> timeout 60
 tftp> put dd-wrt.vXX_XXX.XXX
 Sent 1769472 bytes in 9.0 seconds
[edit] Linux
In Linux, tftp can generally be installed with whatever package manager your distribution uses.
on suse:
smart install tftp
on fedora:
yum install tftp
on ubuntu
sudo apt-get install tftp
etc.
The tftp client for Linux and OS X is very similar. When invoked, it gives the user a prompt and takes commands from the standard input.
Binary mode can be set with command-line flags — in OS X, the «-e» flag sets binary mode (among other things which are less important), and in Linux «-m binary». Binary can be set from the prompt in either (this is done below for consistency).
Typical usage looks like:
 tftp 192.168.x.x
 > binary
 > put dd-wrt.vXX_XXX.XXX
Because the transfer must be initiated in a narrow time window during the router’s bootup, tftp’s retransmit option is useful. In the following sequence of commands, tftp will retry to send the file every second for one minute. This can be issued just before the router is booted, so that it will retry to send every second while the router boots.
 tftp 192.168.x.x
 > binary
 > rexmt 1
 > timeout 60
 > put dd-wrt.vXX_XXX.XXX
If it worked, it will say something like «Sent 1769472 bytes in 9.0 seconds»
If it didn’t work, it will say «Transfer timed out.» This is often because it cannot connect to the IP address. Make sure you have manually set your computer’s IP address to one in the router’s subnet.
You can quit tftp with the ‘quit’ command or hitting ctrl+D.
Many Linksys routers require a special version of tftp that has a simple form of authentication. You can download and compile a special version of tftp that works on these routers from: http://redsand.net/projects/linksys-tftp/linksys-tftp.php
(you will need to unpack the tarball and compile the program)
[edit] Using atftp on Linux
Another way of doing this is using atftp. You can install aftp by search it in your package manager.
On Ubuntu:
sudo aptitude install atftp
On Debian (as root):
aptitude install atftp
On Fedora (as root):
yum install atftp
On Suse (as root):
smart install atftp
Then you go to the folder where you downloaded the official Linksys firmware, for instance if you downloaded it in your desktop:
cd ~Desktop
Unrar the file, for instance if the file is WRT54GL_v4.30.11_012_ETSI_EN_code.rar
unrar x WRT54GL_v4.30.11_012_ETSI_EN_code.rar
Rename the firmware to code.bin.
cp WRT54GL_v4.30.11_012_ETSI_EN_code.bin code.bin
Then you prepare this command (do not press enter yet):
atftp --option "mode octet" --option "timeout 60" --verbose --trace -p -l code.bin 192.168.1.1
Disconnect all your network cables from your router, only leaving one from the computer to the router. Then open another terminal and ping to 192.168.1.1
ping 192.168.1.1
Then unplug and plug back the energy supply and when you see the first ping response from the router you must hit enter in the atftp terminal. Good luck! If everything is alright, you should see a lot of output, from all the transference. At the end you should see the orange/yellow light up. Then you should wait a couple more minutes (you never know what’s happening there :D) and then try the Hard reset aka 30/30/30
About the atftp command: we are putting (-p) a local file (-l) called code.bin to the IP address 192.168.1.1 asking for fully information (verbose) and showing all packages (trace), also that it must be trying for one minute (timeout 60) and in octet mode. Remember, if you get «code pattern error», try with the official Linksys firmware. More information:
man atftp
atftp --help
Important: you should always try atftp with the official firmware and then flashing to DD-WRT with the HTTP webpage on Administration, «Upgrade Firmware»; specially if you get «code pattern error».
Note: if you use Gnome or KDE you can get problems while trying to put your static IP address. Most of the times, applications like NetworkManager (aka nm-applet) or knetworkmanager will try to get a dynamic IP address, so you should first kill them. For example:
sudo killall NetworkManager
or
sudo killall nm-applet
[edit] If Something Goes Wrong
If your router fails to reboot (power light doesn’t stop flashing, no web interface, etc.) you will need to Recover from a bad flash.
[edit] Related Links
Recover from a Bad Flash
Flash Your Siemens SE505
TFTP Flashing a Belkin F5D7230 — more detailed notes on flashing the F5D7230 (v1000, specifically)
Asus TFTP Flash — special steps for WL-500gP, WL-500W and WL-500g Deluxe
Using Ubuntu and tftp to flash an Asus WL-500W
Восстановление прошивки роутера TP-Link через TFTP
1 мин. чтения

Большинство роутеров фирмы TP-Link поддерживают возможность перепрошивки/восстановление прошивки с помощью программы tftpd32, которая работает через протокол TFTP. Далее мы рассмотрим процесс восстановление прошивки на роутере TP-Link TL-MR3220 V2.
Прежде всего нам необходима программа tftpd32. Скачать последнюю версию можно с официального сайта разработчика программы.
Еще нам необходима прошивка для нашего роутера. Скачать ее можно на официальном сайте TP-Link или по ссылке ниже.
Прошивка для восстановления не содержит в названии слово «boot»!
Скачать прошивку для восстановления TP-Link TL-MR3220 V2
Имя файла прошивки должно иметь следующий вид «mr3220v2_tp_recovery.bin» для нашей модели. Для других моделей аналогичные названия «wr842ndv1_tp_recovery.bin», «wr1042nv1_tp_recovery.bin» и т.п.
Теперь у нас есть все для восстановления прошивки. Распаковываем архив с tftpd32. Копируем скаченную прошивку в папку с программой tftpd32.
Подключаем роутер к компьютеру с помощью кабеля. Теперь необходимо изменить настройки сетевого адаптера. Для этого идете в Панель управления — Сеть и Интернет — Сетевые подключения. В свойствах сетевого адаптера пишем следующие настройки:
- IP-адрес: 192.168.0.66
- Маска подсети: 255.255.255.0
Шлюз и DNS-сервера оставляем пустыми.

Запускаем программу Tftpd32 (можно от имени администратора). Проверяем сетевой интерфейс (должен быть 192.168.0.66) и наличие прошивки в папке с программой. Для этого нажимаем кнопку Show dir и смотрим в списке наличие нашей прошивки «mr3220v2_tp_recovery.bin».
Теперь включаем роутер. Если все правильно сделано до этого, то начнется загрузка прошивки в роутер. Остается только дождаться загрузки.

После окончания загрузки прошивки перезагрузите роутер, если это не произошло автоматически. Не забудьте изменить настройки сетевого адаптера на автоматическое получение IP-адреса.
- #Администрирование
Skip to content
We have previously published about how you can upgrade the firmware of your router to the open source DD-WRT through its web interface. But some of the routers also allow the upgrading of the firmware through the TFTP (trivial file transfer protocol) interface. Upgrade of router firmware over TFTP is much more easier than the web interface method and takes much less time. Since TFTP does not support any username or password credentials, you can use the TFTP method of upgrading the firmware even if you have forgotten the router access credentials.
Windows comes with a simple command line TFTP client of its own, but not everyone likes to work with the command line interface. So if you want a simple GUI interface, then you can use the free Tftpd32 server/client for all your TFTP requirements.
In order to upgrade your firmware, first of all you have to download the upgraded version of the firmware file from the website of your router manufacturer. Be very careful when download the firmware and check thoroughly whether it is suitable for your version and model of the router. You can also use the open source router firmware like OpenWRT or DD-WRT.
The Tftpd32 program can act both as a TFTP server and client. We need to use this program only in the client mode. So launch the Tftpd32 tool and switch to the Tftp Client tab. Enter the web-interface IP address for your router (typically 192.168.1.1 or 192.168.0.1) as Host. Enter 69 as the port number as this is the default port for TFTP protocol. Choose the firmware file in the Local File section. And finally click on the Put button to transfer the file to your router.

The file transfer does not take much time. In most of the cases, the firmware file is very small and all it takes is 5-6 seconds to transfer it over TFTP to your router’s flash memory. You would receive a message when the file transfer is complete.

Now you can restart your router, it should use the new version of the firmware. You can also reset the router before starting to work with the new firmware to wipe out any of the obsolete settings.
Conclusion: It is easy to upgrade the firmware of routers over the TFTP protocol. It is as simple as copying a file in Windows from one folder to another because the TFTP protocol does not require any username or password to perform any of the copying actions.
You can download the Tftpd32 program from http://tftpd32.jounin.net/.
We use cookies on our website to give you the most relevant experience by remembering your preferences and repeat visits. By clicking “Accept”, you consent to the use of ALL the cookies.
Здесь, то есть в этом обзоре, мы будем говорить о манипуляциях над роутером, которые проводятся «на свой страх и риск». Обновление встроенной программы – рекомендуют выполнять многие фирмы, однако, процедуру надо проводить в условиях СЦ. Как прошить роутер, установив альтернативное программное обеспечение – рассматривается на форумах. Но там, как правило, сразу сообщается, какие побочные эффекты возможны, и как вернуть прошивку к стандартной версии.
Мы будем рассматривать один вариант, такой, когда замену встроенной программы можно считать оправданной. Допустим, есть роутер с прошивкой оператора связи. Как правило, такие роутеры – изготовлены на базе серийных устройств фирм D-Link, ASUS, Netgear и некоторых других. Так вот, в этом случае есть возможность заменить прошивку на заводской вариант. Но, тоже, далеко не всегда (не для всех моделей, это – факт).

Схема подключения роутера к ПК
Для примера, будет рассмотрено, как перепрошить роутер WNR612 фирмы Netgear (если в нем в данный момент установлена прошивка «Дом.RU»). Все действия выполняются без использования графического интерфейса, с помощью программы tftp.
По поводу других роутеров – скажем следующее. Последовательность операций должна быть аналогична той, что рассматривается здесь. Сначала роутер нужно перевести в режим восстановления прошивки, когда он начнет пинговаться – запустить tftp-клиент, и т.д. Как включить на роутере режим восстановления? Смотрите в инструкции фирмы-изготовителя.
Важно знать: скачивать заводскую прошивку необходимо под определенную модель и ревизию устройства (разные ревизии – несовместимы). Далеко не все роутеры «от оператора» позволяют вернуть фирменную прошивку программно, так, как мы и рассматриваем. Пример (отрицательный) – «Дом.RU», устройство DIR-615 ревизии k1.
Установка заводской прошивки
Программа-клиент tftp
Будем считать, что заводская прошивка для роутера – скачана, и находится в разархивированном виде на «Рабочем столе». Мы для примера рассмотрим устройство WNR612 ревизии v2. Еще раз заметим: устройства разной аппаратной ревизии – не являются совместимыми в 99% случаев. Будьте внимательны!

Наклейка роутера
Чтобы установить прошивку, надо узнать локальный адрес самого роутера. Можно посмотреть IP-адрес в «Состоянии» соединения с роутером, на вкладке «Поддержка» (нужна строка «Шлюз по умолчанию», значение IP – должно оканчиваться единицей).
Дальше, качаем простой «клиент» для tftp с понятным интерфейсом: halvator.ru/files/soft/tftp.exe. Можно сразу запустить эту программу. Как видим, интерфейс ее – тривиален:
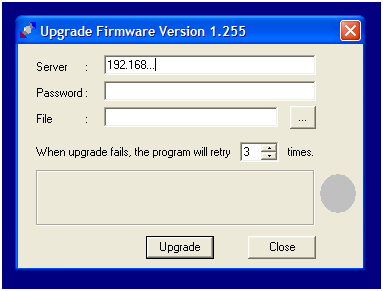
Программа tftp.exe
В поле «Сервер» мы укажем IP-адрес роутера. Для WNR612 (V2), пароль на tftp – пустой. В строке «File» – указываем путь к прошивке (нажав кнопку с тремя точками). Собственно, это все.
Действия, выполняемые до установки прошивки
Перепрошивка роутера по tftp – не намного сложнее, чем в web-интерфейсе. Оставив в локальной сети один компьютер (подключенный к роутеру кабелем), меняем свойства соединения с роутером:

Настройка сетевой карты ПК
Что надо сделать:
- В значении IP-адреса роутера – меняем последнюю цифру на «2»
- Устанавливаем значение в строку «IP-адрес»
- Маска – будет с последним «0», остальное заполнять не нужно (жмем «OK»)
Настроив сетевую карту, проверьте, что соединение с роутером – работает. Дальше, отключите блок питания роутера.
Как выполнить переустановку прошивки
«Залить» новую прошивку в роутер – можно так:
- Жмем reset на выключенном роутере, включаем питание, через 5-7 сек. устройство переходит в режим восстановления (отпускаем reset)
- Проще, после включения – сразу выполнить ping (пробел, адрес роутера), и как только придет ответ, отпускаем reset
- В tftp-клиенте (с указанными значениями), жмем кнопку «Update»
- Если что-то не так – повторяем действия 1-3
- Прошивка будет устанавливаться автоматически (минут 10, не меньше)
- В завершение, жмем reset на роутере (2-3 секунды). Пробуем зайти в web-интерфейс
Важно знать! Адрес роутера с новой прошивкой – может смениться (не открывается интерфейс – меняйте настройки сетевой карты).
Если что-то не получилось, и роутер ждет установки прошивки (не загружая web-интерфейс), пробуйте «залить» старую версию, так же по tftp. Альтернативные прошивки для роутеров – устанавливают аналогично.
Данное руководство – не для начинающих пользователей. Более надежные методы, возможно, и есть, но все действия в любом случае связаны с риском. Конечно, нельзя отключать питание в процессе «заливки» прошивок.
Есть фильм, из которого – ясно, как работает tftp.
Правда, с роутерами все действия выполняют быстрее (после появления ping – есть только 4 секунды):
Предыдущая
МегафонWi-Fi роутер LTE
Следующая
РоутерКак узнать IP-адрес роутера перед его настройкой