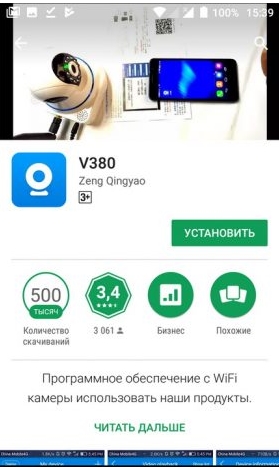
The lower price of the V380 Camera has attracted countless smart homeowners to this brand. You won’t have to spend hundreds of dollars on the monthly subscription and can buy the whole setup within a reasonable price range.
This lower price does not mean that you’ll be losing out on consistency or smart features.
As far as the basic performance of the camera is concerned, V380 is not a bad option. However, you still can’t compare it with some of the other brands like Wyze.
So, if you’re looking at the security of your smart home without going out of budget, the V380 Camera is a good choice for your projects.
It is one of the easiest systems to set up, and you won’t have to spend cash on hiring a local contractor to help with the installation.
The only issue that some owners have complained about is V380 Camera Not connecting to Wi-Fi. The good thing here is that you can easily fix this problem by following a few basic troubleshooting steps.
So, go through this guide, and your V380 camera will connect to Wi-Fi.
- Turn Off The 5GHz Band
If your router is on a dual-band network, then the best thing you can do is turn off the 5GHz band on the system.
It will only take a few seconds, and that should eliminate interference issues between the device and the router. So, if you’re not getting anywhere with the V380 camera Wi-Fi connection, just check the channel band.
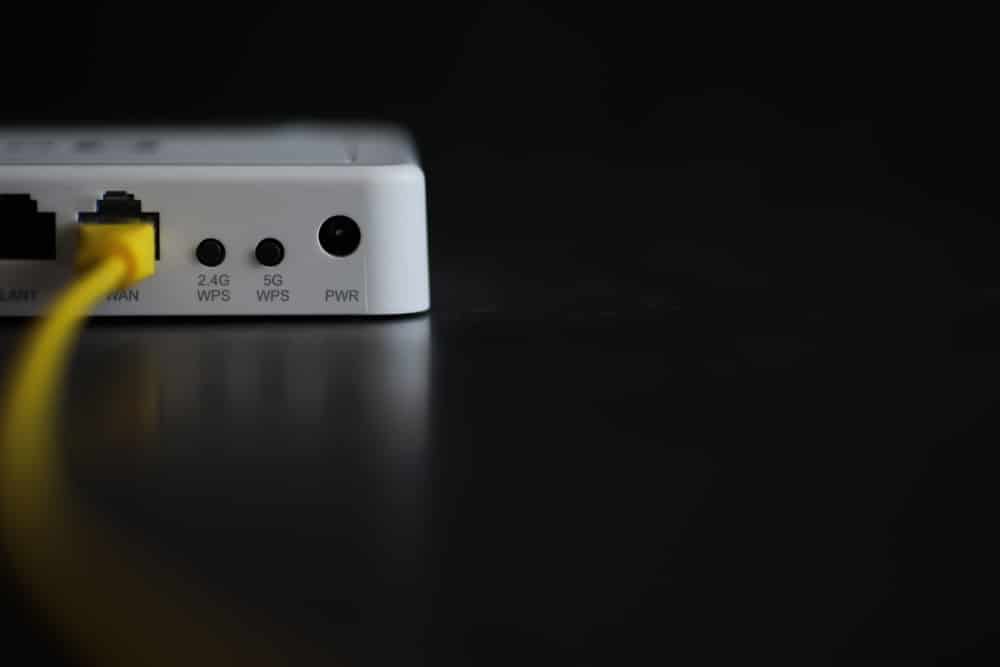
This camera can only connect with a 2.4GHz network and doesn’t work with 5GHz options. So, limit the channel bandwidth and then try to connect the camera again.
The issue is mostly with the credentials being the same for the 5.0 GHz and the 2.4 GHz router as compared to the interference problems.
Most users just forget to update the credentials, and if you’re in s a similar situation, there is no harm in changing the credentials for the 5.0 GHz channel only.
That way, it will be much easier for the device to isolate the 2.4 GHz channel, then you can connect the faster devices with the 5.0 GHz channel, such as your gaming system. Hopefully, it will all be smooth sailing after this point.
- Increase Signal Strength
The signal strength also plays a crucial role in determining the connection of the router with the camera. Most owners have the router placed in another room and try to connect the camera after placing it in an obscure location.
If you’re in a similar situation, then the camera is struggling to secure the proper signal strength for the Wi-Fi to work properly. So, move the router or the camera closer to each other and connect everything again.

Here, you need to focus more on putting the camera in direct line of sight from the router.
Make sure that the distance between your smart devices is less than 20 ft. While there are some routers that can stretch out the range to over 40 ft., most routers are usually limited to 25 ft. max.
For this reason, sticking within the range of 20 ft. is enough to help with the camera connection.
Furthermore, there should be no interference from thick walls and other wireless devices. Otherwise, you won’t be able to establish a secure connection with the smart device.
Having too many smart devices on a single router is never a good idea. The scenario can be a bit different when you’re using some premium options like ASUS.

However, that is not always the case, and you need to try limiting the number of wireless devices to narrow down the issue.
Usually, it will only take a second to remove other wireless devices. However, if you’re skeptical, make sure to turn off these devices first and then check the response from the camera.
If the camera starts to work, then you’ll be sure that the clutter of devices is to blame here.
So, remove these accessories or install an extension. That way, there will be limited interference, and the camera will have a much better chance of connecting with the router.
- Power Cycle The Device
Sometimes, it is the camera that is to blame here and not the router. So, if you’ve yet to narrow down the problem, there is no harm in removing the power from the camera.
This does not mean that you need to turn off the camera and then turn it back on.
Instead, you need to remove all the power connections directly from the unit and then wait around a minute or two before reconnecting the power connection.

These include batteries and any other power source that might keep the unit up.
Once that is done, give a few seconds for the camera to turn on completely, and then you can go through the setup routine one more time.
If you’re lucky, the issue will be fixed right here, and you’ll be able to proceed with the setup routine to fix the device.
- Check Credentials
Sometimes special characters in the Wi-Fi credentials can also lead to similar problems. So, even if you’re sure that the signal strength and the channel configurations are perfect, the issue can be with the Wi-Fi credentials that you’re using.
All you need to do is change the Wi-Fi credentials to simple alphabets and numeric. After that, try connecting the Wi-Fi to the router again, and it should work without further issues.
Keep in mind that changing the credentials will remove the router from every smart device.

You will have to go through the setup from scratch. There are no quick methods or workarounds that will help you through this error. So, make sure to set aside enough time to set up every unit again.
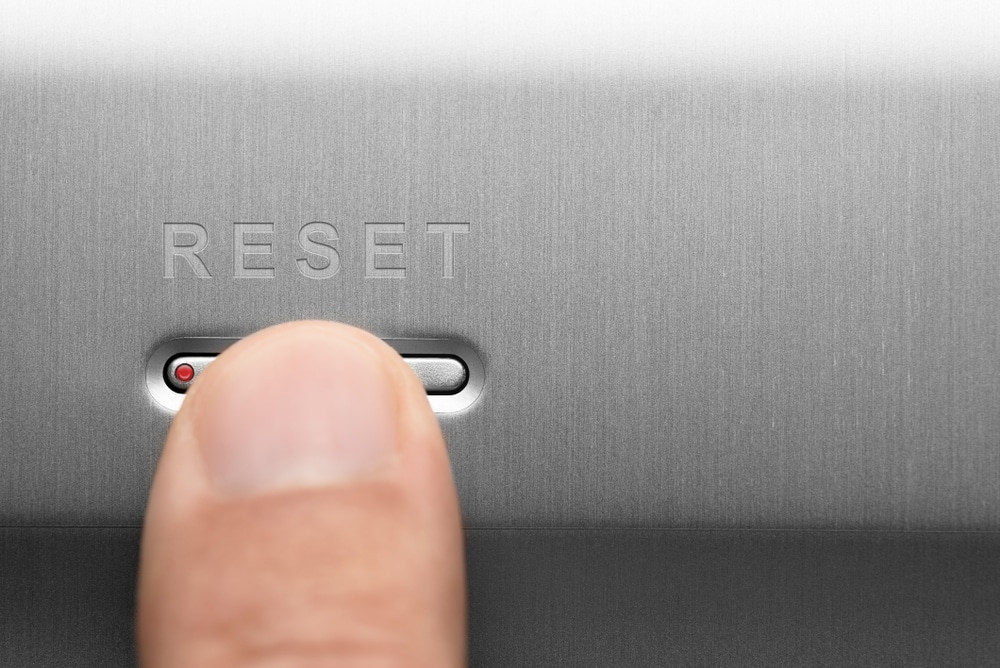
- Reset Device
If the issue is not fixed at this point, then you should probably look towards resetting the camera and the Wi-Fi router to get everything working again. Start by resetting the router and then try to connect both devices once.
If that doesn’t fix the issue, then you should reset the camera as well and go through the whole configuration process again. This should fix all issues with the camera if there are no hardware issues with your device
- Fix Antenna
The Antenna orientation on the device can also play a huge role in the functioning of your camera. Many users have reported similar issues because of a broken camera.
So, you should reach out to the dealer and claim the warranty on the unit if the V380 Camera is not connected to Wi-Fi, even after trying out all of these solutions.
Wrapping Up
These methods will help you quickly fix connection errors with the device.
As long as you’re sure that the unit is not damaged, it shouldn’t be too hard to fix the issue. All you need to do is to refresh the router configurations and set up the unit one more time.
Ideally, the issue should be fixed at this point if you’re not dealing with any serious issues. However, if the issue remains persistent even after changing the credentials, then you need to check the unit for hardware issues.
You have to carefully check for cracks and kinks on the camera. If you do find some rough sections, then there is a chance that the unit got damaged during delivery. If that is the case, then you need to claim the warranty immediately.
You’re not liable for any delivery issues, and reaching out to an official team will help you through this issue.
From there, you can make use of the new unit to avoid further errors. It all comes down to the final condition of the unit, and you can’t really fix a damaged unit yourself.
So, save yourself the hassle and then reach out to the official support team. These professionals will guide you accordingly through these errors.
Network configuration
How to configure wireless camera network (Android users)
Preparation before configuration:
1. Power on the camera and set the device to hotspot mode. When the (MV+ID) hotspot signal is found in the WiFi list of the mobile phone, it means that the device is in the waiting configuration state
Configuration steps:
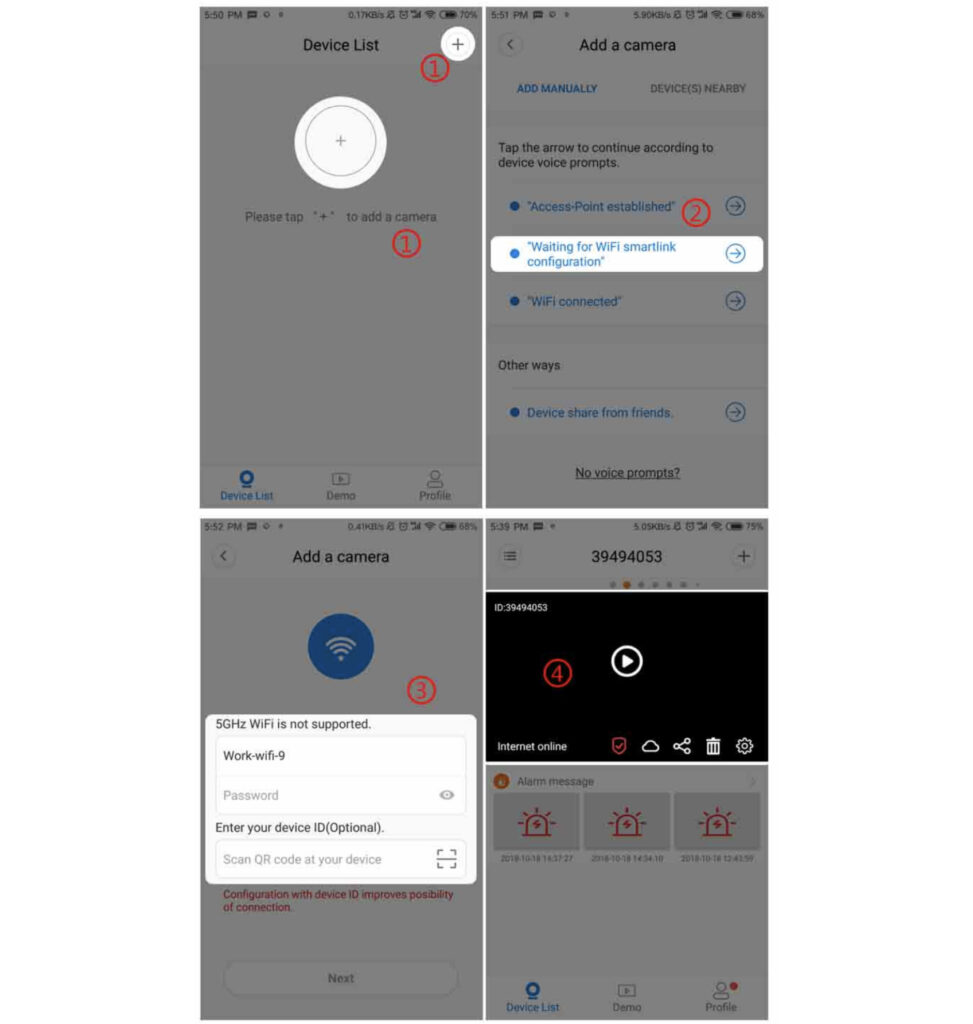
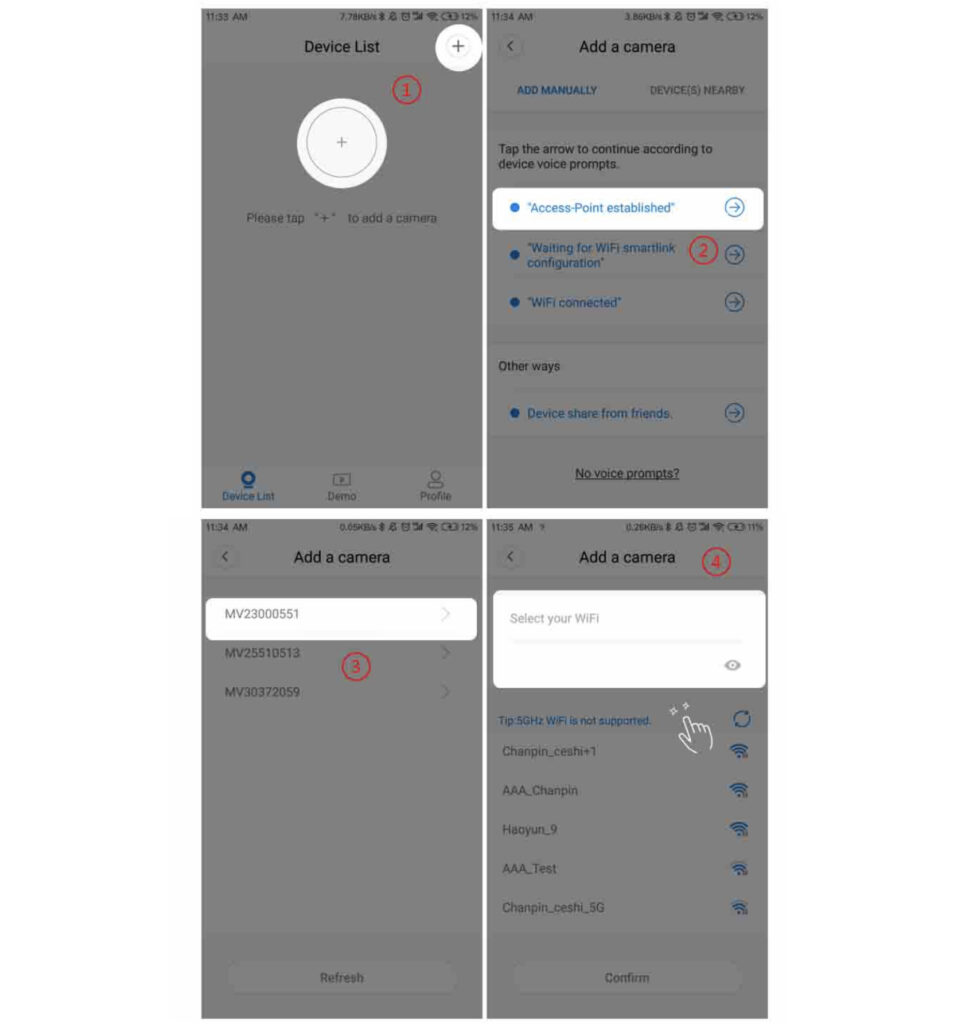
1. Click the “+” button in the upper right corner of the device list -> select [Add Camera]
2. Select [WiFi Smart Camera]
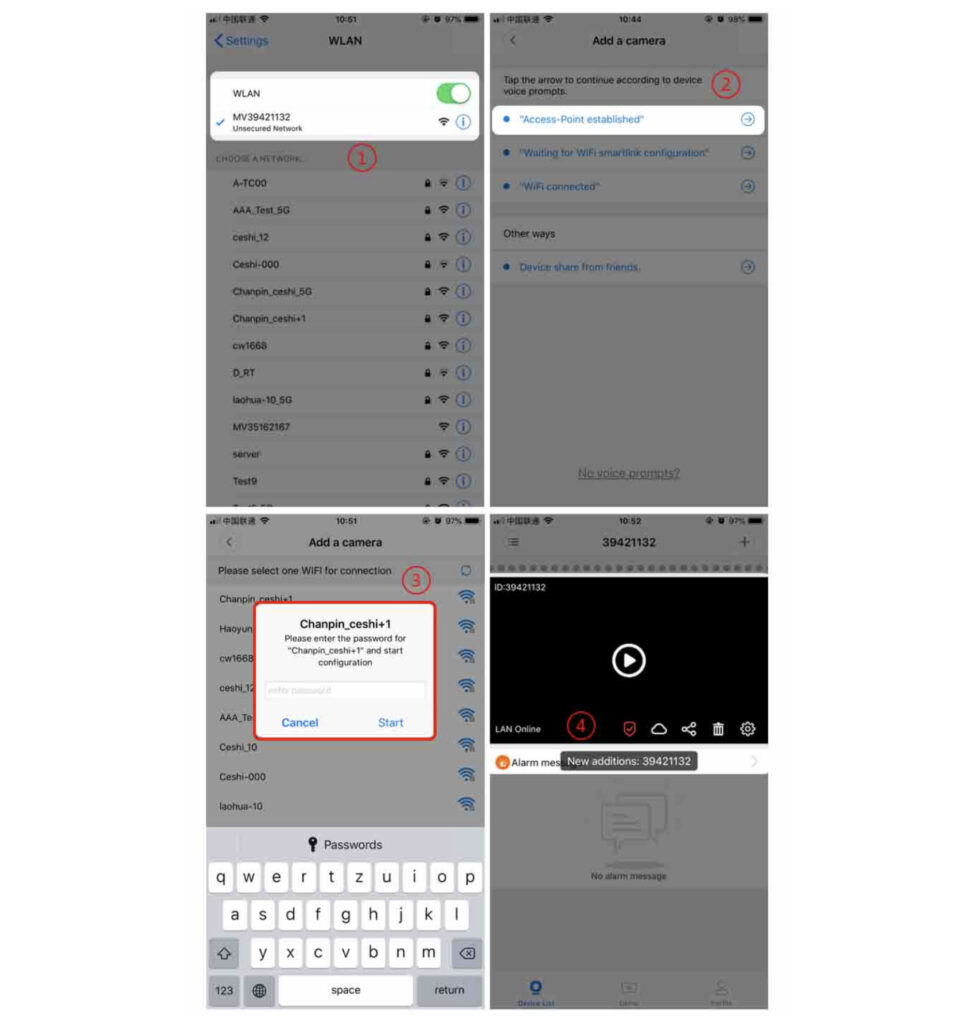
3. Select [AP hotspot connection] and follow the system prompts to continue operation
4. Select the WiFi that the device needs to configure, and enter the WiFi password -> click [Confirm]
5. Below Android 10: Select the device hotspot, and the mobile phone will automatically start network configuration after connecting to the hotspot
Android 10 and above: Click [Connect AP spot] or enter the mobile phone system [Settings], select [WLAN], connect to the device hotspot (MV+ID), and the device will automatically connect to WiFi after returning to the app
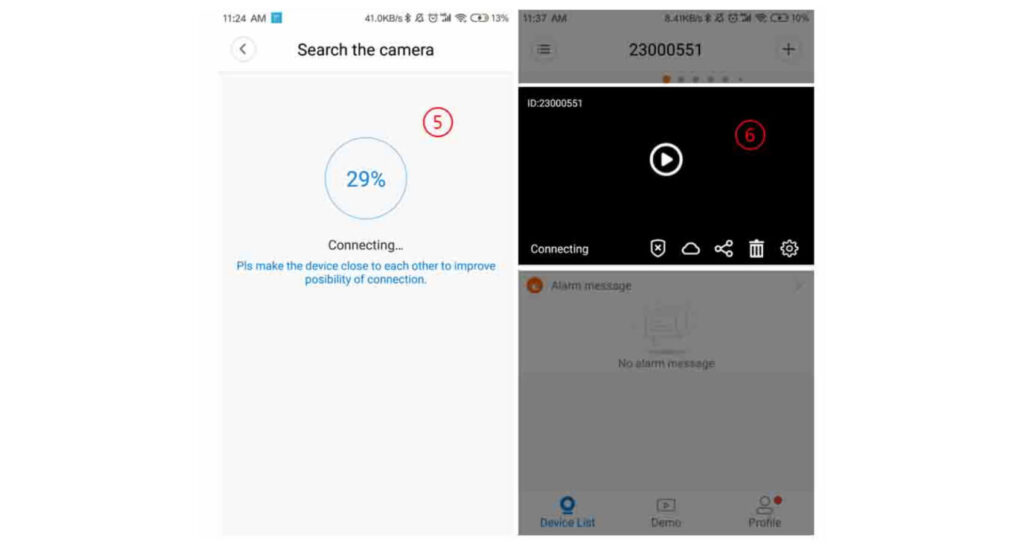
6. The camera’s voice prompts “WiFi connecting – WiFi connected” to indicate that the configuration is successful, and the APP prompts “Completed”
How to configure wireless camera network (IOS users)
Preparation before configuration:
1. Power on the camera and set the device to hotspot mode. When the (MV+ID) hotspot signal is found in the WiFi list of the mobile phone, it means that the device is in the waiting configuration state
Configuration steps:
1. Click the “+” button in the upper right corner of the device list -> select [Add Camera]
2. Select [WiFi Smart Camera]
3. Select [AP hotspot connection] and follow the system prompts to continue operation
4. The system automatically obtains the currently connected WiFi, enter the WiFi password -> click [Confirm]
5. Click [Connect AP spot] or enter the mobile phone system [Settings], select [Wi-Fi], connect to the device hotspot (MV+ID), and the device will automatically connect to WiFi after returning to the app
6. The camera’s voice prompts “WiFi connecting – WiFi connected” to indicate that the configuration is successful, and the APP prompts “Completed”
During the configuration process, the device voice prompts «wifi connected», but the mobile phone doesn’t prompt «Completed»
· The device has been successfully connected to the Internet, just add the connected device to the APP
1. Click the “+” button in the upper right corner of the device list -> select [Add Camera]
2. Select [WiFi Smart Camera] -> [Add device ID]
3. Fill in device ID or scan the QR code on device as prompted by the system -> click [Confirm]
4. APP prompts “Completed”
What if the device fails to connect to WiFi during network configuration
1. The camera can only connect to 2.4G frequency WiFi, and does not support 5G frequency WiFi and mixed frequency WiFi, and does not support connecting to the guest network set by the router
2. Please do not exceed the device connection range, try to configure the network again after the device is closed to the router
3. The WiFi name cannot contain Chinese characters, and the WiFi name cannot be set to hide
4. Check whether the router restricts device access
5. If the device fails to receive configuration information or fails to be configured for multiple times, it is recommended to use AP hotspot mode configuration
How to connect a V380 camera with a network cable
1. Cameras with a network port can use a network cable connected to the network, please use a standard 8-core network cable to connect the device
2. There is no need to configure the network when the device is connected to the network cable. After the network cable is plugged in, the network port indicator will be on, and the device with a system sound will prompt “WiFi Connecting” -> “WiFi Connected” means the connection is successful
3. Click the “+” button in the upper right corner of the device list -> select [Add Camera] -> select [WiFi Smart Camera] -> [Add device ID], follow the system prompts to fill in or scan the device ID -> click [Confirm]
Note: The network cable connection has priority. When the network cable is connected, other connection methods will be blocked. If you need to switch to the wireless connection method, please disconnect the network cable first
How to connect 4G camera
1. Please connect the antenna of the device and insert 4G sim card correctly
2. Power on the device, and the device voice prompts “Cellular network connecting” -> “Successful connection” means that the connection is successful
3. Click the “+” button in the upper right corner of the device list -> select [Add Camera] -> select [4G Smart Camera], scan the code to add or click [Can’t find the QR code on the device?] -> [Please enter device ID] to fill in the device ID
What if 4G camera fails to connect
1. If the device prompts “Dialing timeout, please confirm SIM card status”, it means that the device connection has failed
2. Please make sure that the sim card is available and has remaining data
3. Make sure that the device is connected to the antenna and the 4G sim card is inserted correctly
4. Try to connect the device again where the signal is better
How to connect wifi kit
1. Power on the base station and plug it into the router LAN port
2. Power on the camera that needs to be connected to the WiFi kit, and the camera voice prompts that the connection is complete
3. Click the “+” button in the upper right corner of the device list -> select [Add Camera] -> select [kit] -> click [Next], scan the QR code of the base station body and add the camera connected under the base station to the device list
How to connect the device under the AP station(connecting without router)
Preparation before configuration:
1. Power on the camera and set the device to hotspot mode. When the (MV+ID) hotspot signal is found in the WiFi list of the mobile phone, it means that the device is in the waiting configuration state
Connection steps:
1. Open the WiFi list of the mobile phone, connect to the device hotspot (MV+ID), and the “Connected” status under the hotspot means the connection is successful
2. Open the APP, press and hold the drop-down in the blank of the device list to refresh the list
3. The device card appears in the device list, and the device is successfully added
4. Click the play button on the screen, follow the system prompts to set the password, after that, you can do further operations on the device
Note:
1. To connect the device in the AP hotspot mode, the mobile phone must remain connected to the device hotspot. Please ensure that the mobile phone is within the hotspot connection range to avoid disconnecting the device
2. Device hotspot means that the signal from the camera cannot connect to the Internet, and other networked applications cannot be used when the phone is connected to the hotspot. Please pay attention
Why can’t camera connect to 5G frequency WiFi
The difference between 2.4G WiFi and 5G WiFi
1) 2.4G is a wireless technology. Because its frequency band is between 2.400GHz and 2.4835GHz, it is referred to as 2.4G wireless technology
2) 5G WiFi refers to the wireless technology developed based on the IEEE 802.11ac standard. Because the IEEE 802.11ac technology itself works in the 5G Hz frequency band, it is also called 5G WiFi
The difference between 5G WiFi and 5G communication network
· The 5G in 5G WiFi refers to the frequency band of the wireless signal. In the mobile network, the “G” in 4G and 5G refers to the English word “Generation”, and 4G refers to the fourth-generation mobile phone mobile communication standard, 5G is the fifth-generation mobile phone mobile communication standard
Why can’t the device connect to 5G WiFi
· The WiFi module used by the V380 product only supports connection to 2.4G WiFi, and cannot recognize or connect to 5G WiFi. Therefore, 5G WiFi or mixed-band WiFi cannot be used to configure the device network
Networking settings
How to add the online device to your phone
1. Click the “+” button in the upper right corner of the device list -> select [Add Camera]
2. Select [WiFi Smart Camera] -> [Add device ID]
3. Fill in or scan the device ID as prompted by the system -> click [Confirm]
4. APP prompts “Completed”
How to set static IP
After connecting the device with the mobile phone V380App, click [Settings]-[Device IP] interface setting
requirements in the lower right corner of the device list screen :
1. IP: set according to the gateway itself
2. Subnet mask: 255.255.255.0
3. Gateway : Normally router IP
4, DNS: Generally router IP
Note: After setting the static IP, the device needs to be powered off and restart once to reconnect to the network.
How to connect the device after changing the router connection or modifying WiFi password
· If you did the following operations
a. Replaced the router
b. Modified WiFi username and password
c. Changed the network configuration information
Please restore the wireless camera to the factory default settings and reconfigure the network
How many devices can be added to the device list
→ Theoretically, there is no upper limit for the number of device lists
→ Only one device screen can be previewed at the same time
→ Long-press the device list under local login to manage devices in batches
What if can not add device to the device list
· If the device can’t be added to the device list, or the system prompts “Device already exists” when adding, and the device can’t be found in the device list, please try to uninstall the software and reinstall it to add the device again
Network connection
How to check the network status of camera
· After the device is added to the device list, you can view the camera network status in the device window
1. Connecting: it means that the APP is acquiring the device status, and the current status of the device will be displayed after the acquisition is successful
2. Internet offline: indicates that the device is not connected to the Internet, and the APP cannot connect to the device in this state
3. Internet online: indicates that the device is connected to the Internet, and the APP can connect to the device remotely in this state
4. LAN online: it means that the device and the mobile phone are in the same local area network. In this state, the camera and the mobile phone are connected point-to-point
APP prompts «Device offline» when it connects to the device
LAN offline, Internet offline
1) Please try to restart the camera to confirm that the camera has been started correctly and connected to WiFi
2) Turn off the router AP isolation function
3) Check whether the mobile phone can be connected to the Internet normally, and the APP has obtained the network permission
LAN online, Internet offline
1) Please try to restart the camera and confirm that the camera is already in station mode
2) Check whether the router is connected to the Internet
3) Check whether the router restricts the device from connecting to the Internet
4) Turn off functions such as router firewall, blacklist, mac address binding, etc.
5) If the above methods fail to solve the problem, please contact the technician
What to do if the image always keeps loading
1. Please try to close the APP and open it again
2. Please try to power off and restart the camera once
3. Please do not exceed the router connection range, try to connect the device close to the router
4. Please log in to the router background to check if there is a restricted device connection
What to do if the image freezes when connecting
· Network fluctuation or insufficient mobile phone memory during connection may cause the screen to freeze
1. Please do not exceed the router connection range, try to connect the device close to the router
2. Please try to switch the screen to SD stream preview
Connect Tutorial
What if WiFi can not be connected to the router?
· Please try to configure the network near the router.
· The V380 wireless camera can only connect 2.4G frequency WiFi signal.
· Do not use Chinese characters for the router name.
· Check whether the router has device connection restrictions.
· Some routers may be difficult to configure, AP hot spot mode is recommended for the configuration
How to connect a V380 camera with a network cable
→ camera with network interface may use a network cable connected to the network
no configuration is needed–plug in the cable,the light indicator turns on, device with loudspeaker will speak “connecting” –”connected”, the camera is connected
Note : The network cable connection has priority. When the network cable is connected, other connection methods will be blocked.
How to connect the camera to the router with WiFi smart link?
[Click on “+” in the upper right corner] -> [Please use Wi-Fi Smart to connect] -> [Enter the WiFi password] -> [Scan to add the device ID (optional)] -> Click [Next] – > After the connection is successful, the camera voice prompts “WiFi connected”. The device appears in the device list. Click the device to view the image.
How to switch wireless camera connection mode?
A, switch AP hot spot mode to station mode
1, indoor wireless camera:
a) Method one: [Long press the reset reset button of the tail line for about 7s] to restore the device to the factory settings, that is, switch to the station mode.
b) Method 2: When the device is connected to the network, in the lower right corner of the V380App device list screen, set [Setting] – [replace device network] – [switch the device to routing mode and select the route to fill in the password] – [OK].
2, outdoor wireless camera:
(a) Method one: [Long press the reset reset button for about 10s] to restore the device to the factory settings. wait until the tail indicator light which flashed rapidly turns to constant on, Short press the button again,When the tail indicator flashes slowly, the device has been switched to station mode.
(b) Method 2: In the state that the device is connected to the network, in the lower right corner of the V380App device list screen [Settings]-[Change Device Network]-[Switch device to route mode and select route to fill in password]-[OK].
B, switch station mode to AP hot spot mode
1, indoor wireless camera:
a) Method one: [Long press the reset reset button on the tail line for about 7s] to restore the device to factory settings. When the device prompts “waiting for WiFi smart link configuration”, press RESET once to reset the button. The device prompts “access point established, That means the camera is in Hot spot mode already.
b) Method Two: In the state of the device connected to the network, in the lower right corner of the V380App device list screen [settings] – [replace device network] – [switch device to AP mode] – [OK].
2, outdoor wireless camera:
(a) Method one: [Long press the reset reset button for about 10s] . Press the RESET button for 10 seconds to reset the device to the factory settings. The tail light indicator which flashed quickly turned to constant on,it means the camera is in hot spot mode.
(b) Method 2: When the device is connected to the network, in the lower right corner of the V380App device list screen, set [Setting] – [Change Device Network] – [Switch Device to AP Mode] – [OK].
How to use the ap hotspot configuration to connect the camera into the route?
1. Android user: Click [+] in the upper right corner -> [Access-Point established] -> [Select device] -> [Select the route to be connected and enter the route password] -> [Click OK] After successful connection,
The camera will show a prompt “WIFI connection completed”, the device list appears on the device -> [Click on the device to view the image]
2. Ios user: enter the phone to set the connection [device hotspot (hot spot at the beginning of the MV)] -> [click the “+” in the upper right corner -> [hotspot is established] -> [select the route to connect and enter the route password] – > [Click OK] .
After the connection is successful, the camera will prompt “WIFI connection completed”.
Networking issues
Which protocols are supported by the wireless camera
→ The protocols supported by the V380 wireless camera include: TCP/IP, UDP, RTSP, HTTP, DDNS, DHCP, FTP, NTP, and ONVIF (other protocols are temporarily not supported)
Note:
1. Only Anyka and GM support the ONVIF protocol. Other solutions do not support ONVIF protocol can not connect to NVR
2. Anyka 2505 version, GM 3505 firmware does not open RTSP protocol, if you need to connect NVR please contact the technician to provide upgrade package to open RTSP
Device can not be added to the device list
·If the device can not be added to the device list, or the system prompts “The device already exists” when adding, the device cannot be found in the device list.
Method One: Close the software completely and restart it. Open
Method Two: Uninstall the software and reinstall it.
How far is the hotspot mode connection range?
→ The general connection distance is 10 to 15 meters, depending on the use of a certain deviation, can be further in a open empty space
Can’t see the image after modifying the routing password or changing the router
After changing the routing name, password, or changing the router, the network information has changed and the wireless camera needs to be reset to the factory and reconfigure the network.
How to check the device ID (device number)
→ ID is the 8-digit device number, which can be tagged on the device body, or viewed in the list of software devices.
During the configuration process, the device voice prompt «wifi connected», but the mobile phone prompts «device connection timeout»
Method one: According to the voice prompt “wifi connected”
→ Click [Next] system automatically searches for devices connected to the same LAN and the new device will show up in the device list, click [Next] if the App can not find any new devices automatically, the page turns to device manual adding page automatically, input or scan device ID [Add], the system jumps to the device list, the newly added device is displayed in the device list first
Method 2: Add LAN (Only if the camera and the mobile phone are connected to the same network)
→ Return to the [Device List] interface
→ pull down the screen to refresh the device list
→ The system automatically searches for the LAN device and then adds the device to be displayed in the device list first
Can not find Hot spots on App or mobile phone
Make sure the camera has started without problems and is in hot spot mode.
1) the device will be in hot spot mode after the camera speaks”access point established”
2) Outdoor all in one devices will right be in hot spot mode after factory reset, the tail indicator light of outdoor all in one devices without Internet port will be on.
• Make sure antenna is well installed if the device has external antenna.
• Make sure the device is not connected with Internet wire,if it is connected with a wire, other ways of connection will be screened.
• Try change phone connection or Upgrade the firmware version of the device
· Contact the seller to have the device repaired if none of the above works
How to add a networked device to your phone
Method one: Manually add
1, open the [device list] interface, click [+] in the upper right corner
2, select [WiFi connection completed] or [other ways]
3, after entering the ID and password [OK add], the system jumps to the device List, the newly added device is displayed in the first place in the device list.
Method 2: Local Area Network Addition (Only if the camera and the mobile phone are connected to the same network)
1. Open the Device List screen, Pull down the screen to refresh the device list.
2. The system automatically searches for the LAN device and automatically adds the device display. In the first place of the device list , successful adding, the preview needs to enter the correct access password (as shown below)
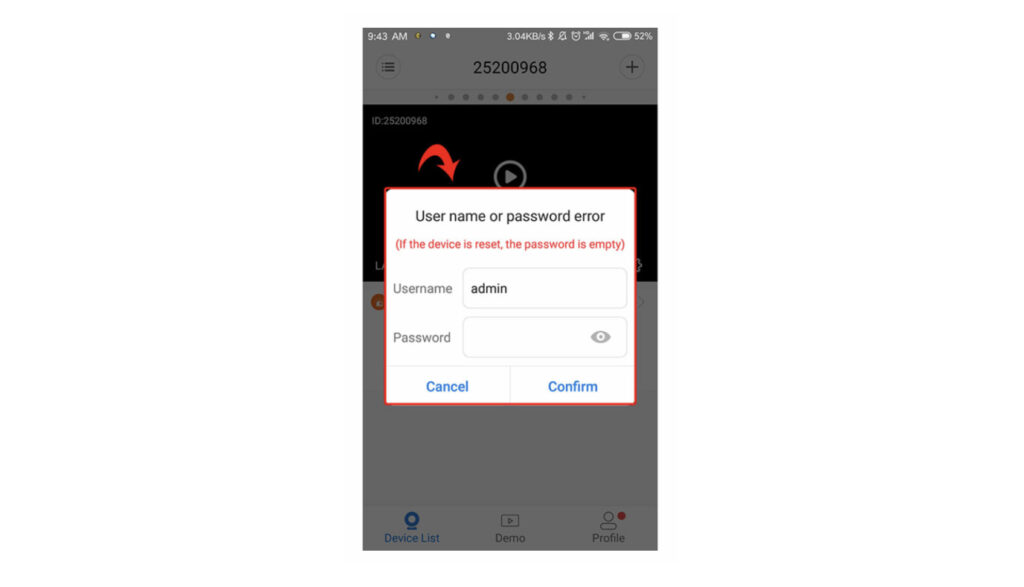
3, the device’s first networked device password is empty, need to set a password
Перейти к контенту
Всем привет! Сегодня наконец-то дошли руки до настройки V380 WiFi Camera. Аппарат хороший, но вот проблема – инструкции на русском языке в интернете нет и скачать её негде. Также русской инструкции нет и в коробке, потому что сам аппарат китайский. Но мне все же удалось её настроить и подключить. Об этом и будет эта статья.
ПОМОЩЬ! Если в процессе настройки возникнут трудности, то срочно пишем об этом в комментариях под статьей. Я или моя команда, оперативно отвечаем на все вопросы.
Содержание
- Инструкция
- Автономный режим
- Задать вопрос автору статьи
Инструкция
- В первую очередь нужно скачать приложение на свой телефон или планшет. Для этого открываем Google Play или App Store и в поисковой строке вводим модель аппарата «V380».
- Второй вариант — это скачать программу с официального сайта. Для этого нужно отсканировать QR-код. У меня он был на коробке, но некоторые находят его в инструкции, которая идёт в коробке.
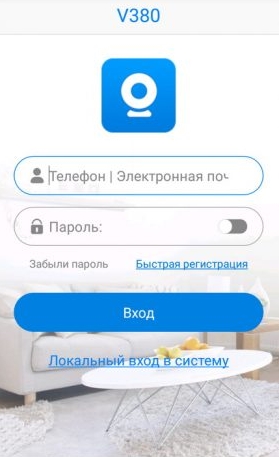
- При первом запуске нужно будет зарегистрироваться. Нажимаем «Быстрая регистрация» и вводим почтовый ящик и пароль. Если нет доступа в интернет – нажмите «Локальный вход в систему». При регистрации на тот почтовый ящик, который вы указали ранее – придёт письмо. Там будет ссылка – на неё нужно перейти, чтобы подтвердить регистрацию.
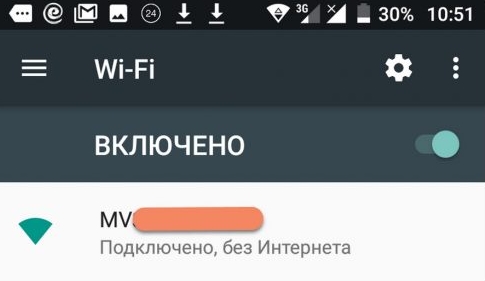
- Теперь отключите мобильную связь на телефоне. Включаем видеокамеру. Она создаст вокруг себя беспроводную точку доступа, к которой можно будет подключиться. Так что нужно просто подключиться к Wi-Fi камеры. Имя сети будет начинаться с «MV», пароля не будет.
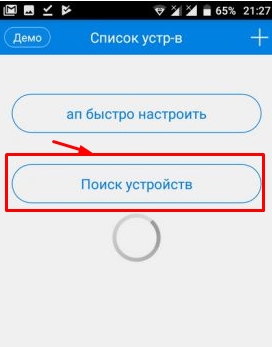
- Запускаем опять приложение и нажимаем «Поиск устройства».
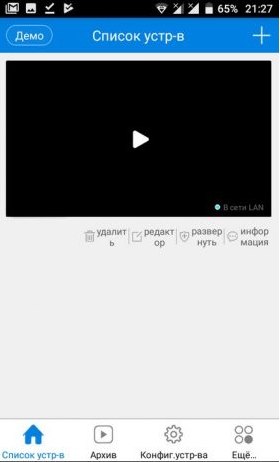
- Теперь мы зашли на камеру. Нажимаем на значок проигрывания. После этого вылезет окно, которое попросит вас создать пароль для «админки».
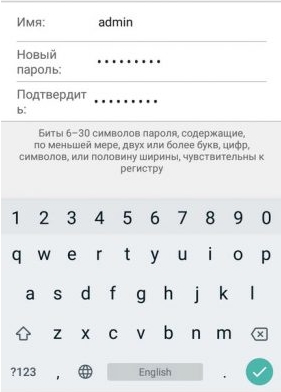
- Придумываем имя пользователя и пароль. После этого вы увидите изображение с камеры.
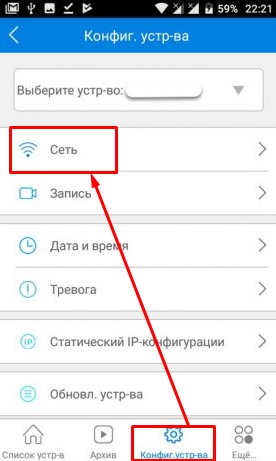
- Теперь осталось подключить устройство к интернету через Wi-Fi вашего маршрутизатора. Для этого там же нажимаем по шестеренке. После этого выбираем раздел «Сеть».
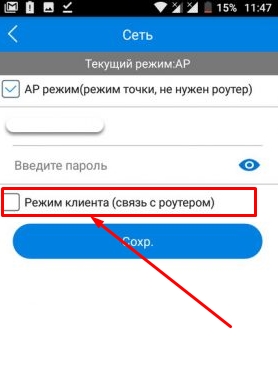
- Сейчас камера работает в режиме точки доступа, но нам нужно переключить ее в режим клиента. Включаем нижнюю галочку.
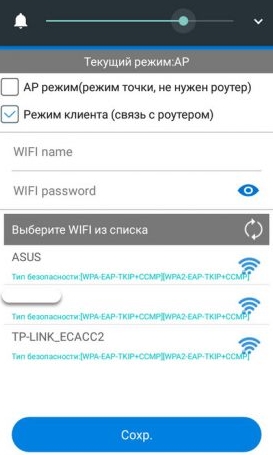
- Далее вы увидите все ближайшие сети. Выбираем свой Wi-Fi, вводим пароль от него. Теперь вы сможете иметь доступ к этой видеокамере из любой точки мира, где есть интернет.
Также советую посмотреть все пункты меню WiFi Smart Net Camera V380. Их немного, но они имеют определенные функции, которые могут быть полезны в той или иной ситуации. Если у вас ещё остались вопросы по поводу настройки или быть может каких-то функций камеры – задавайте их в комментариях и я постараюсь вам помочь. Можете также написать свой короткий отзыв внизу под статьёй для других читателей.
Автономный режим
Обновлено Ботаном.
Если почитать комментарии и наш чат поддержки – у многих владельцев этой камеры включается “автономный” режим. Если быть точнее – при открытии приложения “Устройство в автономном режиме”. Ответы уже были даны в комментариях, но люди продолжают упорно задавать этот вопрос. Выношу это в отдельный раздел, авось количество вопросов хоть немного и уменьшится (вряд ли ибо не все читают).
- В 99% случаев эта проблема возникает из-за невнимательности пользователи – вы не подключили камеру к интернету, отсюда и автономный режим. Бывает, конечно, что камера просто не может найти Wi-Fi (он выключен или далеко) или же долго не использовалась, и чего-то настройки слетели, или какие-то ваши сетевые проблемы (которые сложно предугадать), или вообще старые приложения/прошивки.
- Подключились к камеру напрямую? К Wi-Fi камеры? Отлично, в приложении заходим в ее конфигурацию: Сеть – Режим клиента. Далее выбираем свой домашний Wi-Fi и вводим пароль от него. Теперь у камеры должен получиться доступ к интернету, от ее Wi-Fi сети можно отключаться.
Бородач 1875 статей
Сенсей по решению проблем с WiFiем.
Обладатель оленьего свитера, колчана витой пары и харизматичной бороды.
Любитель душевных посиделок за танками.
Как настроить WiFi камеру V380 Pro
На чтение 6 мин Опубликовано Обновлено
Wi-Fi камеры стали очень популярными среди пользователей благодаря своей простоте и удобству использования. Одной из самых популярных моделей является камера V380 Pro. Она предлагает широкий функционал и отличное качество изображения. Однако, настройка камеры может вызывать затруднения у новичков. В этой статье мы расскажем, как правильно настроить Wi-Fi камеру V380 Pro пошагово.
Первым шагом при настройке камеры V380 Pro является подключение камеры к питанию. Для этого необходимо вставить штекер кабеля питания в разъем камеры и подключить другой конец к розетке. Убедитесь, что камера подключена к надежному источнику питания, чтобы избежать перебоев в работе.
Вторым шагом является установка мобильного приложения V380 Pro на ваше мобильное устройство. Вы можете скачать приложение из официальных магазинов приложений, таких как App Store или Google Play. Запустите приложение на вашем устройстве и выполните простую регистрацию.
Далее вам необходимо подключить камеру к Wi-Fi сети. Для этого в приложении выберите пункт меню «Настройки» и найдите раздел «Wi-Fi настройки». Введите имя и пароль вашей домашней Wi-Fi сети и нажмите кнопку «Подключить». Камера автоматически установит соединение с вашей сетью.
Содержание
- Как настроить Wi-Fi камеру V380 Pro
- Подготовка к настройке
- Подключение к Wi-Fi
- Настройка функций камеры
Wi-Fi камера V380 Pro позволяет легко создать систему видеонаблюдения для вашего дома или офиса. Чтобы правильно настроить камеру, следуйте этим пошаговым указаниям:
- Подключите камеру к питанию с помощью прилагаемого адаптера.
- Скачайте и установите приложение V380 Pro на свой мобильный телефон или планшет с помощью официального магазина приложений (App Store или Google Play).
- Откройте приложение V380 Pro и создайте новый аккаунт.
- Войдите в свой аккаунт и нажмите на кнопку «Добавить устройство» в главном меню приложения.
- Выберите в списке «Добавить устройство» тип камеры «Wi-Fi камера».
- Настройте Wi-Fi на своей камере. Для этого нажмите на кнопку «Wi-Fi настройки» на задней панели камеры и выполните инструкции на экране.
- Вернитесь в приложение V380 Pro и выберите свою камеру из списка доступных устройств.
- Введите пароль Wi-Fi сети, к которой хотите подключить камеру, и нажмите «Подключить».
- Дождитесь, пока камера установит соединение с Wi-Fi сетью. Это может занять несколько минут.
- Поздравляю! Ваша Wi-Fi камера V380 Pro успешно настроена. Теперь вы можете контролировать ее через приложение V380 Pro на своем мобильном устройстве.
Обратите внимание, что для дальнейшей работы с камерой через приложение V380 Pro вам понадобится подключение к Интернету и аккаунт в приложении.
Если у вас возникнут проблемы при настройке камеры, рекомендуется обратиться в техническую поддержку производителя или ознакомиться с дополнительной информацией в руководстве пользователя камеры V380 Pro.
Подготовка к настройке
Перед началом настройки Wi-Fi камеры V380 Pro необходимо убедиться в наличии следующих элементов:
- Wi-Fi камера V380 Pro
- Устройство для настройки (например, смартфон или планшет)
- Доступ к беспроводной сети Wi-Fi с интернет-соединением
- Мобильное приложение V380 Pro (доступно для скачивания в App Store или Google Play)
- Питание для камеры (обычно кабель USB и адаптер питания)
Также перед настройкой рекомендуется выполнить следующие действия:
- Убедиться в полной зарядке аккумулятора камеры или подключить питание, чтобы избежать возможных проблем с питанием во время настройки.
- Расположить камеру в месте, где доступ к беспроводной сети Wi-Fi стабильный.
- Проверить, что Wi-Fi сеть, к которой будет подключаться камера, работает стабильно и имеет доступ в Интернет.
После подготовки всех необходимых элементов и выполнения рекомендаций можно приступать к настройке Wi-Fi камеры V380 Pro.
Подключение к Wi-Fi
Для начала настройки Wi-Fi камеры V380 Pro, убедитесь, что у вас есть работающая Wi-Fi сеть с доступом к Интернету. Затем следуйте этим шагам:
- Включите камеру: Подключите камеру к питанию с помощью кабеля питания и дождитесь, пока она запустится.
- Установите приложение V380 Pro: Скачайте и установите приложение V380 Pro на свой мобильный телефон с помощью App Store или Google Play Store.
- Запустите приложение и зарегистрируйтесь: Откройте приложение и следуйте инструкциям для регистрации новой учетной записи.
- Добавьте камеру в приложение: Нажмите на значок «+» в верхнем правом углу экрана и выберите «Добавить камеру».
- Выберите режим соединения: Выберите «Wi-Fi соединение» в списке доступных режимов соединения.
- Подключитесь к Wi-Fi сети: Введите имя Wi-Fi сети (SSID) и пароль для подключения. Нажмите «Сохранить».
- Установите камеру в режим ожидания: Подождите несколько секунд, пока камера не перейдет в режим ожидания Wi-Fi соединения (индикатор светодиода начнет мигать серым цветом).
- Подключитесь к камере: Вернитесь в приложение и выберите «Подключить камеру». Сканируйте QR-код на камере или введите ее серийный номер вручную.
- Настройте Wi-Fi: Введите имя пользователя и пароль для аутентификации в приложении. Нажмите «Подключиться» и дождитесь завершения процесса настройки.
- Подключение завершено: После успешной настройки Wi-Fi, вы сможете просматривать видео с камеры и управлять ее функциями через приложение V380 Pro.
Теперь вы знаете, как правильно настроить Wi-Fi камеру V380 Pro и подключить ее к вашей Wi-Fi сети. Пользуйтесь камерой для наблюдения за своим домом, офисом или любым другим помещением!
Настройка функций камеры
Wi-Fi камера V380 Pro предлагает широкий спектр функций, которые можно настроить для удобства использования. В этом разделе мы рассмотрим основные функции и способы настройки.
| Функция | Описание | Способ настройки |
|---|---|---|
| Двусторонний звук | Позволяет общаться с людьми находящимися рядом с камерой. | В меню настройки выберите «Двусторонний звук» и включите его. |
| Обнаружение движения | Камера может автоматически срабатывать и записывать видео при обнаружении движения. | В меню настройки выберите «Обнаружение движения» и включите его. |
| Запись на SD карту | Позволяет записывать видео и сохранять его на установленную SD карту. | Вставьте SD карту в камеру, зайдите в меню настройки и выберите «Запись на SD карту». |
| Уведомления на смартфон | Камера может отправлять уведомления на ваш смартфон при срабатывании обнаружения движения или других событий. | В приложении V380 Pro настройте уведомления и разрешения для получения уведомлений. |
| Доступ по сети | Позволяет получить доступ к камере из интернета, используя удаленный доступ. | В меню настройки выберите «Доступ по сети» и настройте необходимые параметры. |
Это лишь некоторые из функций, которые можно настроить на Wi-Fi камере V380 Pro. Ознакомьтесь с руководством пользователя и экспериментируйте с настройками, чтобы максимально раскрыть возможности вашей камеры.
V380 Pro — это популярное приложение для мониторинга и управления камерами видеонаблюдения. Оно предлагает широкий спектр функций, таких как просмотр в режиме реального времени, запись видео, оповещения о движении и многое другое. Однако, как и любое другое приложение, оно иногда может столкнуться с ошибками, которые могут мешать пользователю войти в приложение. В этой статье мы рассмотрим, как решить проблему с ошибкой при входе в приложение V380 Pro.
Шаг 1: Проверьте соединение с Интернетом
Первым шагом в решении проблемы с ошибкой входа в приложение V380 Pro является проверка вашего соединения с Интернетом. Убедитесь, что ваше устройство имеет стабильное подключение к Wi-Fi или мобильным данным. Если вы используете Wi-Fi, попробуйте подключиться к другой Wi-Fi сети или перезагрузить маршрутизатор.
Шаг 2: Проверьте правильность ввода учетных данных
Если уверены, что у вас есть стабильное соединение с Интернетом, следующим шагом будет проверка правильности ввода учетных данных при входе в приложение V380 Pro. Убедитесь, что вы правильно ввели свое имя пользователя и пароль. Обратите внимание на регистр символов, так как они чувствительны к регистру.
Шаг 3: Обновите приложение
Если проверка соединения и правильность ввода учетных данных не помогают решить проблему, попробуйте обновить приложение V380 Pro до последней версии. Обычно разработчики выпускают регулярные обновления, в которых исправляют ошибки и улучшают стабильность работы приложения. Проверьте App Store (для пользователей iOS) или Google Play Store (для пользователей Android) на наличие обновлений приложения V380 Pro.
Шаг 4: Очистите кеш приложения
Кэш приложения иногда может накапливаться и приводить к ошибкам. Чтобы исправить это, попробуйте очистить кеш приложения V380 Pro. Для этого перейдите в настройки вашего устройства, найдите раздел «Управление приложениями» или «Приложения и уведомления» и найдите V380 Pro в списке установленных приложений. Нажмите на него и выберите опцию «Очистить кеш». После этого попробуйте войти в приложение снова.
Шаг 5: Переустановите приложение
Если проблема по-прежнему не решена, последним шагом будет полное удаление и переустановка приложения V380 Pro. Для этого удалите приложение с вашего устройства и загрузите его снова из App Store или Google Play Store. После переустановки введите свои учетные данные и попробуйте войти в приложение.
Заключение
В этой статье мы рассмотрели полное руководство по исправлению ошибки при входе в приложение V380 Pro. Если вы следуете шагам из этого руководства, вероятность успешного входа в приложение должна значительно возрасти. Если проблема не решена даже после выполнения всех этих шагов, рекомендуется обратиться в службу поддержки приложения или проверить форумы сообщества пользователей для поиска решения.