From DD-WRT Wiki
(Redirected from CLI)
Jump to: navigation, search
You are here: DD-WRT wiki mainpage / Scripting / SSH/Telnet & The CLI
Contents
- 1 Using Telnet
- 2 SSH
- 2.1 Overview
- 2.2 Setting Up
- 2.2.1 Public key method
- 2.2.2 Password Login method
- 2.2.3 Automatic Login (for shell scripts)
- 2.2.4 Security Tips
- 2.3 SSH Shell Client
- 2.4 SSH Port Forwarding
- 2.4.1 Local Port Forwarding
- 2.4.2 Remote Port Forwarding
- 2.4.2.1 Requirements
- 2.4.2.2 Setup
- 2.5 SCP
- 2.6 Drop Bear
- 3 The DD-WRT Command Line
- 3.1 Basic Syntax
- 3.1.1 Relative Path Operators
- 3.1.1.1 Examples
- 3.1.2 Pipes and Redirects
- 3.1.3 Background processes
- 3.1.1 Relative Path Operators
- 3.2 WEB-GUI (http[s]) Special note
- 3.3 Basic Commands
- 3.4 More Advanced Commands
- 3.1 Basic Syntax
- 4 Applications
- 5 See also
- 6 External Links
[edit] Using Telnet
- Open the command prompt and type «telnet» (On Windows vista/7 you will need to install it from «programs and features»).
- connect to <Router_LAN_IP> e.g. 192.168.1.1 so in the command prompt, this would look like:
telnet 192.168.1.1
- When asked for the username, enter root (even if you changed username in web interface)
- When asked for the password, enter your router’s password (default «admin»)
[edit] SSH
[edit] Overview
SSH, or Secure Shell, is an encrypted protocol and associated program intended to replace telnet. It can also be used for creating secure tunnels, somewhat akin to Virtual Private Networks, and for use as a network file system (Sshfs). Unless changed, everything SSH operates on port 22.
SSH operates just as telnet with a user/password combination or on a Public/Private key infastructure. For the latter to work, a small public key is given to the server and the server gives your client its public key. Your client encrypts information to the server using the servers public key and the server encrypts information sent to you using your public key. Private keys are never exchanged, and are used to decrypt the information encrypted with the associated public key.
The DD-WRT firmware can use user/pass logon or only allows connections from clients whose public keys are manually entered via the web interface. Multiple keys can be entered by placing them on separate lines.
If you want to use user/password to login using SSH use user «root» with the password you set in the webinterface
Actually you can manually set (via telnet or ssh) the sshd_authorized_keys nvram variable.
ie
nvram set sshd_authorized_keys=key1 key2 key3 etc
You can also manually edit /tmp/root/.ssh/authorized_keys and add keys (although these will
disappear on a reboot unless you have a startup script altering them).
It is worth pointing out ssh keys are quite long strings of characters so if you paste them in you
have to be careful that you don’t get any line breaks (ie it is one Long continuous line).
or they will not work.
[edit] Setting Up
[edit] Public key method
Public key authentication is one of the most secure methods of logging into SSH. It functions similar to HTTPS, as all transmissions are encrypted with a key that only the client and server will have. Another plus…if you use this method instead of password authentication, no one will be able to crack away at your router trying to guess the password!
To enable it, first you should generate a Public/Private key pair on your desktop machine. This can be done through the «Puttygen» utility if you’re using either Putty or WinSCP as clients. Copy the public key to the clipboard and save the private key somewhere on your computer. There is no need to save the public key. If you forget it, you can instruct Puttygen to open your private key file rather than generating a new key pair and it will tell you your public key. Users of non-windows environments may use the ssh-keygen(1) utility:
user@machine:~> ssh-keygen
Generating public/private rsa key pair.
Enter file in which to save the key (/home/user/.ssh/id_rsa):
Enter passphrase (empty for no passphrase):
Enter same passphrase again:
Your identification has been saved in /home/user/.ssh/id_rsa.
Your public key has been saved in /home/user/.ssh/id_rsa.pub.
The key fingerprint is:
68:1c:50:0e:76:c1:d0:c7:9e:5e:5a:65:78:20:5c:fb user@machine.example.com
It is recommended that you don’t secure your key pair with a password, as this will make things easier for you, although somewhat less secure.
- Using the Web Interface, go to the Administration tab. (in v24 use Services tab)
- Under the Services sub-tab, Enable SSHd in the Secure Shell section. If new options don’t appear, Save Settings
- Paste your public key in the authorized key of the SSHD section that has now expanded. You will need to generate this on your desktop if you don’t have one yet.
- Save and Apply Settings
NOTE: The format of the public key when pasted has to be «ssh-rsa», space, key, space, comment. Here is an example: (please note that there should be no line feed at the end)
ssh-rsa AAAAB4NfaC3yc5 ... jZfYmBTi7Q== rsa-key-20101024
Alternate method:
Connect with ssh (login/password :0)
root@wrt54g:~# nvram set sshd_authorized_keys='ssh-rsa AAAAB4NfaC3yc5 ... jZfYmBTi7Q==  rsa-key-20101024'
root@wrt54g:~# nvram commit
root@wrt54g:~# reboot
Remember to enter your key as an entire characters line (no space, tab…)
In Putty, you can enable key authentication by opening the SSH authentication configuration (Connection -> SSH -> Auth) and entering or browsing to your private key file. Also make sure your auto-login username is root (in Connection -> Data).
[edit] Password Login method
If you don’t want the hassle of generating ssh keys, you may use the password logon method. However, please be aware that this method is much less secure! (passwords may be truncated to 8 characters or less)
- Using the Web Interface, go to the Administration tab. (in v24 use Services tab)
- Under the Services sub-tab, Enable SSHd in the Secure Shell section. If new options don’t appear, Save Settings
- Enable Password Login to enable the password login
- Save and Apply Settings
After this you may login as user «root» with the password you set for the webinterface
[edit] Automatic Login (for shell scripts)
The Dropbear SSH client allows you to specify the password through an environment variable. This is useful when you need dd-wrt to auto-login to another host via SSH.
#the following requires dd-wrt v24 or later
DROPBEAR_PASSWORD='my password' ssh user@hostname
[edit] Security Tips
- Choose a random, non-standard port number >1024, especially if you enabled SSH access from the Internet! Most attackers will use a port scanner that only scans for common open ports by default. Scanning all 65535 ports is much slower for them, which makes it more difficult to find an attack vector and also more likely to be flagged by an Intrusion Detection System.
- Memorize, or record somewhere safe, your router’s key fingerprint! In the process of logging into your router, if you see that the key fingerprint matches, you can rest assure noone is spying on your connection (i.e. via man-in-the-middle attack). If the key fingerprint does NOT match (your SSH client would likely notify you of this), something is wrong and you should consider terminating the connection immediately! (Note: the router’s key fingerprint may change upon reset and/or upgrade, as it will likely generate a new key pair)
- For even more added security when using the public key method, you can password protect your private key. This way, if someone malicious happens to get ahold of it, they will still not be able to log into your router without first cracking the password of the key. Otherwise, if the keys are unprotected, anyone who stumbles upon them could likely gain immediate root access to your router and network.
[edit] SSH Shell Client
Provides a secure alternative to standard telnet.
A good Windows Client to use is Putty
Configure the client to use the Private Key you saved earlier.
Most Linux distros have telnet and SSH clients by default.
[edit] SSH Port Forwarding
SSH port forwarding is the ability to create encrypted tunnels to pass traffic through, sort of like a VPN. Below we will discuss two different approaches to SSH port forwarding; Local, and Remote
[edit] Local Port Forwarding
A real world example:
Suppose that you wish to manage your router’s settings from anywhere over the Internet. You want to use a GUI interface, but you don’t want to enable management via remote HTTP (insecure) or HTTPS (resource-intensive). How do you accomplish this?
This is where SSH port forwarding comes in. This feature makes it possible to connect securely to the router’s HTTP web interface, even when the interface has been configured to only be accessible by computers on the router’s LAN.
First, ‘Remote SSH Management’ must be enabled under Administration -> Management if you wish to connect to your router from the WAN.
A local port forward can be established from the CLI with the following syntax:
ssh -L <local_port>:<destination_server>:<destination_port> user@<ssh_server> -p <ssh_port>
To explain more precisely what this command does: your computer establishes an SSH connection to <ssh_server>; a tunnel is created between your computer’s <local_port>, the <ssh_server>, and <destination_port> on <destination_server>. Data sent to <local_port> is transferred over the secure SSH connection to the <ssh_server>, where it is then decrypted and forwarded to <destination_port> on <destination_server>.
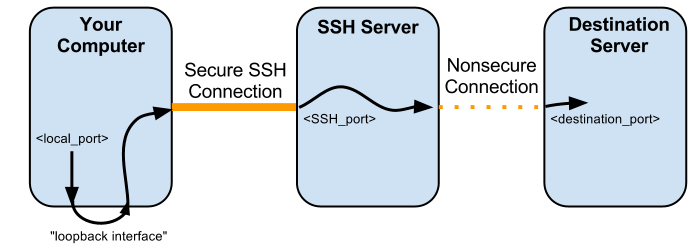
For instance, if your router’s WAN IP address is 12.23.34.35, its remote administration SSH port is 9999 and its LAN-accessible web interface is at port 80:
ssh -L 12345:localhost:80 root@12.23.34.45 -p 9999
The resulting connection:

Open your local browser window and point it to http://localhost:12345, and you should be able to log into the router’s web interface as if you were on the router’s local area network. This connection is secure!
If you’re using PuTTY for SSH, the procedure is similar; SSH port forwarding is configured under SSH -> Tunnels
(NOTE: the PuTTY connection fails after web interface login when using PuTTY from the Ubuntu repositories, giving error: «SSH2_MSG_CHANNEL_FAILURE for nonexistent channel 257» —Brandonc 23:44, 2 August 2012 (CEST))
For more information related to the tunnel setup see here:
Forum Discussion
[edit] Remote Port Forwarding
This is useful to tunnel things like RDP (Remote Desktop) through an encrypted SSH tunnel over the internet. For example, you want to be able to access your work computer from home.
If you had:
HomePC <-> Router <-> Internet <-> Firewall <-> WorkPC
WorkPC, which is running RDP on port 3389, issues ssh -R 5555:localhost:3389 root@router.home
HomePC can use his RDP client to connect to port 5555 on the router and this would create an SSH tunnel which will connect HomePC to port 3389 on the WorkPC.
[edit] Requirements
- DD-WRT v24 RC7+
- SSHd and SSH TCP Forwarding must be enabled under Services -> Secure Shell
- Remote SSH Management should be enabled as well, under Administration -> Management
[edit] Setup
Setting up a remote port forward is relatively straightforward when using the PuTTY utility under Windows.
See Connections -> SSH -> Tunnels. Make sure your configuration includes parameters as illustrated above. Namely,
- Local and Remote ports should accept connections from other hosts
- Source port (port # on the router, should be > 1024)
- Destination IPAddress:Port
- Type: Remote
[edit] SCP
Secure Copy (SCP) allows one to copy files to and from the router and a remote host—usually a desktop machine.
Some good Windows clients to use are FileZilla and WinSCP.
Configure the client to use the Private Key you saved earlier, or use «root» and the webinterface password
Remember: only the /tmp and /jffs partitions are writable!
[edit] Drop Bear
DropBear is an SSH client/server installed by default on the WRT54G. DropBear allows one to connect from the WRT54G to a remote SSH server for scp, etc. I don’t believe SSHD needs to be enabled through the Web Interface in order to use the client portion of DropBear.
If you have an SSH server on your desktop machine (such as OpenSSH) you pull files from your desktop machine using the scp command. This can be used to copy files from your desktop machine in a Startup Script
[edit] The DD-WRT Command Line
aka the DD-WRT Linux shell
This is an ‘ash’ shell. Ash is a version of sh, literally ‘A SHell’
(A command Interpreter)
[edit] Basic Syntax
The Linux Command Shell (Ash) is not the same as the Windows/DOS command prompt.
/ (and not \) is used to separate directories in a path, just like the interweb.
In order to execute a command, the path for that command must be provided. This may either be a full path or a relative path.
[edit] Relative Path Operators
There are two relative path operators.
.        The current path
..       One directory above the current path
[edit] Examples
1) If you are in the /jffs/usr/bin directory and wish to run the /jffs/usr/bin/noip command use:
/jffs/usr/bin # /jffs/usr/bin/noip
or
/jffs/usr/bin # ./noip
2) If you are in the /jffs/usr/bin directory and wish to run the /jffs/usr/kismet command use:
/jffs/usr/bin # /jffs/usr/kismet
or
/jffs/usr/bin # ../kismet
or
/jffs/usr/bin # cd ..
/jffs/usr # ./kismet
3) Relative paths can also be used as arguments. If you installed the noip package, you’d notice that the command is installed as /jffs/usr/bin/noip but its configuration file is installed as /jffs/etc/no-ip.conf When running noip, it is thus required to give it the path to its configuration file with the -c command. This can be done like:
/jffs/usr/bin # ./noip -c /jffs/etc/no-ip.conf
or
/jffs/usr/bin # ./noip -c ../../etc/noip.conf
notice that the first ../ brings us to /jffs/usr/. The second ../ brings us to /jffs/, and then the rest of the path can be appended.
4) While the other examples all showed how to save typing, you can also really screw around with relative paths. To launch the noip command in example 1, you could also use
/jffs/usr/bin # ../../../jffs/./usr/./bin/././../bin/././noip
Here we browse all the way back to the root / directory, then climb back up to /jffs/usr/bin, drop back down to /jffs/usr and then climb back up to /jffs/usr/bin.
Current path references of /./ are thrown in sporadically just to mix things up. Notice how /./ always references the then current path, not the original path of the shell when the command was entered.
[edit] Pipes and Redirects
The output of commands can be piped through other commands or redirected to devices and files.
< and > are the redirect operators.
< Takes input from a device or file and routes it as input to the command given.
> Takes output from a command and redirects it as input for a device or file.
Ex: If you don’t want to see the output of a command, redirect it to the null device:
command > /dev/null
| is the pipe character, and pipes the output through another command (for formatting, etc)
Ex: the most common use of the pipe is to limit the output of a command:
command | more
This is extremely useful for commands like nvram show which list some 800-1200 lines. nvram show | more will list the results 1 page at a time.
[edit] Background processes
It is possible to run programs in the background (returning you to the command prompt immediately) by terminating your command with the & character.
ex:
command &
Make sure you add a space between your command and the ampersand or you will result with a File not found error.
[edit] WEB-GUI (http[s]) Special note
The built-in WEB-GUI command line interface (Diagnostics.asp page) allows only about 200 characters max per line.
Special characters such as » or | must be entered after a \
Example, if you want to set a text nvram value:
Instead of
nvram set svqos_svcs="edonkey p2p 0:0 40 | bittorrent p2p 0:0 40 |"
Enter
nvram set svqos_svcs=\"edonkey p2p 0:0 40 \| bittorrent p2p 0:0 40 \|\"
[edit] Basic Commands
<command> -h                 The -h flag almost always provides help on a command. Use it!
ls                           List the contents of the current directory
cd <directory or full path>  Change to that directory or path
cp <source> <destination>    Copy the source file to the destination
cp -r <source> <destination>    Copy the source directory to the destination directory
mv <source> <destination>    Move the source file to the destination
mkdir <directory name>       Create a new directory
wget <URI>                   Download the file at the given URI to the current path
tar -xz -f <file>            un-gzip and un-tar the given *.tgz or *.tar.gz file
rm <file>                    Delete the file
rm -r <directory>            Delete the directory and all contents
killall <program name>       Kill all running processes of the program
ps                           Show running processes
top                          Show running processes in a graphical frontend
[edit] More Advanced Commands
These commands warrant their own wikis:
- brctl
- cut
- dmesg
- expr
- dnsmasq
- ifup
- ifconfig
- ip
- iptables
- ipkg
- scp
- setpasswd
- setuserpasswd
- startservice
- stopservice
- tc
- wl
- write (part of CLI flash instructions)
[edit] Applications
PuTTY (All), HyperTerminal (WinXP and older), minicom (Linux), picocom (Linux), terminalbpp (Win)
[edit] See also
Script Examples
Sshfs
Startup Scripts
SSH access from internet
Tunnel all traffic over ssh using remote windows machine and Putty
[edit] External Links
Wikipedia’s SSH article
Linux Shell Scripting Tutorial
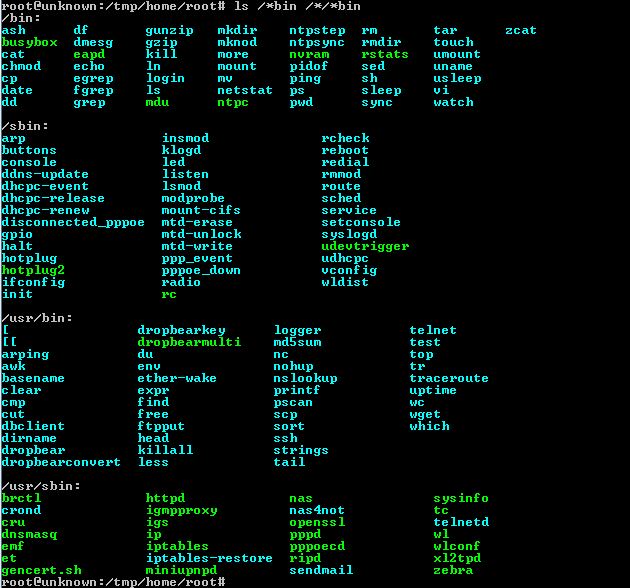
Telnet/SSH BusyBox Commands
If you have flashed your router with DD-WRT or Tomato you can probably use the following linux commands in the picture below.
Before you get started, you’ll need to enable Telnet client on your Windows computer. Go to Programs and Features under the Control Panel. Telnet client is found under add/remove features.
If you want to capture the information to a local Windows computer, during the telnet session, make a folder on your C: drive named telnet. Then type :
telnet youripaddress -f c:\telnet\capture.txt
Enter your username and password.
Want to see the commands that are available? Type ls /*bin /*/*bin . – ls will list the commands and used with bin will give the commands found in the different directories that have ‘bin’ in the name.
While there are hundreds of command options for both operating systems, they are primarily Linux.
Here’s a great list – link. (Not all commands will work)
uname -a gives the Linux version

Want to see a ton of information about your router? Type sysinfo | more
This will give you information about the system including CPU, memory, network and a ton of other information.
unknown login: root
Password:
Tomato v1.28.0000 MIPSR2-120 K26 Max
========================================================
Welcome to the Linksys E2000 [TomatoUSB]
Uptime: 00:39:53 up 1:54
Load average: 0.16, 0.03, 0.01
Mem usage: 30.8% (used 8.88 of 28.84 MB)
WAN : 192.168.0.3/24 @ C0:C1:C0:xx:xx:xx
LAN : 192.168.1.1/24 @ DHCP: 192.168.1.2 – 192.168.1.51
WL0 : Zeus @ channel: 6 @ C0:C1:C0:xx:xx:xx
========================================================
root@unknown:/tmp/home/root# ls /*bin
/bin:
ash date fgrep ls netstat ping sed udpxy
busybox dd grep mdu nice ping6 sh umount
cat df gunzip mkdir ntpc ps sleep uname
chmod dmesg gzip mknod ntpstep pwd stty usleep
chown eapd kill more ntpsync rm sync vi
cp echo ln mount nvram rmdir tar watch
cstats egrep login mv pidof rstats touch zcat
/sbin:
arp hotplug mtd-erase sched
buttons hotplug2 mtd-unlock service
console ifconfig mtd-write setconsole
ddns-update init ppp_event syslogd
dhcp6c-state insmod radio udevtrigger
dhcpc-event klogd rc udhcpc
dhcpc-release led rcheck vconfig
dhcpc-renew listen reboot wldist
disconnected_pppoe lsmod redial
gpio modprobe rmmod
halt mount-cifs route
root@unknown:/tmp/home/root# sysinfo
Tomato v1.28.0000 MIPSR2-120 K26 Max
Linux version 2.6.22.19 (root@tomato) (gcc version 4.2.4) #37 Sat Jun 7 05:30:28
CEST 2014
NVRAM
1012 entries, 21604 bytes used, 39836 bytes free.
INTERFACES
br0 Link encap:Ethernet HWaddr C0:C1:C0:xx:xx:xx
inet addr:192.168.1.1 Bcast:192.168.1.255 Mask:255.255.255.0
UP BROADCAST RUNNING MULTICAST MTU:1500 Metric:1
RX packets:185075 errors:0 dropped:0 overruns:0 frame:0
TX packets:166658 errors:0 dropped:0 overruns:0 carrier:0
collisions:0 txqueuelen:0
RX bytes:21559405 (20.5 MiB) TX bytes:160278768 (152.8 MiB)
eth0 Link encap:Ethernet HWaddr C0:C1:C0xx:xx:xx
UP BROADCAST RUNNING MULTICAST MTU:1500 Metric:1
RX packets:165763 errors:0 dropped:0 overruns:0 frame:0
TX packets:175648 errors:0 dropped:0 overruns:0 carrier:0
collisions:0 txqueuelen:1000
RX bytes:161724476 (154.2 MiB) TX bytes:22794209 (21.7 MiB)
Interrupt:4 Base address:0x2000
eth1 Link encap:Ethernet HWaddr C0:C1:C0:xx:xx:xx
UP BROADCAST RUNNING ALLMULTI MULTICAST MTU:1500 Metric:1
RX packets:235085 errors:10 dropped:0 overruns:0 frame:269509
TX packets:234875 errors:72 dropped:0 overruns:0 carrier:0
collisions:0 txqueuelen:1000
RX bytes:56724666 (54.0 MiB) TX bytes:201731456 (192.3 MiB)
Interrupt:3 Base address:0x1000
lo Link encap:Local Loopback
inet addr:127.0.0.1 Mask:255.0.0.0
inet6 addr: ::1/128 Scope:Host
UP LOOPBACK RUNNING MULTICAST MTU:16436 Metric:1
RX packets:87 errors:0 dropped:0 overruns:0 frame:0
TX packets:87 errors:0 dropped:0 overruns:0 carrier:0
collisions:0 txqueuelen:0
RX bytes:13018 (12.7 KiB) TX bytes:13018 (12.7 KiB)
vlan1 Link encap:Ethernet HWaddr C0:C1:C0:xx:xx:xx
UP BROADCAST RUNNING ALLMULTI MULTICAST MTU:1500 Metric:1
RX packets:7418 errors:0 dropped:0 overruns:0 frame:0
TX packets:16101 errors:0 dropped:0 overruns:0 carrier:0
collisions:0 txqueuelen:0
RX bytes:5137752 (4.8 MiB) TX bytes:1536952 (1.4 MiB)
vlan2 Link encap:Ethernet HWaddr C0:C1:C0xx:xx:xx
inet addr:192.168.0.3 Bcast:192.168.0.255 Mask:255.255.255.0
UP BROADCAST RUNNING MULTICAST MTU:1500 Metric:1
RX packets:158047 errors:0 dropped:0 overruns:0 frame:0
TX packets:159142 errors:0 dropped:0 overruns:0 carrier:0
collisions:0 txqueuelen:0
RX bytes:153556156 (146.4 MiB) TX bytes:21209557 (20.2 MiB)
ROUTING TABLE
Kernel IP routing table
Destination Gateway Genmask Flags Metric Ref Use Iface
192.168.0.1 0.0.0.0 255.255.255.255 UH 0 0 0 vlan2
192.168.1.0 0.0.0.0 255.255.255.0 U 0 0 0 br0
192.168.0.0 0.0.0.0 255.255.255.0 U 0 0 0 vlan2
127.0.0.0 0.0.0.0 255.0.0.0 U 0 0 0 lo
0.0.0.0 192.168.0.1 0.0.0.0 UG 0 0 0 vlan2
Kernel IPv6 routing table
Destination Next Hop
Flags Metric Ref Use Iface
::1/128 ::
U 0 0 1 lo
ARP TABLE
192.168.0.1 dev vlan2 lladdr 00:09:5b:cd:50:40 REACHABLE
192.168.1.38 dev br0 lladdr 68:5d:43:e7:83:44 REACHABLE
IP TABLES
:filter
Chain INPUT (policy DROP 403 packets, 193K bytes)
pkts bytes target prot opt in out source destination
692 61801 DROP all — * * 0.0.0.0/0 0.0.0.0/0
state INVALID
10214 1655K ACCEPT all — * * 0.0.0.0/0 0.0.0.0/0
state RELATED,ESTABLISHED
0 0 shlimit tcp — * * 0.0.0.0/0 0.0.0.0/0
tcp dpt:22 state NEW
14 2052 ACCEPT all — lo * 0.0.0.0/0 0.0.0.0/0
6522 793K ACCEPT all — br0 * 0.0.0.0/0 0.0.0.0/0
0 0 ACCEPT udp — * * 0.0.0.0/0 0.0.0.0/0
udp spt:67 dpt:68
Chain FORWARD (policy DROP 0 packets, 0 bytes)
pkts bytes target prot opt in out source destination
253K 139M all — * * 0.0.0.0/0 0.0.0.0/0
account: network/netmask: 192.168.1.0/255.255.255.0 name: lan
0 0 ACCEPT all — br0 br0 0.0.0.0/0 0.0.0.0/0
59 2360 DROP all — * * 0.0.0.0/0 0.0.0.0/0
state INVALID
9434 453K TCPMSS tcp — * * 0.0.0.0/0 0.0.0.0/0
tcp flags:0x06/0x02 TCPMSS clamp to PMTU
128K 15M monitor all — * vlan2 0.0.0.0/0 0.0.0.0/0
249K 138M ACCEPT all — * * 0.0.0.0/0 0.0.0.0/0
state RELATED,ESTABLISHED
0 0 wanin all — vlan2 * 0.0.0.0/0 0.0.0.0/0
4738 223K wanout all — * vlan2 0.0.0.0/0 0.0.0.0/0
4738 223K ACCEPT all — br0 * 0.0.0.0/0 0.0.0.0/0
Chain OUTPUT (policy ACCEPT 12586 packets, 5087K bytes)
pkts bytes target prot opt in out source destination
Chain monitor (1 references)
pkts bytes target prot opt in out source destination
0 0 RETURN tcp — * * 0.0.0.0/0 0.0.0.0/0
WEBMON –max_domains 2000 –max_searches 2000
Chain shlimit (1 references)
pkts bytes target prot opt in out source destination
0 0 all — * * 0.0.0.0/0 0.0.0.0/0
recent: SET name: shlimit side: source
0 0 DROP all — * * 0.0.0.0/0 0.0.0.0/0
recent: UPDATE seconds: 60 hit_count: 4 name: shlimit side: source
Chain wanin (1 references)
pkts bytes target prot opt in out source destination
Chain wanout (1 references)
pkts bytes target prot opt in out source destination
:nat
Chain PREROUTING (policy ACCEPT 9977 packets, 1113K bytes)
pkts bytes target prot opt in out source destination
403 193K WANPREROUTING all — * * 0.0.0.0/0 192.168.
0.3
0 0 DROP all — vlan2 * 0.0.0.0/0 192.168.1.0/
24
Chain POSTROUTING (policy ACCEPT 10 packets, 1912 bytes)
pkts bytes target prot opt in out source destination
6165 323K MASQUERADE all — * vlan2 0.0.0.0/0 0.0.0.0/0
26 8531 SNAT all — * br0 192.168.1.0/24 192.168.1.0/
24 to:192.168.1.1
Chain OUTPUT (policy ACCEPT 1812 packets, 127K bytes)
pkts bytes target prot opt in out source destination
Chain WANPREROUTING (1 references)
pkts bytes target prot opt in out source destination
0 0 DNAT icmp — * * 0.0.0.0/0 0.0.0.0/0
to:192.168.1.1
:mangle
Chain PREROUTING (policy ACCEPT 273K packets, 142M bytes)
pkts bytes target prot opt in out source destination
128K 124M DSCP all — vlan2 * 0.0.0.0/0 0.0.0.0/0
DSCP set 0x00
Chain INPUT (policy ACCEPT 17877 packets, 2707K bytes)
pkts bytes target prot opt in out source destination
Chain FORWARD (policy ACCEPT 253K packets, 139M bytes)
pkts bytes target prot opt in out source destination
Chain OUTPUT (policy ACCEPT 12618 packets, 5092K bytes)
pkts bytes target prot opt in out source destination
Chain POSTROUTING (policy ACCEPT 266K packets, 144M bytes)
pkts bytes target prot opt in out source destination
IP6 TABLES
:filter
Chain INPUT (policy ACCEPT 0 packets, 0 bytes)
pkts bytes target prot opt in out source destination
Chain FORWARD (policy ACCEPT 0 packets, 0 bytes)
pkts bytes target prot opt in out source destination
Chain OUTPUT (policy ACCEPT 0 packets, 0 bytes)
pkts bytes target prot opt in out source destination
:mangle
Chain PREROUTING (policy ACCEPT 0 packets, 0 bytes)
pkts bytes target prot opt in out source destination
Chain INPUT (policy ACCEPT 0 packets, 0 bytes)
pkts bytes target prot opt in out source destination
Chain FORWARD (policy ACCEPT 0 packets, 0 bytes)
pkts bytes target prot opt in out source destination
Chain OUTPUT (policy ACCEPT 0 packets, 0 bytes)
pkts bytes target prot opt in out source destination
Chain POSTROUTING (policy ACCEPT 0 packets, 0 bytes)
pkts bytes target prot opt in out source destination
NET STATS
Active Internet connections (only servers)
Proto Recv-Q Send-Q Local Address Foreign Address State
tcp 0 0 192.168.1.1:80 0.0.0.0:* LISTEN
tcp 0 0 0.0.0.0:53 0.0.0.0:* LISTEN
tcp 0 0 0.0.0.0:22 0.0.0.0:* LISTEN
tcp 0 0 :::53 :::* LISTEN
tcp 0 0 :::22 :::* LISTEN
tcp 0 0 :::23 :::* LISTEN
udp 0 0 127.0.0.1:38032 0.0.0.0:*
udp 0 0 0.0.0.0:53 0.0.0.0:*
udp 0 0 0.0.0.0:67 0.0.0.0:*
udp 0 0 127.0.0.1:38000 0.0.0.0:*
udp 0 0 :::53 :::*
raw 0 0 0.0.0.0:255 0.0.0.0:* 255
Active UNIX domain sockets (only servers)
Proto RefCnt Flags Type State I-Node Path
FILE SYSTEMS
Filesystem 1K-blocks Used Available Use% Mounted on
/dev/root 5056 5056 0 100% /
tmpfs 14764 172 14592 1% /tmp
devfs 14764 0 14764 0% /dev
MOUNTPOINTS
rootfs on / type rootfs (rw)
/dev/root on / type squashfs (ro)
proc on /proc type proc (rw)
tmpfs on /tmp type tmpfs (rw)
devfs on /dev type tmpfs (rw,noatime)
sysfs on /sys type sysfs (rw)
devpts on /dev/pts type devpts (rw)
SWAPS
Filename Type Size Used Priority
PARTITIONS
major minor #blocks name
31 0 256 mtdblock0
31 1 7872 mtdblock1
31 2 5091 mtdblock2
31 3 1856 mtdblock3
31 4 64 mtdblock4
ENVIRONMENT
USER=root
HOME=/root
PS1=\u@\h:\w\$
LOGNAME=root
TERM=vt100
PATH=/bin:/usr/bin:/sbin:/usr/sbin:/home/root:/mmc/sbin:/mmc/bin:/mmc/usr/sbin:/
mmc/usr/bin:/opt/sbin:/opt/bin:/opt/usr/sbin:/opt/usr/bin:
SHELL=/bin/sh
PWD=/tmp/home/root
CPU INFO
0.12 0.03 0.01 2/32 3739
system type : Broadcom BCM4716 chip rev 1 pkg 9
processor : 0
cpu model : MIPS 74K V4.0
BogoMIPS : 176.53
cpu MHz : 354
wait instruction : no
microsecond timers : yes
tlb_entries : 64
extra interrupt vector : no
hardware watchpoint : yes
ASEs implemented : mips16 dsp
shadow register sets : 1
VCED exceptions : not available
VCEI exceptions : not available
unaligned_instructions : 4
INTERRUPTS
CPU0
3: 770819 MIPS eth1
4: 298897 MIPS eth0
7: 687164 MIPS timer
8: 13 IRQ2 serial
ERR: 0
MEMORY
total used free shared buffers
Mem: 29532 18664 10868 0 2464
-/+ buffers: 16200 13332
Swap: 0 0 0
MemTotal: 29532 kB
MemFree: 10864 kB
Buffers: 2464 kB
Cached: 7112 kB
SwapCached: 0 kB
Active: 6188 kB
Inactive: 5336 kB
SwapTotal: 0 kB
SwapFree: 0 kB
Dirty: 0 kB
Writeback: 0 kB
AnonPages: 1952 kB
Mapped: 1592 kB
Slab: 4228 kB
SReclaimable: 676 kB
SUnreclaim: 3552 kB
PageTables: 284 kB
NFS_Unstable: 0 kB
Bounce: 0 kB
CommitLimit: 14764 kB
Committed_AS: 5068 kB
VmallocTotal: 786356 kB
VmallocUsed: 2404 kB
VmallocChunk: 782068 kB
WIRELESS VER
5.10 RC147.0
wl0: Mar 4 2010 00:00:47 version 5.10.147.0
US (US/0) UNITED STATES
LOADED MODULES
Module Size Used by Tainted: P
xt_webmon 16320 1
xt_DSCP 992 1
ip6table_mangle 992 0
ip6table_filter 704 0
xt_recent 6800 2
xt_IMQ 736 0
imq 2320 0
nf_nat_pptp 1440 0
nf_conntrack_pptp 3808 1 nf_nat_pptp
nf_nat_proto_gre 1072 1 nf_nat_pptp
nf_conntrack_proto_gre 2464 1 nf_conntrack_pptp
nf_nat_ftp 1568 0
nf_conntrack_ftp 5792 1 nf_nat_ftp
nf_nat_sip 5920 0
nf_conntrack_sip 19008 1 nf_nat_sip
nf_nat_h323 5504 0
nf_conntrack_h323 37120 1 nf_nat_h323
wl 1781264 0
et 49280 0
igs 13680 1 wl
emf 17408 2 wl,igs
PROCESSES
Mem: 18812K used, 10720K free, 0K shrd, 2464K buff, 7112K cached
CPU: 0% usr 0% sys 0% nic 100% idle 0% io 0% irq 0% sirq
Load average: 0.12 0.03 0.01 1/32 3757
PID PPID USER STAT VSZ %VSZ %CPU COMMAND
1609 1 root S 2684 9% 0% httpd
2031 1 root S 1312 4% 0% crond -l 9
1612 1611 root S 1304 4% 0% -sh
3564 434 root S 1304 4% 0% -sh
1610 1 root S 1304 4% 0% udhcpc -i vlan2 -b -s dhcpc-event -H u
nknown -m
314 313 root S 1300 4% 0% /bin/sh
434 1 root S 1296 4% 0% telnetd -p 23
3676 3564 root S 1296 4% 0% {sysinfo} /bin/sh /usr/sbin/sysinfo
3757 3676 root R 1296 4% 0% top -b -n1
2018 1 root S 1292 4% 0% syslogd -L -s 50 -b 1
2020 1 root S 1292 4% 0% klogd
1 0 root S 1260 4% 0% /sbin/init noinitrd
312 1 root S 1244 4% 0% buttons
313 1 root S 1184 4% 0% console
1611 496 root S 1140 4% 0% dropbear -p 22 -a
1295 1 nobody S 1104 4% 0% dnsmasq -c 1500 –log-async
1225 1 root S 1080 4% 0% nas
496 1 root S 1072 4% 0% dropbear -p 22 -a
1242 1 root S 968 3% 0% cstats
1236 1 root S 916 3% 0% rstats
1222 1 root S 900 3% 0% eapd
273 1 root S 616 2% 0% hotplug2 –persistent –no-coldplug
87 2 root SW< 0 0% 0% [mtdblockd]
3 2 root SW< 0 0% 0% [ksoftirqd/0]
5 2 root SW< 0 0% 0% [khelper]
42 2 root SW 0 0% 0% [pdflush]
44 2 root SW< 0 0% 0% [kswapd0]
2 0 root SW< 0 0% 0% [kthreadd]
43 2 root SW 0 0% 0% [pdflush]
4 2 root SW< 0 0% 0% [events/0]
45 2 root SW< 0 0% 0% [aio/0]
18 2 root SW< 0 0% 0% [kblockd/0]
DMESG
Linux version 2.6.22.19 (root@tomato) (gcc version 4.2.4) #37 Sat Jun 7 05:30:28
CEST 2014
CPU revision is: 00019740
Found a 8MB ST compatible serial flash
Determined physical RAM map:
memory: 02000000 @ 00000000 (usable)
On node 0 totalpages: 8192
Normal zone: 64 pages used for memmap
Normal zone: 0 pages reserved
Normal zone: 8128 pages, LIFO batch:0
Built 1 zonelists. Total pages: 8128
Kernel command line: root=/dev/mtdblock2 noinitrd console=ttyS0,115200
Primary instruction cache 32kB, physically tagged, 4-way, linesize 32 bytes.
Primary data cache 32kB, 4-way, linesize 32 bytes.
Synthesized TLB refill handler (20 instructions).
Synthesized TLB load handler fastpath (32 instructions).
Synthesized TLB store handler fastpath (32 instructions).
Synthesized TLB modify handler fastpath (31 instructions).
PID hash table entries: 128 (order: 7, 512 bytes)
CPU: BCM4716 rev 1 pkg 9 at 354 MHz
Using 177.000 MHz high precision timer.
console [ttyS0] enabled
Dentry cache hash table entries: 4096 (order: 2, 16384 bytes)
Inode-cache hash table entries: 2048 (order: 1, 8192 bytes)
Memory: 29416k/32768k available (33k kernel code, 3352k reserved, 2718k data, 11
6k init, 0k highmem)
Calibrating delay loop… 176.53 BogoMIPS (lpj=882688)
Mount-cache hash table entries: 512
NET: Registered protocol family 16
PCI: Using membase 8000000
PCI: Disabled
PCI: Fixing up bus 0
PCI: Fixing up bus 1
NET: Registered protocol family 2
Time: MIPS clocksource has been installed.
IP route cache hash table entries: 1024 (order: 0, 4096 bytes)
TCP established hash table entries: 1024 (order: 1, 8192 bytes)
TCP bind hash table entries: 1024 (order: 0, 4096 bytes)
TCP: Hash tables configured (established 1024 bind 1024)
TCP reno registered
squashfs: version 3.0 (2006/03/15) Phillip Lougher
io scheduler noop registered (default)
HDLC line discipline: version $Revision: 4.8 $, maxframe=4096
N_HDLC line discipline registered.
Serial: 8250/16550 driver $Revision: 1.90 $ 2 ports, IRQ sharing disabled
serial8250: ttyS0 at MMIO 0xb8000300 (irq =  is a 16550A
PPP generic driver version 2.4.2
MPPE/MPPC encryption/compression module registered
NET: Registered protocol family 24
PPPoL2TP kernel driver, V0.18.3
PPTP driver version 0.8.5
pflash: found no supported devices
Creating 5 MTD partitions on “sflash”:
0x00000000-0x00040000 : “pmon”
0x00040000-0x007f0000 : “linux”
0x00127400-0x00620000 : “rootfs”
0x00620000-0x007f0000 : “jffs2”
0x007f0000-0x00800000 : “nvram”
u32 classifier
OLD policer on
Netfilter messages via NETLINK v0.30.
nf_conntrack version 0.5.0 (512 buckets, 4096 max)
ip_tables: (C) 2000-2006 Netfilter Core Team
ipt_account 0.1.21 : Piotr Gasidlo <quaker@barbara.eu.org>, http://www.barbara.e
u.org/~quaker/ipt_account/
net/ipv4/netfilter/tomato_ct.c [Jun 7 2014 02:58:57]
NET: Registered protocol family 1
NET: Registered protocol family 10
ip6_tables: (C) 2000-2006 Netfilter Core Team
NET: Registered protocol family 17
802.1Q VLAN Support v1.8 Ben Greear <greearb@candelatech.com>
All bugs added by David S. Miller <davem@redhat.com>
VFS: Mounted root (squashfs filesystem) readonly.
Freeing unused kernel memory: 116k freed
Warning: unable to open an initial console.
emf: module license ‘Proprietary’ taints kernel.
PCI: Setting latency timer of device 0000:00:02.0 to 64
eth0: Broadcom BCM47XX 10/100/1000 Mbps Ethernet Controller 5.10.147.0
PCI: Setting latency timer of device 0000:00:01.0 to 64
eth1: Broadcom BCM4328 802.11 Wireless Controller 5.10.147.0
Algorithmics/MIPS FPU Emulator v1.5
vlan1: add 33:33:00:00:00:01 mcast address to master interface
vlan1: add 01:00:5e:00:00:01 mcast address to master interface
vlan1: dev_set_allmulti(master, 1)
vlan1: dev_set_promiscuity(master, 1)
device eth0 entered promiscuous mode
device vlan1 entered promiscuous mode
device eth1 entered promiscuous mode
br0: port 2(eth1) entering forwarding state
br0: port 1(vlan1) entering forwarding state
vlan2: Setting MAC address to c0 c1 c0 xx:xx:xx.
vlan2: add 33:33:00:00:00:01 mcast address to master interface
vlan2: add 01:00:5e:00:00:01 mcast address to master interface
IMQ starting with 2 devices…
IMQ driver loaded successfully.
Hooking IMQ after NAT on PREROUTING.
Hooking IMQ before NAT on POSTROUTING.
vlan2: del 01:00:5e:00:00:01 mcast address from vlan interface
vlan2: del 01:00:5e:00:00:01 mcast address from master interface
vlan2: del 33:33:00:00:00:01 mcast address from vlan interface
vlan2: del 33:33:00:00:00:01 mcast address from master interface
vlan2: Setting MAC address to c0 c1 c0 xx:xx:xx.
vlan2: add 01:00:5e:00:00:01 mcast address to master interface
vlan2: add 33:33:00:00:00:01 mcast address to master interface
vlan2: del 33:33:00:00:00:01 mcast address from vlan interface
vlan2: del 33:33:00:00:00:01 mcast address from master interface
vlan2: del 01:00:5e:00:00:01 mcast address from vlan interface
vlan2: del 01:00:5e:00:00:01 mcast address from master interface
br0: port 2(eth1) entering disabled state
br0: port 1(vlan1) entering disabled state
vlan1: del 01:00:5e:00:00:01 mcast address from vlan interface
vlan1: del 01:00:5e:00:00:01 mcast address from master interface
vlan1: del 33:33:00:00:00:01 mcast address from vlan interface
vlan1: del 33:33:00:00:00:01 mcast address from master interface
device vlan1 left promiscuous mode
br0: port 1(vlan1) entering disabled state
device eth1 left promiscuous mode
br0: port 2(eth1) entering disabled state
vlan1: add 33:33:00:00:00:01 mcast address to master interface
vlan1: add 01:00:5e:00:00:01 mcast address to master interface
device eth1 entered promiscuous mode
br0: port 2(eth1) entering forwarding state
br0: port 1(vlan1) entering forwarding state
vlan2: Setting MAC address to c0 c1 c0 xx:xx:xx.
vlan2: add 33:33:00:00:00:01 mcast address to master interface
vlan2: add 01:00:5e:00:00:01 mcast address to master interface
DD WRT — это прошивка для маршрутизаторов, созданная на основе Unix. Она используется для моделей, работающих на процессорах BroadCom, Atheros, Xscale и PowerPC, и расширяет их стандартный функционал. Опытному пользователю, которому нужно создать и настроить локальную сеть, почти всегда не хватает обычных настроек роутера для реализации всех задач, потому эта прошивка отлично подойдёт тем, кому нужная тонкая настройка функций и параметров домашней сети.

Установка прошивки позволяет расширить возможности маршрутизатора
Возможности прошивки
Помимо обычных настроек, предлагаемых официальным программным обеспечением роутера, DD WRT обеспечивает следующий функционал:
- доступ по Telnet и SSH;
- настройка планировщика задач Cron;
- удалённый запуск (Wake-on-Lan);
- настройка Samba;
- виртуальные точки Wi-Fi;
- PPTP, VPN — сервер и клиент;
- другие варианты гибкой настройки роутера.
Порядок настройки маршрутизатора с DD-WRT
Для открытия страницы настроек маршрутизатора, прошитого DD WRT, нужно настроить автоматическое назначение IP и других значений на сетевом адаптере ПК, с которого будете настраивать. Затем нужно зайти в настройку роутера по IP, изначально указанному в инструкции. Здесь система предложит вам поменять админские логин и пароль на более надёжные. Придумайте новые данные для входа, введите и запомните их — они ещё не раз пригодятся при работе с другими функциями роутера.
При желании можно поменять язык пользовательского интерфейса. Дальнейшие инструкции мы приводим на примере русского. На странице «Administration» — «Management» нужно найти пункт «Enable Info Site» и поставить метку Disabled. Здесь же в пункте Language Selection выбрать русский язык. Нажать Save.

После этого начинается непосредственно настройка.
Статический IP
- На вкладке «Установка» — «Основные установки» выбрать «Тип соединения» — «Статический IP».
- Внести IP и другие данные, предоставленные поставщиком услуг.
- Снять отметки в пунктах «Использование DNSMasq для DHCP» и «… для DNS». Сохранить параметры.
- Перейти на вкладку «Службы», отключить «DNSMasq». Сохранить параметры.

Маршрутизация
Далее — настройка маршрутизации:
- Перейти на страницу «Установка» — «Маршруты».
- Назначить название и номер маршрута (своё для каждой из созданных подсетей).
- «Сеть назначения» — 172.17.0.0 (или ваш диапазон подсети).
- «Маска подсети» — 255.255.0.0
- «Шлюз» — IP-шлюза, выданный провайдером.
- «Интерфейс» — WAN.
- Сохранить введённые значения, повторить действия для создания следующего маршрута.

Подключение по VPN (PPTP)
- Открыть вкладку «Службы» — «PPTP».
- Включить «Опции клиента PPTP».
- «IP или имя DNS-сервера» — ввести цифровой или буквенный адрес.
- «MPPE-шифрование» — пустое.
- Пользовательское имя и пароль — из договора.
- Сохранить.
")
Подключение PPPoE
В DD WRT есть некоторые сложности с реализацией протокола PPPoE, поэтому понадобится прописать некоторые параметры вручную:
- На вкладке «Службы» — «PPTP» отключить «Опции клиента PPTP».
- На вкладке «Установка» — «Основные установки» выбрать тип подключения «PPPoE».
- Логин-пароль взять из договора.
- «Имя службы» —
- «Статический DNS1» — 172.17.0.2.
- Снять отметки напротив «DNSMasq для DHCP» и «DNSMasq для DNS».
- Сохранить.

Чтобы внешняя и локальная сети роутера под DD WRT корректно работали одновременно, необходимо настроить PPPoE Dual Access. Это делается в виде текстовых команд:
- Зайти на страницу «Тех. обслуживание» — «Команды».
- В текстовое поле ввести (vlan2 — имя интерфейса, выделенного для локалки):
ifconfig vlan2 [ip-адрес] netmask [маска подсети] up
route add -net 172.17.0.0 netmask 255.255.0.0 gw [адрес шлюза]
Повторить для 172.18.0.0 и 172.24.0.0
Нажать «Сохранить параметры запуска».
- В текстовое поле «Команды» ввести:
iptables -t nat -A POSTROUTING -o vlan2 -j MASQUERADE
iptables -t nat -A POSTROUTING -o vlan2 -j SNAT —t WAN_IP
Далее — «Сохранить брандмауэр».

- После перезагрузки устройство соединится по PPPoE.
Сеть Wi-Fi
Последний штрих — настройка вай-фай-сети:
- Вкладка «Wi-Fi» — «Основные настройки».
- Тип беспроводной сети — Точка доступа.
Режим беспроводной сети — Смешанный.
Ширина канала — 20 Мгц.
SSID передаётся в эфир — Включить.
Конфигурация сети — В мосте.

- Чтобы назначить пароль на Wi-Fi-сеть, нужно перейти на вкладку «Безопасность», выбрать Режим безопасности — WPA Personal и ввести новый ключ в «Общий ключ WPA».
- Сохранить параметры и перезагрузить роутер.

Заключение
Опытному пользователю, которого не удовлетворяют стандартные функции роутера для удобной работы домашней сети, мы предлагаем попробовать поработать с роутерами, прошитыми DD WRT. Широкий функционал и правильная настройка этой прошивки позволит вам использовать функции маршрутизатора гораздо шире, чем со стандартным ПО. Попробуйте наше пошаговое руководство по настройке DD WRT и поделитесь своим результатом в комментариях. Там же можно задать нам вопросы по теме статьи.
Мануал по быстрой настройке DD-WRT и установке софта на роутер Tp-Link TL-WR1043ND
Posted: Sun Nov 28, 2010 16:04
ВНИМАНИЕ: все версии альтернативной прошивки DD-WRT для роутера Tp-Link TL-WR1043ND носят статус БЕТА. Поэтому не гарантируют стабильной работы. Установка DD-WRT может привести к полной неработоспособности роутера. Если вас устраивает стабильность и функционал заводской прошивки, рекомендую использовать ее. Еще раз внимательно прочтите написанное выше. Все дальнейшие манипуляции с роутером вы выполняете на свой страх и риск. Автор не несет ответственности за возможные проблемы, которые возникнут у вас после установки DD-WRT.
1. Установка:
Качаем DD-WRT отсюда: ftp://ftp.dd-wrt.com/others/eko/BrainSlayer-V24-preSP2/. 100% работоспособной версии DD-WRT не существует. Новые релизы исправляют ошибки старых, но зачастую долбавляют новые проблемы. Я для себя остановился на версии 15506, с ней я имею следующее:
— полная стабильность роутера
— стабильный и быстрый Wi-Fi в режиме AP
— работоспособный порт форвардинг
— быстрая скорость работы USB
— рабочий IPKG
Остальной функционал не проверялся. Если вам необходимо от DD-WRT что-то еще (WDS, ddns, VPN сервер и т.д.), внимательно читайте темы по релизам на английском форуме и ищите работоспособный билд под свои нужды.
Итак, вы скачали нужную версию прошивки. Если вы перешиваетесь с заводской прошивки, используйте файл factory-to-ddwrt.bin. Если апгрейдите DD-WRT — tl-wr1043nd-webflash.bin. Перед и после прошивки не забудьте сделать сброс 30/30/30 http://www.dd-wrt.com/wiki/index.php/FAQ_%28RU%29. Выбираете в веб интерфейсе пункт upgrade, указываете путь к нужному файлу.
2. Общая настройка:
Итак, вы установили DD-WRT. Заходим браузером на 192.168.1.1. Указываем логин и пароль. Первым делом настройте доступ в интернет. Мануал по настройке популярного в России dual access лежит тут http://www.dd-wrt.com/wiki/index.php/Dual_Access_PPTP. Дальше настраиваем Wi-Fi. У меня максимальная стабильность и скорость достигнута с такими настройками:
Картинка, к сожалению, недоступна
Вам необходимо поэкспериментировать с настройкой канала, чтобы найти наиболее быстрый/стабильный для ваших условий. В вкладке Wireless security выставляем WPA2 Personal — AES. Далее я бы порекомендовал выставить постоянные внутренние IP адреса для всех устройств в сети: вкладка Services — DHCP Server — Static Leases. После этого настраивате все остальное под свои потребности (порт форвардинг, фаерволл и т.д.).
3. Настройка USB/NAS:
Роутер имеет USB порт, подключим к нему USB HDD, настроим доступ. DD-WRT позволяет работать с файловыми системами FAT и EXT2/3 (по отзывам с английского форума последняя на текущий момент версия 15778 умеет работать с NTFS — непотвержденно). Поддержку NTFS можно добавить установкой ntfs-3g (об этом будет рассказано ниже). Выбираем в зависимости от своих потребностей файловую систему. Не забываем, что FAT имеет ограничение по максимальному размеру файла (4Гб). Для доступа к EXT2/3 при непосредственном подключении HDD к компьютеру с ОС Windows необходима установка дополнительного софта (например Ext2fsd). Если вы собираетесь устанавливать на роутер дополнительный софт, я рекомендую создать на HDD раздел размером 256 Мб и отформатировать его в Ext2 (в ОС Windows это можно сделать с помощью программы Partition Manager).
Итак, наш HDD разбит на 2 части: маленький раздел Ext2 для софта, большой раздел с выбранной вами файловой системой под файлохранилище. Настраиваем USB в веб интерфейсе: Services — USB ставим галку на Core USB Support, далее делаем так:
Картинка, к сожалению, недоступна
Перезагружаем роутер. Первый раздел на HDD автоматически смонтируется в /opt. Заходим телнетом на роутер: используйте встроенный в Windows клиент telnet: Пуск — Выполнить — telnet 192.168.1.1 или скачайте putty. Логин: root, пароль: такой же, как от веб интерфейса. Выполняем команду df -h. Видим смонтированные разделы.
Картинка, к сожалению, недоступна
В моем случае первым доступным разделом на диске является маленький раздел Ext2 под софт, он доступен в /dev/sdaX (у меня X=3: sda3) и смонтирован в /opt. Следующий большой раздел будет доступен в dev/sdaX+1 (у меня соответственно sda4). Если ваш большой раздел отформатирован в NTFS, следующие шаги вы пропускаете. Все остальные продолжают. Нам необходимо,чтобы при загрузке роутера большой раздел тоже монтировался. Идем в веб интерфейс: Administration — Commands пишем:
mount /dev/sdaX+1 /mnt (у меня mount /dev/sda4 /mnt ).
Жмем Save Startup.
Если у вас первым разделом на диске будет большой под файлохранилище, а вторым маленький под софт, то тогда делаете тоже самое. Но в веб интерфейсе в Services — USB — Disc mount point указываете /mnt. А в стартапе пишете mount /dev/sdaX+1 /opt. Теперь при загрузке роутера мы имеем 2 смонтированных раздела: маленький Ext2 /opt, большой /mnt.
Настраиваем доступ: DD-WRT имеет встроенные ФТП и Самбу. Включаете, что вам больше нравится. В ProFTPD для доступа к большому разделу в Files Directory ставите /mnt, разрешает запись Allow Write — enable, в User Password List прописываете логин пробел пароль для доступа (например: user 12345). В Самбе все то же самое: Path to files /mnt, Public share — для свободного доступа без паролей, в Use Custom Configuration можно прописать логин пароль.
4. Настраиваем IPKG, устанавливаем дополнительный софт:
Роутер имеет процессор Atheros с архитектурой MIPS, поэтому пакеты opt на него ставить нельзя. Нам необходим ipkg. Обращаю внимание на то, что в дальнейшем ipkg и установленный софт будут доступны только при подключенном USB HDD. Приступаем к настройке:
Заходим телнетом на роутер .Еще раз проверяем с помощью команды df -h, что наш маленький раздел смонтирован в /opt. Далее копируем необходимые нам директории из флеша на HDD:
cp -a /etc/ /opt/
cp -a /bin/ /opt/
cp -a /lib/ /opt/
cp -a /usr/ /opt/
cp -a /tmp/ /opt/
cp -a /jffs/ /opt/
sleep 1
Далее монтируем скопированные директории:
mount /opt/etc /etc
mount /opt/bin /bin
mount /opt/lib/ /lib
mount /opt/usr/ /usr
mount /opt/tmp/ /tmp
mount /opt/jffs/ /jffs
sleep 1
С помощью df -h проверяем, что все смонтировалось:
Картинка, к сожалению, недоступна
Настраиваем ipkg, в телнете:
mv /etc/ipkg.conf /etc/ipkg.conf.orig
echo -e «src backfire http://downloads.openwrt.org/backfire/10.03-rc2/atheros/packages/\ndest root /\ndest ram /tmp» > /etc/ipkg.conf
cp /bin/ipkg /bin/ipkg.orig
cat /bin/ipkg.orig |sed -e «s/—passive-ftp //» > /bin/ipkg
ipkg update
sleep 4
ipkg install coreutils-sort
sleep 1
Теперь нам необходимо, чтобы при перезагрузке роутера ipkg оставался рабочим. В телнете заходим в /opt:
cd /opt
Создаем файл usb.hdd:
touch usb.hdd
Проверяем, что файл появился:
ls
Далее идем в веб интерфейс: Administration — Commands жмем edit и добавляем следующее:
sleep 3
if [ -f /opt/usb.hdd ]; then
mount /opt/etc /etc
mount /opt/bin /bin
mount /opt/lib/ /lib
mount /opt/usr/ /usr
mount /opt/tmp/ /tmp
mount /opt/jffs/ /jffs
else
exit
fi
Жмем Save Startup. Ipkg настроен и готов к работе. Установка производится командой ipkg install <имя пакета>, удаление ipkg remove <имя пакета>.
Рассмотрим установку софта на примере ntfs-3g, который позволит нам получить доступ к NTFS разделу HDD:
Заходим телнетом на роутер, выполняем следующие команды:
ipkg update
ipkg install ntfs-3g
Ntfs-3g установлен. Смотрим, куда поставился fuse.ko (у меня \lib\modules\2.6.34.7-svn15501\kernel\fs\fuse.ko). В телнете выполняем следующий команды:
insmod /opt/lib/modules/2.6.34.7-svn15501/kernel/fs/fuse.ko
ntfs-3g /dev/sdaX+1/ /mnt
Про то, как найти /dev/sdaX+1/, читаем в разделе «Настройка USB/NAS». Наш NTFS раздел теперь доступен в /mnt. Настраиваем ФТП/Самбу, как описано выше. Добавляем ntfs-3g в стартап в веб интерфейсе: Administration — Commands жмем edit, добавляем:
sleep 5
insmod /opt/lib/modules/2.6.34.7-svn15501/kernel/fs/fuse.ko
sleep 10
ntfs-3g /dev/sdaX+1/ /mnt
Жмем Safe Startup — наш раздел NTFS доступен в /mnt после перезагрузки роутера.
Установка другого софта с помощью ipkg аналогична установке ntfs-3g. Автор ставил transmission, unfs3, ushare. Все работает, но не стоит забывать, что это роутер со всеми вытекающими ограничениями в плане производительности.
5. Откат на заводскую прошивку:
Существует 2 метода отката на заводскую прошивку:
- а) откат с помощью специально подготовленного файла webrevert. Подробнее тут http://www.dd-wrt.com/phpBB2/viewtopic.php?t=76051&postdays=0&postorder=asc&start=0
- б) откат при помощи юсб. Подробнее тут http://samiux.blogspot.com/2010/03/howto-dd-wrt-on-tp-link-tl-wr1043nd.html.
Что еще необходимо описать:
— настройка IPTV
— подробная установка другого софта
— описание аппаратного анбрика
— ???????????????
Помогайте, вместе доведем FAQ до полного состояния, и можно будет кидать в вики.
Написал данный мануал на скорую руку, по памяти, без проверки — возможны мелкие ошибки и неточности. Первых воспользовавшихся просьба отписаться, дабы устранить недочеты.
Vinz, привет).
Время на прочтение
11 мин
Количество просмотров 312K
Прошивка DD-WRT на домашнем роутере
Это обзорная статья о том, какие возможность существуют у пользователя обычного домашнего роутера, и как этими возможностями воспользоваться.
Рано или поздно каждый пользователь интернета покупает себе домой роутер, поскольку количество устройств, требующих интернета, растёт. А у многих растут дети, которые тоже требуют подключения к интернету  Но мне больно и обидно видеть, что люди не всегда понимают, что можно и нужно делать для достижения максимального комфорта.
Небольшой дисклаймер (не знаю как это по-русски).
Я буду употреблять слово «правильно» в том смысле, что я сам считаю правильным для себя. Пройдя путь от «нуба» в Линуксе до уровня «могу советовать другим», я считаю, что мои советы по крайней мере не хуже других советов, которые можно встретить на различных форумах.
Речь пойдёт о прошивке роутера на основе известного дистрибутива DD-WRT. Это прошивка, превращающая роутер в «обычный» линукс-сервер с весьма жёсткими ограничениями памяти и быстродействия. Несмотря на это, функционал такого сервера может получиться весьма богатым.
Вот только некоторые из возможностей:
- SSH
- FTP server
- HTTP server
- OpenVPN
- QoS management
- Transmission
- PHP
- MySQL
- RADIUS
- Asterisk
- etc etc
— Давайте же начнем! — сказал Морж, усаживаясь на прибрежном камне. — Пришло время потолковать о многих вещах… (c)
1) Выбор оборудования
Первая и наиболее важная задача — выбрать правильную модель роутера, так как это — «билет в один конец». Оценивая свои финансы и свои амбиции, важно выбрать золотую середину. Возможным фактором риска могла бы быть боязнь «запороть» дорогой роутер своими неправильными действиями. Я сам, покупая дорогую вещь, опасаюсь что-то с ней делать, особенно если нет опыта. Однако могу вас заверить: шансы убить роутер новыми прошивками практически равны нулю. Современные модели имеют режим восстановления, и надо очень сильно захотеть, чтобы угробить роутер (и то не навсегда — просто потребуется специальное оборудование для реанимации).
Назову 2 «правильных» модели, которые я выбрирал для себя.
- Linksys WRT-54GL, модель начального уровня, зато непревзойдённая по надёжности. Покупалась более 3 лет назад, до сих пор в строю, «ни единого разрыва»… Характеристики: WiFi (b/g) + 4 LAN 10/100, 4Mb flash, 16Mb RAM, no USB.
- Asus WL-520GU, современный и весьма дешёвый роутер, 3 месяца в строю, также нет нареканий по работе. Характеристики: WiFi(b/g) + 4 LAN 10/100, 4Mb flash, 16Mb RAM, 1 USB.
Основными критериями выбора моделей являются:
- Совместимось данных моделей с прошивками DD-WRT. Возможности «родных» прошивок не рассматривались вообще: зачем выбирать цвет обоев в новой квартире, если впереди — всесокурушающий ремонт?
- Объем памяти RAM. Почти все современные роутеры имеют 16Mb RAM. Этого как раз хватает для нормальной работы, но, как известно, каждая программа стремится захватить весь доступный объём памяти. Если есть желание выжать максимум из своего роутера или есть лишняя сумма денег, лучше найти модель с 32Mb памяти.
- Наличие портов USB, ибо весь расширенный функционал удобнее всего ставить именно на внешнем носителе, т.к. flash-память роутера не сможет вместить всех новых программ. Мой первый роутер не имел USB, поэтому приходилось немного изгаляться и «работать напильником».
2) Прошивка роутера
Прошивка — это совсем не больно! Это на самом деле простая операция, ну такая как перректальное удаление гланд… Нет, правда ничего сложного.
При самой первой смене прошивки потребуется чуть больше усилий, зато каждая следующая пойдёт всё легче и легче.
Не следует опасаться, что смена прошивок будет происходить регулярно. Выбрав для себя набор программ, входящих в одну из готовых прошивок, можно на этом успокоиться и наслаждаться жизнью. Если понадобится дополнительный функционал — всегда можно установить новые программы отдельно, для этого существует специальный механизм. Но на первых этапах может случиться так, что выбор прошивки окажется неудачным, например в прошивке не окажется такой нужной возможности как поддержка SAMBA. Не беда, скачиваем другую прошивку, 2 движения мышкой — вуаля!
Некоторые модели роутеров (в частности Asus) перед прошивкой на DD-WRT требуют специальных действий (очистка памяти или что-то в этом роде). Внимательно следуйте инструкциям на конкретную модель роутера! Особенно внимательно нужно отнестить к требованиям «выждать 5 минут после окончания прошивки». Я был немного самоуверен и, перепрошивая своему коллеге роутер, слегка поторопился выключить питание после окончания прошивки. Результат — процедура восстановления и всё по-новой.
Если сказано «подождите 5 минут» — возьмите песочные часы на 5 минут и ждите! Это серьёзно.
Я не буду рассматривать сам процесс перепрошивки (tftp, смена адреса на 192.168.0.1, интерфейс и т.д.) — это всё изложено на форумах DD-WRT.
Но, наконец, вы закончили с прошивкой, и перед вами — чудесный новый WEB-интерфейс вашего роутера. Что дальше?
3) Подготовка к установке OPTWARE
Базовый функционал вы уже получили, выбрав версию прошивки. Осталось настроить параметры подключения к вашему провайдеру (DHCP, PPTP etc), и уже можно начинать бороздить просторы вселенной. Многим домашним пользователям этого уже будет достаточно.
Настройки параметров безопасности, управление маршрутеризацией и прочие стандартные для роутеров «фишки» я также описывать не буду. Без этого всё равно не обходится ни один «нормальный» роутер.
Но ведь можно же сделать ещё лучше! Продолжим процесс.
Все дополнительные программы объединены общим понятием Optware. (они ставятся в каталог /opt, который автоматически создаётся роутером и всегда доступен для записи). Однако сам каталог /opt пуст и фактически расположен в RAM — то есть, там очень мало места и всё, что туда попадает, будет потеряно при перезагрузке. Что же делать?
Выход следующий: нам нужно постоянное место на каком-нибудь «диске». И хотя описываемые хранилища не имеют формы диска в геометрическом смысле (скорее это кристаллы кремния в пластиковых корпусах с металлическими выводами), будем всё же называть их дисками.
JFFS
Если flash-память роутера достаточно большая, а размер прошивки меньше общего размера flash-памяти, то оставшееся место можно использовать для хренения данных. Если выбрать прошивку с поддержкой JFFS, то в зависимости от версии, можно получить от 0.5 до 3Mb «диск» прямо внутри роутера. Такой диск будет автоматически примонтирован как /jffs при старте.
Главной неприятностью при работе с flash-дисками является их быстрая деградация при записи. Если количество перезаписей сектора «диска» превысит некий порог (от 10 до 100 тысяч циклов), то диску придёт конец. Всё плохо… 
Если с внутренним диском произойдёт такое, действительно будет плохо. Но если это внешний USB диск, то лёгким движением руки заменяем USB-флешку на новую — и снова в бой. Ведь USB-флешки давно уже расходный материал, не так ли? Тем более что достаточна флешка объемом 1 или 2Gb. Главное, как обычно, вовремя делать бекапы.
USB
Как вы уже поняли, основным местом установки Optware является внешний USB диск. Важно иметь в виду, что USB должен быть определённым образом отформатирован перед установкой в роутер. Как минимум, должен присутствовать первичный раздел, отформатированный как ext2 или ext3.
Более «правильной» является следующая схема:
- раздел ext2, размер ~400Mb — основной раздел Optware, монтируется как /opt
- раздел swap, размер ~24Mb — для свопинга, позволяет работать таким «тяжеловесным» приложениям как RADIUS, MySQL, Apache…
- раздел ext2, размер ~400Mb — резервный раздел Optware (офлайновое зеркало)
- раздел ext2 или fat32, всё остальное место — для пользовательских данных
Форматирование USB лучше всего выполнять на Linux-машине любыми подручными утилитами, например GParted.
CIFS
Если роутер не имеет аппаратного USB, а установить Optware всё-таки хочется, то можно воспользоваться замечетельной возможностью Linux работать с диском через сеть. Для этого нам потребуются 2 вещи:
- постоянно работающий где-то в сети сервер (или NAS, или просто десктоп-машина, даже ноутбук) с поддержкой SAMBA
- прошивка с поддержкой CIFS/SAMBA
Если в доме уже есть компьютеры (а они есть, ведь роутер без компьютеров смотрится как-то нелепо), то один из домашних компьютеров будет выступать в роли «сетевого диска» для роутера.
Роутер при загрузке будет монтировать расшаренную папку как /opt, а дальше — никаких отличий в работе Optware, кроме скорости первоначальной загрузки через сеть. Конечно, для случая CIFS лучше использовать не WiFi, а Ethernet подключение.
Чтобы всё заработало, достаточно в настройках роутера в разделе CIFS указать сетевой адрес и логин/пароль для доступа к расшаренной папке, и при следующей перезагрузке роутер автоматически примонтирует сетевой диск в папку /tmp/smbshare.
SD/MMC
Предположим, что у нас нет ни свободного места в flash-памяти роутера, ни USB, ни сервера. А нам очень нужно установить Optware. Что же делать?
Как обычно, «у нас с собой было» (это мой любимый девиз). Если совсем ничего нет, то придётся немного поработать напильником.
Для некоторых моделей (среди которых WRT-54GL) доступен так называемый SD/MMC mod. Достаточно приклеить куда-либо SD или MMC карту и припаять 6 проводков, и можно получить место для установки Optware и хранения пользовательских данных.
Именно такой мод я в конце концов и сделал, чтобы из старого роутера получить автономную точку доступа под WiFi Hotspot Chilli. Это — тема отдельного поста, возможно скоро соберусь и даже сделаю мини-сайт. Если кого-то ещё эта тема интересует, напишите в приват.
4) Определение точки монтирования, startup, shutdown
В зависимости от выбранного «диска» точка монтирования будет разной. Для внутренней flash-памяти это будет /jffs, для USB это будет /mnt (если разрешить автоматическое монтирование), для CIFS это будет /tmp/smbshare, для SD/MMC это будет /mmc.
Если выбран вариант USB, то следует запретить автоматическое монтирование — мы сами будем это делать «правильным» образом.
Как я уже сказал, Optware устанавливается в строго определённое место — каталог /opt. Этот каталог уже есть, нужно только примонтировать к нему реальный «диск».
Монтирование можно (нужно) делать в процессе начальной загрузки роутера. Для автоматизации в роутере предназначены несколько предопределённых скриптов, которые выполняются при старте и завершении работы.
Нам понадобятся как минимум 2 скрипта:
- .rc_startup
- .rc_shutdown
Первый скрипт будет выполнять монтирование внешнего «диска» и запуск Optware, второй соответственно — останов Optware и размонтирование.
Для начала надо разрешить доступ к роутеру по telnet или по SSH протоколу.
Рекомендую настроить доступ по SSH, так как это безопаснее и просто удобнее (можно настроить авторизацию по ключевому файлу и даже не вводить каждый раз пароль при доступе). А доступ нам понадобится неоднократно, чтобы устанавливать программы и смотреть, WTF, почему они не хотят правильно работать.
Сервер SSH уже присутствует и работает во всех версиях прошивок роутера. Нужно только создать пару ключей, один из которых (публичный) загрузить в роутер, а другой (приватный) положить на ноутбуке рядом с программой Putty и WinSCP. Про ключи тоже писать не буду, везде это достаточно подробно расписывается.
Создадим скрипт .rc_startup, который пока будет делать только одно: монтировать внешний «диск» в папку /opt.
Варианты:
| USB | mount /dev/scsi/host0/bus0/target0/lun0/part1 /opt |
| JFFS | mkdir -p /jffs/opt mount -o bind /jffs/opt /opt |
| CIFS | mount.cifs $(nvram get samba_share) /jffs -o user=$(nvram get samba_user),pass=$(nvram get samba_password) mount -o bind /jffs/opt /opt |
Сохраним его в роутере кнопкой
Save startup
, перезагрузим роутер (возможно, он перезагрузится сам) — после этого у роутера должен появиться каталог /opt, куда теперь можно записывать файлы. Проверим?
telnet router

cd /opt

echo "OK" >opt.ok

cat opt.ok
если получилось «OK» — значит всё ОК, если нет — значит что-то не так… Гуглим, ищем где ошибка, повторяем…
5) Установка Optware — первый шаг
Ну вот, всё позади, у нас в сети — роутер с возможностью установки Optware. Приступим.
Т.к. у меня на ноутбуках Windows, я использую Putty (telnet или SSH) для доступа к консоли роутера и WinSCP для копирования и редактирования файлов.
Подключаемся через WinSCP к роутеру и создаём в папке /tmp следующий скрипт:
opt-inst.sh
Подключаемся через Putty к роутеру и выполняем скрипт:
cd /tmp

chmod 740 ./optw-inst.sh

./optw-inst.sh
В результате работы скрипта будет создана начальная конфигурация Optware и программа-установщик opt-inst. Теперь можно приступать к установке всех остальных пакетов программ.
6) Установка первых пакетов
Для начала установим какой-нибудь совсем простой пакет, например rsync. Он нам пригодится в дальнейшем для настройки резервного копирования.
cd /opt

ipkg-opt update

ipkg-opt install rsync
Если всё прошло успешно и нет никакой ругани в консоли, то можно продолжить установку.
Среди пакетов «первой необходимости» я бы назвал следующие:
- mc — Midnight Commander
- tcpdump — сбор и анализ сетевого трафика
- busybox — расширенные версии основных утилит Linux
Некоторые пакеты будут требовать установки других (через механизм зависимостей) — так и надо, пусть они ставятся сами. Обычно всё что требуется — нажимать «y» и соглашаться.
7) Окончательная настройка
Осталось настроить роутер так, чтобы запуск, работа и останов нужных сервисов происходил полностью автоматически. Для этого нужно исправить скрипты .rc_startup, .rc_shutdown, возможно, запустить процесс cron, и наслаждаться.
Тут следует сделать некоторые замечания. В разных версиях прошивок процедура запуска и останова почему-то отличается, причём в существенной части, а именно — запуск пользовательских скриптов из init.d.
В более новом роутере (версия прошивки 13972) пользовательские скрипты
/opt/etc/init.d/S* автоматически вызываются после завершения работы системного .rc_startup, и аналогично, /opt/etc/init.d/K* перед запуском .rc_shutdown. Поэтому для запуска и оснанова нужных сервисов достаточно, чтобы их соответствующие S* и K* скрипты находились в папке запуска /opt/etc/init.d
Однако и тут (по крайней мере в моём случае) не обошлось без «подводных граблей» (чьё-то меткое выражение). По законам жанра, запуск скрипта S* должен быть с параметром start, а запуск K* — с параметром stop. Но DD-WRT почему-то не передаёт start при старте, хотя и передаёт stop при останове. Пришлось делать некий work-around:
Системный скрипт .rc_statup (создаётся при запуске в /tmp и запускается силами процесса init) выглядит примерно так (некоторые подробности опущены, полный код доступен здесь):
# /tmp/.rc_startup:
# 1: Монтировать "диск" optware в папку /opt
DST=`ls /dev/scsi/host?/bus?/target?/lun?/part1`
if [ -n "$DST" ]; then
/bin/mount -t ext3 -o noatime,nodiratime $DST /opt
echo "mount USB part1 -> /opt"
fi
# 2: Разрешить swapfile с раздела swap
DST=`ls /dev/scsi/host?/bus?/target?/lun?/part2`
if [ -n "$DST" ]; then
/opt/bin/busybox swapon $DST
echo "mount USB part2 -> swap"
fi
# 3: Создать окружение для запуска S* скриптов Optware
echo "start">/tmp/.rc_stage
# 4: Закончить работу, далее запустятся скрипты /opt/etc/init.d/S*
exit
Каждый S* и K* скрипт содержит примерно такой код:
if [ -n "$1" ]; then

    OP=$1

else

    OP=$(cat /tmp/.rc_stage)

fi
case "$OP" in
start) # bla-bla
;;
stop) # bla-bla
;;
esac
Системный скрипт .rc_shutdown (создаётся при перезагрузке в /tmp и запускается по команде reboot) выглядит примерно так (некоторые подробности опущены, полный код доступен здесь):
# /tmp/.rc_shutdown:
# 1: Скрипты /opt/etc/init.d/K* уже отработали
# 2: Запретить swapfile
DST=`ls /dev/scsi/host?/bus?/target?/lun?/part2`
if [ -n "$DST" ]; then
/opt/bin/busybox swapoff $DST
echo "swap disabled"
fi
# 3: Отмонтировать optware
DST=`ls /dev/scsi/host?/bus?/target?/lun?/part1`
if [ -n "$DST" ]; then
/bin/umount /opt
echo "/opt umounted"
fi
# 4: Закончить работу, далее будет перезагрузка роутера
echo "*** Shutdown ***
В более старом роутере (версия прошивки 13064) S* и K* скрипты вообще не вызываются автоматически, поэтому пришлось делать так:
Системный скрипт .rc_statup копирует и стартует (в фоновом режиме) скрипт запуска optware:
# /opt/.startup - скрипт запуска Optware

CFG=/mmc # или /mnt, или /jffs, или /tmp/smbshare

if [ -x $CFG/opt/.startup ]; then

    cp $CFG/opt/.* /tmp

    echo "startup: switch to optware" >>/tmp/log

    /tmp/.startup start $CFG &

else

    echo "startup: optware not found" >>/tmp/log

fi
А уже optware-скрипт /opt/.startup делает всё остальное, а именно — запускает S* скрипты.
Аналогично устроен и системный скрипт .rc_shutdown: (только запускает /opt/.shutdown не в фоновом режиме, а непосредственно)
# /opt/.shutdown - скрипт останова Optware

CFG=/mmc

if [ -x $CFG/opt/.shutdown ]; then

    cp $CFG/opt/.* /tmp

    . /tmp/.shutdown stop $CFG

fi
На этом пока всё.