Configure Option 125 on a Server to Allow Dynamic Host Configuration Protocol (DHCP) Auto Image Updates on a Switch
Objective
Scenario:
Managing multiple or stacked switches in the network could be very challenging to maintain, especially if you have to add a new switch to the network, apply new configuration settings, or update each switch to its latest image version. You would want to find a way to allow the switches to automatically update their own images.
If you have enabled and configured the Dynamic Host Configuration Protocol (DHCP) Auto Configuration and Auto Image Update features to automatically update the firmware and configurations on a switch that is connected to a server which serves as a DHCP server. However, after configuring DHCP-based auto update, the switch did not download and apply the latest image.
Solution:
Enabling the DHCP image upgrade features to download both a new image and a new configuration file to one or more switches in the network is very helpful in making sure that each new switch added to the network receives the same image and configuration. These features function properly only when the DHCP server is configured to assign the host IP address dynamically. By default, the switch is enabled as a DHCP client when the Auto Configuration feature is enabled. If Image Auto Update is enabled, the flash image is downloaded and updated. If the new configuration is downloaded to a switch that already has a configuration, the downloaded configuration is appended to the configuration file stored on the switch.
Auto image download is done using an indirect image file. The indirect Image file is a text file that contains the path to the actual image file which is uploaded on a TFTP or SCP server. To provide the indirect image file name, Option 125 needs to be configured with the following parameters on the DHCP server:
- enterprise-number (4 octets) — Hex (0000.0009)
- sub-option-code (1 octet) — Hex (05)
- File name that points to the indirect image (ASCII to Hex)
This article provides instructions on how to configure Option 125 on the server to relay DHCP addresses correctly and make auto image update work on the switch.
Note: Before you proceed, you can verify if you have correctly configured the DHCP Image Upgrade Settings on your switch. For step-by-step instructions, click here.
Applicable Devices
- Sx200 Series
- Sx250 Series
- Sx300 Series
- Sx350 Series
- SG350X Series
- Sx500 Series
- Sx550X Series
Configure Option 125
Add Option 125 in your Server
Important: Make sure that there is an active DHCP server running in your Linux or Windows server.
Note: In this scenario, Windows Server 2012 R2 is used.
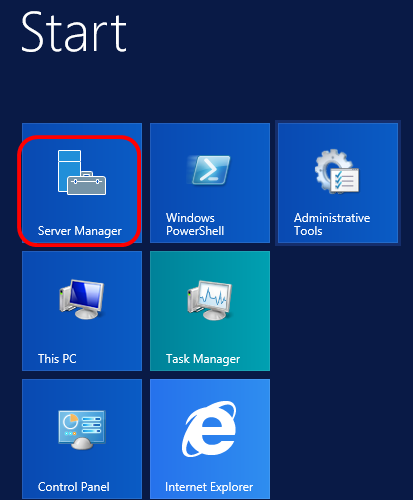
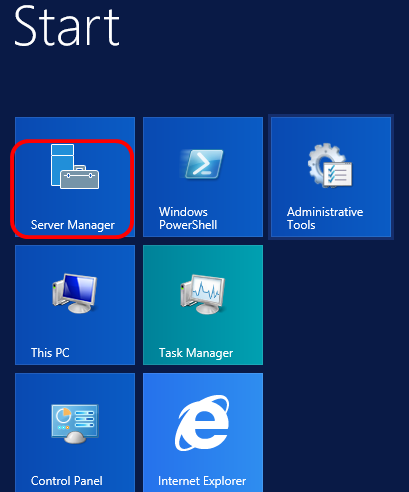
Step 1. Click Start > Server Manager.
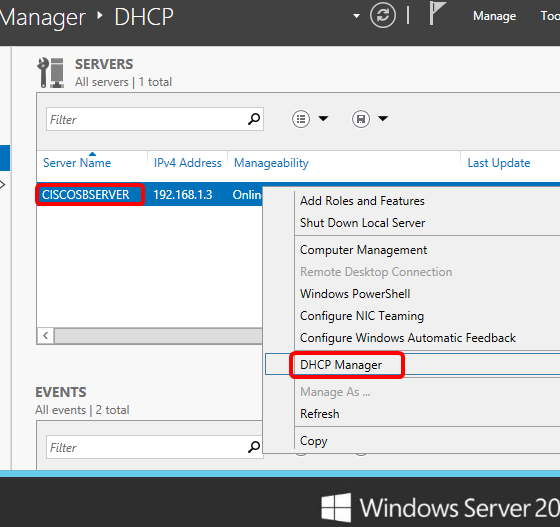
Step 2. Right-click on the server name then click DHCP Manager.
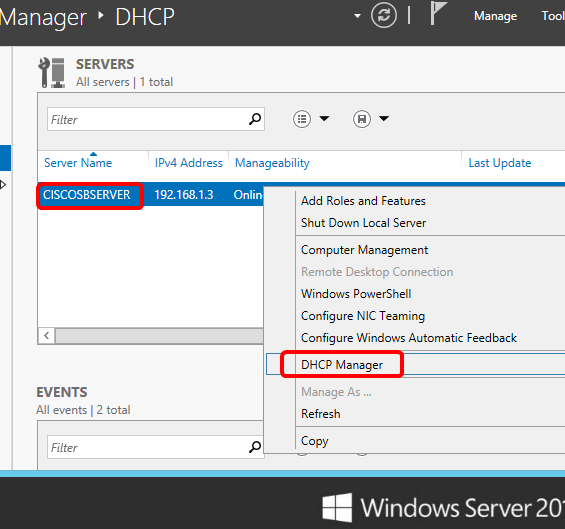
Note: In this example, CISCOSBSERVER is the server name.
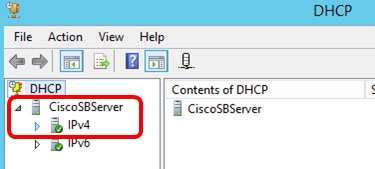
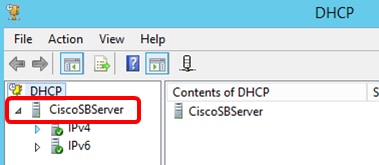
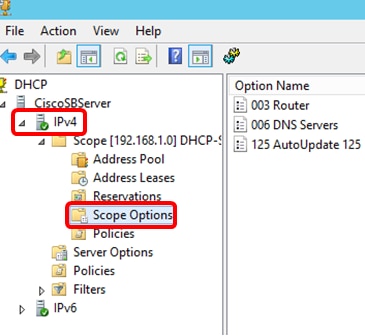
Step 3. Click the collapse button of the server name, and then click the collapse button of IPv4 to show available options.
Note: Option 125 works on IPv4 addressing only. If you want to configure DHCP Auto Image Upgrade settings on IPv6 address scope, configure Option 60 instead.
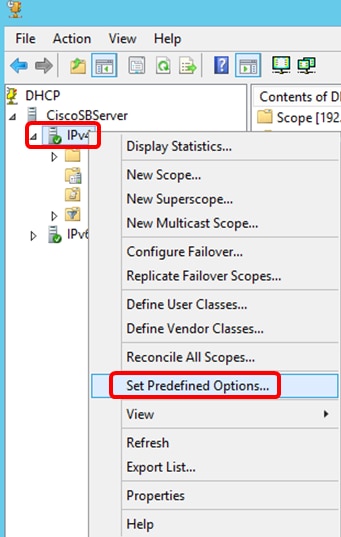
Step 4. Right-click on IPv4, and then click Set Predefined Options.
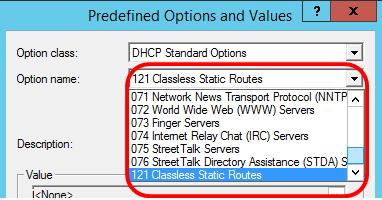
Step 5. Click DHCP Standard Options in the Option class drop-down list.
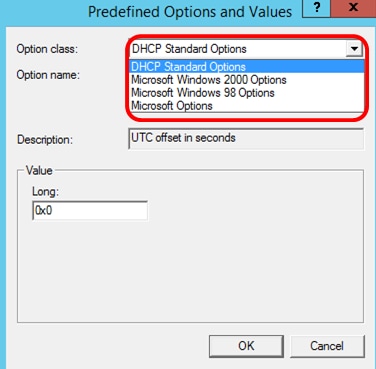
Step 6. Scroll down the Option name drop-down list to search for the option that starts with 125.
Note: By default, Option 125 is not available. If you have pre-configured Option 125, you can skip to Configure Option 125 Settings Through Netsh.
Step 7. If verified that Option 125 is not on the list, click Add.

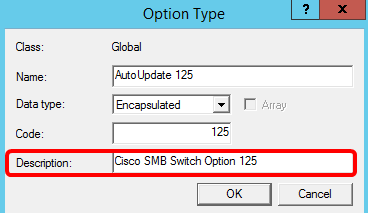
Step 8. Enter the option name in the Name field.
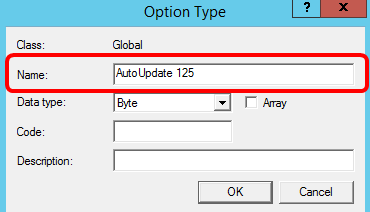
Note: In this example, AutoUpdate 125 is used.
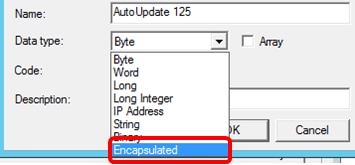
Step 9. Click Encapsulated from the Data type drop-down list.
Step 10. Enter 125 in the Code field. This code refers to the Option number indicator found at the beginning of the Option name as shown in Step 6.

Note: This code is used to create the Option 125.
Step 11. Enter the option description in the Description field and then, click OK.
Note: Cisco SMB Switch Option 125 is used as an example.
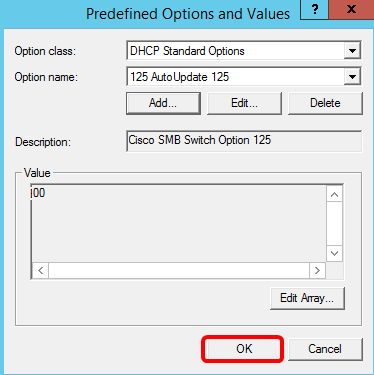
Step 12. Click OK in the Predefined Options and Values window.
Step 13. (Optional) To verify the newly added option, choose Scope Options > Configure Options under the IP version that you have configured.
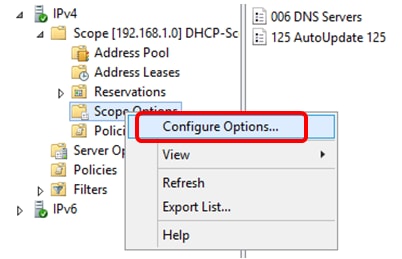
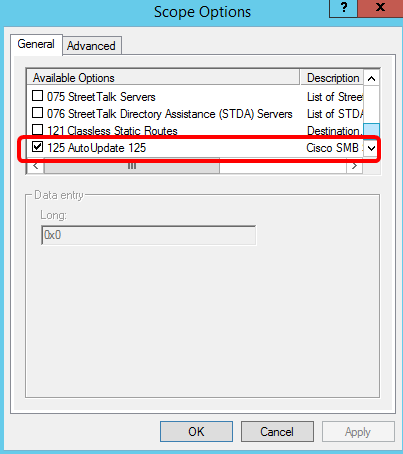
The Option 125 should now show in the list of Scope Options.
Configure Option 125 Settings Through Netsh
The proposed configuration method here uses netsh for configuring Option 125. This will allow you to run several netsh DHCP commands in the command prompt to modify the network configuration settings.
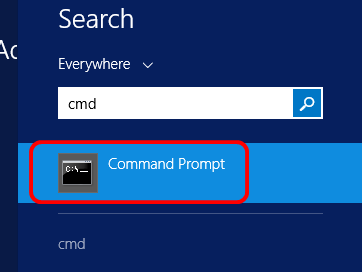
Step 1. Click Start then enter cmd in the Search box.
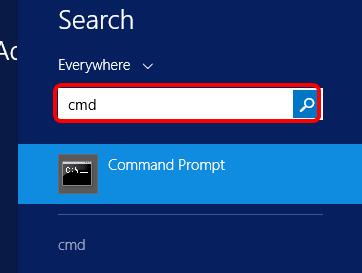
Step 2. Once the Command Prompt logo appears, click to launch.
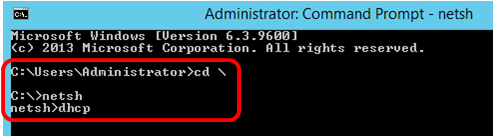
Step 3. Change your current directory to Drive C:\ by entering the following:

Note: In this example, C:\Users\Administrator is the current directory. This may vary depending on the user name and directory on your computer.
Step 4. Access the netsh command-line utility by entering the following:

Step 5. Change to the DHCP context by entering the following:

Step 6. Shift from DHCP context to the server by entering the following:

Step 7. Enter the command scope and IP address to shift from the server context to the specified DHCP scope address and then press the Enter key. The prompt should display that current scope context has been changed.

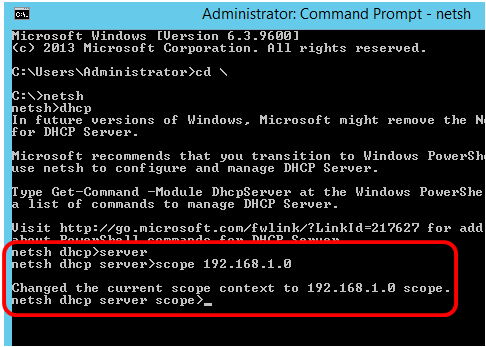
Note: In this example, the scope used is 192.168.1.0.
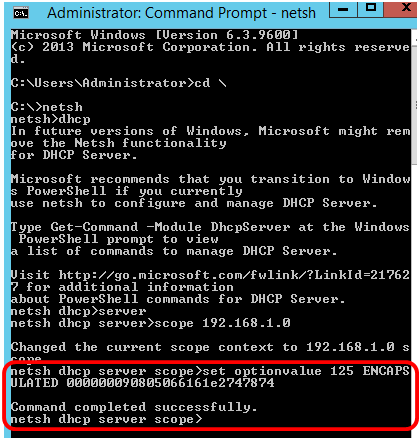
Step 8. Enter the command set optionvalue 125 ENCAPSULATED and the Option 125 code. After pressing Enter on your keyboard, the prompt below should display that the command has been successfully completed.

Note: In this example, 000000090805066161e2747874 is the code number used.
Option 125 Code Interpretation:
- 00-00-00-09 — Enterprise Number (Cisco Value)
- 08 — Option 125 Data Len
- 05 — Sub Option Code
- 06 — Sub Option Length
- 61-61-2E-74-78-74 — Sub Option Data ( aa.txt – ASCII to HEX conversion)
You should now have configured the Option 125 settings through netsh.
Verify Option 125 in DHCP Server
Step 1. Click Start > Server Manager.
Step 2. Right-click on the server name then click DHCP Manager.
Note: In this example, CISCOSBSERVER is the server name.
Step 3. Click the collapse button of the server name to show available IP versions.
Step 4. Click the collapse button of the IP version, then click Scope Options.
Note: In this example, IPv4 is chosen.
Step 5. Right-click on the configured Option 125, then click Properties.
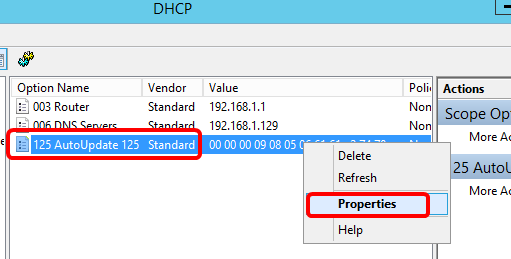
The configured Option 125 Scope Options page should display the Data, Binary, and ASCII codes in the Data entry area.

The Option 125 has now been successfully configured on your Windows Server.
Revision History
| Revision | Publish Date | Comments |
|---|---|---|
|
1.0 |
13-Dec-2018 |
Initial Release |
Important
The information provided by this page is only relevant if you are planning to use Infinity across multiple network subnets.
Option 125 is a vendor-specific DHCP Server feature that is required if you are using AIM’s multi-subnet mode. It provides additional information to the Infinity Receivers and Transmitters when requesting an IP Address from the DHCP Server. The option gives the endpoints the IP Address of the Primary and any other Backup or Satellite AIM Servers that reside on the network. It is also used to setup Satellite AIM’s. To simplify the process you can download a Windows DHCP Option 125 application, if you require.
Note
New/factory reset endpoints only read the first IP address in the Option 125 list until it has communicated with the Primary AIM and security keys have been exchanged. Thereafter, it will contact any of the IP addresses listed in the event of an AIM failure.
The information is provided in a hex code which can be formatted slightly differently depending on the DHCP Server, but will typically look like:-
0000621f0a01080a0014050a001406
The Hex code is broken down to the following elements:
| 0000621f | Adder Enterprise number (25119) – fixed |
| 0a | Length A |
| 01 | Sub-option 1 – fixed |
| 08 | Length B |
| 0a001405 | 10.0.20.5 (Primary AIM) |
| 0a001406 | 10.0.20.6 (Backup AIM) |

The Adder Enterprise and Sub-option 1 elements of the hex code are fixed and do not change, however the IP Address and Length A & B hex values will change depending on your own Infinity installation.
The first IP address in the list must always be the Primary AIM Server, followed by the Backup then Satellite AIM’s.
There are a number of online websites that help you convert an IP Address into a hex number. Alternatively, you could use a Calculator with a Hex and Dec function which you may find is built into your computers operating system.
An IP Address hex code can be calculated by converting each of the four decimal octet’s individually into hex then combining them.
| Decimal | Hex | |
|---|---|---|
| 10 | 0a | |
| 0 | 00 | |
| 20 | 14 | |
| 5 | 05 |
10.0.20.5 = 0a001405
The Length A and B values will change depending on the number of IP Addresses that are included.
Each hex IP Address is 4-bytes in length, for example:
| 0a | 00 | 14 | 05 |
| 1 | 1 | 1 | 1 (Total 4 bytes) |
The Length B value is the total byte count of the hex IP Addresses. In the example below, there are 2x hex IP addresses. Each hex IP address is 4-bytes, therefore Length B is 8-bytes in total which equates to 08 in hex.

Length A includes Sub-option 1 (1-byte) and the Length B value (1-byte) plus the total of Length B (8-bytes). This makes the total 10-bytes which equates to 0a in hex.

Example
In the following example an additional IP address will be added to the existing DHCP option 125 hex code shown previously. It will be a Satellite AIM whose IP address is 10.0.30.1 which is on a different subnet.
Step 1: Convert IP Address 10.0.30.1 into hex, which is 0a001e01. Add it to the end of the hex code.
0000621f..01..0a0014050a0014060a001e01
Step 2: Calculate Length B. Since we now have 3x IP addresses and each hex IP address is 4-bytes, the total length is 12-bytes which equates to 0c in hex.
0000621f..010c0a0014050a0014060a001e01
Step 3: Calculate Length A. This is the total of Length B plus the byte count for Sub-option 1 and the Length B value. The Sub-option 1 and Length B value are 1-byte each, the Length B total is 12-bytes. This makes the total of Length A to be 14-bytes which equate to 0e in hex.
0000621f0e010c0a0014050a0014060a001e01
Formatting Hex Code
The formatting of the option can vary between DHCP servers. You will need to check the manual for the specific server. For example:-
No delimiter
0000621f0a01080a0014050a001406
Dots/Periods
0000.621f.0a01.080a.0014.050a.0014.06
Colons
00:00:62:1f:0a:01:08:0a:00:14:05:0a:00:14:06
Example DHCP Configurations
Example: ISC DHCPd, Adder, AIM servers: 10.0.20.5, 10.0.20.6
/# ISC DHCPd configuration for Adder
set vendor-string = option vendor-class-identifier;
option space adder code width 1 length width 1; option adder.aim-servers code 1 = array of ip-address;
option space vivso code width 4 length width 1; option vivso.iana code 0 = string;
option vivso.adder code 25119 = encapsulate adder;
option option-125 code 125 = encapsulate vivso;
default-lease-time 3600; max-lease-time 7200;
log-facility local7;
class «adder»
{
match if option vendor-class-identifier = «adder»;
}
subnet 10.0.20.0 netmask 255.255.255.0
{
pool
{
allow members of «adder»; vendor-option-space adder;
option domain-name «customer.com»; option domain-name-servers 10.0.20.2; option routers 10.0.20.1;
option vivso.iana 01:01:01;
option adder.aim-servers 10.0.20.5,10.0.20.6; range 10.0.20.100 10.0.20.200;
}
}
Example: Cisco IOS DHCPd, Adder, AIM servers: 10.0.20.5, 10.0.20.6
ip dhcp pool vlan20
network 10.0.20.0 255.255.255.0 default-router 10.0.20.1 option 60 ascii «adder»
option 125 hex 0000.621f.0a01.080a.0014.050a.0014.06
Example: HP 2920 Switch. Adder AIM Servers: 10.0.10.10, 10.0.10.11
dhcp-server pool «DHCP-VLAN2»
authoritative
default-router «10.0.20.254»
domain-name «adder.com»
network 10.0.20.0 255.255.255.0
option 125 hex «0000621f0a01080a000a0a0a000a0b»
range 10.0.20.10 10.0.20.250
exit
Example: Setting up DHCP Option 125 on Microsoft Windows Server 2012
Note: This assumes that you have setup the IP address scope to issue a range of IP addresses.
- Open the DHCP server configuration console (found within administration tools).
- Expand the server tree in question on the left hand side.
- Right click the IPv4 object in the left hand tree Select «Set Predefined Options».
- With the Option Class set to «DHCP Standard Options»
- Click Add
- Enter a Name, for example, Adder AIMs
- Set the Data type to Binary
- Set the Code to 125
- Enter a Description (optional)
- Press OK to close the dialog window.
- Open the DHCP Scope that you have created to issue IP addresses.
- In the Scope Options section, right mouse click and choose Configure Options.
- On the General tab, scroll down the list and find option 125.
- Tick the checkbox for option 125
- In the data entry section, you need to enter the hex number in the binary section.

- Click OK to close the dialog window.
- For our setup to take immediate effect a restart the DHCP service was required.
Checking an Endpoint
When a transmitter or receiver has successfully acquired a DHCP IP address along with Option 125, it will automatically assume that it is under the AIM Managers control and you should see the IP address of the AIM Manager(s) listed on the About page.
For example, the screenshot below has been taken from ALIF2020. In the AIM section that you will see that the AIM servers are 10.0.20.5 and 10.0.20.6 respectively.

На чтение 9 мин Просмотров 42к.

Антон Богданов
Инженер-проектировщик сетей связи
DHCP-сервер — до недавнего времени этот термин использовался только среди профессионалов в области информационных систем. Но с появлением интернет-маршрутизаторов практически в каждой квартире разобраться с тем, как работает DHCP, будет нелишним и для простых людей, не связанных с телекоммуникационными сетями.
Содержание
- Что такое DHCP
- Виды
- Принцип действия
- IP адресация
- Проблемы с интернетом и сетью
- Включение в Windows
- Настройка на роутерах
- Asus
- D-Link
- TP-LINK
- Zyxel keenetic
- Netis
- Upvel
Что такое DHCP
Дословно эта аббревиатура (protocol DHCP) означает Dynamic Host Configuration Protocol, что в переводе на русский язык означает «протокол динамической настройки узла». Благодаря этой технологии не требуется прописывать на каждом клиенте сетевые параметры, такие как:
- IP-адрес;
- Маска подсети;
- Основной шлюз;
- Адрес DNS-сервера.
В рамках этой статьи определим термины:
- Клиент (Client) – устройство, с которого происходит выход в интернет;
- Сервер (Server) – устройство, предоставляющее возможность выхода в интернет для клиента.
Простыми словами, DHCP выполняет всю работу по подбору сетевых настроек автоматически, без необходимости присваивать вручную каждому устройству свой IP-адрес. Это очень упрощает работу системного администратора в случае расширения сети.
Виды
Для выхода в интернет используется протокол IPv4. Для своей работы он применяет IP-адреса. IP у каждого компьютера в рамках одной сети должен быть уникальный.
Определение адресов может быть двух типов:
- Статическое (распределение вручную) – IP каждому клиенту присваивается вручную администратором сети;
- Динамическое (DHCP) – IP присваиваются автоматически исходя из заданных условий.
Принцип действия
Если то для чего нужен DHCP, понять довольно просто, то с принципом его работы нужно немного разобраться. Присвоение IP посредством DHCP выполняется в 4 действия:
- Discover (Поиск сервера). Клиент, которому нужно получить сетевой адрес, отправляет сообщение на все компьютеры в сети с запросом на присвоение ему IP. Для своей временной идентификации клиенту присваивается адрес 0.0.0.0;
- Offer (Предложение сервера). Сервер получает запрос от клиента, анализирует его и, исходя из своих настроек, подбирает конфигурацию и отправляет её клиенту;
- Request (Запрос). Получив предлагаемые настройки, клиент отправляет на адрес ответившего ему сервера запрос о предоставлении ему этих настроек;
- Acknowledge (Подтверждение). Сервер получает запрос на уже конкретные настройки, предложенные ранее, создаёт привязку для клиента и отправляет ему их.

Присвоенные настройки выдаются не навсегда, а на какое-то время. Когда срок аренды (lease time) адреса подходит к концу, клиент отправляет на сервер запрос для обновления аренды этого же адреса. Сервер получает запрос, и если никаких причин для отказа нет, обновляет аренду.
Весь этот обмен пакетами происходит в пределах одной подсети, если клиент и сервер находятся в разных подсетях, то нужно использовать DHCP Relay для связи между ними.
IP адресация
Для работы по сети любому устройству требуется IP-адрес. В протоколе IPv4 это числовой идентификатор, состоящий из 4 разрядов, каждый из которых отделяется точкой, без него устройство не может быть определено в сетевой инфраструктуре. Зачастую маршрутизатор имеет IP-адрес 192.168.1.1, а подключённое к нему устройство, например, 192.168.1.2.
Клиенту должна быть присвоена определённая маска подсети, например, 255.255.255.0. Она позволяет определить к какой сети относится данный клиент.
Для связи между интернетом и сетью в любой сети должен быть определён IP-адрес основного шлюза. В роли шлюза выступает маршрутизатор, который предоставляет доступ в сеть всем устройствам в своей сети.
Проблемы с интернетом и сетью
При использовании DHCP могут возникать некоторые проблемы с доступом в интернет:
- Дублирование IP. Когда в пределах одной сети у двух и более устройств прописан один и тот же адрес, то возникнет ошибка «Address Already in Use», что означает, что данный адрес уже используется. В этом случае нужно проверить настройки IP на всех компьютерах и изменить совпадающие. Это может быть из-за того, что на роутере установлена раздача адресов по DHCP или присвоены статические адреса некоторым устройствам, и из-за того, что неправильно задан диапазон IP, раздаваемых динамически, DHCP сервер пытается присвоить уже используемый адрес. Для решения этой проблемы можно посмотреть список клиентов DHCP и передвинуть диапазон динамических адресов далее;
- Исчерпание IP. Это означает, что пул адресов, доступных для динамической раздачи, исчерпан и его нужно расширить, чтобы новые устройства могли получать адреса.
- Неправильная настройка DHCP и клиента. В случае, если изменить на самом клиенте присвоенные ему автоматические настройки, то доступа в сеть не будет. Присваивать адреса клиентам нужно на роутере, и уже после и на клиенте.
Включение в Windows
В случае подключения компьютера напрямую к кабелю от интернет-провайдера, как правило, умения работать с DHCP не требуется. Поскольку в большинстве случаев подключение физических лиц происходит через протокол PPPoE, в котором пользователю нужно лишь создать подключение к сети и ввести там свой логин и пароль. В этом случае компьютеру будет присвоен динамический IP, который через время изменится на другой. И в этот момент пользователь не догадывается, что служба DHCP уже вовсю работает на его компьютере, и позволяет провайдеру предоставить ему любой IP.
Для настройки DHCP сервера в операционной системе Windows нужно зайти в “Центр управления сетями и общим доступом” и выбрать пункт “Изменение параметров адаптера”. В открывшемся окне нужно найти сетевую карту и в контекстном меню выбрать пункт “Свойства”, в новом окне найти пункт “IP версии 4” и нажать на кнопку “Свойства”. В открывшемся окне можно увидеть, что активны настройки получения адреса автоматически.

В случае, если провайдер предоставил вам статический IP, то это означает что для доступа в интернет устройство должно иметь строго тот адрес, который выдал провайдер, для этого в этом же окне нужно указать параметры, выданные провайдером. Проведя соответствующие настройки, вы отключите DHCP на своём компьютере и ему никто не сможет присвоить другой адрес, отличный от того, который был установлен.
Настройка на роутерах
Всё это относилось к настройкам внешнего IP, но что делать, если у пользователя стоит задача обеспечить доступом в интернет несколько устройств? В этом случае нужно использовать маршрутизатор, для настройки которого пригодится умение работать с DHCP.
В зависимости от того, какой тип подключения используется, с выделенным или динамическим IP, так же как и в случае с настройкой подключения в операционной системе, роутер получит либо динамический (DHCP), либо статический IP.
Но это ещё не всё, ведь для каждого устройства, подключённого к сети, требуется собственный адрес, уникальный только в рамках данной сети, чтобы роутер мог «понимать», как ему общаться с тем или иным устройством. Внешний адрес, уникальный в глобальной сети, у всех устройств будет точно такой же, как и у маршрутизатора, а вот с внутренними нужно будет разобраться непосредственно пользователю.
Сам роутер имеет статический внутренний IP, обычно это 192.168.1.1 или 192.168.0.1. На всех роутерах DHCP сервер активирован по умолчанию. Это сделано для того, чтобы можно было подключиться к маршрутизатору с любого устройства, роутер сам определит, какой ему присвоить адрес и даст доступ во внутреннюю сеть. Такой способ подключения клиентов очень удобен, ведь в этом случае не нужно проводить предварительную настройку каждого устройства и присваивать каждому уникальный внутренний адрес. Все новые устройства без проблем получат адреса и доступ в сеть.
Однако это может быть неудобно, если нужно управлять этими устройствами, в этом случае лучше будет отключить динамическое распределение адресов и присвоить каждому устройству свой IP. Принцип настройки DHCP-сервера на роутере разных моделей одинаков, но достигается разными путями.
Итак, всё же как включить DHCP на роутере? Если вкратце, то нужно сначала активировать работу сервера, настроить пул (диапазон адресов, которые выдаются роутером автоматически) задав начальный и конечный IP и время его аренды.
Asus
Настройка роутера этой фирмы происходит следующим образом. В левом краю web-панели есть пункт “Локальная сеть”, нажав на него, нужно выбрать вкладку DHCP-сервер. На открывшейся странице нужно отметить пункт “Да” в графе “Включить DHCP-сервер”.

Здесь можно настроить пул выдаваемых автоматически адресов и время аренды.
D-Link
Настраивать роутеры D-Link чуть сложнее, поскольку у них сильно разнятся варианты исполнения интерфейса. Но обычно пункт настройки DHCP вынесен непосредственно в основное меню на главной странице.

Здесь всё те же настройки, только выглядят несколько иначе.
TP-LINK
Параметры DHCP на устройствах TP-LINK доступны практически с главной страницы интерфейса.
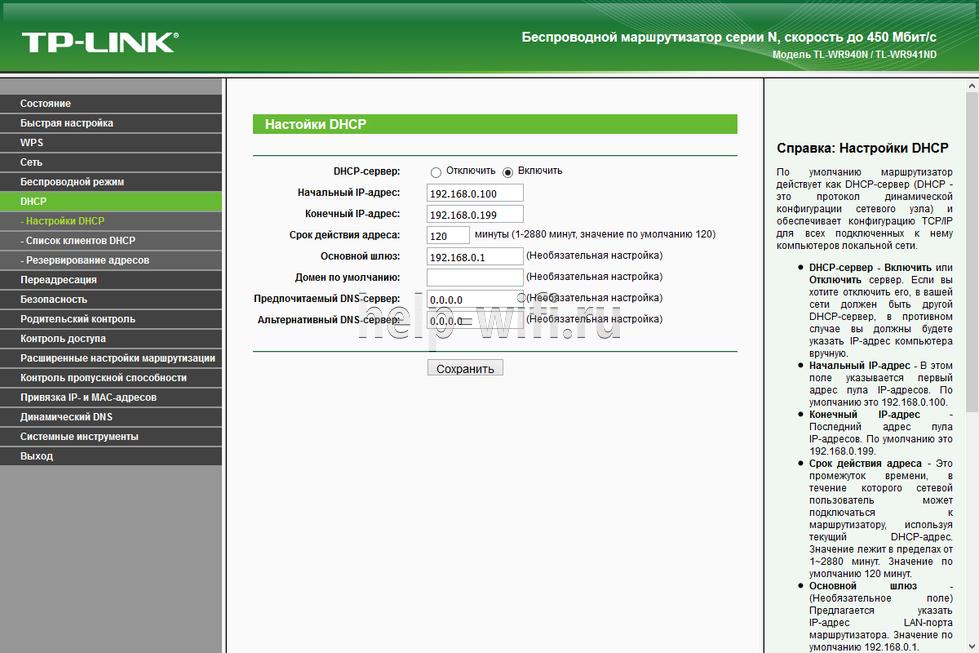
В левом краю есть стэк “DHCP”. Развернув его, можно увидеть ещё три пункта, в которых можно настроить, посмотреть список клиентов и зарезервировать адреса для определённых клиентов. Для настройки нужно выбрать пункт “Настройка DHCP”. Далее нужно активировать сервер и произвести его настройку, задав интервал и время аренды.
Zyxel keenetic
Для настройки роутеров Zyxel нужно зайти в панель Администратора, затем в настройки домашней сети.

Там выбрать вкладку “Параметры IP” и поставить галочку “Включён” в пункте “Сервер DHCP”.
Netis
Настройки роутеров Netis несколько более скудные, здесь можно включить и отключить DHCP на маршрутизаторе и задать диапазон выдаваемых IP.

Попасть в эти настройки можно из стэка “Сеть”, пункт “LAN”.
Upvel
В левом стеке есть пункт “Основные настройки”, там “Интерфейс LAN”, в нём на выбор можно включить DHCP или DHCP Relay (ретранслятор в другие подсети).
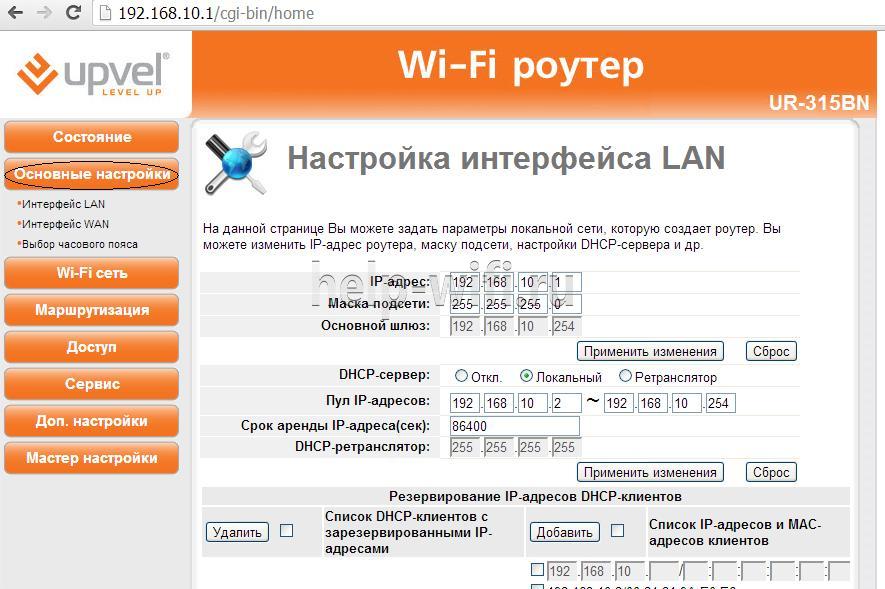
Здесь можно установить диапазон адресов, срок аренды и редактировать список зарезервированных клиентов, добавлять и удалять их.

Grilled Giardiniera-Stuffed Steak Sandwich
This rolled flank steak is inspired by the Italian beef sandwich, a Chicago delicacy typically consisting of chopped thin slices of roast beef stuffed…
Provided by Food Network Kitchen

Mapo Potato
Let’s be clear: Nothing surpasses the hearty deliciousness of a traditional mapo tofu. But for those days when you find yourself without soft tofu in the…
Provided by Hetty McKinnon

Chili
This is a spicy, smoky and hearty pot of chili. It’s the kind of chili you need after a long day skiing — or hibernating. To create a rich and thick sauce,…
Provided by Ali Slagle

Banket
This recipe is from my mother. It is the one she taught me with a slight tweak. In my home on the holidays one way to show someone or a family they were…
Provided by Jena Lewis

Moroccan Nachos
This Moroccan twist on the much-loved appetizer features kefta, a ground beef (or lamb) mixture seasoned with parsley, cilantro, mint, paprika and cumin,…
Provided by Nargisse Benkabbou
Peanut Butter Brownie Cups
I’m not a chocolate fan (atleast not the kind made in the U.S.), but I LOVE peanut butter and chocolate and this hit the spot. I found the recipe in 2007…
Provided by AmyZoe
Banana Cream Pudding
This fabulous version of the favorite Southern dessert boosts the banana flavor by infusing it into the homemade vanilla pudding, in addition to the traditional…
Provided by Martha Stewart
Lemon Russian Tea Cakes
I love lemon desserts,these are a simple cookie I can make quickly. The recipe is based on the pecan Russian tea cakes.I don’t like lemon extract,instead…
Provided by Stephanie L. @nurseladycooks
Easy Churros with Mexican Chocolate Sauce
Forgo the traditional frying — and mixing up the batter! — for this Latin American treat. Instead, bake store-bought puff pastry for churros that are…
Provided by Martha Stewart
Easy Lasagna
Everyone loves lasagna. It’s perfect for feeding a big crowd and a hit at potlucks. But most people reserve it for a weekend cooking project since it can…
Provided by Food Network Kitchen
Grilled Vegetables Korean-Style
Who doesn’t love grilled vegetables — the sauce just takes them over the top.
Provided by Daily Inspiration S @DailyInspiration
Outrageous Chocolate Cookies
From Martha Stewart. I’m putting this here for safe keeping. This is a chocolate cookie with chocolate chunks. Yum! Do not over cook this cookie since…
Provided by C. Taylor
CERTO® Citrus Jelly
A blend of freshly squeezed orange and lemon juices puts the citrusy deliciousness in this CERTO Citrus Jelly.
Provided by My Food and Family
Previous
Next
CONFIGURE OPTION 125 — CISCO COMMUNITY
WebOct 12, 2016 Step 5. Click DHCP Standard Options in the Option class drop-down list. Step 6. Scroll down the Option name drop-down list to search for the option that starts …
From community.cisco.com
Estimated Reading Time 6 mins
THE FOLLOWING 3 SCREENSHOTS DEMONSTRATE HOW OPTION 125 …
WebIn our demonstration, we manually update option 125 via netsh command as follows: C:\Users\Administrator.PROSERV>netsh netsh>dhcp netsh dhcp>server netsh dhcp …
From static.spiceworks.com
In our demonstration, we manually update option 125 via netsh command as follows: C:\Users\Administrator.PROSERV>netsh netsh>dhcp netsh dhcp>server netsh dhcp …»>
See details
DHCPD: OPTION 125 NOT PRESENT IN THE MSG. — CISCO …
WebNov 4, 2020 Mitel IP Phones use option 125 to configure the call server, TFTP server and various other network settings. The switches are completely dropping the DHCP offers …
From community.cisco.com
DHCP OPTIONS IN PLAIN ENGLISH | IPV4 IPV6 — INCOGNITO
Web23 rows DHCP Options in Plain English This article provides a summary of everything you need to know about common, configurable DHCP options to manage devices. Updated …
From incognito.com
23 rows DHCP Options in Plain English This article provides a summary of everything you need to know about common, configurable DHCP options to manage devices. Updated …»>
See details
DHCP OPTION 125 IN DATA & VOICE VLAN? — TEK-TIPS
WebMay 23, 2011 On bootup the phone uses Option 125 from the Data VLAN DHCP scope and begins tagging packets with the Voice VLAN tag, it leases a Voice VLAN IP address …
From tek-tips.com
May 23, 2011 On bootup the phone uses Option 125 from the Data VLAN DHCP scope and begins tagging packets with the Voice VLAN tag, it leases a Voice VLAN IP address …»>
See details
OPTION 125 — SEND FROM CLIENT TO SERVER #169 — GITHUB
WebCurrently dhcpcd can only decode the DHCP option 125, it cannot send it. No-one has asked for the ability to send it before, just request it and decode it. Although RFC 3925 …
From github.com
Currently dhcpcd can only decode the DHCP option 125, it cannot send it. No-one has asked for the ability to send it before, just request it and decode it. Although RFC 3925 …»>
See details
ADDER SUPPORT WIKI | ALIF: UNDERSTANDING DHCP OPTION 125
WebOption 125 is a vendor-specific DHCP Server feature that is required if you are using AIM’s multi-subnet mode. It provides additional information to the Infinity Receivers and …
From support.adder.com
Option 125 is a vendor-specific DHCP Server feature that is required if you are using AIM’s multi-subnet mode. It provides additional information to the Infinity Receivers and …»>
See details
DHCP OPTION 124/125 FOR UBEE DDW36C : R/NETWORKING — REDDIT
WebThe AWG’s DHCPv4 server MUST respond with ACS Discovery information contained in Vendor-Identifying Vendor Specific data (option 125) when answering a lease from a …
From reddit.com
RFC 3925 — VENDOR-IDENTIFYING VENDOR OPTIONS FOR DYNAMIC HOST …
WebRFC 3925 Vendor-Identifying Vendor Options October 2004 1.Introduction The DHCP protocol for IPv4, RFC 2131 [], defines options that allow a client to indicate its vendor …
From datatracker.ietf.org
RFC 3925 Vendor-Identifying Vendor Options October 2004 1.Introduction The DHCP protocol for IPv4, RFC 2131 [], defines options that allow a client to indicate its vendor …»>
See details
DYNAMIC HOST CONFIGURATION PROTOCOL (DHCP) AND …
Web191 rows Apr 28, 2023 The document «DHCP Options and BOOTP Vendor …
From iana.org
191 rows Apr 28, 2023 The document «DHCP Options and BOOTP Vendor …»>
See details
HOW TO RESOLVE «NO OPTION 125» — CISCO COMMUNITY
WebMar 12, 2015 03-12-2015 08:00 AM — edited 03-07-2019 11:03 PM. Hi guy. I configured a router as a dhcp server but i got «No option 125», may I know how to resolve? 150557: Mar 12 2015 22:42:27.767 GMT: DHCPD: no option 125. 150558: Mar 12 2015 22:42:27.767 GMT: DHCPD: broadcasting BOOTREPLY to client ac44.f211.a13b.
From community.cisco.com
DHCP OPTIONS — SPICEWORKS
WebIMPORTANT: DHCP options 128-135 used to configure Mitel IP endpoints have been reclassified as public options by the Internet Engineering Task Force (see RFC 2133 …
From static.spiceworks.com
IMPORTANT: DHCP options 128-135 used to configure Mitel IP endpoints have been reclassified as public options by the Internet Engineering Task Force (see RFC 2133 …»>
See details
GRANDSTREAM NETWORKS, INC.
WebDHCP options Guide DHCP Option 125 (Vendor-Identifying Vendor Options) Description DHCP clients may use this option to identify the vendor that manufactured the hardware …
From documentation.grandstream.com
DHCP options Guide DHCP Option 125 (Vendor-Identifying Vendor Options) Description DHCP clients may use this option to identify the vendor that manufactured the hardware …»>
See details
SOLVED: ERROR DHCPD: NO OPTION 125 — CISCO COMMUNITY
WebAug 24, 2018 3 Error DHCPD: no option 125 Go to solution TranVinh Beginner Options 08-23-2018 08:55 PM — edited 03-03-2019 08:53 AM Hi everybody, I have one problem …
From community.cisco.com
NO OPTION 125 IN DHCP LOG — CISCO COMMUNITY
WebOct 28, 2016 Router 1: ip dhcp excluded-address 10.27.100.1 10.27.100.30 ip dhcp excluded-address 10.27.100.129 10.27.100.254 ! ip dhcp pool Vlan100 import all …
From community.cisco.com
DHCP OPTION | EFFICIENT IP
WebCommon Options Here is the list of the most common DHCP options exchanged with clients: DHCP option 1: subnet mask to be applied on the interface asking for an IP …
From efficientip.com
Common Options Here is the list of the most common DHCP options exchanged with clients: DHCP option 1: subnet mask to be applied on the interface asking for an IP …»>
See details
DHCP OPTION 125 — SOCIAL.TECHNET.MICROSOFT.COM
WebAug 19, 2012 This is example of linux, but i need to do on server 2008: The example below demonstrates how to return option 125 for the widely used ISC DHCP server. Option …
From social.technet.microsoft.com
SET VENDOR-ENCAPSULATED-OPTIONS (CODE 125) WITH ISC …
WebCode 125: V-I Vendor Specific Information Based on the ISC DHCP server documentation, the three codes exist and they could be easily sent by adding the convinient options: …
From askubuntu.com
Code 125: V-I Vendor Specific Information Based on the ISC DHCP server documentation, the three codes exist and they could be easily sent by adding the convinient options: …»>
See details
MITEL PHONE SYSTEM AND DHCP OPTION 125 : R/SYSADMIN — REDDIT
WebMitel phone system and DHCP option 125 I am having a little trouble getting DHCP options for our Mitel MiVoice Office 400 going. I have been searching and have found a few …
From reddit.com
Mitel phone system and DHCP option 125 I am having a little trouble getting DHCP options for our Mitel MiVoice Office 400 going. I have been searching and have found a few …»>
See details
WHY DO I GET «NO OPTION 125» IN DEBUG DHCP? — CISCO COMMUNITY
WebMay 29, 2015 Beginner Options 05-29-2015 01:05 PM Ive configured two dhcp pool to serve the same subnet, the first pool have static bindind and the second is dynamic. The configuration is working correctly except that I’m having delay to get answer from the router.
From community.cisco.com
ANYONE OUT THERE USING MITEL PHONES AND DHCP OPTIONS TO GET …
WebOption 125 Mitel Option 125 = The string above, which contains Options 128/129/130/132/133 In the olden days we used to layout each option, and some of us …
From reddit.com
Option 125 Mitel Option 125 = The string above, which contains Options 128/129/130/132/133 In the olden days we used to layout each option, and some of us …»>
See details
TECHNICAL BULLETIN CS-10-30 — SPECTRALINK
Webpage 2, and DHCP Option 125 Data Format on page 3. When DHCP option 60 is set to ASCII String, DHCP option 43 data will be interpreted as encapsulated DHCP options, …
From support.spectralink.com
page 2, and DHCP Option 125 Data Format on page 3. When DHCP option 60 is set to ASCII String, DHCP option 43 data will be interpreted as encapsulated DHCP options, …»>
See details

PC-PORTAL
МЕНЮ
Обновлено: 09.10.2023


/Khajiev.files/image001.png "Опция 125 в роутере что")
Читайте также:
- Переходник ide usb как пользоваться
- Программа для прошивки iphone 2g
- Фатальная ошибка закончилась свободная оперативная память