На чтение 3 мин Опубликовано Обновлено
Маршрутизаторы Mikrotik — это популярное решение для создания сетей и управления интернет-трафиком. Они имеют множество функций, включая DHCP-сервер, который автоматически назначает IP-адреса устройствам в сети. Однако в некоторых ситуациях может понадобиться отключить DHCP-сервер, например, когда используется другое устройство для выдачи IP-адресов или требуется более тонкая настройка сети.
Отключение DHCP-сервера на Mikrotik довольно просто. Вам потребуется выполнить несколько шагов. Перед тем как начать, убедитесь, что у вас есть доступ к маршрутизатору Mikrotik через интерфейс командной строки или графический интерфейс.
1. Войдите в систему Mikrotik с помощью соответствующих учетных данных. Если вы используете интерфейс командной строки (CLI), введите свои учетные данные. Если вы используете графический интерфейс (GUI), откройте веб-браузер, введите IP-адрес маршрутизатора Mikrotik в адресной строке и введите соответствующие учетные данные.
2. Откройте меню «IP» и выберите вкладку «DHCP-сервер». Здесь вы увидите настройки DHCP-сервера.
3. Чтобы отключить DHCP-сервер, просто выключите его, щелкнув по флажку рядом с надписью «Включен». Теперь DHCP-сервер на маршрутизаторе Mikrotik отключен и не будет назначать IP-адреса устройствам в сети.
Помните, что после отключения DHCP-сервера вам может потребоваться настроить статические IP-адреса для каждого устройства в сети вручную.
Теперь вы знаете, как отключить DHCP-сервер на Mikrotik. Это простой и эффективный способ настроить сеть под свои нужды и требования.
Содержание
- Шаг 1: Вход в настройки роутера
- Шаг 2: Переход в раздел настроек сети
- Шаг 3: Отключение DHCP сервера
Шаг 1: Вход в настройки роутера
Перед тем, как отключить DHCP сервер на Mikrotik, необходимо войти в настройки роутера. Для этого:
Примечание: Убедитесь, что ваш компьютер подключен к роутеру с помощью Ethernet-кабеля или Wi-Fi.
- Откройте веб-браузер и введите в адресной строке IP-адрес роутера. Обычно IP-адрес роутера Mikrotik по умолчанию — 192.168.88.1.
- Введите логин и пароль для доступа к настройкам роутера. По умолчанию логин — admin, пароль — без пароля.
- Нажмите кнопку «Войти» или нажмите Enter.
Если все данные введены правильно, вы должны быть перенаправлены на главную страницу настроек роутера Mikrotik.
Шаг 2: Переход в раздел настроек сети
2. В появившемся окне авторизации введите имя пользователя и пароль администратора Mikrotik. По умолчанию имя пользователя — «admin», пароль — пустое поле. Нажмите Ok.
3. После успешной авторизации вы увидите главное окно Web-интерфейса роутера Mikrotik.
4. На левой панели выберите раздел «IP» и раскройте его, кликнув на плюсик рядом. Затем выберите «DHCP Server» из раскрывшегося списка.
5. Вы попадете в раздел настроек DHCP сервера, где можно внести необходимые изменения или отключить DHCP сервер полностью.
Шаг 3: Отключение DHCP сервера
1. Зайдите в настройки роутера Mikrotik, открыв веб-браузер и введя IP-адрес роутера в адресную строку.
2. В левой панели выберите раздел «IP» и кликните на «DHCP Server».
3. В открывшемся окне выберите вкладку «Leases» и щелкните правой кнопкой мыши по активной аренде. Выберите пункт «Disable» для отключения DHCP сервера.
4. После этого DHCP сервер будет отключен, и роутер Mikrotik перестанет выдавать сетевые адреса клиентам, подключенным к сети.
5. Не забудьте сохранить изменения, нажав кнопку «Apply» или «OK».
Это завершает процесс отключения DHCP сервера на Mikrotik. Теперь вы можете использовать другой способ для назначения IP-адресов в вашей сети.
Как отключить DHCP-сервер на Mikrotik
На чтение 4 мин Опубликовано Обновлено
Настройка и обслуживание сети – важный аспект работы системного администратора. Одной из ключевых задач является настройка DHCP-сервера, который автоматически назначает IP-адреса устройствам в локальной сети. Однако, в некоторых случаях требуется отключить DHCP-сервер и назначить IP-адреса вручную. В данной статье мы рассмотрим, как отключить DHCP-сервер в Mikrotik.
Микротик – популярный производитель сетевого оборудования, известный своими роутерами и коммутаторами. Настройка DHCP-сервера в Mikrotik осуществляется через веб-интерфейс или с помощью терминала. Обратите внимание, что вы должны иметь права администратора для выполнения этих действий.
Перед тем, как отключить DHCP-сервер, убедитесь, что у Вас есть статический IP-адрес, который будет использоваться вместо DHCP-сервера. Если вы используете другой DHCP-сервер в сети, проверьте его настройки и убедитесь, что он будет работать корректно после отключения DHCP-сервера на Mikrotik.
Содержание
- Зачем отключать DHCP-сервер в Mikrotik
- Шаг 1: Вход в WebFig
- Шаг 2: Перейти к DHCP-серверу
- Шаг 3: Отключение DHCP-сервера
- Проверка отключения DHCP-сервера
Зачем отключать DHCP-сервер в Mikrotik
Отключение DHCP-сервера в Mikrotik может быть полезным во многих случаях, вот некоторые из них:
- Использование другого DHCP-сервера: если в вашей сети уже работает DHCP-сервер от другого устройства или программы, может быть необходимо отключить DHCP-сервер в Mikrotik, чтобы избежать конфликтов адресов и перекрытий.
- Статические IP-адреса: если ваши клиенты требуют постоянных IP-адресов, вам может потребоваться отключить DHCP-сервер и настроить статическую адресацию вручную.
- Установка VPN-сервера: при создании VPN-сервера на Mikrotik может быть полезным отключить DHCP-сервер, чтобы освободить IP-адреса для клиентов VPN.
- Работа с устройствами с фиксированными IP-адресами: если у вас есть устройства с уже назначенными статическими IP-адресами, отключение DHCP-сервера может обеспечить их правильное функционирование.
Шаг 1: Вход в WebFig
Прежде чем перейти к отключению DHCP-сервера в Mikrotik, необходимо войти в WebFig, веб-интерфейс управления роутером. Для этого выполните следующие действия:
- Откройте любой совместимый веб-браузер, такой как Google Chrome или Mozilla Firefox.
- В адресной строке введите IP-адрес роутера Mikrotik. Обычно это 192.168.88.1 или 192.168.1.1. Проверьте, какой IP-адрес используется на вашем роутере.
- Нажмите клавишу Enter или Return, чтобы открыть страницу входа в WebFig.
- В появившемся окне авторизации введите логин и пароль администратора Mikrotik.
- Нажмите кнопку «Войти» или клавишу Enter. Если данные авторизации введены верно, вы будете перенаправлены на главную страницу WebFig.
Поздравляю! Теперь вы вошли в WebFig и готовы продолжить с отключением DHCP-сервера в Mikrotik.
Шаг 2: Перейти к DHCP-серверу
Чтобы отключить DHCP-сервер на устройстве Mikrotik, необходимо войти в его конфигурацию через веб-интерфейс.
1. Откройте веб-браузер и введите IP-адрес вашего Mikrotik в адресной строке. По умолчанию IP-адрес равен 192.168.88.1.
2. Введите свои учетные данные для входа, если они требуются. По умолчанию логин и пароль равны admin.
3. После успешного входа в систему откроется главное окно веб-интерфейса Mikrotik.
4. Найдите раздел «IP» в верхнем меню и щелкните по нему.
5. В выпадающем меню выберите «DHCP Server».
Теперь вы находитесь в разделе настроек DHCP-сервера и можете продолжить с дальнейшими шагами по его отключению.
Шаг 3: Отключение DHCP-сервера
Чтобы отключить DHCP-сервер в Mikrotik, выполните следующие действия:
- Откройте программу Winbox и подключитесь к вашему маршрутизатору Mikrotik.
- В левой панели выберите вкладку «IP» и выберите «DHCP Server» из выпадающего списка.
- В открывшемся окне вы увидите список DHCP-серверов настроенных на вашем маршрутизаторе.
- Выберите DHCP-сервер, который вы хотите отключить, щелкнув на нем левой кнопкой мыши.
- Нажмите на кнопку «Disable» (Отключить) в верхней части окна.
- Подтвердите ваш выбор, нажав на кнопку «OK».
Теперь DHCP-сервер в Mikrotik будет отключен. Убедитесь, что вы предоставляете статические IP-адреса для всех устройств в вашей сети, чтобы они могли успешно подключиться к Интернету.
Проверка отключения DHCP-сервера
После выполнения всех необходимых шагов по отключению DHCP-сервера в Mikrotik, следует проверить его состояние, чтобы убедиться, что изменения успешно вступили в силу.
Для этого:
- Откройте командную строку или терминал и подключитесь к Mikrotik с помощью SSH-клиента или Telnet.
- Введите команду
/ip dhcp-server print, чтобы отобразить список DHCP-серверов. - Если список пуст или отображается только один сервер, и его статус — «disabled», это означает, что DHCP-сервер успешно отключен.
- Если список содержит активные DHCP-серверы, убедитесь, что сервер, который вы хотите отключить, имеет статус «disabled». В противном случае, повторите шаги по отключению DHCP-сервера.
Теперь вы убедились, что DHCP-сервер в Mikrotik успешно отключен и больше не будет выдавать IP-адреса устройствам в сети.
DHCP Client
Summary
The DHCP (Dynamic Host Configuration Protocol) is used for the easy distribution of IP addresses in a network. The MikroTik RouterOS implementation includes both server and client parts and is compliant with RFC 2131.
The MikroTik RouterOS DHCP client may be enabled on any Ethernet-like interface at a time. The client will accept an address, netmask, default gateway, and two DNS server addresses. The received IP address will be added to the interface with the respective netmask. The default gateway will be added to the routing table as a dynamic entry. Should the DHCP client be disabled or not renew an address, the dynamic default route will be removed. If there is already a default route installed prior to the DHCP client obtaining one, the route obtained by the DHCP client would be shown as invalid.
RouterOS DHCP client asks for the following options:
- option 1 — SUBNET_MASK,
- option 3 — GATEWAY_LIST,
- option 6 — TAG_DNS_LIST,
- option 33 — STATIC_ROUTE,
- option 42 — NTP_LIST,
- option 121 — CLASSLESS_ROUTE,
DHCP Options
DHCP client has the possibility to set up options that are sent to the DHCP server. For example, hostname and MAC address. The syntax is the same as for DHCP server options.
Currently, there are three variables that can be used in options:
- HOSTNAME;
- CLIENT_MAC — client interface MAC address;
- CLIENT_DUID — client DIUD of the router, same as used for the DHCPv6 client. In conformance with RFC4361
DHCP client default options include these default Options:
| Name | code | value |
|---|---|---|
| clientid_duid | 61 | 0xff$(CLIENT_DUID) |
| clientid | 61 | 0x01$(CLIENT_MAC) |
| hostname | 12 | $(HOSTNAME) |
Properties
| Property | Description |
|---|---|
| add-default-route (yes | no | special-classless; Default: yes) | Whether to install default route in routing table received from DHCP server. By default, the RouterOS client complies with RFC and ignores option 3 if classless option 121 is received. To force the client not to ignore option 3 set special-classless. This parameter is available in v6rc12+
|
| client-id (string; Default: ) | Corresponds to the settings suggested by the network administrator or ISP. If not specified, the client’s MAC address will be sent |
| comment (string; Default: ) | Short description of the client |
| default-route-distance (integer:0..255; Default: ) | Distance of default route. Applicable if add-default-route is set to yes. |
| disabled (yes | no; Default: yes) | |
| host-name (string; Default: ) | The hostname of the client is sent to a DHCP server. If not specified, the client’s system identity will be used. |
| interface (string; Default: ) | The interface on which the DHCP client will be running. |
| script (script; Default: ) | Execute script when DHCP client obtains a new lease or loses an existing one. This parameter is available in v6.39rc33+ These are available variables that are accessible for the event script:
|
| use-peer-dns (yes | no; Default: yes) | Whether to accept the DNS settings advertised by DHCP Server. (Will override the settings put in the /ip dns submenu. |
| use-peer-ntp (yes | no; Default: yes) | Whether to accept the NTP settings advertised by DHCP Server. (Will override the settings put in the /system ntp client submenu) |
Read-only properties
| Property | Description |
|---|---|
| address (IP/Netmask) | IP address and netmask, which is assigned to DHCP Client from the Server |
| dhcp-server (IP) | The IP address of the DHCP server. |
| expires-after (time) | A time when the lease expires (specified by the DHCP server). |
| gateway (IP) | The IP address of the gateway which is assigned by the DHCP server |
| invalid (yes | no) | Shows whether a configuration is invalid. |
| netmask (IP) | |
| primary-dns (IP) | The IP address of the first DNS resolver, which was assigned by the DHCP server |
| primary-ntp (IP) | The IP address of the primary NTP server, assigned by the DHCP server |
| secondary-dns (IP) | The IP address of the second DNS resolver, assigned by the DHCP server |
| secondary-ntp (IP) | The IP address of the secondary NTP server, assigned by the DHCP server |
| status (bound | error | rebinding… | requesting… | searching… | stopped) | Shows the status of the DHCP Client |
Menu specific commands
| Property | Description |
|---|---|
| release (numbers) | Release current binding and restart the DHCP client |
| renew (numbers) | Renew current leases. If the renewal operation was not successful, the client tries to reinitialize the lease (i.e. it starts the lease request procedure (rebind) as if it had not received an IP address yet) |
Configuration Examples
Simple DHCP client
Add a DHCP client on the ether1 interface:
/ip dhcp-client add interface=ether1 disabled=no
After the interface is added, you can use the «print» or «print detail» command to see what parameters the DHCP client acquired:
[admin@MikroTik] ip dhcp-client> print detail
Flags: X - disabled, I - invalid
 0   interface=ether1 add-default-route=yes use-peer-dns=yes use-peer-ntp=yes
     status=bound address=192.168.0.65/24 gateway=192.168.0.1
     dhcp-server=192.168.0.1 primary-dns=192.168.0.1 primary-ntp=192.168.0.1
     expires-after=9m44s
[admin@MikroTik] ip dhcp-client>
If the interface used by the DHCP client is part of the VRF configuration, then the default route and other received routes from the DHCP server will be added to the VRF routing table.
DHCP client status can be checked with:
/ip dhcp-client print detail
Lease script example
It is possible to execute a script when a DHCP client obtains a new lease or loses an existing one. This is an example script that automatically adds a default route with routing-mark=WAN1 and removes it when the lease expires or is removed.
/ip dhcp-client
add add-default-route=no dhcp-options=hostname,clientid disabled=no interface=ether2 script="{\r\
    \n    :local rmark \"WAN1\"\r\
    \n    :local count [/ip route print count-only where comment=\"WAN1\"]\r\
    \n    :if (\$bound=1) do={\r\
    \n        :if (\$count = 0) do={\r\
    \n            /ip route add gateway=\$\"gateway-address\" comment=\"WAN1\" routing-mark=\$rmark\r\
    \n        } else={\r\
    \n            :if (\$count = 1) do={\r\
    \n                :local test [/ip route find where comment=\"WAN1\"]\r\
    \n                :if ([/ip route get \$test gateway] != \$\"gateway-address\") do={\r\
    \n                    /ip route set \$test gateway=\$\"gateway-address\"\r\
    \n                }\r\
    \n            } else={\r\
    \n                :error \"Multiple routes found\"\r\
    \n            }\r\
    \n        }\r\
    \n    } else={\r\
    \n        /ip route remove [find comment=\"WAN1\"]\r\
    \n    }\r\
    \n}\r\
    \n"
Resolve default gateway when ‘router’ (option3) is from a different subnet
In some cases, administrators tend to set the ‘router’ option which cannot be resolved with offered IP’s subnet. For example, the DHCP server offers 192.168.88.100/24 to the client, and option 3 is set to 172.16.1.1. This will result in an unresolved default route:
 #      DST-ADDRESS        PREF-SRC        GATEWAY            DISTANCE
 0  DS  0.0.0.0/0                          172.16.1.1              1
 1 ADC  192.168.88.0/24    192.168.88.100  ether1
To fix this we need to add /32 route to resolve the gateway over ether1, which can be done by the running script below each time the DHCP client gets an address
/system script add name="dhcpL" source={ /ip address add address=($"lease-address" . "/32") network=$"gateway-address" interface=$interface }
Now we can further extend the script, to check if the address already exists, and remove the old one if changes are needed
/system script add name="dhcpL" source={
  /ip address {
    :local ipId [find where comment="dhcpL address"]
    :if ($ipId != "") do={
      :if (!([get $ipId address] = ($"lease-address" . "/32") && [get $ipId network]=$"gateway-address" )) do={
        remove $ipId;
        add address=($"lease-address" . "/32") network=$"gateway-address" \
          interface=$interface comment="dhcpL address"
      }
    } else={
      add address=($"lease-address" . "/32") network=$"gateway-address" \
        interface=$interface comment="dhcpL address"
    }
  }
}
DHCPv6 Client
Summary
Sub-menu: /ipv6 dhcp-client
DHCP-client in RouterOS is capable of being a DHCPv6-client and DHCP-PD client. So it is able to get a prefix from the DHCP-PD server as well as the DHCPv6 stateful address from the DHCPv6 server.
Properties
| Property | Description |
|---|---|
| add-default-route (yes | no; Default: no) | Whether to add default IPv6 route after a client connects. |
| comment (string; Default: ) | Short description of the client |
| disabled (yes | no; Default: no) | |
| interface (string; Default: ) | The interface on which the DHCPv6 client will be running. |
| pool-name (string; Default: ) | Name of the IPv6 pool in which received IPv6 prefix will be added |
| pool-prefix-length (string; Default: ) | Prefix length parameter that will be set for IPv6 pool in which received IPv6 prefix is added. Prefix length must be greater than the length of the received prefix, otherwise, prefix-length will be set to received prefix length + 8 bits. |
| prefix-hint (string; Default: ) | Include a preferred prefix length. |
| request (prefix, address; Default: ) | to choose if the DHCPv6 request will ask for the address or the IPv6 prefix, or both. |
| script (string; Default: ) | Run this script on the DHCP-client status change. Available variables:
|
| use-peer-dns (yes | no; Default: yes) | Whether to accept the DNS settings advertised by the IPv6 DHCP Server. |
Read-only properties
| Property | Description |
|---|---|
| duid (string) | Auto-generated DUID that is sent to the server. DUID is generated using one of the MAC addresses available on the router. |
| request (list) | specifies what was requested — prefix, address, or both. |
| dynamic (yes | no) | |
| expires-after (time) | A time when the IPv6 prefix expires (specified by the DHCPv6 server). |
| invalid (yes | no) | Shows whether a configuration is invalid. |
| prefix (IPv6 prefix) | Shows received IPv6 prefix from DHCPv6-PD server |
| status (stopped | searching | requesting… | bound | renewing | rebinding | error | stopping) | Shows the status of DHCPv6 Client:
|
Menu specific commands
| Property | Description |
|---|---|
| release (numbers) | Release current binding and restart DHCPv6 client |
| renew (numbers) | Renew current leases. If the renewal operation was not successful, the client tries to reinitialize the lease (i.e. it starts the lease request procedure (rebind) as if it had not received an IP address yet) |
Script
It is possible to add a script that will be executed when a prefix or an address is acquired and applied or expires and is removed using the DHCP client. There are separated sets of variables that will have the value set by the client depending on prefix or address status change as the client can acquire both and each of them can have a different effect on the router configuration.
Available variables for dhcp-client
- pd-valid — value — 1 or 0 — if prefix is acquired and it is applied or not
- pd-prefix — value ipv6/num (ipv6 prefix with mask) — the prefix inself
- na-valid — value — 1 or 0 — if address is acquired and it is applied or not
- na-address — value — ipv6 address — the address
IAID
To determine what IAID will be used, convert the internal ID of an interface on which the DHCP client is running from hex to decimal.
For example, the DHCP client is running on interface PPPoE-out1. To get internal ID use the following command:
[admin@t36] /interface> :put [find name="pppoe-out1"]
*15
Now convert hex value 15 to decimal and you get IAID=21
Configuration Examples
Simple DHCPv6 client
This simple example demonstrates how to enable dhcp client to receive IPv6 prefix and add it to the pool.
/ipv6 dhcp-client add request=prefix pool-name=test-ipv6 pool-prefix-length=64 interface=ether13
Detailed print should show status of the client and we can verify if prefix is received
[admin@x86-test] /ipv6 dhcp-client> print detail
Flags: D - dynamic, X - disabled, I - invalid
 0 interface=bypass pool-name="test-ipv6" pool-prefix-length=64 status=bound
prefix=2001:db8:7501:ff04::/62 expires-after=2d23h11m53s request=prefix
Notice that server gave us prefix 2a02:610:7501:ff04::/62 . And it should be also added to ipv6 pools
[admin@MikroTik] /ipv6 pool> print
Flags: D - dynamic
# NAME PREFIX REQUEST PREFIX-LENGTH
0 D test-ipv6 2001:db8:7501:ff04::/62 prefix 64
It works! Now you can use this pool, for example, for pppoe clients.
Use received prefix for local RA
Consider following setup:
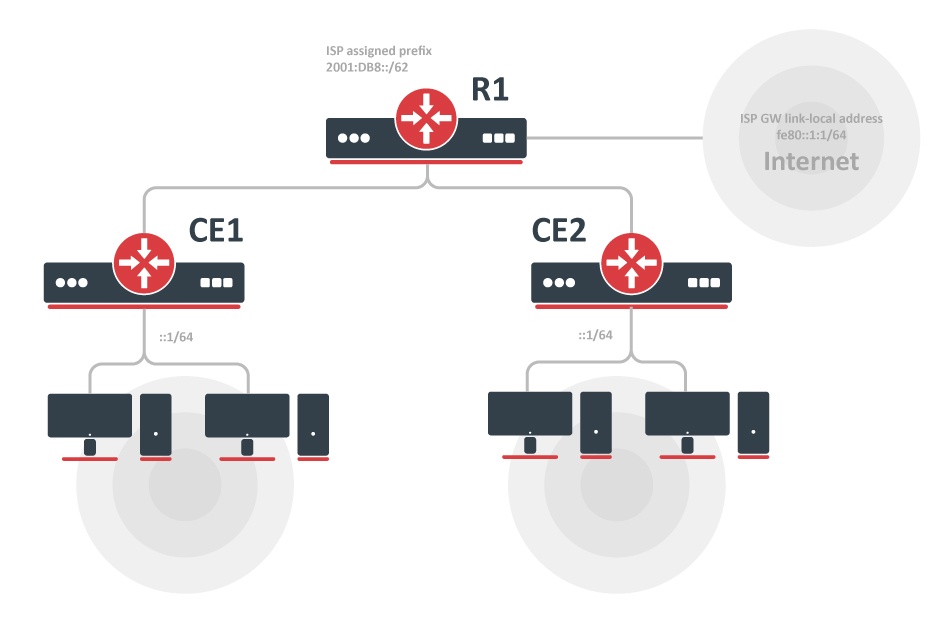
- ISP is routing prefix 2001:DB8::/62 to the router R1
- Router R1 runs DHCPv6 server to delegate /64 prefixes to the customer routers CE1 CE2
- DHCP client on routers CE1 and CE2 receives delegated /64 prefix from the DHCP server (R1).
- Client routers uses received prefix to set up RA on the local interface
Configuration
R1
/ipv6 route
add gateway=fe80::1:1%to-ISP

/ipv6 pool
add name=myPool prefix=2001:db8::/62 prefix-length=64

/ipv6 dhcp-server
 add address-pool=myPool disabled=no interface=to-CE-routers lease-time=3m name=server1
CE1
/ipv6 dhcp-client
add interface=to-R1 request=prefix pool-name=my-ipv6

/ipv6 address
add address=::1/64 from-pool=my-ipv6 interface=to-clients advertise=yes
CE2
/ipv6 dhcp-client
 add interface=to-R1 request=prefix pool-name=my-ipv6
/ipv6 address add address=::1/64 from-pool=my-ipv6 interface=to-clients advertise=yes
Check the status
After configuration is complete we can verify that each CE router received its own prefix
On server:
[admin@R1] /ipv6 dhcp-server binding> print
 Flags: X - disabled, D - dynamic
# ADDRESS DUID IAID SERVER STATUS
 1 D 2001:db8:1::/64 0019d1393536 566 server1 bound
2 D 2001:db8:2::/64 0019d1393535 565 server1 bound
On client:
[admin@CE1] /ipv6 dhcp-client> print
Flags: D - dynamic, X - disabled, I - invalid
# INTERFACE STATUS REQUEST PREFIX
0 to-R1 bound prefix 2001:db8:1::/64

[admin@CE1] /ipv6 dhcp-client> /ipv6 pool print
Flags: D - dynamic
# NAME PREFIX PREFIX-LENGTH
0 D my-ipv6 2001:db8:1::/64 64
We can also see that IPv6 address was automatically added from the prefix pool:
[admin@CE1] /ipv6 address> print
Flags: X - disabled, I - invalid, D - dynamic, G - global, L - link-local
# ADDRESS FROM-POOL INTERFACE ADVERTISE 0 G 2001:db8:1::1/64 to-clients yes
..
And pool usage shows that ‘Address’ is allocating the pool
[admin@CE1] /ipv6 pool used> print
 POOL PREFIX OWNER INFO
my-ipv6 2001:db8:1::/64 Address to-clients
DHCP Server
Summary
The DHCP (Dynamic Host Configuration Protocol) is used for the easy distribution of IP addresses in a network. The MikroTik RouterOS implementation includes both server and client parts and is compliant with RFC 2131.
The router supports an individual server for each Ethernet-like interface. The MikroTik RouterOS DHCP server supports the basic functions of giving each requesting client an IP address/netmask lease, default gateway, domain name, DNS-server(s) and WINS-server(s) (for Windows clients) information (set up in the DHCP networks submenu)
In order for the DHCP server to work, IP pools must also be configured (do not include the DHCP server’s own IP address into the pool range) and the DHCP networks.
It is also possible to hand out leases for DHCP clients using the RADIUS server; the supported parameters for a RADIUS server are as follows:
Access-Request:
- NAS-Identifier — router identity
- NAS-IP-Address — IP address of the router itself
- NAS-Port — unique session ID
- NAS-Port-Type — Ethernet
- Calling-Station-Id — client identifier (active-client-id)
- Framed-IP-Address — IP address of the client (active-address)
- Called-Station-Id — the name of DHCP server
- User-Name — MAC address of the client (active-mac-address)
- Password — » «
Access-Accept:
- Framed-IP-Address — IP address that will be assigned to a client
- Framed-Pool — IP pool from which to assign an IP address to a client
- Rate-Limit — Datarate limitation for DHCP clients. Format is: rx-rate[/tx-rate] [rx-burst-rate[/tx-burst-rate] [rx-burst-threshold[/tx-burst-threshold] [rx-burst-time[/tx-burst-time][priority] [rx-rate-min[/tx-rate-min]]]]. All rates should be numbers with optional ‘k’ (1,000s) or ‘M’ (1,000,000s). If tx-rate is not specified, rx-rate is as tx-rate too. Same goes for tx-burst-rate and tx-burst-threshold and tx-burst-time. If both rx-burst-threshold and tx-burst-threshold are not specified (but burst-rate is specified), rx-rate and tx-rate are used as burst thresholds. If both rx-burst-time and tx-burst-time are not specified, 1s is used as default. Priority takes values 1..8, where 1 implies the highest priority, but 8 — the lowest. If rx-rate-min and tx-rate-min are not specified rx-rate and tx-rate values are used. The rx-rate-min and tx-rate-min values can not exceed rx-rate and tx-rate values.
- Ascend-Data-Rate — TX/RX data rate limitation if multiple attributes are provided, first limits tx data rate, second — RX data rate. If used together with Ascend-Xmit-Rate, specifies RX rate. 0 if unlimited
- Ascend-Xmit-Rate — tx data rate limitation. It may be used to specify the TX limit only instead of sending two sequential Ascend-Data-Rate attributes (in that case Ascend-Data-Rate will specify the receive rate). 0 if unlimited
- Session-Timeout — max lease time (lease-time)
DHCP server requires a real interface to receive raw ethernet packets. If the interface is a Bridge interface, then the Bridge must have a real interface attached as a port to that bridge which will receive the raw ethernet packets. It cannot function correctly on a dummy (empty bridge) interface.
DHCP Server Properties
| Property | Description |
|---|---|
| add-arp (yes | no; Default: no) | Whether to add dynamic ARP entry. If set to no either ARP mode should be enabled on that interface or static ARP entries should be administratively defined in /ip arp submenu. |
| address-pool (string | static-only; Default: static-only) | IP pool, from which to take IP addresses for the clients. If set to static-only, then only the clients that have a static lease (added in the lease submenu) will be allowed. |
| allow-dual-stack-queue (yes | no; Default: yes) | Creates a single simple queue entry for both IPv4 and IPv6 addresses, and uses the MAC address and DUID for identification. Requires IPv6 DHCP Server to have this option enabled as well to work properly. |
| always-broadcast (yes | no; Default: no) | Always send replies as broadcasts even if the destination IP is known. Will add additional load on L2 network. |
| authoritative (after-10sec-delay | after-2sec-delay | yes | no; Default: yes) | Option changes the way how a server responds to DHCP requests:
If all requests with «secs < x» should be ignored, then delay-threshold=x setting should be used. |
| bootp-lease-time (forever | lease-time | time; Default: forever) | Accepts two predefined options or time value:
|
| bootp-support (none | static | dynamic; Default: static) | Support for BOOTP clients:
|
| client-mac-limit (integer | unlimited; Default: unlimited) | Specifies whether to limit a specific number of clients per single MAC address or leave unlimited. Note that this setting should not be used in relay setups. |
| conflict-detection (yes | no; Default: yes) | Allows disabling/enabling conflict detection. If the option is enabled, then whenever the server tries to assign a lease it will send ICMP and ARP messages to detect whether such an address in the network already exists. If any of the above get a reply address is considered already used. |
| delay-threshold (time | none; Default: none) | If the sec’s field in the DHCP packet is smaller than the delay threshold, then this packet is ignored. If set to none — there is no threshold (all DHCP packets are processed) |
| dhcp-option-set (name | none; Default: none) | Use a custom set of DHCP options defined in the option sets menu. |
| insert-queue-before (bottom | first | name; Default: first) | Specify where to place dynamic simple queue entries for static DCHP leases with a rate-limit parameter set. |
| interface (string; Default: ) | The interface on which the DHCP server will be running. |
| lease-script (string; Default: «») | A script that will be executed after a lease is assigned or de-assigned. Internal «global» variables that can be used in the script:
|
| lease-time (time; Default: 30m) | The time that a client may use the assigned address. The client will try to renew this address after half of this time and will request a new address after the time limit expires. |
| name (string; Default: ) | Reference name |
| parent-queue (string | none; Default: none) | A dynamically created queue for this lease will be configured as a child queue of the specified parent queue. |
| relay (IP; Default: 0.0.0.0) | The IP address of the relay this DHCP server should process requests from:
|
| server-address (IP; Default: 0.0.0.0) | The IP address of the server to use in the next step of the client’s bootstrap process (For example, to assign a specific server address in case several addresses are assigned to the interface) |
| use-framed-as-classless (yes | no; Default: yes) | Forward RADIUS Framed-Route as a DHCP Classless-Static-Route to DHCP-client. Whenever both Framed-Route and Classless-Static-Route are received Classless-Static-Route is preferred. |
| use-radius (yes | no | accounting; Default: no) | Whether to use RADIUS server:
|
Leases
Sub-menu: /ip dhcp-server lease
DHCP server lease submenu is used to monitor and manage server leases. The issued leases are shown here as dynamic entries. You can also add static leases to issue a specific IP address to a particular client (identified by MAC address).
Generally, the DHCP lease is allocated as follows:
- an unused lease is in the «waiting» state
- if a client asks for an IP address, the server chooses one
- if the client receives a statically assigned address, the lease becomes offered, and then bound with the respective lease time
- if the client receives a dynamic address (taken from an IP address pool), the router sends a ping packet and waits for an answer for 0.5 seconds. During this time, the lease is marked testing
- in the case where the address does not respond, the lease becomes offered and then bound with the respective lease time
- in other cases, the lease becomes busy for the lease time (there is a command to retest all busy addresses), and the client’s request remains unanswered (the client will try again shortly)
A client may free the leased address. The dynamic lease is removed, and the allocated address is returned to the address pool. But the static lease becomes busy until the client reacquires the address.
IP addresses assigned statically are not probed!
| Property | Description |
|---|---|
| address (IP; Default: 0.0.0.0) | Specify IP address (or ip pool) for static lease. If set to 0.0.0.0 — a pool from the DHCP server will be used |
| address-list (string; Default: none) | Address list to which address will be added if the lease is bound. |
| allow-dual-stack-queue (yes | no; Default: yes) | Creates a single simple queue entry for both IPv4 and IPv6 addresses, and uses the MAC address and DUID for identification. Requires IPv6 DHCP Server to have this option enabled as well to work properly. |
| always-broadcast (yes | no; Default: no) | Send all replies as broadcasts |
| block-access (yes | no; Default: no) | Block access for this client |
| client-id (string; Default: none) | If specified, must match the DHCP ‘client identifier’ option of the request |
| dhcp-option (string; Default: none) | Add additional DHCP options from option list. |
| dhcp-option-set (string; Default: none) | Add an additional set of DHCP options. |
| insert-queue-before (bottom | first | name; Default: first) | Specify where to place dynamic simple queue entries for static DCHP leases with rate-limit parameter set. |
| lease-time (time; Default: 0s) | Time that the client may use the address. If set to 0s lease will never expire. |
| mac-address (MAC; Default: 00:00:00:00:00:00) | If specified, must match the MAC address of the client |
| parent-queue (string | none; Default: none) | A dynamically created queue for this lease will be configured as a child queue of the specified parent queue. |
| queue-type (default, ethernet-default, multi-queue-ethernet-default, pcq-download-default, synchronous-default, default-small, hotspot-default, only-hardware-queue, pcq-upload-default, wireless-default) | Queue type that can be assigned to the specific lease |
| rate-limit (integer[/integer] [integer[/integer] [integer[/integer] [integer[/integer]]]];; Default: ) | Adds a dynamic simple queue to limit IP’s bandwidth to a specified rate. Requires the lease to be static. Format is: rx-rate[/tx-rate] [rx-burst-rate[/tx-burst-rate] [rx-burst-threshold[/tx-burst-threshold] [rx-burst-time[/tx-burst-time]]]]. All rates should be numbers with optional ‘k’ (1,000s) or ‘M’ (1,000,000s). If tx-rate is not specified, rx-rate is as tx-rate too. Same goes for tx-burst-rate and tx-burst-threshold and tx-burst-time. If both rx-burst-threshold and tx-burst-threshold are not specified (but burst-rate is specified), rx-rate and tx-rate is used as burst thresholds. If both rx-burst-time and tx-burst-time are not specified, 1s is used as default. |
| routes ([dst-address/mask] [gateway] [distance]; Default: none) |
Routes that appear on the server when the client is connected. It is possible to specify multiple routes separated by commas. This setting will be ignored for OpenVPN. |
| server (string) | Server name which serves this client |
| use-src-mac (yes | no; Default: no) | When this option is set server uses the source MAC address instead of the received CHADDR to assign the address. |
Menu specific commands
| check-status (id) | Check the status of a given busy (status is conflict or declined) dynamic lease, and free it in case of no response |
| make-static (id) | Convert a dynamic lease to a static one |
Store Configuration
Sub-menu: /ip dhcp-server config
Store Leases On Disk: The configuration of how often the DHCP leases will be stored on disk. If they would be saved on a disk on every lease change, a lot of disk writes would happen which is very bad for Compact Flash (especially, if lease times are very short). To minimize writes on disk, all changes are saved on disk every store-leases-disk seconds. Additionally, leases are always stored on disk on graceful shutdown and reboot.
Manual changes to leases — addition/removal of a static lease, removal of a dynamic lease will cause changes to be pushed for this lease to storage.
Accounting: The accounting parameter in the DHCP server configuration enables or disables accounting for DHCP leases. When accounting is enabled, the DHCP server logs information about IP address assignments and lease renewals. This information can be useful for tracking and monitoring network usage, analyzing traffic patterns, or generating reports on IP address allocations.
Interim-update: The interim-update parameter determines whether the DHCP server sends periodic updates to the accounting server during a lease. These updates provide information about the lease duration, usage, and other relevant details. Enabling interim updates allows for more accurate tracking of lease activity.
Radius-password: The radius-password parameter is used to set the password for the RADIUS (Remote Authentication Dial-In User Service) server. RADIUS is a networking protocol commonly used for providing centralized authentication, authorization, and accounting for network access. When configuring the DHCP server to communicate with a RADIUS server for authentication or accounting purposes, you need to specify the correct password to establish a secure connection. This parameter ensures that the DHCP server can authenticate with the RADIUS server using the specified password.
Rate limiting
It is possible to set the bandwidth to a specific IPv4 address by using DHCPv4 leases. This can be done by setting a rate limit on the DHCPv4 lease itself, by doing this a dynamic simple queue rule will be added for the IPv4 address that corresponds to the DHCPv4 lease. By using the rate-limit parameter you can conveniently limit a user’s bandwidth.
For any queues to work properly, the traffic must not be FastTracked, make sure your Firewall does not FastTrack traffic that you want to limit.
First, make the DHCPv4 lease static, otherwise, it will not be possible to set a rate limit to a DHCPv4 lease:
[admin@MikroTik] > /ip dhcp-server lease print
Flags: X - disabled, R - radius, D - dynamic, B - blocked
 #   ADDRESS               MAC-ADDRESS       HOST-NAME               SERVER               RATE-LIMIT               STATUS
 0 D 192.168.88.254        6C:3B:6B:7C:41:3E MikroTik                DHCPv4_Server                                 bound

[admin@MikroTik] > /ip dhcp-server lease make-static 0

[admin@MikroTik] > /ip dhcp-server lease print
Flags: X - disabled, R - radius, D - dynamic, B - blocked
 #   ADDRESS               MAC-ADDRESS       HOST-NAME               SERVER               RATE-LIMIT               STATUS
 0   192.168.88.254        6C:3B:6B:7C:41:3E MikroTik                DHCPv4_Server                                 bound
Then you can set a rate to a DHCPv4 lease that will create a new dynamic simple queue entry:
[admin@MikroTik] > /ip dhcp-server lease set 0 rate-limit=10M/10M

[admin@MikroTik] > /queue simple print
Flags: X - disabled, I - invalid, D - dynamic
 0  D name="dhcp-ds<6C:3B:6B:7C:41:3E>" target=192.168.88.254/32 parent=none packet-marks="" priority=8/8 queue=default-small/default-small limit-at=10M/10M max-limit=10M/10M burst-limit=0/0 burst-threshold=0/0 burst-time=0s/0s
      bucket-size=0.1/0.1
By default allow-dual-stack-queue is enabled, this will add a single dynamic simple queue entry for both DCHPv6 binding and DHCPv4 lease, without this option enabled separate dynamic simple queue entries will be added for IPv6 and IPv4.
If allow-dual-stack-queue is enabled, then a single dynamic simple queue entry will be created containing both IPv4 and IPv6 addresses:
[admin@MikroTik] > /queue simple print
Flags: X - disabled, I - invalid, D - dynamic
 0  D name="dhcp-ds<6C:3B:6B:7C:41:3E>" target=192.168.88.254/32,fdb4:4de7:a3f8:418c::/66 parent=none packet-marks="" priority=8/8 queue=default-small/default-small limit-at=10M/10M max-limit=10M/10M burst-limit=0/0 burst-threshold=0/0
      burst-time=0s/0s bucket-size=0.1/0.1
Network
Sub-menu: /ip dhcp-server network
Properties
| Property | Description |
|---|---|
| address (IP/netmask; Default: ) | the network DHCP server(s) will lease addresses from |
| boot-file-name (string; Default: ) | Boot filename |
| caps-manager (string; Default: ) | A comma-separated list of IP addresses for one or more CAPsMAN system managers. DHCP Option 138 (capwap) will be used. |
| dhcp-option (string; Default: ) | Add additional DHCP options from the option list. |
| dhcp-option-set (string; Default: ) | Add an additional set of DHCP options. |
| dns-none (yes | no; Default: no) | If set, then DHCP Server will not pass dynamic DNS servers configured on the router to the DHCP clients if no DNS Server in DNS-server is set. By default, if there are no DNS servers configured, then the dynamic DNS Servers will be passed to DHCP clients. |
| dns-server (string; Default: ) | the DHCP client will use these as the default DNS servers. Two comma-separated DNS servers can be specified to be used by the DHCP client as primary and secondary DNS servers |
| domain (string; Default: ) | The DHCP client will use this as the ‘DNS domain’ setting for the network adapter. |
| gateway (IP; Default: 0.0.0.0) | The default gateway to be used by DHCP Client. |
| netmask (integer: 0..32; Default: 0) | The actual network mask is to be used by the DHCP client. If set to ‘0’ — netmask from network address will be used. |
| next-server (IP; Default: ) | The IP address of the next server to use in bootstrap. |
| ntp-server (IP; Default: ) | the DHCP client will use these as the default NTP servers. Two comma-separated NTP servers can be specified to be used by the DHCP client as primary and secondary NTP servers |
| wins-server (IP; Default: ) | The Windows DHCP client will use these as the default WINS servers. Two comma-separated WINS servers can be specified to be used by the DHCP client as primary and secondary WINS servers |
RADIUS Support
Since RouterOS v6.43 it is possible to use RADIUS to assign a rate limit per lease, to do so you need to pass the Mikrotik-Rate-Limit attribute from your RADIUS Server for your lease. To achieve this you first need to set your DHCPv4 Server to use RADIUS for assigning leases. Below is an example of how to set it up:
/radius
add address=10.0.0.1 secret=VERYsecret123 service=dhcp
/ip dhcp-server
set dhcp1 use-radius=yes
After that, you need to tell your RADIUS Server to pass the Mikrotik-Rate-Limit attribute. In case you are using FreeRADIUS with MySQL, then you need to add appropriate entries into radcheck and radreply tables for a MAC address, that is being used for your DHCPv4 Client. Below is an example for table entries:
Error rendering macro ‘code’: Invalid value specified for parameter ‘com.atlassian.confluence.ext.code.render.InvalidValueException’
INSERT INTO `radcheck` (`username`, `attribute`, `op`, `value`) VALUES
('00:0C:42:00:D4:64', 'Auth-Type', ':=', 'Accept'),

INSERT INTO `radreply` (`username`, `attribute`, `op`, `value`) VALUES
('00:0C:42:00:D4:64', 'Framed-IP-Address', '=', '192.168.88.254'),
('00:0C:42:00:D4:64', 'Mikrotik-Rate-Limit', '=', '10M'),
Alerts
To find any rogue DHCP servers as soon as they appear in your network, the DHCP Alert tool can be used. It will monitor the interface for all DHCP replies and check if this reply comes from a valid DHCP server. If a reply from an unknown DHCP server is detected, an alert gets triggered:
[admin@MikroTik] ip dhcp-server alert>/log print
00:34:23 dhcp,critical,error,warning,info,debug dhcp alert on Public:
    discovered unknown dhcp server, mac 00:02:29:60:36:E7, ip 10.5.8.236
[admin@MikroTik] ip dhcp-server alert>
When the system alerts about a rogue DHCP server, it can execute a custom script.
As DHCP replies can be unicast, the rogue DHCP detector may not receive any offer to other DHCP clients at all. To deal with this, the rogue DHCP detector acts as a DHCP client as well — it sends out DHCP discover requests once a minute.
The DHCP alert is not recommended on devices that are configured as DHCP clients. Since the alert itself generates DHCP discovery packets, it can affect the operation of the DHCP client itself. Use this feature only on devices that are DHCP servers or using a static IP address.
Sub-menu: /ip dhcp-server alert
Properties
| Property | Description |
|---|---|
| alert-timeout (none | time; Default: 1h) | Time after which the alert will be forgotten. If after that time the same server is detected, a new alert will be generated. If set to none timeout will never expire. |
| interface (string; Default: ) | Interface, on which to run rogue DHCP server finder. |
| on-alert (string; Default: ) | Script to run, when an unknown DHCP server is detected. |
| valid-server (string; Default: ) | List of MAC addresses of valid DHCP servers. |
Read-only properties
| Property | Description |
|---|---|
| unknown-server (string) | List of MAC addresses of detected unknown DHCP servers. The server is removed from this list after alert-timeout |
Menu specific commands
| Property | Description |
|---|---|
| reset-alert (id) | Clear all alerts on an interface |
DHCP Options
Sub-menu: /ip dhcp-server option
With the help of the DHCP Option list, it is possible to define additional custom options for DHCP Server to advertise. Option precedence is as follows:
- radius,
- lease,
- server,
- network.
This is the order in which the client option request will be filled in.
According to the DHCP protocol, a parameter is returned to the DHCP client only if it requests this parameter, specifying the respective code in the DHCP request Parameter-List (code 55) attribute. If the code is not included in the Parameter-List attribute, the DHCP server will not send it to the DHCP client, but since RouterOS v7.1rc5 it is possible to force the DHCP option from the server-side even if the DHCP-client does not request such parameter:
ip/dhcp-server/option/set force=yes
Properties
| Property | Description |
|---|---|
| code (integer:1..254; Default: ) | dhcp option code. All codes are available at http://www.iana.org/assignments/bootp-dhcp-parameters |
| name (string; Default: ) | Descriptive name of the option |
| value (string; Default: ) | Parameter’s value. Available data types for options are:
RouterOS has predefined variables that can be used:
Now it is also possible to combine data types into one, for example: «0x01’vards’$(HOSTNAME)» For example if HOSTNAME is ‘kvm’, then raw value will be 0x0176617264736b766d. |
| raw-value (HEX string ) | Read-only field which shows raw DHCP option value (the format actually sent out) |
DHCP Option Sets
Sub-menu: /ip dhcp-server option sets
This menu allows combining multiple options in option sets, which later can be used to override the default DHCP server option set.
Example
Classless Route
A classless route adds a specified route in the clients routing table. In our example, it will add
- dst-address=160.0.0.0/24 gateway=10.1.101.1
- dst-address=0.0.0.0/0 gateway=10.1.101.1
According to RFC 3442: The first part is the netmask («18» = netmask /24). Second part is significant part of destination network («A00000» = 160.0.0). Third part is IP address of gateway («0A016501» = 10.1.101.1). Then There are parts of the default route, destination netmask (0x00 = 0.0.0.0/0) followed by default route (0x0A016501 = 10.1.101.1)
/ip dhcp-server option
add code=121 name=classless value=0x18A000000A016501000A016501
/ip dhcp-server network
set 0 dhcp-option=classless
Result:
[admin@MikroTik] /ip route> print
Flags: X - disabled, A - active, D - dynamic, C - connect, S - static, r - rip, b - bgp, o - ospf,
m - mme, B - blackhole, U - unreachable, P - prohibit
 #      DST-ADDRESS        PREF-SRC        GATEWAY            DISTANCE
 0 ADS  0.0.0.0/0                          10.1.101.1         0
 1 ADS  160.0.0.0/24                       10.1.101.1         0
A much more robust way would be to use built-in variables, the previous example can be rewritten as:
/ip dhcp-server option
add name=classless code=121 value="0x18A00000\$(NETWORK_GATEWAY)0x00\$(NETWORK_GATEWAY)"
Auto proxy config
/ip dhcp-server option
  add code=252 name=auto-proxy-config value="'https://autoconfig.something.lv/wpad.dat'"
Vendor Classes
Since the 6.45beta6 version RouterOS support vendor class, ID matcher. The vendor class is used by DHCP clients to optionally identify the vendor and configuration.
Vendor-class-id matcher changes to generic matcher since RouterOS v7.4beta4.
Example
In the following configuration example, we will give an IP address from a particular pool for an Android-based mobile phone. We will use the RouterBOARD with a default configuration
/ip pool
add name=default-dhcp ranges=192.168.88.10-192.168.88.254
add name=pool-for-VID ranges=172.16.16.10-172.16.16.120
Configure vendor-class-id matcher. DHCP servers configuration remains the default
/ip dhcp-server
add address-pool=default-dhcp disabled=no interface=bridge name=defconf
/ip dhcp-server network
add address=192.168.88.0/24 comment=defconf gateway=192.168.88.1
/ip dhcp-server vendor-class-id
add address-pool=pool-for-VID name=samsung server=defconf vid=android-dhcp-9
Connect your mobile phone to the device to receive an IP address from the 172.16.16.0 network
[admin@mikrotik] > /ip dhcp-server lease print detail
Flags: X - disabled, R - radius, D - dynamic, B - blocked
 0 D address=172.16.16.120 mac-address=30:07:4D:F5:07:49 client-id="1:30:7:4d:f5:7:49" address-lists="" server=defconf dhcp-option=""
     status=bound expires-after=8m55s last-seen=1m5s active-address=172.16.16.120 active-mac-address=30:07:4D:F5:07:49
     active-client-id="1:30:7:4d:f5:7:49" active-server=defconf host-name="Galaxy-S8"
If you do not know your devices Vendor Class ID, you can turn on DHCP debug logs with /system logging add topics=dhcp. Then in the logging entries, you will see Class-ID
10:30:31 dhcp,debug,packet defconf received request with id 4238230732 from 0.0.0.0
10:30:31 dhcp,debug,packet     secs = 3
10:30:31 dhcp,debug,packet     ciaddr = 0.0.0.0
10:30:31 dhcp,debug,packet     chaddr = 30:07:4D:F5:07:49
10:30:31 dhcp,debug,packet     Msg-Type = request
10:30:31 dhcp,debug,packet     Client-Id = 01-30-07-4D-F5-07-49
10:30:31 dhcp,debug,packet     Address-Request = 172.16.16.120
10:30:31 dhcp,debug,packet     Server-Id = 192.168.88.1
10:30:31 dhcp,debug,packet     Max-DHCP-Message-Size = 1500
10:30:31 dhcp,debug,packet     Class-Id = "android-dhcp-9"
10:30:31 dhcp,debug,packet     Host-Name = "Galaxy-S8"
10:30:31 dhcp,debug,packet     Parameter-List = Subnet-Mask,Router,Domain-Server,Domain-Name,Interface-MTU,Broadcast-Address,Address-Time,Ren
ewal-Time,Rebinding-Time,Vendor-Specific
10:30:31 dhcp,info defconf assigned 172.16.16.120 to 30:07:4D:F5:07:49
10:30:31 dhcp,debug,packet defconf sending ack with id 4238230732 to 172.16.16.120
10:30:31 dhcp,debug,packet     ciaddr = 0.0.0.0
10:30:31 dhcp,debug,packet     yiaddr = 172.16.16.120
10:30:31 dhcp,debug,packet     siaddr = 192.168.88.1
10:30:31 dhcp,debug,packet     chaddr = 30:07:4D:F5:07:49
10:30:31 dhcp,debug,packet     Msg-Type = ack
10:30:31 dhcp,debug,packet     Server-Id = 192.168.88.1
10:30:31 dhcp,debug,packet     Address-Time = 600
10:30:31 dhcp,debug,packet     Domain-Server = 192.168.88.1,10.155.0.1,10.155.0.126
Generic matcher
Since RouterOS 7.4beta4 (2022-Jun-15 14:04) the vendor-id matcher is converted to a generic matcher. The genric matcher allows matching any of the DHCP options.
And an example to match DHCP option 60 similar to vendor-id-class matcher:
/ip dhcp-server matcher
add address-pool=pool1 code=60 name=test value=android-dhcp-11
Match the client-id with option 61 configured as hex value:
/ip dhcp-server matcher
add address-pool=pool1 code=61 name=test value=0x016c3b6bed8364
Match the code 12 using the string:
/ip dhcp-server matcher
add address-pool=testpool code=12 name=test server=dhcp1 value="MikroTik"
Configuration Examples
Setup
To simply configure DHCP server you can use a setup command.
First, you configure an IP address on the interface:
[admin@MikroTik] > /ip address add address=192.168.88.1/24 interface=ether3 disabled=no
Then you use setup a command which will automatically ask necessary parameters:
[admin@MikroTik] > /ip dhcp-server setup
Select interface to run DHCP server on

dhcp server interface: ether3
Select network for DHCP addresses

dhcp address space: 192.168.88.0/24
Select gateway for given network

gateway for dhcp network: 192.168.88.1
Select pool of ip addresses given out by DHCP server

addresses to give out: 192.168.88.2-192.168.88.254
Select DNS servers

dns servers: 10.155.126.1,10.155.0.1,
Select lease time

lease time: 10m
That is all. You have configured an active DHCP server.
Manual configuration
To configure the DHCP server manually to respond to local requests you have to configure the following:
- An IP pool for addresses to be given out, make sure that your gateway/DHCP server address is not part of the pool.
/ip pool add name=dhcp_pool0 ranges=192.168.88.2-192.168.88.254
- A network indicating subnets that DHCP-server will lease addresses from, among other information, like a gateway, DNS-server, NTP-server, DHCP options, etc.
/ip dhcp-server network add address=192.168.88.0/24 dns-server=192.168.88.1 gateway=192.168.88.1
- In our case, the device itself is serving as the gateway, so we’ll add the address to the bridge interface:
/ip address add address=192.168.88.1/24 interface=bridge1 network=192.168.88.0
- And finally, add DHCP Server, here we will add the previously created address pool, and specify on which interface the DHCP server should work on
/ip dhcp-server add address-pool=dhcp_pool0 disabled=no interface=bridge1 name=dhcp1
DHCPv6 Server
Summary
Standards: RFC 3315, RFC 3633
Single DUID is used for client and server identification, only IAID will vary between clients corresponding to their assigned interface.
Client binding creates a dynamic pool with a timeout set to binding’s expiration time (note that now dynamic pools can have a timeout), which will be updated every time binding gets renewed.
When a client is bound to a prefix, the DHCP server adds routing information to know how to reach the assigned prefix.
Client bindings in the server do not show MAC address anymore (as it was in v5.8), DUID (hex) and IAID are used instead. After upgrade, MAC addresses will be converted to DUIDs automatically, but due to unknown DUID type and unknown IAID, they should be further updated by the user;
RouterOS DHCPv6 server can only delegate IPv6 prefixes, not addresses.
General
Sub-menu: /ipv6 dhcp-server
This sub-menu lists and allows to configure DHCP-PD servers.
DHCPv6 Server Properties
| Property | Description |
|---|---|
| address-pool (enum | static-only; Default: static-only) | IPv6 pool, from which to take IPv6 prefix for the clients. |
| allow-dual-stack-queue (yes | no; Default: yes) | Creates a single simple queue entry for both IPv4 and IPv6 addresses, and uses the MAC address and DUID for identification. Requires IPv6 DHCP Server to have this option enabled as well to work properly. |
| binding-script (string; Default: ) | A script that will be executed after binding is assigned or de-assigned. Internal «global» variables that can be used in the script:
|
| dhcp-option (string; Default: none) | Add additional DHCP options from option list. |
| disabled (yes | no; Default: no) | Whether DHCP-PD server participates in the prefix assignment process. |
| interface (string; Default: ) | The interface on which server will be running. |
| lease-time (time; Default: 3d) | The time that a client may use the assigned address. The client will try to renew this address after half of this time and will request a new address after the time limit expires. |
| name (string; Default: ) | Reference name |
Read-only Properties
| Property | Description |
|---|---|
| dynamic (yes | no) | |
| invalid (yes | no) |
Bindings
Sub-menu: /ipv6 dhcp-server binding
DUID is used only for dynamic bindings, so if it changes then the client will receive a different prefix than previously.
| Property | Description |
|---|---|
| address (IPv6 prefix; Default: ) | IPv6 prefix that will be assigned to the client |
| allow-dual-stack-queue (yes | no; Default: yes) | Creates a single simple queue entry for both IPv4 and IPv6 addresses, uses the MAC address and DUID for identification. Requires IPv4 DHCP Server to have this option enabled as well to work properly. |
| comment (string; Default: ) | Short description of an item. |
| disabled (yes | no; Default: no) | Whether an item is disabled |
| dhcp-option (string; Default: ) | Add additional DHCP options from the option list. |
| dhcp-option-set (string; Default: ) | Add an additional set of DHCP options. |
| life-time (time; Default: 3d) | The time period after which binding expires. |
| duid (hex string; Default: ) | DUID value. Should be specified only in hexadecimal format. |
| iaid (integer [0..4294967295]; Default: ) | Identity Association Identifier, part of the Client ID. |
| prefix-pool (string; Default: ) | Prefix pool that is being advertised to the DHCPv6 Client. |
| rate-limit (integer[/integer] [integer[/integer] [integer[/integer] [integer[/integer]]]]; Default: ) | Adds a dynamic simple queue to limit IP’s bandwidth to a specified rate. Requires the lease to be static. Format is: rx-rate[/tx-rate] [rx-burst-rate[/tx-burst-rate] [rx-burst-threshold[/tx-burst-threshold] [rx-burst-time[/tx-burst-time]]]]. All rates should be numbers with optional ‘k’ (1,000s) or ‘M’ (1,000,000s). If tx-rate is not specified, rx-rate is as tx-rate too. Same goes for tx-burst-rate and tx-burst-threshold and tx-burst-time. If both rx-burst-threshold and tx-burst-threshold are not specified (but burst-rate is specified), rx-rate and tx-rate is used as burst thresholds. If both rx-burst-time and tx-burst-time are not specified, 1s is used as default. |
| server (string | all; Default: all) | Name of the server. If set to all, then binding applies to all created DHCP-PD servers. |
Read-only properties
| Property | Description |
|---|---|
| dynamic (yes | no) | Whether an item is dynamically created. |
| expires-after (time) | The time period after which binding expires. |
| last-seen (time) | Time period since the client was last seen. |
| status (waiting | offered | bound) | Three status values are possible:
|
For example, dynamically assigned /62 prefix
[admin@RB493G] /ipv6 dhcp-server binding> print detail
 Flags: X - disabled, D - dynamic
0 D address=2a02:610:7501:ff00::/62 duid="1605fcb400241d1781f7" iaid=0
 server=local-dhcp life-time=3d status=bound expires-after=2d23h40m10s
last-seen=19m50s
1 D address=2a02:610:7501:ff04::/62 duid="0019d1393535" iaid=2
server=local-dhcp life-time=3d status=bound expires-after=2d23h43m47s
last-seen=16m13s
Menu specific commands
| Property | Description |
|---|---|
| make-static () | Set dynamic binding as static. |
Rate limiting
It is possible to set the bandwidth to a specific IPv6 address by using DHCPv6 bindings. This can be done by setting a rate limit on the DHCPv6 binding itself, by doing this a dynamic simple queue rule will be added for the IPv6 address that corresponds to the DHCPv6 binding. By using the rate-limit the parameter you can conveniently limit a user’s bandwidth.
For any queues to work properly, the traffic must not be FastTracked, make sure your Firewall does not FastTrack traffic that you want to limit.
First, make the DHCPv6 binding static, otherwise, it will not be possible to set a rate limit to a DHCPv6 binding:
[admin@MikroTik] > /ipv6 dhcp-server binding print
Flags: X - disabled, D - dynamic
# ADDRESS DUID SERVER STATUS
0 D fdb4:4de7:a3f8:418c::/66 0x6c3b6b7c413e DHCPv6_Server bound

[admin@MikroTik] > /ipv6 dhcp-server binding make-static 0

[admin@MikroTik] > /ipv6 dhcp-server binding print
Flags: X - disabled, D - dynamic
# ADDRESS DUID SERVER STATUS
0 fdb4:4de7:a3f8:418c::/66 0x6c3b6b7c413e DHCPv6_Server bound
Then you need can set a rate to a DHCPv6 binding that will create a new dynamic simple queue entry:
[admin@MikroTik] > /ipv6 dhcp-server binding set 0 rate-limit=10M/10
[admin@MikroTik] > /queue simple print
Flags: X - disabled, I - invalid, D - dynamic
0 D name="dhcp<6c3b6b7c413e fdb4:4de7:a3f8:418c::/66>" target=fdb4:4de7:a3f8:418c::/66 parent=none packet-marks="" priority=8/8 queue=default
-small/default-small limit-at=10M/10M max-limit=10M/10M burst-limit=0/0
burst-threshold=0/0 burst-time=0s/0s bucket-size=0.1/0.1
By default allow-dual-stack-queue is enabled, this will add a single dynamic simple queue entry for both DCHPv6 binding and DHCPv4 lease, without this option enabled separate dynamic simple queue entries will be added for IPv6 and IPv4.
If allow-dual-stack-queue is enabled, then a single dynamic simple queue entry will be created containing both IPv4 and IPv6 addresses:
[admin@MikroTik] > /queue simple print
Flags: X - disabled, I - invalid, D - dynamic
 0 D name="dhcp-ds<6C:3B:6B:7C:41:3E>" target=192.168.1.200/32,fdb4:4de7:a3f8:418c::/66 parent=none packet-marks="" priority=8/8 queue=default
-small/default-small limit-at=10M/10M max-limit=10M/10M
burst-limit=0/0 burst-threshold=0/0 burst-time=0s/0s bucket-size=0.1/0.1
RADIUS Support
Since RouterOS v6.43 it is possible to use RADIUS to assign a rate-limit per DHCPv6 binding, to do so you need to pass the Mikrotik-Rate-Limit attribute from your RADIUS Server for your DHCPv6 binding. To achieve this you first need to set your DHCPv6 Server to use RADIUS for assigning bindings. Below is an example of how to set it up:
/radius
add address=10.0.0.1 secret=VERYsecret123 service=dhcp
/ipv6 dhcp-server
set dhcp1 use-radius=yes
After that, you need to tell your RADIUS Server to pass the Mikrotik-Rate-Limit attribute. In case you are using FreeRADIUS with MySQL, then you need to add appropriate entries into radcheck and radreply tables for a MAC address, that is being used for your DHCPv6 Client. Below is an example for table entries:
INSERT INTO `radcheck` (`username`, `attribute`, `op`, `value`) VALUES
('000c4200d464', 'Auth-Type', ':=', 'Accept'),
 INSERT INTO `radreply` (`username`, `attribute`, `op`, `value`) VALUES
('000c4200d464', 'Delegated-IPv6-Prefix', '=', 'fdb4:4de7:a3f8:418c::/66'),
('000c4200d464', 'Mikrotik-Rate-Limit', '=', '10M');
By default allow-dual-stack-queue is enabled and will add a single dynamic queue entry if the MAC address from the IPv4 lease (or DUID, if the DHCPv4 Client supports Node-specific Client Identifiers from RFC4361), but DUID from DHCPv6 Client is not always based on the MAC address from the interface on which the DHCPv6 client is running on, DUID is generated on a per-device basis. For this reason, a single dynamic queue entry might not be created, separate dynamic queue entries might be created instead.
Configuration Example
Enabling IPv6 Prefix delegation
Let’s consider that we already have a running DHCP server.
To enable IPv6 prefix delegation, first, we need to create an address pool:
/ipv6 pool add name=myPool prefix=2001:db8:7501::/60 prefix-length=62
Notice that prefix-length is 62 bits, which means that clients will receive /62 prefixes from the /60 pool.
The next step is to enable DHCP-PD:
/ipv6 dhcp-server add name=myServer address-pool=myPool interface=local
To test our server we will set up wide-dhcpv6 on an ubuntu machine:
- install wide-dhcpv6-client
- edit «/etc/wide-dhcpv6/dhcp6c.conf» as above
You can use also RouterOS as a DHCP-PD client.
interface eth2{
send ia-pd 0;
};

id-assoc pd {
prefix-interface eth3{
sla-id 1;
sla-len 2;
};
};
- Run DHCP-PD client:
sudo dhcp6c -d -D -f eth2
- Verify that prefix was added to the:
mrz@bumba:/media/aaa$ ip -6 addr
 ..
2: eth3: <BROADCAST,MULTICAST,UP,LOWER_UP> mtu 1500 qlen 1000
 inet6 2001:db8:7501:1:200:ff:fe00:0/64 scope global
 valid_lft forever preferred_lft forever
 inet6 fe80::224:1dff:fe17:81f7/64 scope link
 valid_lft forever preferred_lft forever
- You can make binding to specific client static so that it always receives the same prefix:
[admin@RB493G] /ipv6 dhcp-server binding> print
Flags: X - disabled, D - dynamic
# ADDRESS DU IAID SER.. STATUS 0 D 2001:db8:7501:1::/62 16 0 loc.. bound
[admin@RB493G] /ipv6 dhcp-server binding> make-static 0
- DHCP-PD also installs a route to assigned prefix into IPv6 routing table:
[admin@RB493G] /ipv6 route> print
 Flags: X - disabled, A - active, D - dynamic, C - connect, S - static, r - rip, o - ospf, b - bgp, U - unreachable
 # DST-ADDRESS GATEWAY DISTANCE
...
2 ADS 2001:db8:7501:1::/62 fe80::224:1dff:fe17:8... 1
DHCP Relay
Summary
Sub-menu: /ip dhcp-relay
The purpose of the DHCP relay is to act as a proxy between DHCP clients and the DHCP server. It is useful in networks where the DHCP server is not on the same broadcast domain as the DHCP client.
DHCP relay does not choose the particular DHCP server in the DHCP-server list, it just sends the incoming request to all the listed servers.
Properties
| Property | Description |
|---|---|
| add-relay-info (yes | no; Default: no) | Adds DHCP relay agent information if enabled according to RFC 3046. Agent Circuit ID Sub-option contains mac address of an interface, Agent Remote ID Sub-option contains MAC address of the client from which request was received. |
| delay-threshold (time | none; Default: none) | If secs field in DHCP packet is smaller than delay-threshold, then this packet is ignored |
| dhcp-server (string; Default: ) | List of DHCP servers’ IP addresses which should the DHCP requests be forwarded to |
| interface (string; Default: ) | Interface name the DHCP relay will be working on. |
| local-address (IP; Default: 0.0.0.0) | The unique IP address of this DHCP relay needed for DHCP server to distinguish relays. If set to 0.0.0.0 — the IP address will be chosen automatically |
| relay-info-remote-id (string; Default: ) | specified string will be used to construct Option 82 instead of client’s MAC address. Option 82 consist of: interface from which packets was received + client mac address or relay-info-remote-id |
| name (string; Default: ) | Descriptive name for the relay |
Configuration Example
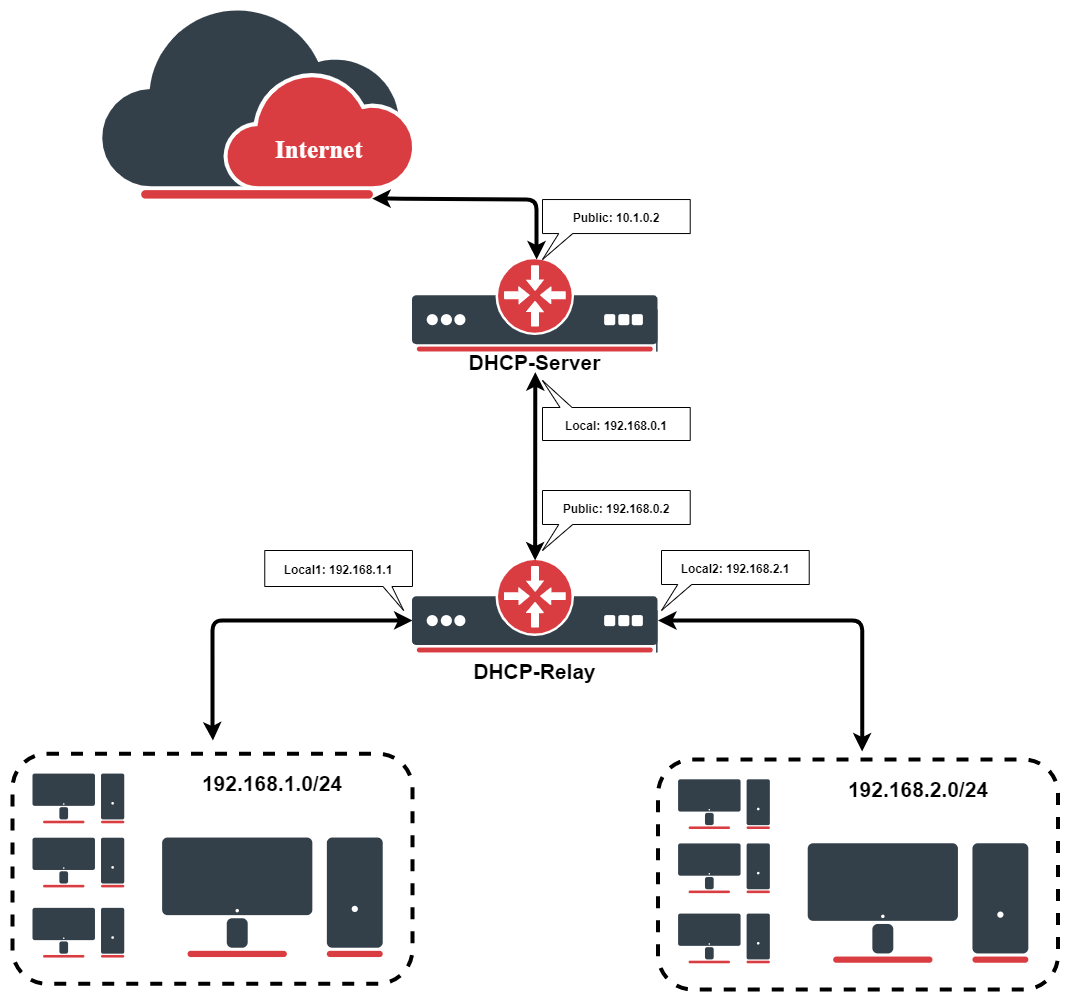
Let us consider that you have several IP networks ‘behind’ other routers, but you want to keep all DHCP servers on a single router. To do this, you need a DHCP relay on your network which will relay DHCP requests from clients to the DHCP server.
This example will show you how to configure a DHCP server and a DHCP relay that serves 2 IP networks — 192.168.1.0/24 and 192.168.2.0/24 that are behind a router DHCP-Relay.
IP Address Configuration
IP addresses of DHCP-Server:
[admin@DHCP-Server] ip address> print
Flags: X - disabled, I - invalid, D - dynamic
 #   ADDRESS            NETWORK         BROADCAST       INTERFACE
 0   192.168.0.1/24     192.168.0.0     192.168.0.255   To-DHCP-Relay
 1   10.1.0.2/24	10.1.0.0	10.1.0.255	Public
[admin@DHCP-Server] ip address>
IP addresses of DHCP-Relay:
[admin@DHCP-Relay] ip address> print
Flags: X - disabled, I - invalid, D - dynamic
 #   ADDRESS            NETWORK         BROADCAST       INTERFACE
 0   192.168.0.2/24     192.168.0.0     192.168.0.255   To-DHCP-Server
 1   192.168.1.1/24     192.168.1.0     192.168.1.255   Local1
 2   192.168.2.1/24     192.168.2.0     192.168.2.255   Local2
[admin@DHCP-Relay] ip address>
DHCP Server Setup
To setup 2 DHCP Servers on the DHCP-Server router add 2 pools. For networks 192.168.1.0/24 and 192.168.2.0:
/ip pool add name=Local1-Pool ranges=192.168.1.11-192.168.1.100
/ip pool add name=Local2-Pool ranges=192.168.2.11-192.168.2.100
[admin@DHCP-Server] ip pool> print
 # NAME                                         RANGES
 0 Local1-Pool                                  192.168.1.11-192.168.1.100
 1 Local2-Pool                                  192.168.2.11-192.168.2.100
[admin@DHCP-Server] ip pool>
Create DHCP Servers:
/ip dhcp-server add interface=To-DHCP-Relay relay=192.168.1.1 \
   address-pool=Local1-Pool name=DHCP-1 disabled=no
/ip dhcp-server add interface=To-DHCP-Relay relay=192.168.2.1 \
   address-pool=Local2-Pool name=DHCP-2 disabled=no
[admin@DHCP-Server] ip dhcp-server> print
Flags: X - disabled, I - invalid
 #   NAME         INTERFACE     RELAY           ADDRESS-POOL LEASE-TIME ADD-ARP
 0   DHCP-1       To-DHCP-Relay 192.168.1.1     Local1-Pool  3d00:00:00
 1   DHCP-2       To-DHCP-Relay 192.168.2.1     Local2-Pool  3d00:00:00
[admin@DHCP-Server] ip dhcp-server>
Configure respective networks:
/ip dhcp-server network add address=192.168.1.0/24 gateway=192.168.1.1 \
   dns-server=159.148.60.20
/ip dhcp-server network add address=192.168.2.0/24 gateway=192.168.2.1 \
   dns-server 159.148.60.20
[admin@DHCP-Server] ip dhcp-server network> print
 # ADDRESS            GATEWAY         DNS-SERVER      WINS-SERVER     DOMAIN
 0 192.168.1.0/24     192.168.1.1     159.148.60.20
 1 192.168.2.0/24     192.168.2.1     159.148.60.20
[admin@DHCP-Server] ip dhcp-server network>
DHCP Relay Config
Configuration of DHCP-Server is done. Now let’s configure DHCP-Relay:
/ip dhcp-relay add name=Local1-Relay interface=Local1 \
   dhcp-server=192.168.0.1 local-address=192.168.1.1 disabled=no
/ip dhcp-relay add name=Local2-Relay interface=Local2 \
   dhcp-server=192.168.0.1 local-address=192.168.2.1 disabled=no
[admin@DHCP-Relay] ip dhcp-relay> print
Flags: X - disabled, I - invalid
 #   NAME                        INTERFACE      DHCP-SERVER     LOCAL-ADDRESS
 0   Local1-Relay                Local1         192.168.0.1     192.168.1.1
 1   Local2-Relay                Local2         192.168.0.1     192.168.2.1
[admin@DHCP-Relay] ip dhcp-relay>
Настройка и администрирование сети требует умения выполнять различные задачи. Одной из таких задач является отключение DHCP сервера на Mikrotik. DHCP (Dynamic Host Configuration Protocol) позволяет автоматически назначать IP-адреса и другие сетевые параметры клиентским устройствам в сети. Однако, в некоторых случаях, может потребоваться отключить DHCP сервер, например, если вы хотите использовать статические IP-адреса или другой DHCP сервер в сети.
Для того чтобы отключить DHCP сервер на Mikrotik, вам потребуется доступ к управляющему интерфейсу Mikrotik, например, через Winbox или WebFig, и осуществить несколько простых шагов. Воспользовавшись следующей пошаговой инструкцией, вы сможете без труда отключить DHCP сервер на Mikrotik.
Шаг 1: Подключитесь к управляющему интерфейсу Mikrotik, используя вашу обычную программу для управления, например, Winbox или WebFig.
Шаг 2: В левой панели управления найдите раздел «IP» и раскройте его. Затем выберите «DHCP Server».
Шаг 3: В открывшемся окне вы увидите список DHCP серверов, которые настроены на Mikrotik. Выберите DHCP сервер, который вы хотите отключить. Обычно это сервер, настроенный на интерфейсе, через который вы хотите отключить DHCP.
Шаг 4: Нажмите на кнопку «Disable».
Шаг 5: Сохраните изменения, нажав на кнопку «Apply».
После выполнения этих шагов DHCP сервер на Mikrotik будет отключен. Теперь вы можете использовать другой DHCP сервер или настраивать IP-адреса вручную на клиентских устройствах в сети. Будьте внимательны и внимательно следуйте инструкции, чтобы избежать нежелательных изменений в конфигурации сети Mikrotik.
Содержание
- Подготовка к отключению DHCP сервера:
- Проверка наличия DHCP сервера
- Проверка списка активных клиентов
- Создание нового адреса главным сервером
- Отключение DHCP сервера
Подготовка к отключению DHCP сервера:
Перед тем, как отключить DHCP сервер на устройстве Mikrotik, необходимо выполнить следующие шаги:
- Убедитесь, что у вас есть доступ к устройству Mikrotik и административные права.
- Зайдите в интерфейс управления устройством Mikrotik, используя IP-адрес и логин/пароль администратора.
- Перейдите в меню «IP» и выберите пункт «DHCP Server».
- Убедитесь, что DHCP сервер включен и работает.
После выполнения этих шагов вы будете готовы отключить DHCP сервер на устройстве Mikrotik.
Проверка наличия DHCP сервера
Перед тем как отключать DHCP сервер на Mikrotik, необходимо убедиться в его наличии. Выполните следующие шаги:
1. Откройте web-интерфейс Mikrotik, введя IP-адрес роутера в адресную строку браузера.
2. Введите свои учетные данные для входа в систему.
3. После успешной авторизации, вам будет предоставлен доступ к главной странице настроек роутера.
4. В левой части экрана найдите раздел «IP», раскройте его, затем выберите «DHCP Server».
5. Если в списке отображается DHCP сервер, значит он активен. Если же список пустой, это означает, что DHCP сервер уже отключен.
Теперь вы можете быть уверены в наличии или отсутствии DHCP сервера на Mikrotik и приступить к его отключению или настройке.
Проверка списка активных клиентов
Чтобы убедиться, что DHCP сервер успешно отключен, можно проверить список активных клиентов. Для этого выполните следующие шаги:
- Зайдите в раздел «IP» в меню управления Mikrotik.
- Выберите пункт «DHCP Server» из списка.
- В открывшемся окне найдите вкладку «Leases» и перейдите на нее.
- На этой вкладке отобразится список всех активных аренд DHCP. Если список пустой или не содержит новых записей, значит DHCP сервер успешно отключен.
Теперь вы можете быть уверены, что DHCP сервер на Mikrotik отключен и работает только в режиме статического IP-адреса.
Создание нового адреса главным сервером
Чтобы отключить DHCP сервер на MikroTik и создать новый адрес главным сервером, выполните следующие шаги:
Шаг 1: Зайдите в веб-интерфейс MikroTik, например, откройте браузер и введите IP-адрес вашего MikroTik в адресную строку. Введите логин и пароль.
Шаг 2: Перейдите в раздел «IP» на левой панели, затем выберите «DHCP Server».
Шаг 3: В списке серверов DHCP найдите сервер, который вы хотите отключить, и выберите его.
Шаг 4: В правой части экрана найдите вкладку «Settings» и нажмите на нее. Затем снимите галочку с опции «Enabled», чтобы отключить DHCP сервер. Нажмите кнопку «OK», чтобы сохранить изменения.
Шаг 5: Теперь перейдите в раздел «IP» на левой панели и выберите «Addresses».
Шаг 6: Нажмите на кнопку «+», чтобы создать новый адрес главным сервером.
Шаг 7: Введите IP-адрес и маску подсети для нового адреса. Выберите интерфейс, который будет использоваться для главного сервера.
Шаг 8: Нажмите «Apply» и «OK», чтобы сохранить настройки.
Теперь DHCP сервер на MikroTik отключен, а новый адрес становится главным сервером.
Отключение DHCP сервера
Инструкция для отключения DHCP сервера на Mikrotik:
Шаг 1: Вход в Web интерфейс
Откройте браузер и введите IP адрес вашего Mikrotik в адресной строке. Введите свои учетные данные для входа в Web интерфейс.
Шаг 2: Переход в раздел IP
На главной странице Web интерфейса перейдите в раздел «IP».
Шаг 3: Выбор вкладки DHCP Server
В разделе «IP» выберите вкладку «DHCP Server».
Шаг 4: Отключение DHCP сервера
В разделе «DHCP Server» найдите и выберите нужный вам DHCP сервер. Нажмите кнопку «Disable» для отключения DHCP сервера.
Шаг 5: Сохранение настроек
После отключения DHCP сервера не забудьте сохранить изменения, нажав кнопку «Apply» или «OK».
Теперь DHCP сервер на Mikrotik будет отключен и вы можете использовать другой способ настройки IP адресов устройств в вашей сети.
-
Всем доброго времени.
Ситуация следующая:
На Mikrotik настроено 2 провайдера ISP1 — PPPoE (постоянный), ISP2 — статика (резервный).
Для резервирования был выбран вариант создания статических маршрутов с переключением скриптом.
Также оба провайдера раздают динамические настройки, соответственно и динамические маршруты.
Все работает отлично, но в момент переключения между провайдерами, срабатывает DHCP Client, получает IP, прописывает динамические маршруты.Вопрос: как это отключить? как запретить получение настроек DHCP или маршрутов?
-
/ip dhcp-client и нажать кнопочку disable.
-
Не подскажите, где эта кнопка?

-
Мне кажется он не активен.
-
Запись появляется динамически. В том правиле где задается и надо исправить. Иногда помогает кнопкой Copy сделать статическую запись и уже её исправлять
-
по описанию, правило создает интернет-детект. отключите его


Задача отключить DHCP сервер на Mikrotik может возникнуть в различных ситуациях. Например, вы можете хотеть использовать другой DHCP сервер или настроить адресацию сети статически. В любом случае, отключение DHCP сервера на Mikrotik довольно просто и быстро.
Во-первых, необходимо зайти в веб-интерфейс Mikrotik, используя свои учетные данные. Обычно адрес для доступа к веб-интерфейсу Mikrotik — это 192.168.88.1. После входа в интерфейс, перейдите на вкладку «IP» и выберите «DHCP Server».
На этой странице вы увидите список всех DHCP серверов, настроенных на вашем Mikrotik. Чтобы отключить DHCP сервер, выберите нужный DHCP сервер и нажмите кнопку «Disable». Ваши клиенты теперь будут получать адреса IP по другому методу.
Если вы всегда будете использовать другой DHCP сервер в своей сети, вы можете установить автоматическое отключение DHCP сервера при каждой загрузке Mikrotik. Для этого перейдите на вкладку «System» и выберите «Packages». Нажмите кнопку «Extra Packages» и найдите пакет «dhcp», выберите его и нажмите кнопку «Disable». Теперь DHCP сервер будет автоматически отключаться при каждой загрузке Mikrotik.
Содержание
- Что такое DHCP сервер?
- Зачем отключать DHCP сервер на Mikrotik?
- Гайд: Как отключить DHCP сервер на Mikrotik
- Шаг 1: Вход в веб-интерфейс Mikrotik
- Шаг 2: Открытие раздела «IP» и выбор пункта «DHCP сервер»
- Шаг 3: Отключение DHCP сервера
- Шаг 4: Проверка отключения DHCP сервера
- Шаг 5: Подключение устройств к сети без DHCP сервера
Что такое DHCP сервер?
Основное преимущество использования DHCP сервера заключается в автоматизации процесса настройки сетевых параметров, что позволяет существенно сэкономить время и упростить управление сетью. Без использования DHCP, администратору пришлось бы вручную настраивать каждое устройство, подключаемое к сети, указывая IP адреса, маску подсети и другие параметры. Также DHCP сервер отслеживает изменения в сетевой конфигурации, например, подключение новых устройств или выделение новых IP адресов, и позволяет динамически обновить сетевые настройки устройств в соответствии с этими изменениями.
Важно отметить, что DHCP сервер используется только в локальных сетях и не работает в Интернете. Он не является обязательным компонентом сети, но его использование значительно упрощает процесс настройки и управления сетью. В домашних и офисных сетях DHCP сервер является неотъемлемой частью роутера или коммутатора, который предоставляет доступ к интернету и осуществляет функцию DHCP сервера для подключенных устройств.
Зачем отключать DHCP сервер на Mikrotik?
Отключение DHCP сервера на Mikrotik может быть полезным во многих случаях:
- Если у вас уже есть работающий DHCP сервер на сети, необходимо отключить DHCP сервер на Mikrotik, чтобы избежать конфликтов с другими серверами и устройствами, выдающими IP адреса.
- Если вы хотите использовать статические IP адреса для конкретных устройств в сети, отключение DHCP сервера позволит вам установить IP адрес каждому устройству вручную.
- Отключение DHCP сервера может улучшить производительность сети, особенно если в вашей сети находятся большое количество устройств, которые постоянно запрашивают IP адрес у DHCP сервера.
- Вы также можете отключить DHCP сервер на Mikrotik для настройки режима моста или роутера, где IP адреса выделяются другим DHCP сервером.
Гайд: Как отключить DHCP сервер на Mikrotik
Вот пошаговое руководство о том, как отключить DHCP сервер на Mikrotik:
- Запустите программу Winbox на вашем компьютере и подключитесь к Mikrotik, используя IP-адрес и учетные данные администратора.
- Откройте меню «IP» в левой панели и выберите пункт «DHCP Server».
- В открывшемся окне выберите вкладку «Leases».
- На новой вкладке вы увидите список всех активных DHCP-аренд. Нажмите на кнопку «Remove» рядом с каждой записью, чтобы удалить аренду.
- После удаления всех DHCP-аренд выберите пункт меню «DHCP Server» в левой панели.
- В открывшемся окне найдите кнопку «Disable». Нажмите ее, чтобы отключить DHCP сервер.
После завершения этих шагов DHCP сервер будет полностью отключен на Mikrotik. Вы можете проверить его состояние, открыв меню «IP» и выбрав пункт «DHCP Server». Вы увидите, что статус DHCP сервера изменился на «not running».
Шаг 1: Вход в веб-интерфейс Mikrotik
1. Откройте веб-браузер на устройстве и введите IP-адрес вашего Mikrotik- маршрутизатора в адресной строке. Обычно адрес состоит из набора чисел, например, 192.168.1.1.
2. После ввода IP-адреса нажмите клавишу «Enter» или «Go», чтобы перейти на страницу входа в веб-интерфейс Mikrotik.
3. Введите имя пользователя и пароль для входа в веб-интерфейс Mikrotik. По умолчанию имя пользователя — «admin», а пароль — пустой. Если вы внесли изменения в настройки Mikrotik, используйте соответствующие учетные данные.
4. Нажмите кнопку «Войти» или «Login» для завершения входа в веб-интерфейс Mikrotik.
5. После успешного входа вы будете перенаправлены на главную страницу веб-интерфейса Mikrotik, где вы сможете просматривать и управлять настройками маршрутизатора.
Шаг 2: Открытие раздела «IP» и выбор пункта «DHCP сервер»
После успешной авторизации в интерфейсе MikroTik RouterOS необходимо открыть раздел «IP», который расположен в левом меню.
В открывшемся меню необходимо выбрать пункт «DHCP сервер».
После выбора пункта «DHCP сервер» откроется окно настроек DHCP сервера, где можно произвести все необходимые изменения.
Шаг 3: Отключение DHCP сервера
Чтобы отключить DHCP сервер на устройстве Mikrotik, выполните следующие действия:
- Откройте программу Winbox и подключитесь к вашему устройству Mikrotik.
- Перейдите во вкладку «IP» в левой панели управления.
- Выберите «DHCP Server» из списка.
- Выберите DHCP сервер, который вы хотите отключить.
- Нажмите на кнопку с изображением красного крестика в верхней части окна.
- Подтвердите отключение DHCP сервера, нажав «ОК» в появившемся диалоговом окне.
Теперь DHCP сервер на вашем устройстве Mikrotik будет отключен.
Шаг 4: Проверка отключения DHCP сервера
После того, как вы успешно отключили DHCP сервер на устройстве MikroTik, вам необходимо выполнить проверку, чтобы убедиться в правильности проведенных действий.
Для этого выполните следующие шаги:
- Откройте командную строку или терминал на своем компьютере.
- Введите команду ipconfig /all (для Windows) или ifconfig (для Linux или MacOS), и нажмите Enter.
- В списке сетевых интерфейсов найдите связанный с вашим устройством MikroTik. Обычно он называется «Ethernet adapter Ethernet» или «Ethernet adapter Local Area Connection».
- Проверьте, что в разделе «DHCP Enabled» стоит значение «No». Это означает, что DHCP сервер успешно отключен.
Если в разделе «DHCP Enabled» все еще стоит значение «Yes», это может означать, что DHCP сервер не был полностью отключен. В этом случае, повторите шаги из предыдущего раздела и проверьте настройки еще раз.
Поздравляю! Вы успешно проверили отключение DHCP сервера на устройстве MikroTik. Теперь ваш роутер будет работать только как коммутатор, без выдачи IP-адресов.
Шаг 5: Подключение устройств к сети без DHCP сервера
После отключения DHCP сервера на устройстве Mikrotik, вам потребуется настроить статические IP адреса на каждом устройстве, которое вы хотите подключить к сети. Здесь показано, как это сделать:
| Устройство | IP адрес | Маска подсети | Шлюз по умолчанию |
|---|---|---|---|
| Компьютер 1 | 192.168.0.2 | 255.255.255.0 | 192.168.0.1 |
| Компьютер 2 | 192.168.0.3 | 255.255.255.0 | 192.168.0.1 |
| Принтер | 192.168.0.4 | 255.255.255.0 | 192.168.0.1 |
Вам необходимо вручную присвоить IP адрес, маску подсети и шлюз по умолчанию каждому устройству в сети. В большинстве случаев, IP адресом шлюза по умолчанию будет являться IP адрес вашего роутера.
После настройки статических IP адресов, устройства должны успешно подключиться к сети без использования DHCP сервера.