У компании Huawei есть два популярных сетевых устройства: Huawei HG8245 и Huawei HG8240. Это оптические терминалы, с помощью которых пользователи могут получать скоростной доступ к интернету по технологии GPON. И именно эти модемы предлагают своим пользователям большие интернет-провайдеры. Например, Ростелеком.
Это по сути два абсолютно одинаковых устройства. Только модель HG8245 умеет раздавать интернет по Wi-Fi, а HG8240 – нет.
В этой инструкции я хочу подробно показать, как зайти в настройки Huawei HG8245. Ну и соответственно инструкция подойдет для HG8240. Мы рассмотрим процесс входа в панель уравнения. Расскажу по какому IP-адресу нужно перейти, чтобы зайти в веб-интерфейс, и какие заводские логин и пароль нужно указать для входа в настройки.
Есть много причин, по которым вам может понадобится доступ к настройкам этих модемов от Huawei. Например, чтобы сменить пароль на Wi-Fi, настроить подключение модема к интернету, настроить IPTV, или обновить прошивку.
Есть информация, что компания Ростелеком хочет сделать (или уже сделала) возможность удаленной настройки модемов. Это значит, что заходить в настройки модема Ростелеком и менять там какие-то параметры смогут только представители поддержки провайдера. Они будут выполнять вход удалённо. А это значит, у вас настройки Huawei HG8245 могут не открываться.
В любом случае, рекомендую попробовать зайти в панель управления своего модема, если вам это необходимо.
Как открыть страницу с настройками HG8245 и HG8240?
1
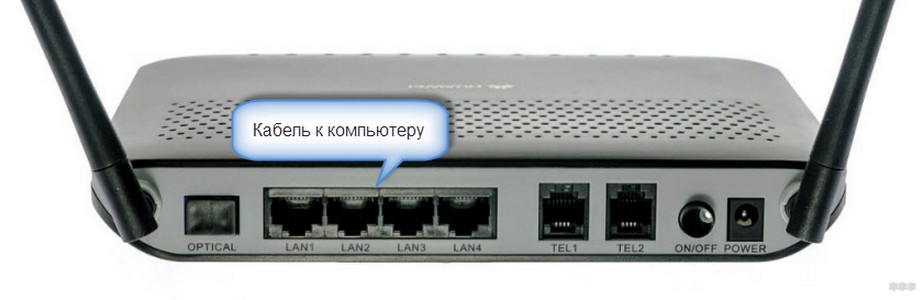
Нужно подключится к модему. Ваш компьютер по кабелю (или телефон, планшет по Wi-Fi) должен быть подключен к терминалу. Кабель должен быть в комплекте с модемом.

2
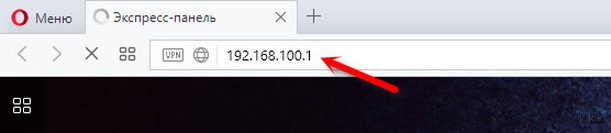
В настройки HG8245 и его младшего брата можно зайти по адресу 192.168.100.1. Поэтому, открываем любой браузер и в адресной строке набираем адрес 192.168.100.1. Для перехода нажимаем Ентер. Важно! IP-адрес нужно прописать именно в адресной строке браузера, а не поисковой.

Если что-то не получается – посмотрите подробную инструкцию: 192.168.100.1 – вход в роутер Huawei.
Вы должны увидеть страницу авторизации, где нужно указать логин и пароль для входа.

Или так:

Сейчас подробнее.
Какой логин и пароль указывать?
Как правило, по умолчанию используется: логин (Account) – root, пароль (Password) – admin.
Если они не подходят, то попробуйте указать логин – telecomadmin и пароль – admintelecom.
Дальше нажимаем кнопку «Login» и должны открыться настройки нашего модема Huawei.

Дальше вы можете сменить необходимые параметры в соответствующих разделах панели управления. Надеюсь, у вас все получилось.
Если не удается открыть настройки модема
Не редко бывает ситуация, когда страница с настройками модема просто не открывается. Появляется ошибка что-то типа «Не удалось отобразить страницу», или «Не удалось получить доступ к сайту». Несколько советов:
- Сначала проверьте, подключено ли ваше устройство к модему.
- Попробуйте перейти по адресу 192.168.100.1 с другого браузера. Если есть возможность, то с другого устройства.
- В свойствах протокола IPv4 подключения по локальной сети можно прописать статический IP-адрес: 192.168.100.2 и маску подсети.
 Подробнее как это сделать я писал в статье: как прописать IP-адрес в Windows 7. После настройки установите автоматическое получение адресов!
 Подробнее как это сделать я писал в статье: как прописать IP-адрес в Windows 7. После настройки установите автоматическое получение адресов!
На этом все. Пишите в комментариях, задавайте вопросы.
Пароль для входа в настройки роутера HUAWEI HG8245 HG8245T HG8245R HG8247
Роутер HUAWEI HG8245 HG8245T HG8245R HG8247, GPON терминал.
Если не получается зайти в настройки роутера смотрите здесь.
IP-адрес оптических модемов Huawei по умолчанию — 192.168.100.1, URL веб-интерфейса https://192.168.100.1. Логин и пароль на доступ может быть следующим:
- telecomadmin \ admintelecom
- telecomadmin \ NWTF5x%RaK8mVbD
- telecomadmin \ NWTF5x%
- telecomadmin \ nE7jA%5m
- root \ admin
Для настройки роутера см.инструкцию
Просмотрено:
2 599
Если у вас дома несколько компьютеров, а Ethernet-кабель всего один, то в таком случае рекомендуется приобрести беспроводной роутер. Хорошим прибором такого типа является маршрутизатор Huawei HG8245H.
Настройки роутера, как нам известно, делаются через панель управления (веб-интерфейс). Но какой у прибора HG8245 пароль и IP-адрес? Ведь эти данные необходимы для доступа к админке. Ниже мы узнаем, что вводить при авторизации, как установить и настроить этот сетевой коммутатор согласно инструкции.
Содержание
- Краткое техническое описание
- Подключаем и настраиваем
- Работа с модемом
- Активация Интернет (для Ростелеком)
- Активация Wi-Fi-сети
- Популярные проблемы и ошибки
- Проблема с запуском LAN2 и LAN3
- Заключение
- Задать вопрос автору статьи
Краткое техническое описание
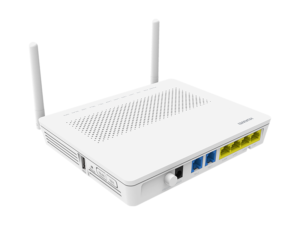
Роутер Huawei HG8245H – это устройство для управления интернет-сетями и телефонией. Маршрутизатор работает как с проводными, так и с беспроводными сетями. Устройство относится к классу GPON-терминалов, поэтому с помощью этого прибора можно добиться большой скорости подключения (до 1,2 гигабит в секунду).
Внешне имеет вид небольшой прямоугольной коробки белого цвета. По бокам устройства имеется 2 антенны для работы с беспроводными сетями. Обратите внимание, что устройство выпускается в различных версиях (HG8245A, HG8245M и другие). Однако они незначительно отличаются друг от друга (обычно разнятся только заводские данные по умолчанию).
Детальные технические характеристики прибора представлены в таблице ниже:
| Технические возможности | Маршрутизатор, управление Wi-Fi-сетями, работа с IPTV-подключениями |
| Количество разъемов | 2 входящих порта, 4 исходящих порта и 1 USB-порт |
| Скорость доступа | Входящая скорость – до 2,4 гигабит в секунду, исходящая скорость – до 1,2 гигабит в секунду |
| Стандарты Вай-Фай | 802.11 b/g/n |
| Шифрование | AES, TKIP, WPA/WPA2-PSK |
| Совместимость с операционными системами | Windows XP/Vista/7/8/10, Linux, MacOS, UNIX и другие |
| Размеры | Приблизительно 3 x 17,5 х 13 см |
| Особые указания | Есть возможность фильтрации по MAC- и IP-адресам, имеется встроенная защита от DDoS-атак |
Видео-обзор смотрите здесь:
Подключаем и настраиваем
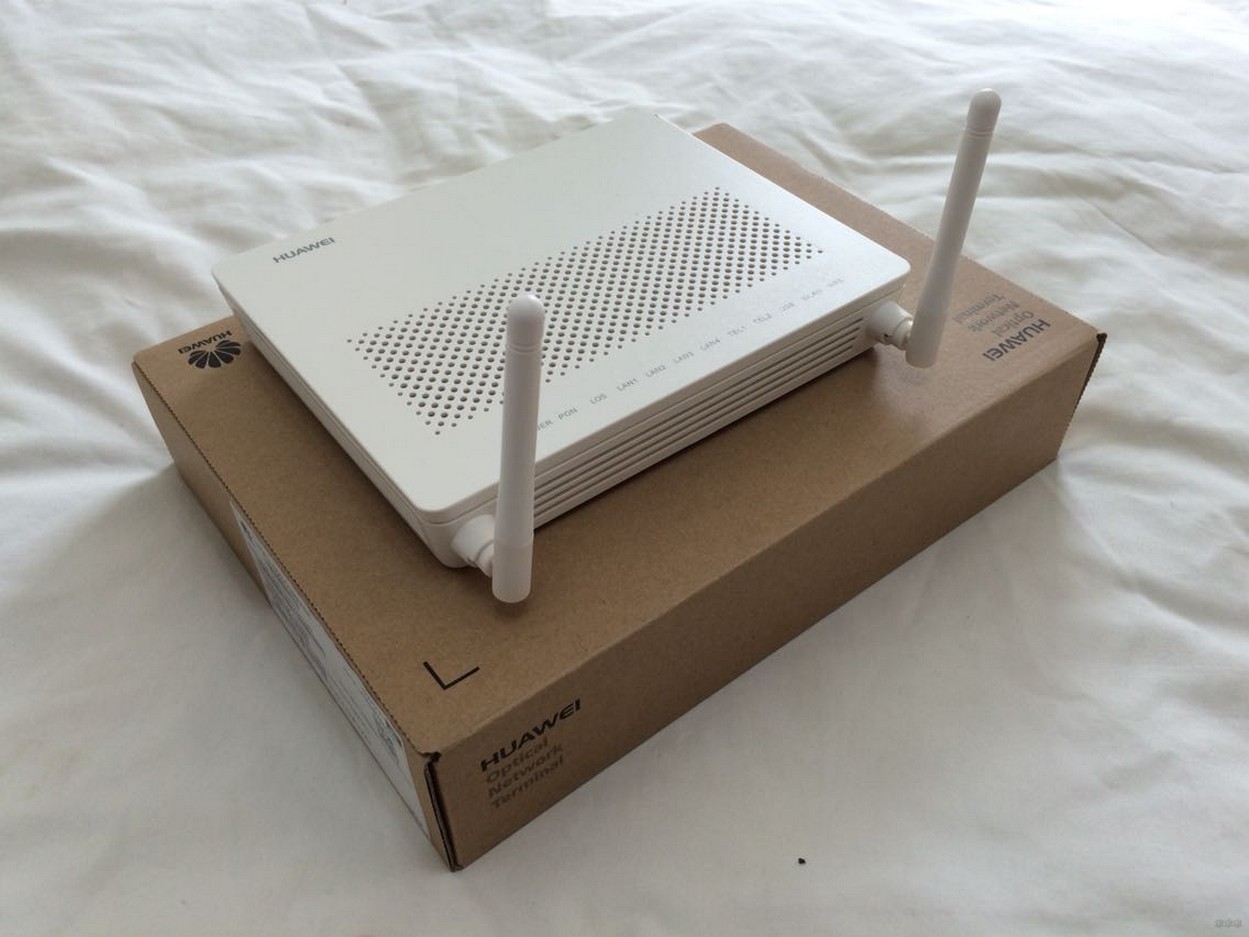
Давайте теперь узнаем о том, как настроить роутер Huawei. Сперва достаньте устройство из коробки и подключите его к электросети. После подключения на приборе должна загореться зеленая лампочка-индикатор рядом с отметкой PWR.
Теперь возьмите внешний интернет-шнур или телефонный кабель и вставьте его в один из двух разъемов для сети МГТС GPON. Разъемы окрашены в черный цвет, а расположены они на тыльной стороне устройства. После подключения на роутере должен загореться еще один зеленый индикатор рядом с отметкой POS или LOS.
После подключения вам следует активировать прибор. Сделать это можно двумя способами:
- Через Ethernet-кабель. Для этого нужно соединить роутер с кабелем провайдера, а патч-корд вставить в 1 из 4 разъемов (нужные гнезда окрашены в желтый цвет). Другой конец вставьте в гнездо интернет-карты на компьютере.
- Через Wi-Fi. С помощью Wi-Fi-адаптера на компьютере найдите ваш роутер и подключитесь к нему.
Теперь вам необходимо зайти в меню настроек. Откройте любой интернет-браузер, вбейте в строку поиска адрес вашего устройства и нажмите клавишу Enter.
Обратите внимание, что маршрутизаторы HG8245H имеют IP-адрес 192.168.100.1.
Теперь перед вами откроется окошко авторизации в админке HG8245H для ввода логина и пароля. Стандартный заводской логин – root, пароль по умолчанию – admin. Их нужно вписать в поля, чтобы зайти в настройки модема.
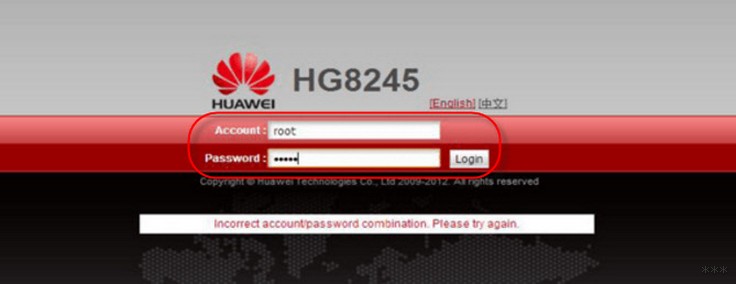
Если устройство уже находилось в эксплуатации, то вполне возможно, что предыдущий владелец поменял логин и/или пароль. В таком случае вам нужно выполнить перезагрузку. Для этого нажмите кнопку «Default» на роутере. После перезагрузки следует ввести стандартный логин и пароль root/admin.
Инструкция по входу в интерфейс доступна в формате видео:
Также обратите внимание, что на некоторых роутерах HG8245 в зависимости от версии прошивки, по умолчанию установлен другой заводской Login/Password:
| Login | Password |
|---|---|
| telecomadmin | telecomadmin |
| telecomadmin | admintelecom |
| admintelecom | telecomadmin |
| admintelecom | admintelecom |
| admin | admin |
| superadmin | superadmin |
| admin | HG8245H |
Работа с модемом
После ввода данных откроется панель конфигурации. Давайте теперь рассмотрим основные настройки Хуавей HG8245H.
Активация Интернет (для Ростелеком)
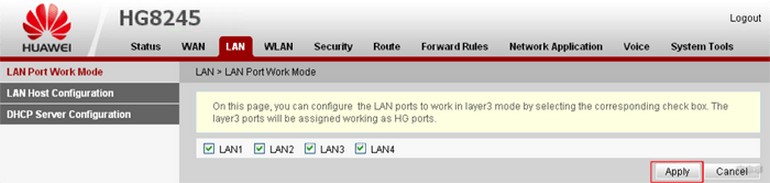
- Откройте вкладку «LAN» и выберите пункт «Lan Port Work Model». Убедитесь, что напротив всех портов поставлены галочки. Если галочек нет, поставьте их и нажмите кнопку «Apply».
- Теперь откройте вкладку WAN и выполните настройку согласно вашему договору с провайдером. Обычно настройка выглядит так:
- поставьте галочку рядом с пунктом Enable WAN,
- выберите пункт IPoE,
- в блоке WAN Mode укажите Route,
- в блоке Service Type – INTERNET,
- поставьте галочку напротив пункта VLAN,

- потом заполните блоки VLAN ID, Encapsulation mode и IP acquisition Mode согласно вашему договору с провайдером.
Если у вас возникли трудности, свяжитесь с техподдержкой поставщика услуг по телефону.
Активация Wi-Fi-сети
Теперь откройте вкладку «WLAN» и выберите пункт «WLAN Configuration». Вы попали в блок настройки беспроводной сети.
Настраиваем сеть так:
- придумываем название сети и указываем его в блоке SSID Name,
- ставим галочку напротив пункта Enable SSID,
- в пункте Device Number указываем максимальное количество подключений (до 32 штук),
- в пункте Authentication Mode выбираем WPA или WPA2,
- в блоке Encryption Mode ставим AES,
- придумываем пароль и указываем его в пункте WPA Key (не менее 10 символов),
- нажимаем кнопку «Apply».
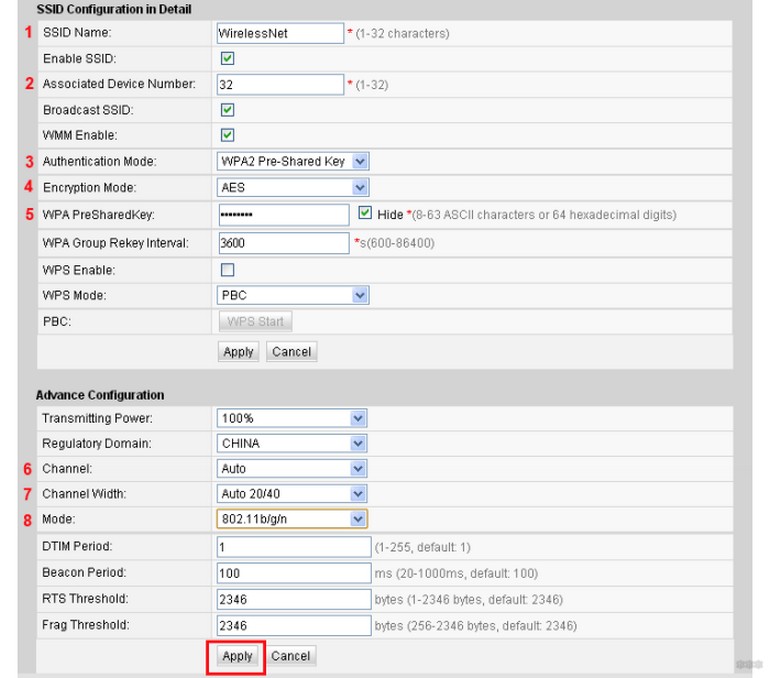
Также заполняем дополнительные пункты: Channel – Auto, Channel Width – Auto 20/40, Mode – 802.11b/n/g.
Для любителей формата видео инструкции по настройке доступны здесь:
Популярные проблемы и ошибки
Давайте теперь рассмотрим основные проблемы, с которыми человек может столкнуться при настройке роутера:
- IP-адрес устройства отличен от 192.168.100.1. В таком случае необходимо сделать следующее. Нажмите кнопку «Пуск», выберите пункты «Параметры сети и Интернет» – «Ethernet» – «Сопутствующие параметры». Нужно попасть в настройки сетевого адаптера. Потом выберите свой адаптер и нажмите правую кнопку мыши. В появившемся меню выберите пункт «Состояние». В открывшейся таблице найдите пункт «Шлюз». Там вы увидите настоящий IP-адрес маршрутизатора. Скопируйте его и вставьте в адресную строку браузера.

- Роутер несовместим с настройками вашего компьютера. Решить эту проблему можно так. Откройте настройки адаптера согласно инструкции выше, выберите протокол 4 версии и нажмите кнопку «Свойства». Нажмите «Использовать следующий IP». Заполните соответствующие блоки следующим образом:
- IP – 192.168.100.5
- маска – 255.255.255.0
- шлюз и DNS – 192.168.100.1
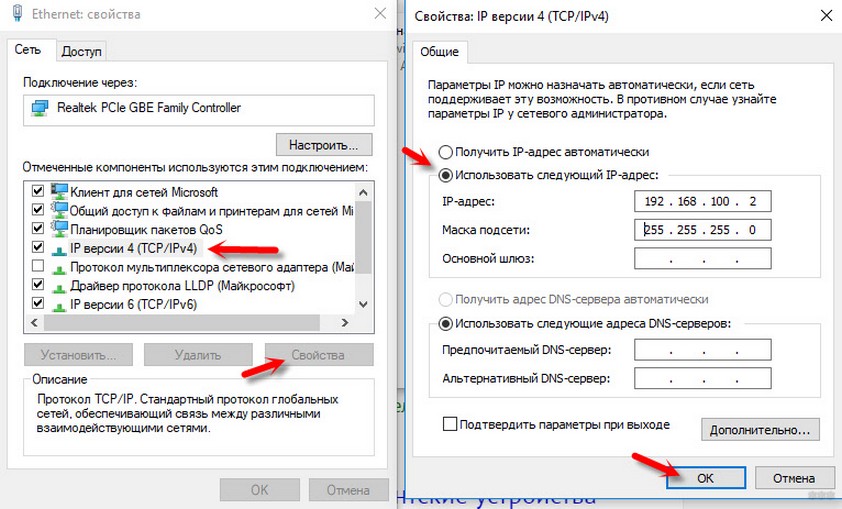
Нажмите клавишу «ОК», откройте браузер и попытайтесь еще раз подключиться к устройству.
Проблема с запуском LAN2 и LAN3
Обновление от Ботана. Поступил ко мне в чат вот такой интересный вопрос от Олега:
Как на ростелекомовском роутере запустить оставшиеся два LAN2 и LAN3? Купил телек Samsung, WiFi адаптер встроенный кривой, вечно сигнал падает. У ростелекома LAN4 заведен на их же приставку с привязкой к МАК адресу, а интернет раздаёт только LAN1 (он идет на комп). Хочу шнур из LAN4 воткнуть в LAN2 ли LAN3, но они залоченные. Роутер Huawei hg8245. Как сделать, чтобы инет раздавался со всех LAN? Можно ли открыть порт для телевизора, и как узнать какой для них диапазон портов? Можно ли это сделать при помощи Simple Port Forwarding, UPnP Wizard или других подобных программ? Или же однозначно надо ползти в настройки роутера?
Проблема возникла в том, что нам не приходилось сталкиваться с подобными блокировками, т.к. модемы приходили без предварительного “обрезания”. А при входе в конфигуратор этих настроек там просто нет – все почищено. В итоге было найдено решение – нужно войти в роутер не из под обычного пользователя, а с паролем суперадминистратора. До этого и догадался сам лично владелец сего девайся. Комментарий от него почти дословно прикладываю ниже. На благо всем, авось и пригодится:
Проблему решил: надо просто было добраться до пароля суперадмина. После обычной авторизации 192.168.100.1 и захода в залоченные настройки, в адресной строке ставим:
192.168.100.1/html/network/set.cgi?RequestFile=../../mnt/jffs2/hw_ctree.xml
– и качаем конфиг терминала. А там уже ищем:
<X_HW_WebUserInfoInstance Enable=”1″ InstanceID=”2″ Password=”1NasMb26UBWY8uI7Rm4Cvt0dqGwK3PgVejoiynX9DkOpEZJTzc” UserLevel=”0″ UserName=”telecomadmin”/>
Хеш, правда, может быть зашифрован MD5, тогда возня с расшифровкой (но хоть что-то). Это и есть пароль супера. Заходим повторно под ним, и все разблокировано.
Отписался, на всякий случай, вдруг Вам придется столкнуться с такой заковыкой. В любом случае, спасибо за участие…:)
Заключение
Теперь вы знаете, как зайти в настройки беспроводного роутера Huawei. Подведем итоги. После подключения HG8245 к электросети делают первичную настройку. Для этого нужно либо через кабель, либо через Wi-Fi сеть подключиться к устройству и указать его адрес. Потом пишут логин и пароль. Станет доступна админка роутера, где и можно выполнить все настройки.
Если остались вопросы, обязательно пишите в комментарии! Если был полезен, ставьте оценки. Если что забыл, тоже пишите! До встречи!
Чтобы помочь вам лучше понять содержимое этого документа, компания Huawei перевела его на разные языки, используя машинный перевод, отредактированный людьми.
Примечание: даже самые передовые программы машинного перевода не могут обеспечить качество на уровне перевода, выполненного профессиональным переводчиком.
Компания Huawei не несет ответственность за точность перевода и рекомендует ознакомиться с документом на английском языке (по ссылке, которая была предоставлена ранее).
How to Log In to the AR Router Through the Web and CLI
- Introduction
- Ports for Logging In to the AR Router
- What Is the Default Password for Logging In to the AR Router?
- How to Log In to the AR Router Through the Console Port (CLI)
- How to Log In to the Router Through the Management Port (Web)
- Where Is the Management Port of the Router Located?
- How to Configure the User Name and Password for Logging In to the Web System
- How to Log In to the Router Through the Mini USB Port (CLI)
- What If I Forget the Login Password?
- Related Information
Introduction
This document describes how to log in to an access router (AR), including login through the console port, mini USB port, and web UI. This document also describes the ports for logging in to the AR router, the default password for each login mode, and what to do if the login password is forgotten.
Ports for Logging In to the AR Router
You can log in to the AR router through the console port, mini USB port, Ethernet port, and management port.
After the AR router is powered on, you can connect to the console port or mini USB port and enter the default user name and password to log in to the device through the CLI. Alternatively, you can connect to the management port and enter the default user name and password to log in to the device through the web.
After logging in to the device for the first time, you can configure Telnet or STelnet to connect to the Ethernet port for subsequent login through the CLI.
You can connect a user terminal serial port to the console port of the device or connect the user terminal USB port to the mini USB port of the device.
Generally, a console port is marked with the CONSOLE silkscreen, and a management port is marked with the MGMT or Management silkscreen.
Figure 1-2 Console port
Figure 1-3 Management port
The mini USB port and console port cannot be used together. By default, the console port works.
What Is the Default Password for Logging In to the AR Router?
The default username and password are available in AR Router Default Usernames and Passwords (Enterprise Network or Carrier). If you have not obtained the access permission of the document, see Help on the website to find out how to obtain it.
The password is case sensitive.
How to Log In to the AR Router Through the Console Port (CLI)
When an AR router is powered on for the first time, you can connect a PC to the console port of the device and enter the default user name and password to log in to and then configure and manage the device. The console port is provided on all device models.
Before performing the following operations, ensure that the device is powered on and is connected to a PC through the console cable.
Procedure
- Connect the DB9 female connector of the console cable to the COM port on the PC, and connect the RJ45 connector to the console port on the device, as shown in Figure 1-4. (No console cable is delivered with the AR100, AR120, AR150, AR160, AR200, AR100-S, AR110-S, AR120-S, AR150-S, AR160-S, AR200-S, AR500, and SRG500 series routers. You need to prepare console cables separately.)
Figure 1-4 Connecting to a device through the console port
Figure 1-5 Console port structure
- Start the terminal emulation software on the PC. Create a connection, select the connected port, and set communication parameters. (The following uses SecureCRT as an example.)
- Click to establish a connection, as shown in Figure 1-6.
Figure 1-6 Establishing a connection
- Set the connected port and communication parameters, as shown in Figure 1-7.
Select the connected port based on actual situations. For example, you can view port information and select the connected port in Device Manager on Windows.
Communication parameters of the terminal emulation software must be consistent with those of the device. The default settings are as follows: 9600 bit/s baud rate, 8 data bits, 1 stop bit, no parity check, and no flow control.
By default, no flow control mode is configured on the device. Because RTS/CTS is selected in the software by default, you need to deselect RTS/CTS; otherwise, you cannot enter commands.
If you modify the serial port communication parameters on the device, you must make the same modifications on the PC and then create a connection again.
A PC may provide multiple serial ports with corresponding numbers. Ensure that the correct serial port is selected.
For details about how to modify device communication parameters, see (Optional) Configuring Attributes for the Console User Interface under «First Login to a Device» in «Basic Configuration Guide» in the configuration guide.
Figure 1-7 Setting the connected port and communication parameters
- Click to establish a connection, as shown in Figure 1-6.
- Click Connect. The following information is displayed, prompting you to set a password. For details about the default password for logging in to the device, see What Is the Default Password for Logging In to the AR Router?
By default, a user only needs to pass password authentication to log in to the device from the console user interface. To prevent unauthorized users from accessing the device, change the authentication mode of the console user interface to AAA authentication.
Login authentication
                                                                                                                                           Username:admin
Password:
<Huawei> Info: The entered password is the same as the default. You are advised to change  it to ensure security.
How to Log In to the Router Through the Management Port (Web)
In V200R006C10 and later versions, the management IP address is configured and the web system is enabled in factory default settings for all models. The default management IP address is 192.168.1.1/24.
After connecting a PC to the management port of the device, you can enter the default user name and password on the HTTPS page to log in to the device.
No default management IP address is configured for AR1200-S, AR2200-S, and AR3200-S series routers running versions earlier than V200R005C20. You need to specify the management IP address before logging in to the web system.
No default management IP address is configured for AR1200, AR2200, AR3200, AR120-S, SRG1300, SRG2300, and SRG3300 series routers running versions earlier than V200R006C10. You need to specify the management IP address before logging in to the web system.
- Open the web browser on the PC, enter https://192.168.1.1 in the address box, and press Enter. The web system login page is displayed.
To enhance security, if you enter http://192.168.1.1, the system automatically jumps to https://192.168.1.1. If the EasyOperation edition is supported, the login page shown in Figure 1-8 is displayed. If the EasyOperation edition is not supported, the login page shown in Figure 1-9 is displayed.
After the IP address of the management port is changed, enter the corresponding URL in the address box. By default, the HTTPS session timeout interval is 10 minutes.
Figure 1-8 EasyOperation web system login page
The following AR routers support the EasyOperation web system:
- AR100 series: AR109, AR109W, and AR109GW-L
- AR120 series: AR121, AR129, AR121W, AR129CV, AR129CVW, AR121GW-L, AR129GW-L, and AR129CGVW-L
- AR150 series: AR151, AR157, AR157G-HSPA+7, AR156, AR158E, AR158EVW, AR151W-P, AR151G-HSPA+7, AR157W, AR157VW, AR151G-C, and AR156W
- AR160 series: AR161, AR161W, AR161EW, AR161EW-M1, AR161G-L, AR161G-Lc, AR161G-U, AR161F, AR161F-DGP, AR161FW, AR161FV-1P, AR161FG-L, AR161FG-Lc, AR161FGW-L, AR161FGW-La, AR161FGW-Lc, AR161FW-P-M5, AR162F, AR168F, AR168F-4P, AR169, AR169EW, AR169G-L, AR169G-Lc, AR169EGW-L, AR169-P-M9, AR169W-P-M9, AR169RW-P-M9, AR169F, AR169BF, AR169FGVW-L AR169FVW, AR169FVW-8S, AR169FGW-L, AR169CVW, AR169CVW-4B4S, and AR169JFVW-4B4S
- AR200 series: AR201, AR206, AR207, AR207V, AR207V-P, AR208E, AR207G-HSPA+7, AR201VW-P, and AR207VW
- AR550 series: AR550-8FE-D-H, AR550-24FE-D-H, AR550C-4GE, AR550C-2C6GE, and AR550C-2C6GE-2D
- AREC series: AR111EC and AR161EC
- AR600 series (except AR651-X8 and AR651W-X4)
- AR300, AR700, AR6000 and AR6000-S series
Figure 1-9 Classics web system login page
You can use the web mode to configure voice services only when the device works in PBX mode.
If the device supports the voice self-service system, you can log in to the voice self-service system using either of the following methods:
- On the web platform, click Enter voice self-service system.
- Before logging in to the voice self-service system, run the self-service-http-server command in the voice view to access the self-service HTTP server configuration view, and then run the self-service http secure-server enable command to enable the self-service HTTPS server. You can enter https://ip address:1443/professional/user/login.html to access the voice self-service system. In the configuration view of the self-service HTTPS server, you can run the self-service http secure-server port command to change the port number of the self-service HTTPS server. The default port number is 1443.
Enter the web user name and password, and click Login or press Enter. The web system homepage is displayed. If you log in to the device for the first time, enter the default user name and password. In other situations, enter the user-defined web user name and password.
- Change the initial login password after logging in to the web system for the first time.
After changing the password, click OK. If the password is changed successfully, the system displays the message «Your password has been modified successfully». Click OK. The login page is displayed. If you do not change the password, click Cancel. The login page is displayed and you cannot log in to the web system.
You need to change the password in the following situations:
- If the login password expires, the system forcibly requires you to change the password.
- If you log in to the system for the first time after the password is changed by another user, the system forcibly requires you to change the password.
- If you log in to the system within the password expiration notification period, the system notifies you of the password expiration time and advises you to change the password.
After changing the password, click OK. If the password is changed successfully, the system displays the message «Your password has been modified successfully». Click OK. The login page is displayed. If you do not change the password, click Cancel. The Device Information page is displayed.
Where Is the Management Port of the Router Located?
How to Configure the User Name and Password for Logging In to the Web System
Where Is the Management Port of the Router Located?
Generally, the management port is marked with the MGMT or Management silkscreen. After connecting a PC to the management port of the device, you can enter the default user name and password on the HTTPS page to log in to the device.
Figure 1-10 Management port
Table 1-1 lists the devices whose management port is not marked with the MGMT or Management silkscreen.
Table 1-1 Devices whose management port is not marked with the MGMT or Management silkscreen
|
Series |
Model |
Interface |
|
|---|---|---|---|
|
AR150 series |
Models except the AR156W |
FE3 |
Ethernet0/0/3 |
|
AR160 series |
AR168F, AR168F-4P, and AR169F |
GE0 |
GigabitEthernet0/0/0 |
|
AR200 series |
All models |
FE6 |
Ethernet0/0/6 |
|
AR150-S series |
AR151-S, AR151W-P-S, and AR151G-U-S |
FE0 |
Ethernet0/0/0 |
|
AR200-S series |
All models |
||
|
AR530 series |
|||
|
AR550 series |
|||
|
SRG550 series |
How to Configure the User Name and Password for Logging In to the Web System
Web System Account Rights
You can configure the user level on the CLI or web system. The CLI only allows you to downgrade your own user level or configure a user level for users at lower levels. The web system only allows you to configure access levels of other users.
If the level of a user is 0 or no level is configured for the user, the user does not have the right to log in to the web system. The mapping between user levels and users is as follows:
- If the user level is 1, the user is a common administrator.
- If the user level is 2, the user is an enterprise administrator.
- If the user level is in the range from 3 to 15, the user is a super administrator.
Procedure
- Run the system-view command to enter the system view.
- Run the aaa command to enter the AAA view.
- Run the local-user user-name password irreversible-cipher password command to set the web user name and password.
By default, the system has a local user admin. For details about the default password of this user, see What Is the Default Password for Logging In to the AR Router?. You can directly use the user name and password to log in to the web system. After login, the system forcibly requires you to change the password to ensure security.
- Run the local-user user-name privilege level level command to configure the user level.
By default, the level of the local user admin is 15, which indicates that the local user is a super administrator.
How to Log In to the Router Through the Mini USB Port (CLI)
If no console port is available on a PC, you can connect a USB port on the PC to the mini USB port of the device and enter the default user name and password to log in to and then configure and manage the device.
The device supports the mini USB Type-B cable, which needs to be purchased separately.
To obtain the mini USB driver, visit http://support.huawei.com/enterprise, search for AR_MiniUSB_driver, and download the corresponding file. The mini USB driver supports only Windows XP, Windows Vista, and Windows 7 operating systems.
Procedure
- Install the mini USB driver on the PC.
- Use a mini USB cable to connect a USB port on the PC to the mini USB port of the device.
If you reinstall the mini USB cable or manually terminate the serial connection when using the mini USB port, open a new serial connection window after the serial connection is restored. The original serial connection window is invalid.
- As shown in Figure 1-11, double-click the driver installation file on the PC and click Next.
Figure 1-11 Running the mini USB driver on the PC
- As shown in Figure 1-12, select I accept the terms in the license agreement and click Next.
Figure 1-12 Accepting the terms in the license agreement
- As shown in Figure 1-13, click Change to change the driver directory, and click Next.
Figure 1-13 Specifying the driver directory
- As shown in Figure 1-14, click Install and decompress the driver. When the system finishes decompressing the driver, click Finish.
Figure 1-14 Finishing driver decompression
- Find the DISK1 folder in the file decompression directory specified in substep 4, and double-click setup.exe in the folder.
- Click Next. Select I accept the terms in the license agreement and click Next to install the driver.
- Click Finish. Right-click Computer, and choose Manage > Device Manager > Ports(COM&LPT). The system displays TUSB3410 Device, indicating the driver that has been installed.
If there is no TUSB3410 Device in the device manager, reinstall the driver or use another mini USB cable to connect the device to the PC.
- Use a mini USB cable to connect a USB port on the PC to the mini USB port of the device.
- Start the terminal emulation software on the PC. Create a connection, select the connected port, and set communication parameters. (The following uses SecureCRT as an example.)
- Click to establish a connection.
Figure 1-15 Establishing a connection
- Set the connected port and communication parameters.
Select the connected port based on actual situations. For example, you can view port information and select the connected port in Device Manager on Windows.
Communication parameters of the terminal emulation software must be consistent with those of the device. The default settings are as follows: 9600 bit/s baud rate, 8 data bits, 1 stop bit, no parity check, and no flow control.
By default, no flow control mode is configured on the device. Because RTS/CTS is selected in the software by default, you need to deselect RTS/CTS; otherwise, you cannot enter commands.
If you modify the serial port communication parameters on the device, you must make the same modifications on the PC and then create a connection again.
Figure 1-16 Setting the connected port and communication parameters
- Click to establish a connection.
- Click Connect. The following information is displayed, prompting you to set a password. For details about the default password for logging in to the device, see What Is the Default Password for Logging In to the AR Router?.
What If I Forget the Login Password?
Login Through the Console or Mini USB Port
You can use the BootROM menu of the device to clear the lost password for login through the console port or mini USB port. After starting the device, set a new password and save your configuration.
- Connect a terminal to the console port of the device and restart the device. When the following information is displayed, press Ctrl+B and enter the BootROM password to enter the BootROM menu.
If you do not press Ctrl+B within the timeout interval (several seconds), you have to restart the device again.
Press Ctrl+B to break auto startup ...  1
Enter Password:       //Enter the BootROM password.
- In the BootROM menu, select Password Manager and then Clear the console login password.
- Select Return and Default Startup in turn to restart the device.
- After the system starts, you can log in through the console port without password authentication. You can set an authentication mode and a password for the console user interface according to service requirements.
Configuring the authentication mode and password for the console user interface is necessary; otherwise, after the device is restarted, users still need to be authenticated using the original password when they log in to the device through the console port.
Login Through the Management Port
Super administrator
- Restoring the factory default settings on the CLI: Run the factory-configuration reset command in the user view to restore the factory default settings after the device restarts.
- Configuring the web login password on the CLI: Run the local-user user-name password irreversible-cipher password command in the AAA view to set the web user name and password.
Non-super administrator
The super administrator can change the password of a non-super administrator on the User Management tab page.
Figure 1-17 Changing the password of a non-super administrator
Login Through Telnet
- Restoring the factory default settings on the CLI: Run the factory-configuration reset command in the user view to restore the factory default settings after the device restarts.
- On the VTY user interface, run the set authentication password cipher command to set the password for password authentication or the local-user user-name password irreversible-cipher password command to configure the user name and password for AAA authentication. During password authentication, the user name does not need to be entered. To prevent unauthorized users from accessing the device, you are advised to use the AAA authentication mode.
Related Information
- Introduction
- Ports for Logging In to the AR Router
- What Is the Default Password for Logging In to the AR Router?
- How to Log In to the AR Router Through the Console Port (CLI)
- How to Log In to the Router Through the Management Port (Web)
- Where Is the Management Port of the Router Located?
- How to Configure the User Name and Password for Logging In to the Web System
- How to Log In to the Router Through the Mini USB Port (CLI)
- What If I Forget the Login Password?
- Related Information

Многие знают уже как настраивать Wi-Fi на терминалах (модемах) Белтелеком. Зачастую не знают только логина и пароля для входа в админку Huawei EchoLife HG8245H5, HG8245Hv5, HG8245A, HG8245H-256M. В этой заметке рассматриваются роутеры которые выдают абонентам ByFly.
Логины и пароли на роутеры модельного ряда HG8245 одинаковы:
Вход в админку http://192.168.100.1
| Роутер HG8245 | Права | Логин | Пароль |
| Вся линейка | Админ | root | admin |
| Вся линейка | Супер Админ | telecomadmin | admintelecom |
В китайских моделях пароли могут быть другие. Например это может быть adminHW
Прочитано 16882 раз
Последнее изменение Суббота, 13 Август 2022 11:05