Chapter 6 Wireless Settings
This chapter guides you on how to configure the wireless settings.
It contains the following sections:
•Specify Wireless Settings
•Schedule Your Wireless Function
•Use WPS for Wireless Connection
•Advanced Wireless Settings
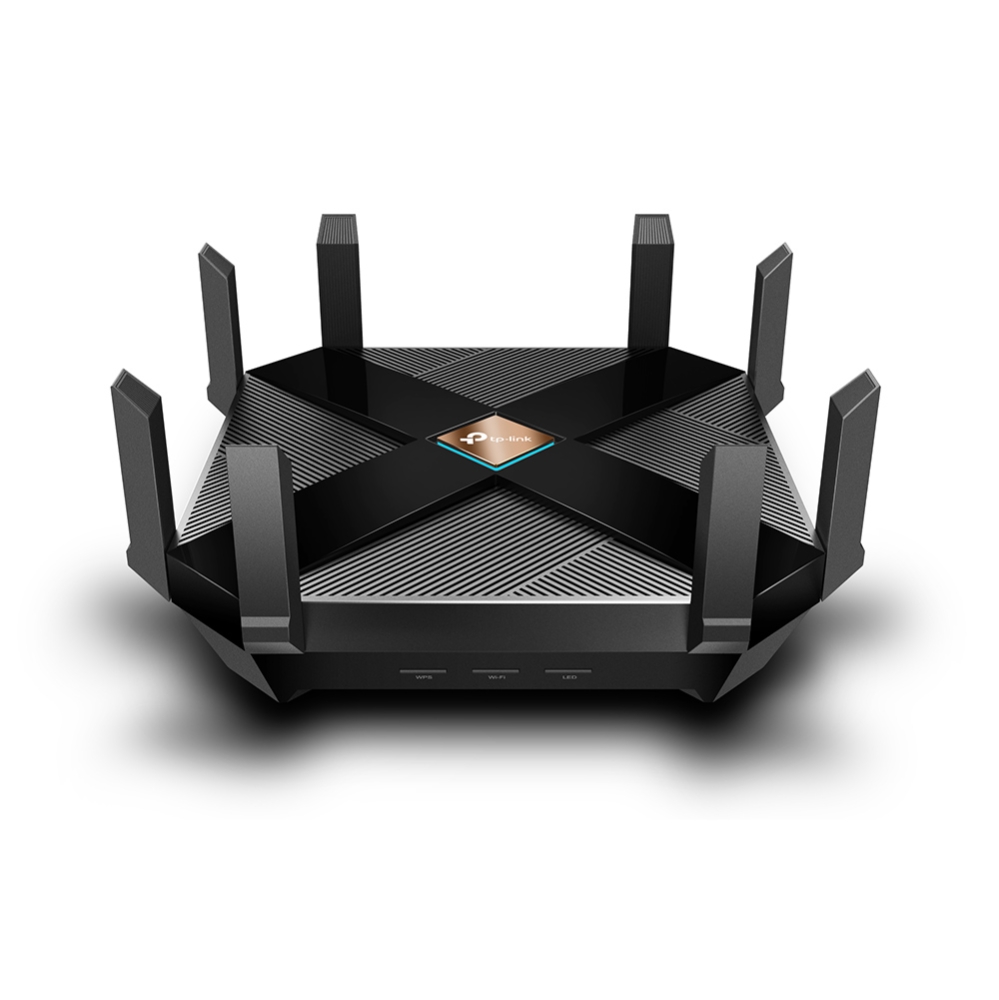
1. Specify Wireless Settings
The router’s wireless network name (SSID) and password, and security option are preset in the factory. The preset SSID and password can be found on the label of the router. You can customize the wireless settings according to your needs.
1.Visit http://tplinkwifi.net, and log in with your TP-Link ID or the password you set for the router.
2.Go to Wireless or Advanced > Wireless > Wireless Settings.
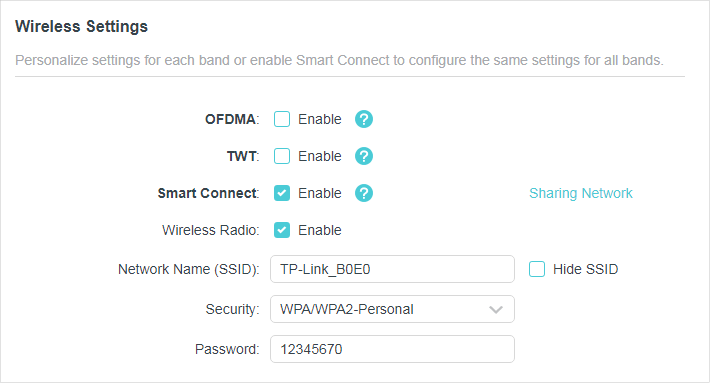
•To enable or disable OFDMA:
OFDMA enables multiple users to transmit data simultaneously, and thus greatly improves speed and efficiency. Noted that only when your clients also support OFDMA, can you fully enjoy the benefits. It is disabled by default.
1.Go to Advanced > Wireless > Wireless Settings.
2.Enable OFDMA.
•To enable or disable TWT:
TWT (Target Wake Time) allows 802.11ax routers and clients to negotiate their periods to transmit and receive data packets. Clients only wake up at TWT sessions and remain in sleep mode for the rest of the time, which significantly extend their battery life. It is disabled by default.
1.Go to Advanced > Wireless > Wireless Settings.
2.Enable TWT.
•To use the Smart Connect function:
The Smart Connect function lets you enjoy a more high-speed network by assigning your devices to best wireless bands based on actual conditions to balance network demands.
1.Go to Advanced > Wireless > Wireless Settings.
2.Enable Smart Connect.
3.Keep the default values or set a new SSID and password, and click SAVE. This SSID and password will be applied for the 2.4GHz and 5GHz wireless networks. If you want to configure the wireless settings separately for each band, untick the checkbox to disable this feature.
•To enable or disable the wireless function:
1.Go to Wireless or Advanced > Wireless > Wireless Settings.
2.The wireless function is enabled by default. If you want to disable the wireless function of the router, just untick the Enable checkbox of each wireless network. In this case, all the wireless settings will be invalid.
•To change the wireless network name (SSID) and wireless password:
1.Go to Wireless or Advanced > Wireless > Wireless Settings.
2.Create a new SSID in Network Name (SSID) and customize the password for the network in Password. The value is case-sensitive.
Note: If you change the wireless settings with a wireless device, you will be disconnected when the settings are effective. Please write down the new SSID and password for future use.
•To hide SSID:
1.Go to Wireless or Advanced > Wireless > Wireless Settings.
2.Select Hide SSID, and your SSID won’t display when you scan for local wireless networks on your wireless device and you need to manually join the network.
•To change the security option:
1.Go to Advanced > Wireless > Wireless Settings.
2.Select an option from the Security drop-down list: None, WPA/WPA2-Personal, WPA2/WPA3-Personal, WPA/WPA2-Enterprise. We recommend you don’t change the default settings unless necessary.
In addition
•Transmit Power — Select either High, Middle or Low to specify the data transmit power. The default and recommended setting is High.
•Channel Width — Select a channel width (bandwidth) for the wireless network.
•Channel — Select an operating channel for the wireless network. It is recommended to leave the channel to Auto, if you are not experiencing the intermittent wireless connection issue.
•Mode — Select a transmission mode according to your wireless client devices. It is recommended to just leave it as default.
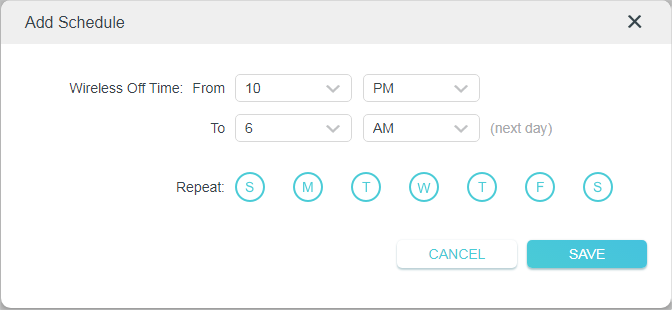
2. Schedule Your Wireless Function
The wireless network can be automatically off at a specific time when you do not need the wireless connection.
1.Visit http://tplinkwifi.net, and log in with your TP-Link ID or the password you set for the router.
2.Go to Advanced > Wireless > Wireless Schedule.
3.Enable the Wireless Schedule feature.

4.Click Add to specify a wireless off period during which you need the wireless off automatically, and click Save.
Note:
•The Effective Time Schedule is based on the time of the router. You can go to Advanced > System > Time & Language to modify the time.
•The wireless network will be automatically turned on after the time period you set.
3. Use WPS for Wireless Connection
Wi-Fi Protected Setup (WPS) provides an easier approach to set up a security-protected Wi-Fi connection.
1.Visit http://tplinkwifi.net, and log in with your TP-Link ID or the password you set for the router.
2.Make sure the Wi-Fi of your router is on and go to Advanced > Wireless > WPS.
3.1. Connect via the Client’s PIN
Enter the PIN of your device and click Connect. Then your device will get connected to the router.
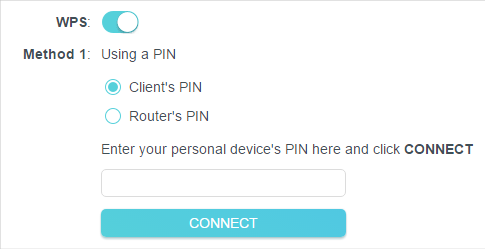
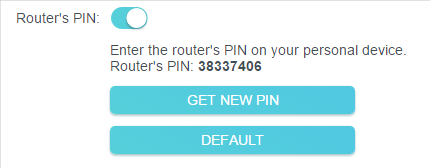
3.2. Connect via the Router’s PIN
Select Router’s PIN in Method 1 to enable Router’s PIN. You can use the default PIN or generate a new one.
Note:
PIN (Personal Identification Number) is an eight-character identification number preset to each router. WPS supported devices can connect to your router with the PIN. The default PIN is printed on the label of the router.
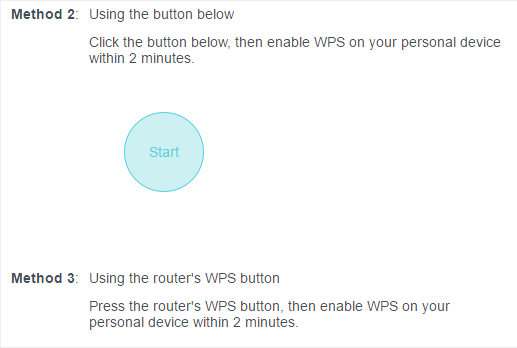
3.3. Push the WPS Button
Click Start on the screen or directly press the router’s WPS button. Within two minutes, enable WPS on your personal device. Success will appear on the screen and the WPS LED of the router should change from flashing to solid on, indicating successful WPS connection.
4. Advanced Wireless Settings
Check advanced wireless settings for your device.
1.Visit http://tplinkwifi.net, and log in with your TP-Link ID or the password you set for the router.
2.Go to Advanced > Wireless > Additional Settings.
3.Configure advanced wireless settings.
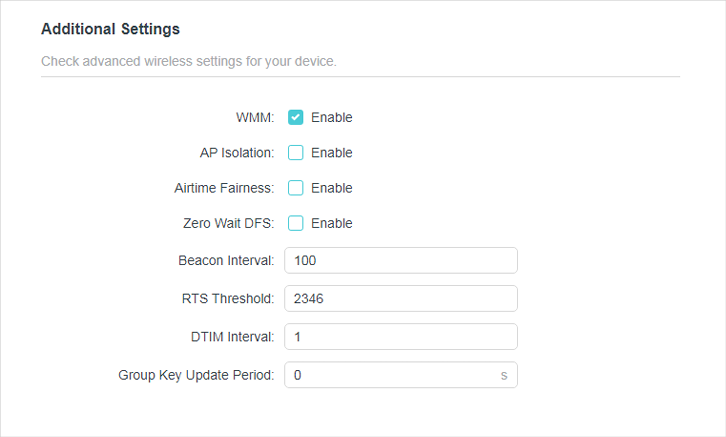
•WMM — WMM function can guarantee the packets with high-priority messages being transmitted preferentially.
•AP Isolation — This function isolates all connected wireless stations so that wireless stations cannot access each other through WLAN.
•Airtime Fairness — This function can improve the overall network performance by sacrificing a little bit of network time on your slow devices.
•Zero Wait DFS — Zero Wait DFS (Dynamic Frequency Selection) allows the router to immediately reselect a new channel once the radar signal is detected on a channel allocated to radar devices to ensure lag-free network experience.
•Beacon Interval — Enter a value between 40 and 1000 in milliseconds to determine the duration between beacon packets that are broadcasted by the router to synchronize the wireless network. The default value is 100 milliseconds.
•RTS Threshold— Enter a value between 1 and 2346 to determine the packet size of data transmission through the router. By default, the RTS (Request to Send) Threshold size is 2346. If the packet size is greater than the preset threshold, the router will send RTS frames to a particular receiving station and negotiate the sending of a data frame.
•DTIM Interval — The value determines the interval of DTIM (Delivery Traffic Indication Message). Enter a value between 1 and 15 intervals. The default value is 1, which indicates the DTIM Interval is the same as Beacon Interval.
•Group Key Update Period — Enter a number of seconds (minimum 30) to control the time interval for the encryption key automatic renewal. The default value is 0, meaning no key renewal.
Waiting in line can be really frustrating, especially if you’re waiting for something that you really want. But what if there were a way to avoid waiting altogether? In this article, we’ll take a look at one such way: zero wait Dfs TP-link routers.
What is TP-Link?
TP-Link is a global leading brand for Home and Small Business Networks. The company was founded in 1996 and is headquartered in Bangkok, Thailand. TP-Link has a wide range of products, including routers, switches, wireless access points, and security cameras. TP-Link’s mission is to empower people everywhere to connect and share their passions
TP-Link’s Zero Wait Dfs Tp-link Router is designed to help eliminate long wait times for downloads. This router uses the latest technology to deliver fast downloads and smooth video streaming.
In this ultimate guide, we will discuss everything you need to know about the TP-Link Zero Wait Dfs Tp-link Router. We will cover its features, specifications, and how it can benefit your home network. We will also recommend some compatible devices so that you can get the most out of this powerful router!
What is the TP-Link Zero Wait Dfs Tp-link Router?
The TP-Link Zero Wait Dfs Tp-link Router is a powerful router that can help eliminate long wait times for downloads. This router uses the latest technology to deliver fast downloads and smooth video streaming.
This router is perfect for use in homes and small businesses. It has a range of features that will make it an essential part of your network, including:
Fast download speeds – The TP-Link Zero Wait Dfs Tp-link Router can deliver fast downloads, making it perfect for use with demanding media files.
– The TP-Link Zero Wait Dfs Tp-link Router can deliver fast downloads, making it perfect for use with demanding media files. Smooth video streaming – The TP-Link Zero Wait Dfs Tp-link Router can keep your streaming experience smooth and uninterrupted.
– The TP-Link Zero Wait Dfs Tp-link Router can keep your streaming experience smooth and uninterrupted. Easy set up – The TP-Link Zero Wait Dfs Tp-link Router is easy to set up, even if you are new to networking.
– The TP-Link Zero Wait
How do Zero Wait Dfs work?
Zero Wait Dfs is a new feature on TP-Link routers that lets you browse the internet without waiting for your computer to connect to the internet. This feature is perfect for people who have slow or unreliable internet connections. TP-Link Zero Wait Dfs works by connecting your computer directly to the router, bypassing your ISP. The downside of this approach is that it can be more expensive than using an ISP, and it may not be available in all areas.
How does Zero Wait Dfs work?
TP-Link Zero Wait Dfs works by using a special software program that resides on your computer. When you want to browse the internet, you open the program and tell it which website you want to visit. The software then connects you directly to the website, without going through your ISP. This means that you can access websites even if your connection is slow or unreliable.
How do I use Zero Wait Dfs?
To use Zero Wait Dfs on a TP-Link router, first, make sure that the feature is enabled on your device. To do this, open the main menu of your router and click on “Settings”. Under “Network & Internet”, click on “
What are the benefits of using Zero Wait Dfs?
If you’re looking for a simple and efficient way to access your files from anywhere in the world, look no further than Zero Wait Dfs. This cloud-based file-sharing service is perfect for users who need…
fast and reliable file transfers
zero configuration required
access your files from any devicezero wait times for file downloads
Zero Wait Dfs is perfect for users who need a fast and reliable way to access their files from anywhere in the world. It offers zero configuration required, quick and easy file transfers, and access to your files from any device.
How to use Zero Wait Dfs on TP-Link devices
Zero Wait Dfs is a new DFS feature that allows you to accelerate file downloads by pre-loading files from the server before they are needed. This can significantly reduce the time it takes to download files, making it a great option for users who frequently access large files. TP-Link devices support Zero Wait Dfs, so you can take advantage of this optimization option without having to configure anything on your device.
To use Zero Wait Dfs on your TP-Link device:
1. Open the TP-Link app and select Files.
2. Select the file you want to download, and thazen click Download.
3. If you have selected a file that is using Zero Wait Dfs, the app will pre-load the file from the server before it is needed, speeding up the download process.
Conclusion
The wait time for a DFS player is always frustrating. Whether you’re playing on FanDuel or DraftKings, there’s always that one lineup that just won’t go your way. In this article, I have provided tips and advice on how to minimize the wait time for your favorite DFS lineups. From making sure you are using the right tools to building optimal lineups before entering contests, I hope that by the end of this guide you will be able to reduce your wait time to zero!
Zero wait dfs – это функция, которая позволяет увеличить производительность Wi-Fi сети на роутере. При использовании этой функции роутер значительно сокращает время простоя канала, что позволяет передавать данные более эффективно и с неизменной высокой скоростью.
При использовании обычного режима работы канал Wi-Fi может находиться в состоянии ожидания передачи данных в течение определенного времени. Это приводит к падению производительности сети и увеличению задержек при передаче информации. Zero wait dfs решает эту проблему, позволяя мгновенно начинать передачу данных, не ожидая освобождения канала.
Включение функции Zero wait dfs на роутере имеет несколько важных преимуществ. Во-первых, это позволяет повысить скорость передачи данных и уменьшить задержки в сети. Это особенно важно для потоковой передачи видео, онлайн игр и других приложений, которые требуют высокой производительности Wi-Fi.
Во-вторых, Zero wait dfs позволяет снизить влияние от других Wi-Fi сетей, работающих на том же канале. Благодаря этой функции роутер моментально занимает канал, не давая другим сетям передавать данные. Это позволяет избежать мешающих перекрытий и снижает вероятность возникновения конфликтов при передаче данных.
Включение Zero wait dfs – это простой и эффективный способ повысить производительность Wi-Fi сети на роутере. Эта функция обеспечивает мгновенное начало передачи данных, уменьшая время простоя канала. Учтите, что не все роутеры поддерживают эту функцию, поэтому перед покупкой рекомендуется проверить спецификации устройства.
Содержание
- Zero wait dfs на роутере: особенности включения и преимущества
- Что такое zero wait dfs и как он работает
- Почему включение zero wait dfs на роутере важно для быстрой передачи данных
- Как включить zero wait dfs на роутере: пошаговая инструкция
- Преимущества использования zero wait dfs: эффективность и безопасность сети
Zero wait dfs на роутере: особенности включения и преимущества
Особенности включения Zero wait dfs:
- Настройки Zero wait dfs обычно доступны в разделе «Расширенные настройки Wi-Fi» или в подобных секциях пользовательского интерфейса роутера.
- Для включения Zero wait dfs необходимо выбрать соответствующий пункт настройки и сохранить изменения.
- Некоторые роутеры могут требовать перезагрузку после включения Zero wait dfs.
Преимущества включения Zero wait dfs на роутере:
- Улучшение качества беспроводного сигнала и стабильности соединения. Zero wait dfs позволяет избегать радиопомех от других устройств, работающих на подобных частотах.
- Большая пропускная способность и скорость передачи данных. Zero wait dfs позволяет автоматически выбирать наименее загруженный и наиболее свободный радиоканал.
- Снижение интерференции с Wi-Fi сетями соседей. Zero wait dfs позволяет предотвращать проблемы, связанные с перекрывающимися сигналами от разных роутеров.
- Увеличение радиуса покрытия Wi-Fi сети. Zero wait dfs позволяет использовать более высокие частоты, которые имеют больший радиус действия.
Включение Zero wait dfs на роутере является эффективным способом улучшить работу беспроводной сети и повысить качество передачи данных. Пользуясь этой технологией, вы сможете получить более стабильное и быстрое подключение к Интернету.
Что такое zero wait dfs и как он работает
Zero wait dfs предлагает эффективное решение проблемы перекрытия частотных каналов, которое может приводить к интерференции и снижению скорости передачи данных. Вместо простого переключения на другой канал, как это делают традиционные dfs алгоритмы, zero wait dfs позволяет более гибко управлять частотными каналами.
Работа zero wait dfs основана на анализе радио-канала за определенный промежуток времени и определении его доступности. Когда маршрутизатор обнаруживает неиспользуемый канал, он активирует его без ожидания нахождения других устройств на этом канале.
При использовании zero wait dfs достигается более эффективное использование частотных каналов, что помогает снизить интерференцию и улучшить производительность беспроводной сети. Это особенно важно для сетей с высоким трафиком и большим количеством активных устройств.
Почему включение zero wait dfs на роутере важно для быстрой передачи данных
Включение zero wait dfs на роутере имеет несколько важных преимуществ:
- Улучшение качества сигнала: zero wait dfs позволяет избегать пересекающихся сигналов от других беспроводных устройств или соседних роутеров. Это помогает улучшить качество сигнала и увеличить скорость передачи данных.
- Устранение интерференции: zero wait dfs автоматически выбирает наиболее свободный канал, что позволяет избежать интерференции от других беспроводных устройств, работающих на той же частоте. Это особенно важно в перенаселенных местах, где есть много Wi-Fi сетей.
- Улучшение стабильности сигнала: zero wait dfs позволяет избежать проблем с пересечением сигналов, которые могут привести к снижению стабильности передачи данных. Это особенно важно при работе с большим объемом данных или стриминговом видео.
Включение zero wait dfs на роутере является важным шагом для обеспечения оптимальной производительности и стабильности сигнала Wi-Fi. Это поможет улучшить скорость передачи данных, устранить интерференцию и обеспечить более стабильное подключение к беспроводной сети.
Как включить zero wait dfs на роутере: пошаговая инструкция
- Войдите в настройки роутера, введя IP-адрес роутера в адресной строке браузера. Обычно это 192.168.0.1 или 192.168.1.1.
- Войдите в раздел Wi-Fi настроек. Обычно он называется «Wireless» или «Wi-Fi Settings».
- Найдите опцию DFS или Dynamic Frequency Selection. Она может быть размещена в разделе Advanced Settings или Advanced Options.
- Включите опцию DFS, выбрав флажок или переключатель в положение «Включено».
- Сохраните изменения, применив настройки.
После выполнения этих шагов ваш роутер будет использовать zero wait dfs, чтобы автоматически выбирать наиболее оптимальный канал для вашего Wi-Fi соединения. Это поможет улучшить скорость и стабильность вашей сети.
Преимущества использования zero wait dfs: эффективность и безопасность сети
Применение zero wait DFS имеет несколько значимых преимуществ:
- Увеличение эффективности сети: благодаря автоматическому выбору оптимального радиочастотного канала, роутер гарантирует наилучшую скорость передачи данных. Это особенно важно в зонах с высокой концентрацией wifi-сетей (на рабочих местах, в офисах, в крупных торговых центрах и т.д.), где свободные каналы могут быстро закончиться и возникнуть интерференции.
- Улучшение безопасности сети: постоянное обновление используемого радиочастотного канала помогает предотвратить взлом wifi-сети. Перехватчику будет сложнее отследить и проникнуть в защищенное соединение при использовании zero wait DFS, так как система регулярно меняет каналы связи.
- Повышение надежности сети: zero wait DFS позволяет роутеру быстро и безопасно переключаться на другой канал, если текущий становится перегружен или имеет проблемы с качеством сигнала. Это способствует стабильной работе сети и предотвращает возможные сбои и перебои в передаче данных.
Включение zero wait DFS на роутере — это простая и эффективная мера по оптимизации работы сети, улучшению производительности и обеспечению безопасности wifi-соединения. Эта технология особенно полезна для организаций и предприятий, где стабильное и безопасное интернет-подключение критично для бизнес-процессов.
На чтение 3 мин Просмотров 17к. Опубликовано
Обновлено
Если заглянуть в описание технических характеристик современных роутеров с поддержкой нового стандарта беспроводной связи WiFi 6, то можно обнаружить работу с таким алгоритмом, как «DFS». Что это за служба и как она используется на wifi маршрутизаторе? Об этом пойдет речь в данной статье.
Что такое DFS?
Dynamic Frequency Selection, или сокращенно DFS, — это технология, позволяющая задействовать для трафика обмена данных по дополнительные частотные каналы. Дословно переводится как «Динамический выбор частот»
То есть алгоритмы DFS призваны улучшить качество беспроводного соединения с роутером. Давайте посмотрим подробнее, каким образом. Если помните, на заре появления беспроводных сетей пользовались WiFi в диапазоне 2.4 ГГц. Я бы и сейчас с удовольствием его использовал, поскольку сигнал на 2.4 GHz обладает гораздо лучшей способностью преодоления препятствий, что особенно важно в многокомнатных квартирах с толстыми перекрытиями.
Однако с повсеместным распространением роутеров и умных беспроводных устройств и комплектов умного дома частоты 2.4 ГГц сильно загрузились. В результате чего скорости wifi стали сильно снижаться. Чтобы это понять, достаточно просто посмотреть в специальной программе количество одновременно работающих сетей в одном диапазоне

Другой стороной проблемы стали ограниченные возможности по передачи больших объемов данных через wifi сеть. То есть не только большое количество гаджетов стали потреблять wifi соединение, но и размеры информации стали слишком велики. Простой пример — раньше мы смотрели видео в разрешении HD, вес которых редко доходил до 1 ГБ. Сегодня же мы смотрим фильмы в 4К, которые весят несколько десятков гигабайт.
Эпоха 5 GHz
Тогда разработчики решили задействовать другой диапазон частот WiFi в 5 ГГц. У него значительно больше пропускная способность и максимальная скорость. Только вот с дальностью сигнала есть проблемы, которые стали решать с помощью усилителей сигнала и комплектами mesh систем роутеров.

Все было хорошо поначалу, но есть одна незадача. Широкому кругу пользователей для работы доступно лишь небольшое количество разрешенных частот в диапазоне 5 ГГц. Остальные зарезервированы для военных нужд — на них обмениваются сигналами радары и радиолокационные станции.
Появление алгоритма DFS каналов на wifi роутере
Но как мы понимаем, количество устройств, которые работают в диапазоне 5 ГГц, тоже неуклонно растет. И объемы трафика становятся от года к году все больше. При это военные радары все-таки размещены не повсеместно, и постоянно отключать свободные и вполне доступные частоты в такой ситуации становится непозволительной роскошью. Поэтому разработчики придумали встроить в роутер алгоритм DFS, который дает следующий выход из положения. При сильной загруженности разрешенных для WiFi 6 частот в диапазоне 5 ГГц маршрутизатор автоматически задействует одну из ранее закрытых. Но при появлении в радиусе приема сигнала от военных радаров служба DFS автоматически отключается, и роутер продолжает раздавать Wi-Fi на стандартной для 5 GHz частоте.

В этом и заключается преимущество современных роутеров с поддержкой WiFi 6 и DFS, то есть динамического выбора каналов беспроводных частот. В пиковые моменты нагрузки при большом количестве одновременно работающих устройств и параллельных соседских сетей роутер делает все возможное, чтобы скорость wifi осталась неизменной. В том числе и переключает их на соседние свободные каналы через алгоритмы Dynamic Frequency Selection. И работает это более эффективно, чем даже если бы выставить ширину wifi канала в 40 или 80 МГц.
Если еще вчера технология DFS использовалась только в топовых wifi роутерах, то сегодня производители все чаще встраивают ее уже в относительно бюджетные модели, например TP-Link Archer AX50, который был у нас на обзоре. Так что при выборе маршрутизатора для дома или офиса обращайте внимание на наличие DFS в характеристиках. Особенно, если стоимость роутера исчисляется несколькими тысячами рублей.
Актуальные предложения:
Задать вопрос
- 10 лет занимается подключением и настройкой беспроводных систем
- Выпускник образовательного центра при МГТУ им. Баумана по специальностям «Сетевые операционные системы Wi-Fi», «Техническое обслуживание компьютеров», «IP-видеонаблюдение»
- Автор видеокурса «Все секреты Wi-Fi»
( 739 оценок, среднее 3 из 5 )
Dynamic Frequency Selection (DFS) is a mandate for radio systems operating in the 5 GHz band to identify and avoid interference with Radar systems. IEEE 802.11h is the standard that covers the usage of DFS channels. To make use of DFS channels, wireless access points need to be certified to ensure that WiFi services on AP do follow the rule, e.g., stop immediately when a Radar signal is detected.
Since only a few business or enterprise APs are certified to use DFS channels, DFS channels are generally not so crowded in comparing with non-DFS channels. Network providers like to use DFS channels because of less interference. However, for the area with occasional Radar signals, service providers tend to avoid DFS channels.
Based on the 802.11h standard, AP needs to change its channel immediately when the Radar signal is detected in the current DFS channel. In general, AP can only hop back to the non-DFS channel. The main reason is:
According to 802.11h, an AP, when moving to a new DFS channel, has to listen silently to the medium for one minute before it is allowed to transmit anything (like a beacon) in order to make sure that no radar is currently operating on that channel.
AP cannot wait for one minute without serving its wireless clients. That’s why falling back to regular non-DFS channels is the only way for conventional APs to comply with standards.
Instead of falling back to the non-DFS channel, zero-wait DFS is a technique providing the seamless change of channels. That is, stations do not lose their connectivity when an AP moves to another DFS channel. With the dedicated scanning radio, EnGenius S-series APs can always guarantee the one-minute clearance of the target DFS channel hence hop to that channel without any waiting.
When an AP changes its channel, Channel Switch Announcement (CSA), as defined by IEEE 802.11h, is adopted to announce that AP is switching to a new channel before it begins transmitting on that channel. This allows the clients, who support CSA, to transition to the new channel with minimal downtime.
How Does EnGenius Support Zero-wait DFS
How Does EnGenius Support Zero-wait DFS
All S-series APs support zero-wait DFS. Relative options are available in radio settings.
-
Enable Spectrum Analyzer or Channel Scan in Live Diag would suspend zero-wait DFS temporarily because these Live Diag Tools need the scanning radio to scan all channels.
-
AirGuard may work with zero-wait DFS smoothly except the containment feature is enabled. The containment feature requires the scanning radio to do the containment in advance.