Configuration Guide
Дата последнего обновления: 06-20-2023 07:07:12 AM
![]() 44655
44655
There are two generations of Starlink Satellite Dish: The Gen-1 Terminal (Circular Dish) and the Gen-2 Terminal (Rectangular Dish). The main difference between the two versions is the removal of the Ethernet Jack. So with a Gen-2 Terminal, you must purchase an Ethernet Adapter from Starlink first to allow for a wired connection to the network.
Head below to learn how to connect the TP-Link router to the Starlink Terminal.
For the updated Gen-2 Starlink User Terminal
Unlike the Original Starlink Terminal, the Gen-2 Dish is Rectangular, and no PoE adapter is included. The Rectangular Dish will be directly powered by the Gen-2 Starlink router. Since there is no more Ethernet jack on the Gen-2 Starlink router, you must purchase an Ethernet Adapter from Starlink to Connect the TP-Link router.
- Connect the TP-Link router together with the Gen-2 Starlink router
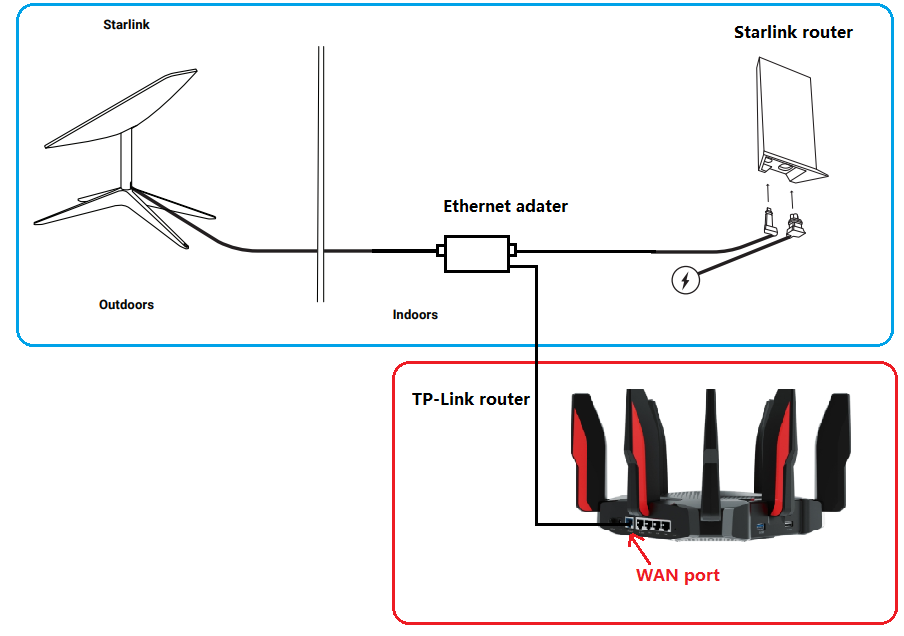
Gen-2 Starlink router supports Bypass mode that will completely disable the built-in Starlink WiFi router functionality. A factory reset is required if you want to switch back to router mode. So when the TP-Link router is connected to the Ethernet adapter, there are two recommended setups.
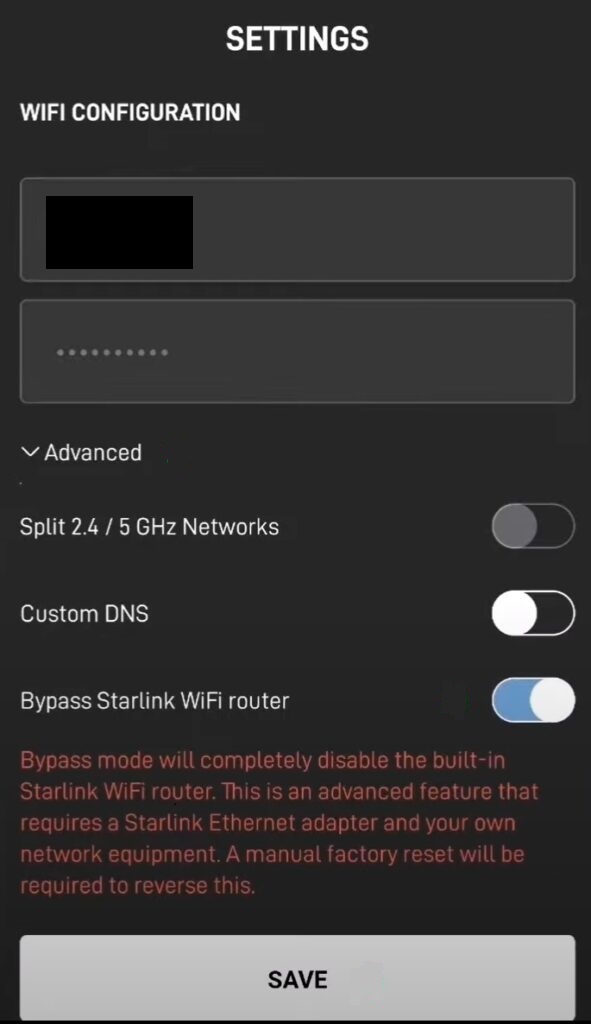
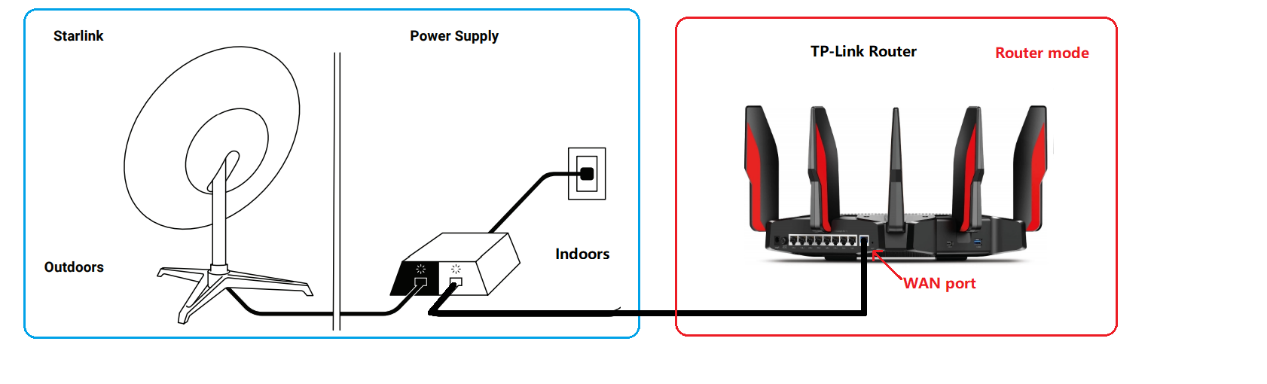
- Enable Bypass mode on Starlink APP under Settings > Advanced, then set up the TP-Link router in Wireless Router mode.
- Leave Bypass mode disabled on Starlink APP, then set up the TP-Link router in Access Point mode.
For the original Gen-1 Starlink User Terminal
- Connect the TP-Link router without the Gen-1 Starlink router
Go through this FAQ to set up the TP-Link router.
- Connect the TP-Link router together with Gen-1 Starlink router

On this network topology, please connect the TP-Link router to the AUX port of the Gen-1 Starlink Router. To avoid double NAT, it is suggested to change the TP-Link router into Access Point mode.
Follow this guide to change the TP-Link router into Access Point mode.
For any further inquiries about the TP-Link router setup or configuration with Starlink, please contact our technical support.
Был ли этот FAQ полезен?
Ваш отзыв поможет нам улучшить работу сайта.
Что вам не понравилось в этой статье?
- Недоволен продуктом
- Слишком сложно
- Неверный заголовок
- Не относится к моей проблеме
- Слишком туманное объяснение
- Другое
Как мы можем это улучшить?
Спасибо
Спасибо за обращение
Нажмите здесь, чтобы связаться с технической поддержкой TP-Link.
The Wifi router that comes with Starlink will work great for most people. But what if you need more features, or advanced networking options? In order to use your own 3rd party router with Starlink, you’ll want to enable bypass mode.
Bypass mode is a feature on the Starlink router that disables the Wifi and router functions, so that a 3rd party router can take over. Since the Starlink router doubles as the dish power supply, you can’t remove the router from the system completely. But in bypass mode, all networking functions are disabled, making it act only as a power supply.
In this guide, I will explain the accessories required to use your own router. I’ll also show you step-by-step how to enable bypass mode. Finally, I will provide answers to some of the common questions and issues that come up when trying to use your own router.
Note: This tutorial applies to the Standard, rectangular Starlink model.
Table of Contents
Video tutorial
Note: Some ad blockers will block our video player. If you don’t see the video, try disabling your ad blocker, and then reload the page.
Accessories needed
Before you can use your own 3rd party router with Starlink, you need to purchase the Starlink Ethernet Adapter. The Ethernet Adapter, pictured above, is the accessory that gives you access to an Ethernet port. An Ethernet port is required to be able to connect an aftermarket router to Starlink.
The Ethernet Adapter costs $25, and is available in the Starlink shop.
Obviously, you will also need a 3rd party router if you want to ditch the Starlink one. Almost any aftermarket router will work. In this guide, I’m using a TP-Link router. It came with an Ethernet cable, which is the last accessory that you will need before continuing on.
For a list of router recommendations, check out our article on the Best Aftermarket Wifi Routers For Starlink.
Connect 3rd party router to Starlink
To connect a 3rd party router to Starlink, first hook up the Starlink Ethernet Adapter. Unplug the Starlink cable from the bottom of the router. Plug in the Ethernet Adapter to the router. Then plug in the Starlink cable to the connector on the Ethernet Adapter. Wait a few minutes to allow the dish to boot back up, and verify that Starlink is online.
Next, use the Ethernet cable included with your 3rd party router to connect the router to Starlink. One end of the Ethernet cable will plug into the Starlink Ethernet Adapter, and the other end will connect to the Internet or WAN port on your 3rd party router.
For more on installing the Starlink Ethernet Adapter, check out our setup and review article.
Configure 3rd party router

If you haven’t already done so, plug in the power for your 3rd party router, and turn it on. Before you can begin to use it as a router, you need to go through the setup process. The setup process varies by manufacturer and model, so be sure to follow the instructions for your particular router.
I’m using a TP-Link router for this guide. All I had to do was download the Tether app on my phone, and it walked me through a simple setup wizard. You don’t need any special router settings to connect to Starlink. I applied all the default settings, and just renamed the Wifi network and set my own password.
Once your 3rd party router is configured, connect to it, and make sure you have internet access. At this point you will notice that you have two Wifi networks. The Starlink Wifi, and the Wifi from your 3rd party router. Having two routers connected to one internet source means you are double NAT’ed. While it can work this way, having two NAT configurations isn’t ideal. That’s why we will enable bypass mode on the Starlink router next.
Enable bypass mode
Once your 3rd party router is connected and working, you can put the Starlink router in bypass mode by following these steps:
- Open up the Starlink app
- Tap Settings
- Swipe down and tap Bypass Mode
- Slide the toggle to the right
- When prompted, confirm you want to continue by tapping OK
Managing Starlink in bypass mode
Even though the Starlink router is now in bypass mode, you can still access most of the dish settings from either the app, or the Starlink web interface. You’ll need to be on a device that is connected to your 3rd party router. If you aren’t familiar with the web interface, it can be accessed from a web browser by visiting:
http://dishy.starlink.com
or
http://192.168.100.1
If the Starlink app isn’t connecting, but you have internet on your 3rd party router Wifi network, try to access Starlink using the web interface from your device first, and then try the app. If neither the app or web interface is connecting, you may have to create a static route in your router configuration settings:
Network destination: 192.168.100.0
Subnet Mask: 255.255.255.0
Gateway: 192.168.100.1
Interface: WAN
Turning off bypass mode
If you ever need to go back to using the Starlink router, turn off bypass mode by performing a factory reset of the Starlink router. A reset will restore the Starlink router to factory settings, allowing you to configure a new Starlink Wifi network and password.
To factory reset the Starlink router, unplug and plug in the Starlink router power cable 6 times in a row, waiting a couple seconds in between each power cycle.
If successful, a new Wifi network should appear, named STINKY or STARLINK. Connect to the new network and follow the instructions. After you set a new Wifi network name and password, connect to your new network, and open the Starlink app to confirm everything is working.
For more details, check out our article on performing a factory reset of the Starlink router.
What about other Starlink dish models?
Bypass mode is only necessary on the Standard rectangular Starlink model, because the router and dish power supply are integrated as one unit. It is not necessary for the original round dish, the High Performance (Business) dish, or the Flat High Performance in-motion dish.
The Starlink router for those models can be completely removed from the system and replaced with a 3rd party router. To use a 3rd party router on the round dish, remove the Starlink router and plug in your own router to the Starlink power supply Ethernet port. On the High Performance and Flat High Performance models, use the included Starlink Ethernet cable to plug in your own router to the power supply.
The router that comes with Starlink can be a bit limiting for some users.
Well, the good news is that third-party routers work well with Starlink.
Here’s everything you need to know about using third-party/aftermarket Routers with Starlink.
To use a third-party router with Starlink, enable bridge mode from the Starlink app. With bridge mode enabled, connect the Ethernet cable to the WAN port of the Router. With the newer rectangular Dishes, you have to use an ethernet adapter to connect the router to the dish.
BlinqBlinq is reader-supported. When you buy through links on my site, I may earn an affiliate commission at no extra cost to you.
How to Set Up a Third-Party Router With Starlink

Starlink does come with a powerful enough Router capable of outputting everything Starlink has to offer in terms of promised speeds and connectivity.
But it fails to match the performance and the features offered by most Routing devices on the market today, especially for activities like online gaming and hosting.
But before you power up and use Starlink via a third-party Router, you may have to see to a few requirements.
The primary concern would be to know which type of Starlink kit you’ve got.
If you have the first-gen Dish (Round), you don’t have to satisfy any requirements. All you have to do is to replace the existing Router with the third-party one.
It is only with the gen-2 Dish (Square) that you’ll have to clear a few roadblocks before setting up the Router.
Unlike the Round Dishes, the Rectangular Dish setup doesn’t have an RJ-45/Ethernet port.
Even the Router draws its power from the PoE injector coupled directly with the Dish (it doesn’t have a power adapter).
And so, to direct the service from the Dish to an external device, you’ll have to use an Ethernet Adapter sold in the Starlink store.
Once you have secured the said Ethernet Adapter, you could redirect the service from the Dish to the Router via an Ethernet Cable.
Furthermore, the ‘roadblocks’ don’t end with the cable situation. Next, you will have to disable the Starlink Router services to bypass the networking capabilities to an external Router.
To take care of that, you will have to enable Bypass Mode. Here’s how to do so:
How to Enable Bypass Mode from Starlink App
One of the significant shortcomings of the Starlink Router is that it depends on carrier-grade NAT (CGNAT) to take care of client-server authentication instead of public IPs or even Static IPs.
And when you introduce an external networking element like an additional Router into the network with a CGNAT-enabled device, it could lead to Double-NAT.
Double NAT is a phenomenon that leads to uncertainty in establishing a connection between the client and the server devices when two or more servers are hosting the same network.
As a result, network connections become unstable and severely affect various networking characteristics like signal strength, speeds, and latency.
Fortunately, there exists a simple fix — enabling Bridge Mode.
Note: This process works for installing a mesh node as well and not just a router.
With Bridge Mode enabled, the incumbent Router becomes inactive and the networking capabilities get passed on to the newly introduced device, effectively negating double NAT.
Bridging has been an established technique to get rid of double NAT for quite some time now, and Starlink has been kind enough to provide the said feature (Bypass Mode) well within the Starlink app.
And so, it is essential to switch ON Bypass Mode in Starlink if you desire to use an external Router.
Before you do this, make sure your Starlink firmware is updated.
Here is how to do so:
1. Open the app and log into your Starlink account.
2. Tap open the Settings menu.

3. Select Bypass Mode.

4. Toggle ON the feature and hit Save.
Exit the menu to trigger a Router reboot and save the changes. If you want to disable Bypass Mode, perform a manual reset.
With Bypass Mode enabled, you’ll no longer be able to monitor or control the activities of the Starlink Router.
How to Use the Ethernet Adapter

Once you have enabled the Bypass mode on Starlink, proceed to couple the Router to the Dish via the Ethernet Adapter.
The Starlink Ethernet Adapter features an RJ45 port through which you can connect an Ethernet cable to the Router.
Here’s how to do so:
1. Connect the Starlink Dish input to the Adapter and plug in the power cable.
2. Next, connect one end of the Ethernet cable (Cat 5e and above) to the Adapter.
3. Connect the opposite end to the WAN port of the third-party Router.
Complete the setup by configuring the Router.
You can verify a proper connection between the Router and Starlink by checking the WAN address on the Router portal.
If the field corresponds to a 100. x. x. x address, then everything should work just fine.
Why Choose a Third-Party Router Over Starlink Router?

As many aspects as Starlink does instill its brilliance, the Router may be one of the very few letdowns.
Don’t get me wrong, for the Starlink Router is in no way an inferior technology that stymies the full potential of the service.
Starlink recommends its proprietary Router instead of a third-party one for utilizing the best of its services.
And this notion may hold its ground true and well when you factor in the flexibility in accessibility and control Starlkink offers via the Starlink app.
Hence the question, why choose a third-party alternative?
The answer — it comes up short on features and technology.
While the Starlink Router may offer better speeds and handling characteristics than any other Router on the market (only with Starlink), it does exhibit quite a lack of features.
Here are some of the more significant cons with the Starlink Router:
- Lack of Ethernet Ports
- Abysmal range
- Cannot monitor network/internet consumption info or any advanced info
- Lack of features like beam forwarding and network priority
- Cannot host guest networks
- No Triband Support (only Dual-band)
- Doesn’t support WiFi 6 (WiFi 5 preferred)
In a world where Tri-band support and abundant Ethernet ports have become a norm, the Starlink Router still sticks with the basics.
Not to mention the shoddy effective range, which falls short of the 1000 ft. mark. You can get a decently powered Router with a range of well over the 1K mark for dirt-cheap nowadays.
Lack of Port forwarding on Starlink Routers, sans the Business model, and beam forwarding further cement the need for an external router.
If you prefer a wired connection over the wireless mode, you are limited to just one port, and that, too, via the Ethernet Adapter. All the more reason to look elsewhere.
And above all, a complete lack of even the most basic features like guest network hosting sums up the need for a third-party alternative.
One benefit of Starlink routers is their pretty great IP rating of IP54, making them as resistant to weather conditions as the standard Starlink dish
For people on the road or those who prefer to set up their Starlink outdoors, this can seem like a benefit that other third-party routers cant provide.
With that said, here are some of the best Routing devices that outvies the Starlink Router in the market right now:
Best Third-Party Routers to Pair With Starlink
Now that you’ve got a grasp of how to pair a third-party router with Starlink, and more importantly, why to get a new Router, let’s look at some viable options.
Some aspects to keep an eye on while shopping for a new Router are the network bands, features, port selection, and range.
And so, without any further ado, here are some of the best Router to get right now:
TP-Link AX3000 WiFi 6 Router — Best Overall

The AX3000 would be an ideal upgrade over the Starlink Router since it shines well above the latter in almost every category.
As its name suggests, the AX3000 is a WiFi 6 enabled Router. So you don’t have to worry about speeds or latency issues commonly associated with the prior version.
With an effective range of about 1600+ ft, network coverage is no longer a concern, thanks to the 4 beamforming antennas.
The AX3000 features OFDMA which optimizes channel allocation and device recognition to the next level. You pretty much don’t have to worry about latency issues.
You also get an assortment of features like beam-forwarding, device prioritizing, and guest networks.
TP-Link’s innovative heat-management system also keeps the router from heating up.
The port selection, too, doesn’t fall short of your expectations.
And if you are concerned about the security aspect, TP-Link has got that covered, too, by gearing up the AX3000 with WPA3.
NETGEAR Nighthawk RAXE500

The Nighthawk series can come out as overkill for Starlink. Nevertheless, the RAXE500 is the fastest Router on this list.
Apart from WiFi6 compatibility, the RAXE500 also features tri-band support with the added 6GHz network for even faster and better wireless connectivity
You get an impressive 3500 ft. range with the RAXE500, which is a far more effective range on offer than most WiFi routers.
Beamforming, guest network access, etc., all come as standard on the RAXE500.
The device also features a dedicated CPU for better network characteristics management. You also get a VPN on the go.
The Nighthawk app helps you configure the various aspects of the Router with ease.
If you can get over the price of the device, the RAXE500 could be the most powerful Router for Starlink.
NETGEAR Orbi Mesh WiFi System

If you want even more range out of Starlink, Mesh systems are the one for you. And Orbi has always been a favorite among Mesh enthusiasts.
Featuring a mind-boggling range of 5K+ feet, you won’t have to worry about dropped connections anymore in your premise.
Coupled with WiFi6 and Tri-band support, you get even more flexibility in switching bands.
Setting up the device couldn’t get any easier, courtesy of the Orbi app.
The best thing about Mesh systems is that you can further accentuate the effective range of your network by introducing more and more Access Points to the primary Router.
Frequently Asked Questions (FAQ)
Can you use a mesh router with Starlink?
Yes, you can use Starlink with a Mesh system. Starlink does offer proprietary Mesh networking options for their Routers called Mesh Nodes. You can get them from the Starlink Store.
How many devices can the Starlink router handle?
Starlink Router can handle as many as 128 devices. Although, connecting a lot of devices can compromise network speed and latency.
Does the Starlink router have ethernet ports?
Second Gen (Rectangular Dish) Starlink Routers do not come with an Ethernet port. You can however buy by the Ethernet Adapter accessory to get an ethernet port.
You May Also Enjoy Reading
- Starlink vs 5G Home Internet [2023]: Which is Better?
- Starlink Degraded Service: Why Does it Happen [2023]
- Starlink RV Internet: Is it any Good? [2023]
- Amazon’s Project Kuiper vs Starlink: Worthy Rival [2023]
- Starlink vs Viasat: Big Difference? [2023]
- Will Starlink be Free Ever? What’s Likely [2023]

Подключение и настройка
WiFi роутеров
Скидка 10%
Вызвать мастера
 Наша компания предлагает настройку интернета Starlink через роутер.
Если вы приобрели роутер для Starlink, и не можете его настроить, то наши специалисты готовы подъехать в течении 1-2 часов и произвести полную настройку роутера у вас дома.
Если вы еще не определились с выбором роутера для Starlink, наша компания предлагает купить роутер у нас вместе с настройкой. Это значит, что наш специалист привозит новый роутер, и сразу производит его настройку.
Для выбора подходящей модели WiFi роутера для Starlink позвоните нам, и мы проконсультируем вас по всем характеристикам и предложим оптимальный вариант для вашего интернет провайдера.
К Starlink мы подключаем любые модели роутеров ASUS, D-link, Huawei, Linksys, NetGear, TP-LINK, TRENDnet, Upvel, Zyxel и др.
Для заказа подключения роутера к Starlink позвоните по нашему телефону, или воспользуйтесь формой заказа, расположенной справа.
Настройка роутера для Starlink включает:
- Подключение роутера
- Настройку WiFi сети
- Настройку безопасности WiFi сети
- Настройка цифрового ТВ
- Подключение по WiFi ноутбуков, планшетов, смартфонов и игровых приставок