В статье рассматривается вероятное решение проблемы, из-за которой не устанавливается Windows 11 на Virtual Box с ошибкой Запуск Windows 11 на этом компьютере невозможен. Далее — чуть подробнее, но не легче:
Этот компьютер не соответствует минимальным требованиям к системе для установки этой версии Windows.
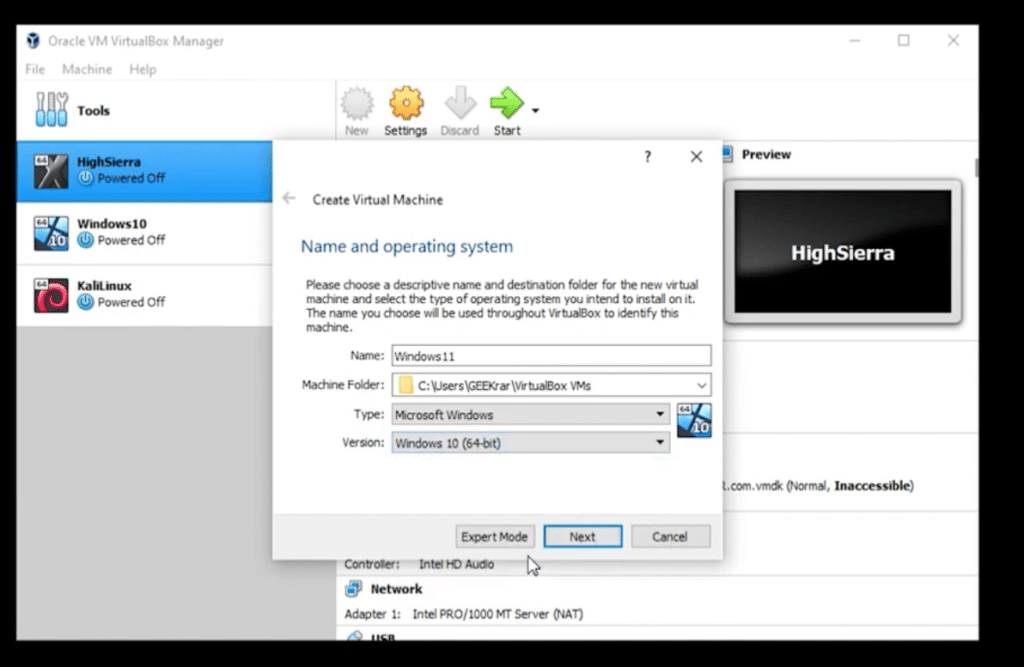
И т.д. Таким образом, даже во вполне подходящей для установки виртуальной среде Windows умудряется обнаружить для себя неподходящие условия. И это на фоне вроде бы всех подходящих для того настроек, сформированных ещё на этапе создания виртуальной машины. Т.е. в момент, когда вы указываете на тип и версию и т.п. для Windows в VirtualBox:


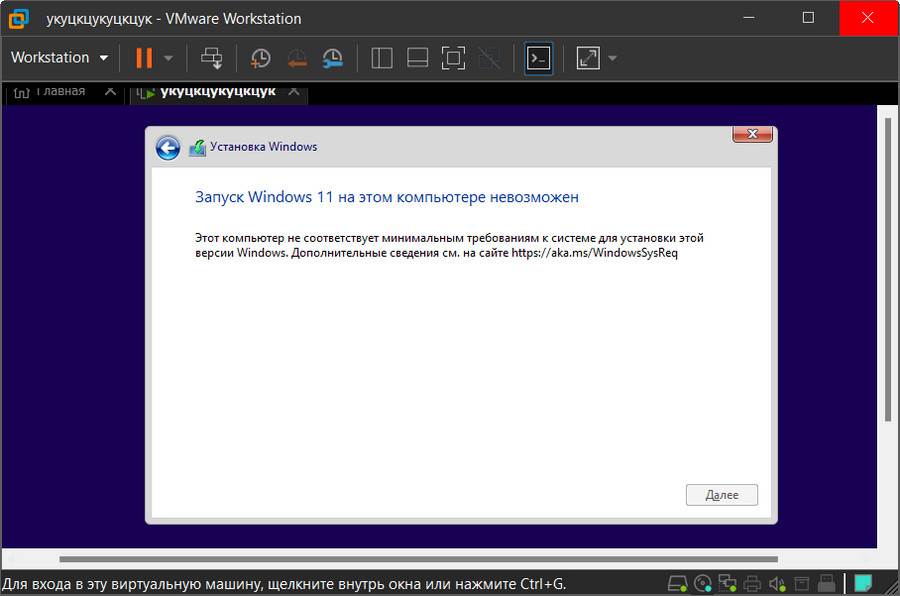
Но, практически неизменно, мы натыкаемся на характерное окно:

Что проверяет установщик Windows 11?
Инсталлятору нужно, чтобы вы загружались только в безопасной среде (Secure Boot), с достаточным объёмом оперативной памяти и, что главное, наличие на материнской плате компьютера чипа TPM. Он же Доверенный платформенный модуль. В общем, вы в курсе. И наверняка знаете, что Windows 11 давно в себе самой несёт возможность эту проверку отключить. А она лежит на поверхности.
Запуск Windows 11 на этом компьютере невозможен: решаем проблему виртуальной машины.
Так что:
- сверьтесь с условиями установки Windows 11 по установкам и настройкам, представленным на фото выше (впрочем, 80 Гб для виртуального диска многовато; я часто выбираю 40-50 максимум);
- повторяем установку Windows 11 на виртуальной машине;
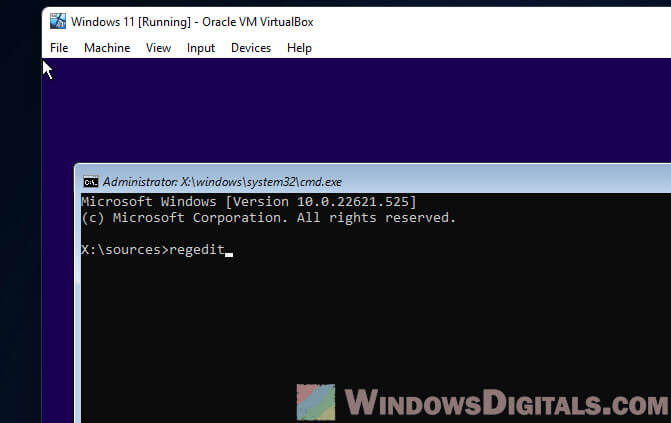
- при появлении ошибки в окне инсталлятора зажатием Shift и F10 вызываем окно консоли cmd
- оттуда запускаем редактор реестра
regedit
- проходим по пути
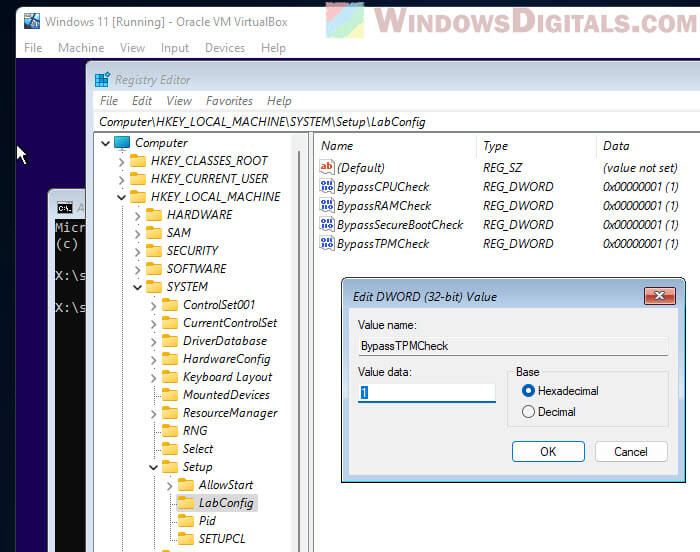
HKEY_LOCAL_MACHINE\SYSTEM\Setup
- здесь создаём новый раздел с именем LabConfig
- во вновь созданном разделе создаём сразу (чтобы не возвращаться) три новых параметра DWORD с именами
BypassSecureBootCheck
BypassRAMCheck
BybassTPMCheck
- всем им присваиваем значение 1. Окна редактора и консоли закрываем.

- установку возобновляем. Думаю, сейчас всё получится:
А как вы решили проблему? Успехов всем.
В этой публикации, друзья, рассмотрим недавно взволновавшую тестирующих Windows 11 новость: компания Microsoft в блоге инсайдерской программы Windows Insider заявила, что начиная со сборок 22458 на Dev-канале и 22000.194 на Beta-канале к виртуальным машинам для установки на них Windows 11 применяются такие же системные требования, что и для физических компьютеров. В компании изъяснились как всегда расплывчато, мы же имеем факт — у Windows 11 много пунктов системных требований. И виртуальные машины с тем функционалом гипервизоров, что есть сейчас, по условию не смогут соответствовать всем этим требованиям. Как теперь работать с виртуальными машинами в программах VirtualBox, VMware Workstation Pro, VMware Workstation Player и Hyper-V?
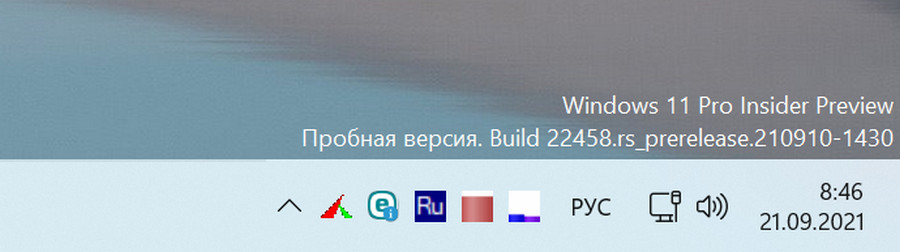
Итак, друзья, Microsoft внедрила для виртуальных машин уравниловку с физическими компьютерами в плане системных требований к Windows 11. Эта уравниловка действует начиная с инсайдерских сборок, с 22458 на Dev-канале и с 22000.194 на Beta-канале. И также это правило касается стабильной Windows 11. В ранних же инсайдерских сборках Windows 11 для виртуальных машин никаких требований нет. Но если мы захотим на виртуальной машине обновить более раннюю сборку вручную с использованием свежего установочного ISO, либо через центр обновлений,
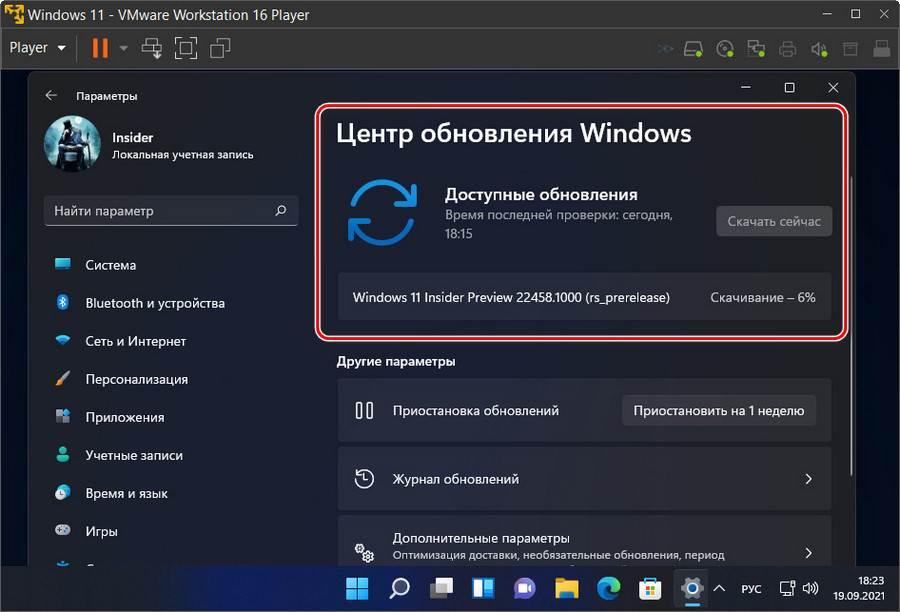
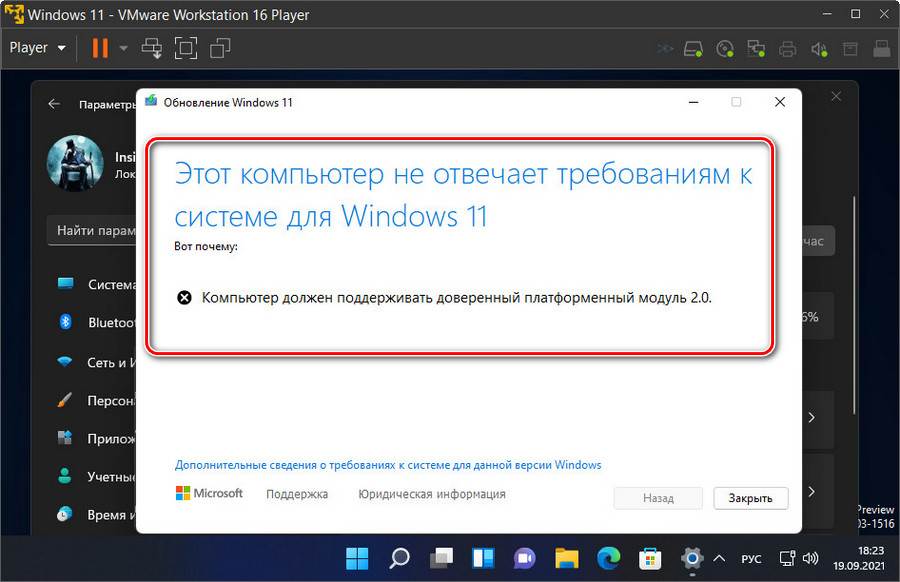
в процессе обновления получим этап проверки на совместимость с Windows 11 и неудовлетворительный результат этой проверки. Машина получит пресловутое уведомление «Этот компьютер не отвечает системным требованиям Windows 11» с констатацией, какому требованию именно не соответствует, либо без констатации вовсе.
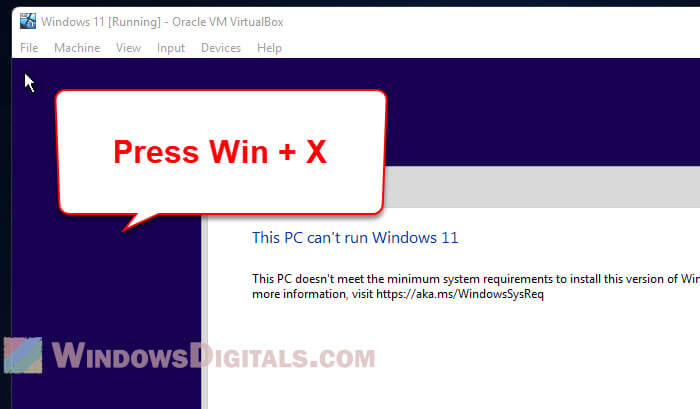
При новой установке на виртуальные машины Windows 11 в окне системного установщика будем видеть уведомление «Запуск Windows 11 на этом компьютере невозможен».
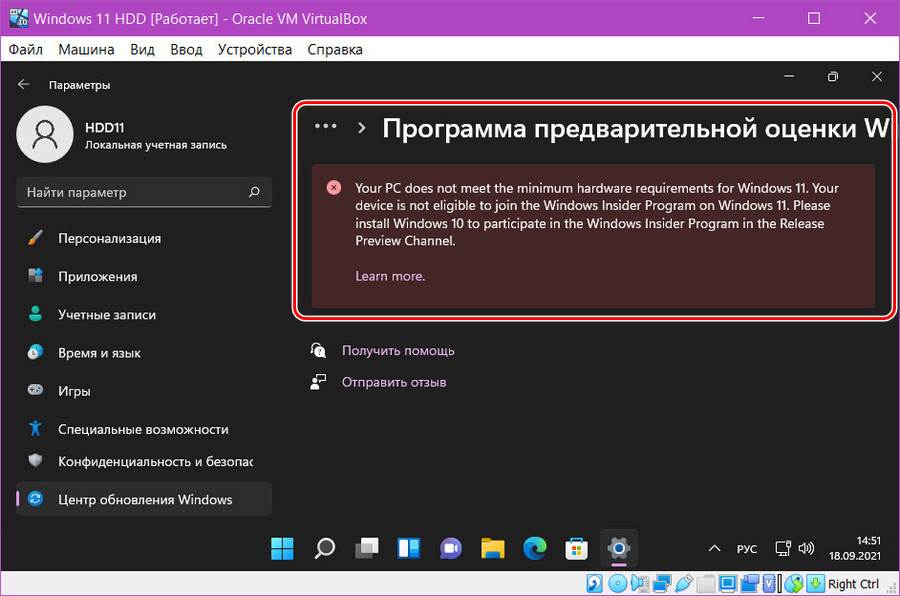
А на виртуальных машинах VirtualBox нам даже не будет доступна программа Windows Insider. При попытке подключиться к ней увидим уведомление «Your PC does not meet the minimum hardware requirements for Windows 11». Что значит, что машина не соответствует минимальным системным требованиям Windows 11.
Всё это, друзья, результат политики Microsoft. На деле пока что требования Windows 11 для виртуальных машин коснулись числа ядер процессора – не менее 2-х, объёма оперативной памяти – не менее 4 Гб, эмуляции прошивки UEFI и модуля безопасности TPM 2.0. А это значит, что официально установить свежие сборки Windows 11 и участвовать в её программе Windows Insider можно только в Hyper-V и актуальной версии программы VMware Workstation Pro (не ниже 14), ибо только они поддерживают эмуляцию TPM 2.0. Возможно, в будущем требования коснутся и самого процессора, т.е. чтобы используемый виртуальной машиной процессор был из перечня официально поддерживаемых. Друзья, если у вас несовместимый с Windows 11 процессор, и у вас с ним на виртуальной машине есть проблемы, отпишитесь в комментариях с описанием проблемы. Ну и давайте разбираться, что можно сделать с виртуальными машинами, чтобы на них можно было установить новые сборки Windows 11.
Обновлено: бесплатный гипервизор VirtualBox поддерживает эмуляцию всех необходимых устройств и технологий для официального использования Windows 11 только начиная с версии программы 7. Детали в статье «Как установить Windows 11 на VirtualBox 7 и выше».
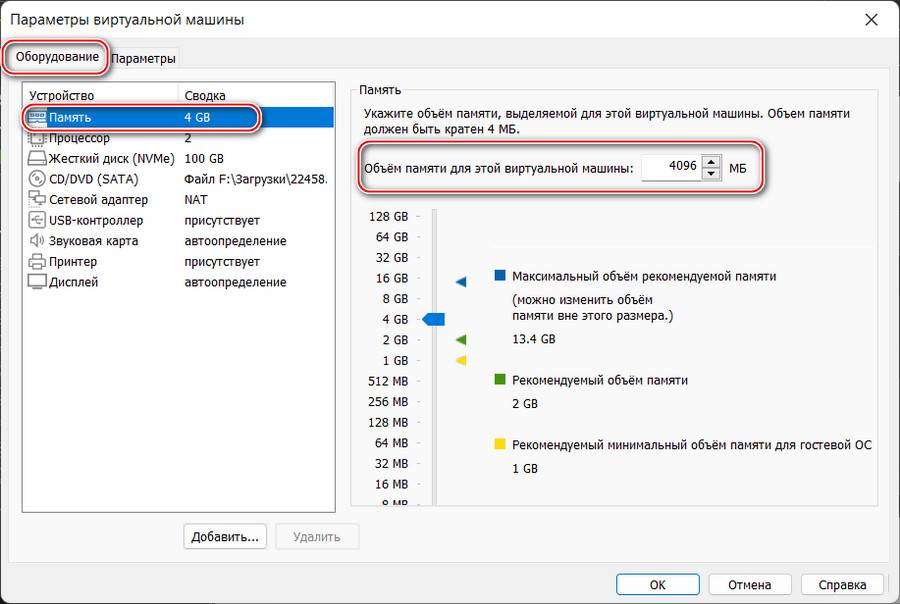
Чтобы благополучно работать с виртуальной машиной с официально установленной Windows 11 в программах VMware Workstation Pro и Workstation Player, нужны их версии не ниже 16.2. А параметры у виртуальной машины должны быть следующие. Во вкладке «Оборудование» в графе оперативной памяти её должно быть не меньше 4 Гб, т.е. не меньше 4096 Мб.
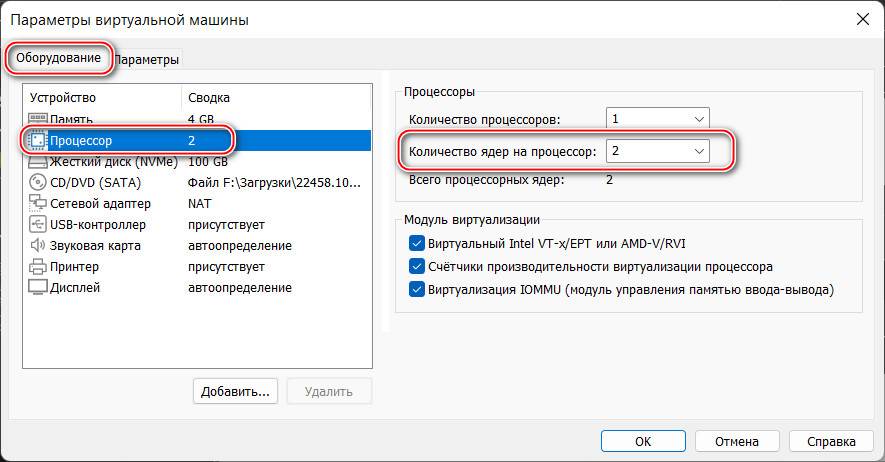
Во вкладке «Оборудование» в графе процессора должно стоять не менее 2-х ядер.
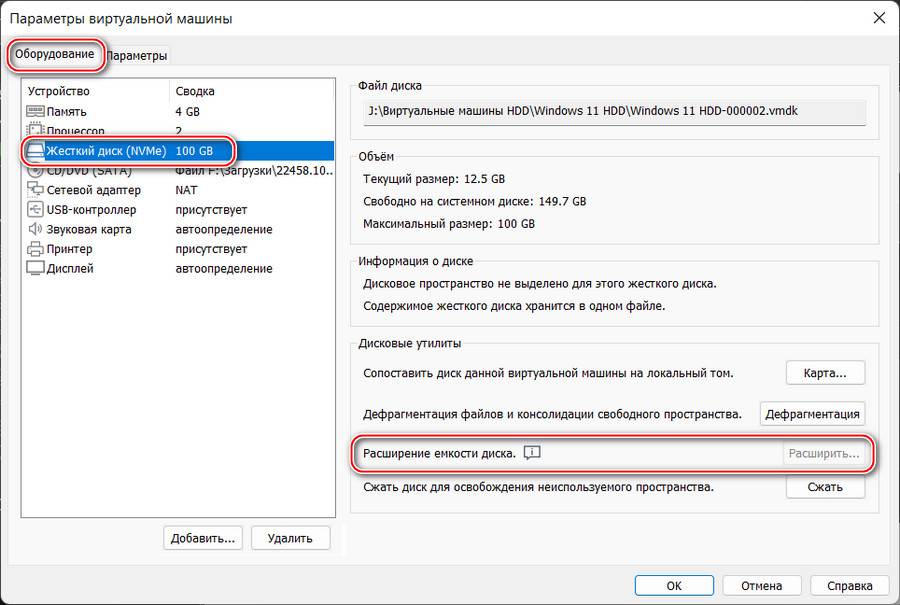
Во вкладке «Оборудование» в графе жёсткого диска должен быть указан виртуальный жёсткий диск с объёмом не меньше 64 Гб. Если у вас меньше, уберите снапшоты виртуальной машины и расширьте жёсткий диск, если он вас динамический.
Во вкладке «Параметры» в графе «Дополнительно» должна быть активна эмуляция UEFI. Можете также выставить галочку безопасной загрузки. Пока что это не требуется, но в дальнейшем, возможно, эта настройка будет играть роль.
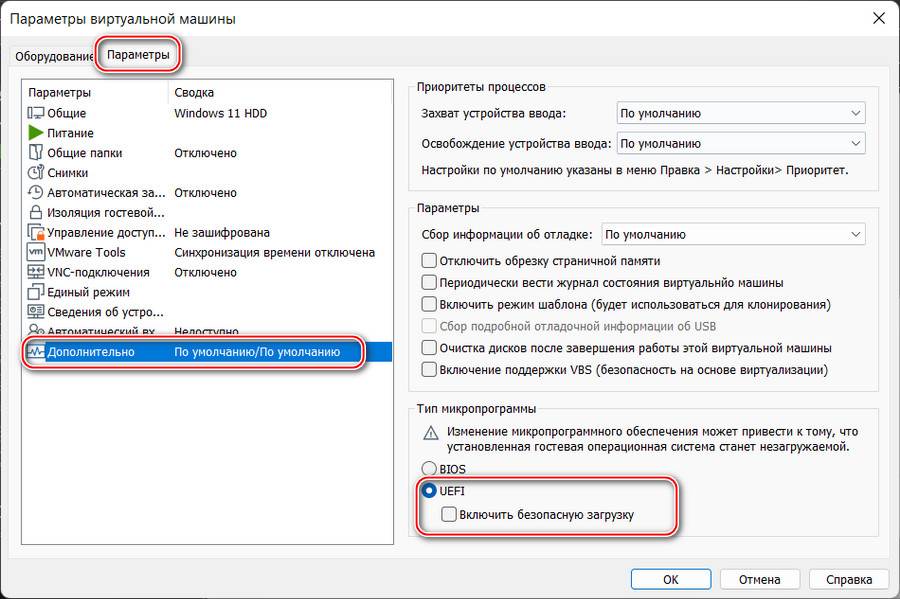
И необходимо в число оборудования виртуальной машины добавить эмуляцию TPM 2.0. Для этого не нужно, чтобы TPM 2.0 поддерживал ваш физический компьютер.
Обновлено: друзья, в версии VMware Workstation Player 17 и выше реализован улучшенный способ эмуляции TPM 2.0 на виртуальных машинах. Используйте его.
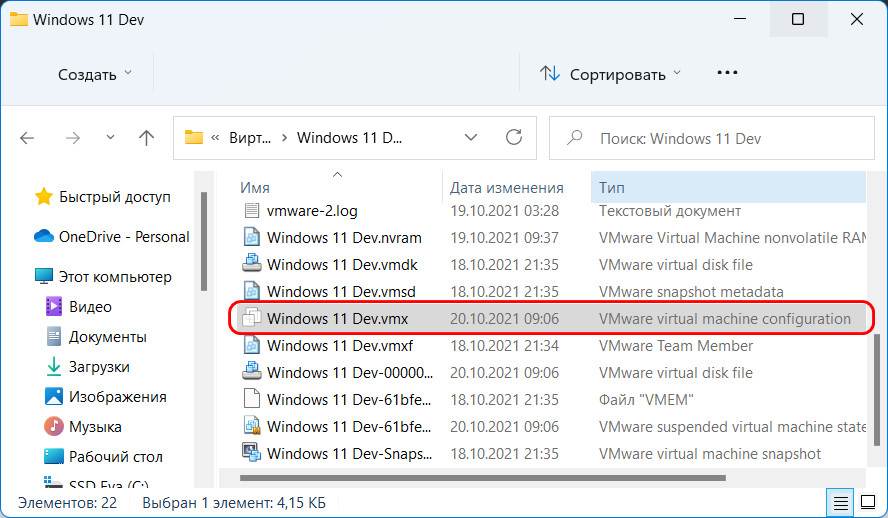
Выключаем виртуальную машину, на которой хотим добавить программный TPM 2.0. Идём по пути нахождения её файлов на жёстком диске. Здесь нам нужен файл конфигурации виртуальной машины с расширением «.wmx».
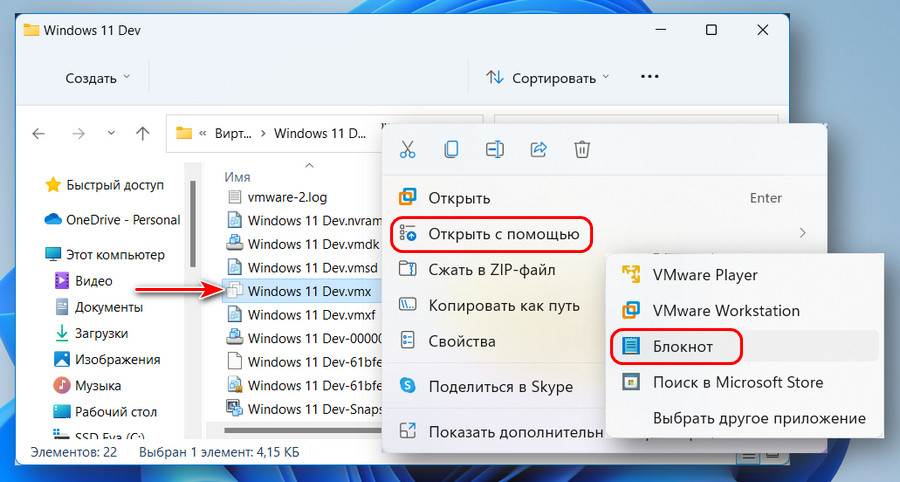
Открываем на этом файле контекстное меню, выбираем «Открыть с помощью» и открываем файл в блокноте Windows.
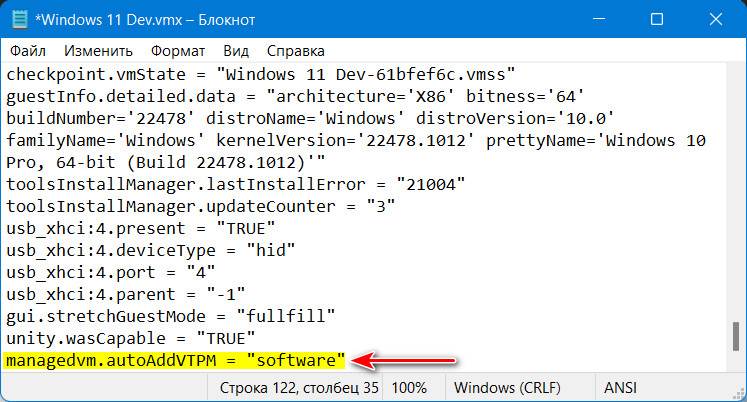
В конце файла вносим:
managedvm.autoAddVTPM = «software»
Жмём Ctrl+S и сохраняем внесённые изменения.
Друзья, комплексный мануал по созданию в этой программе виртуалки для установки на неё Windows 11 смотрите в статье «Как установить Windows 11 на виртуальную машину в программе VMware Workstation Pro».
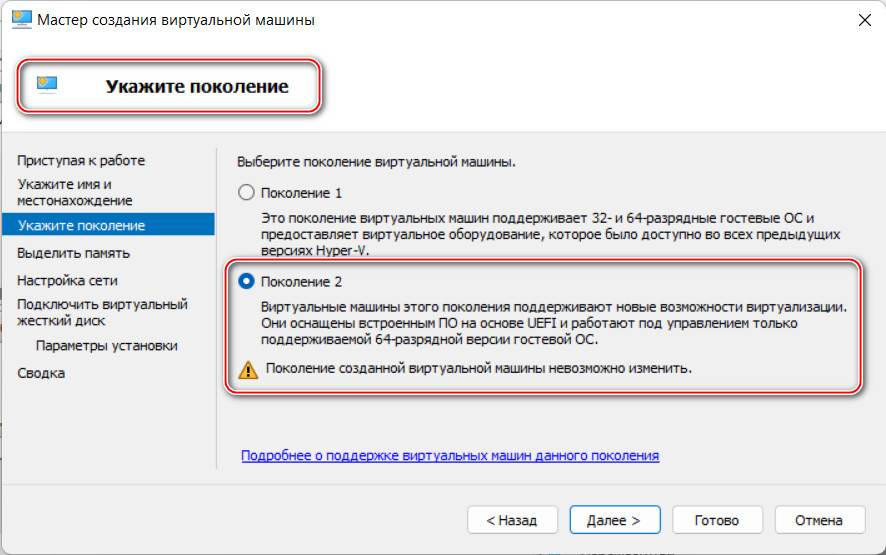
Чтобы без лишней волокиты работать с Windows 11 на виртуальной машине Hyper-V, нужен этот гипервизор с поддержкой машин 2-го поколения на базе UEFI. А это Hyper-V, входящий в состав серверных Windows Server не ранее 2012 R2, а также 64-битных редакций от Pro и выше клиентских Windows начиная с 8.1. В Hyper-V для работы с Windows 11 параметры виртуальной машины должны быть следующими. Сама машина должна быть 2-го поколения, это выбирается при создании машины и не может быть изменено впоследствии.
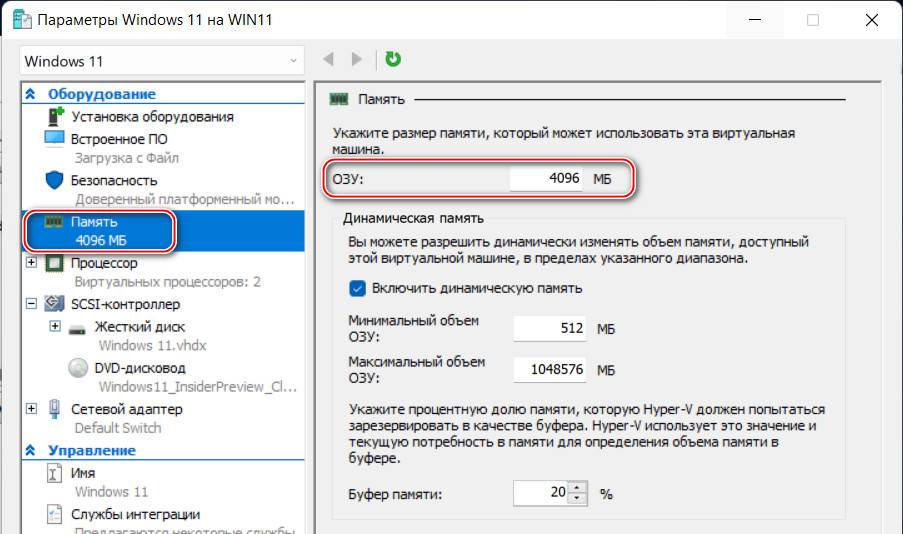
В параметрах оборудования «Память» у машины должно быть оперативной памяти не менее 4 Гб, соответственно, 4096 Мб.
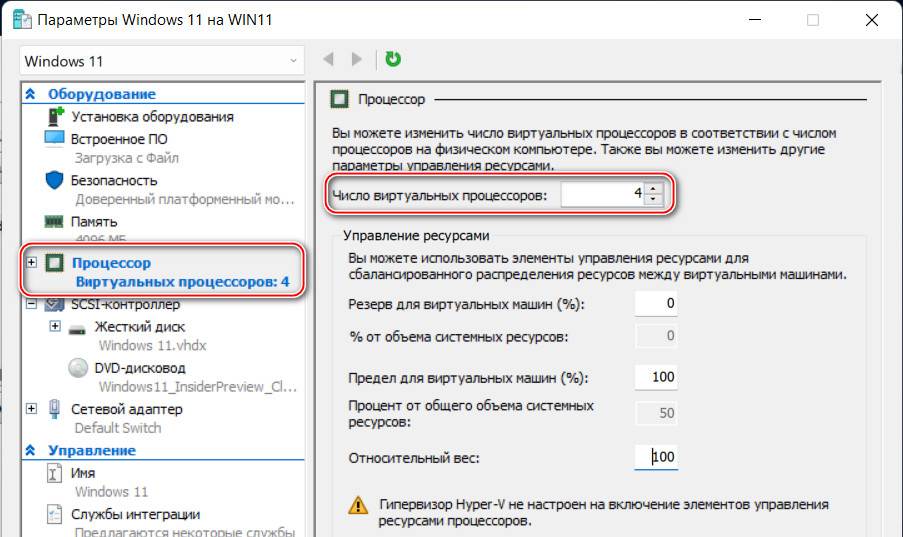
В параметрах оборудования «Процессор» число виртуальных процессоров, т.е. ядер процессора должно быть не менее 2-х.
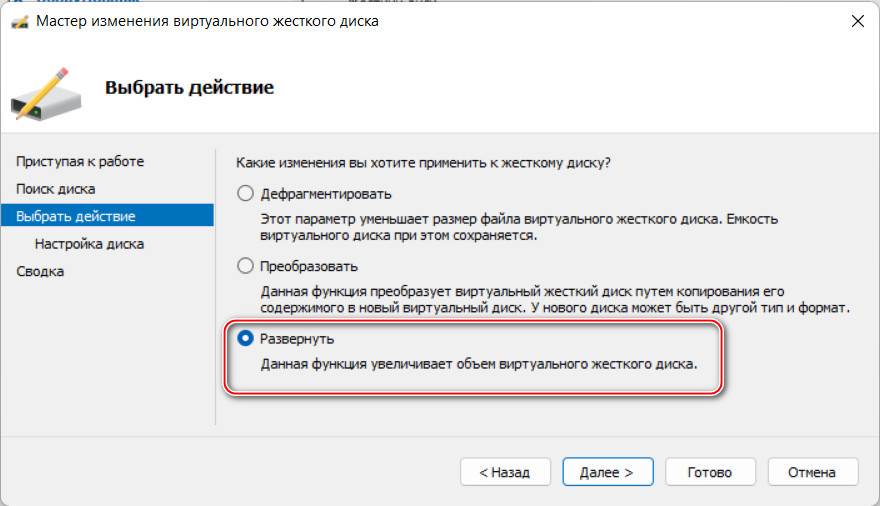
В параметрах оборудования «SCSI-контроллер» должен быть подключён виртуальный жёсткий диск с объёмом не меньше 64 Гб. Если у вас меньше, жмите «Правка».
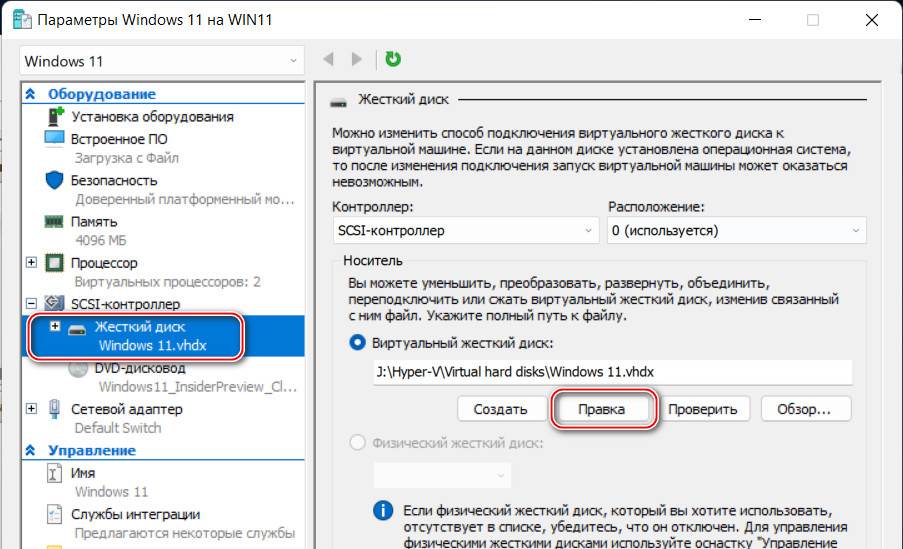
И увеличьте объём с помощью функции «Развернуть».
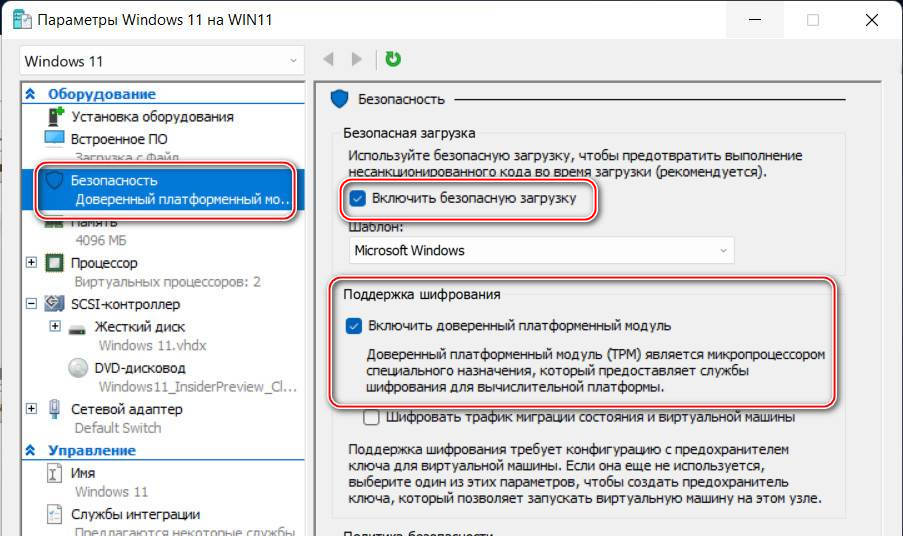
В параметрах оборудования «Безопасность», если у вас не включена настройка безопасной загрузки, можете включить её. Пока что она не является принципиальной, но в будущем может стать такой. Ну и, наконец, эмуляция TPM 2.0: ставим галочку функции «Поддержка шифрования». Это и есть добавление машине доверенного платформенного модуля TPM 2.0, даже если у вас его физически на компьютере нет.
Не забываем сохранить параметры, и на этом всё. Комплексный мануал по созданию виртуальной машины Hyper-V для установки Windows 11 смотрите в статье «Как создать виртуальную машину с Windows 11 в Hyper-V».
-
Home
-
News
- This PC Can’t Run Windows 11 on VirtualBox? Here Are 3 Fixes!
By Daisy | Follow |
Last Updated
It’s annoying to encounter the “This PC can’t run Windows 11 on VirtualBox” issue. Luckily, this post can help you solve the problem. You can follow this guide from MiniTool to get rid of the issue. Now, keep on your reading.
This PC can’t run Windows 11 on VirtualBox
When you try to install Windows 11 on your VirtualBox, you may receive the “This pc can’t run Windows 11 on VirtualBox” error message. This issue can also occur on Windows 10/11 hosts and Vmware Workstation.
Then, let’s see how to get rid of the “This PC can’t run Windows 11 on VirtualBox” issue.
How to Fix This PC can’t run Windows 11 on VirtualBox
Fix 1: Change the Windows Version You Choose
Virtualbox allows you to choose which version of Windows to install and set the virtual machine’s resources accordingly. You can change the Windows 11 version to Windows 10 or others. This method is proved useful to fix the “Windows 11 not installing on Virtualbox” issue.
Step 1: Open the VirtualBox and click the Settings icon and go to the General tab.
Step 2: Scroll down the menu next to the Version line and change the Windows version.

Related articles: Fixed: This PC Can’t Run Windows 11 on Vmware Workstation
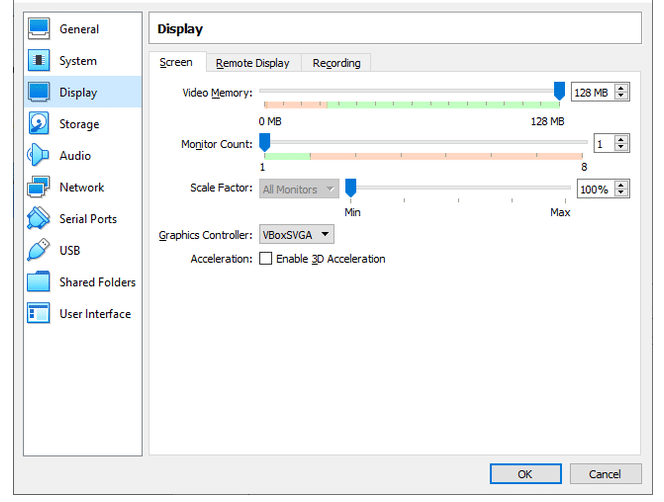
Fix 2: Select VBoxSVGA as Your Video Adapter
If you are unable to install Windows 11 on VirtualBox, you can also try to select VBoxSVGA as your video adapter.
Step 1: Open the VirtualBox and click the Settings icon and go to the Display tab.
Step 2: Scroll down the menu next to the Acceleration line and choose VBoxSVGA.

Fix 3: Bypass the Check
If the previous methods are not working, you should try to bypass the check. Follow the guide below:
Step 1: After you receive the “This PC can’t run Windows 11” on VirtualBox, you need to restart the VirtualBox.
Step 2: Then, press the Shift + F10 keys together to open the command line window on the first page of windows 11 installation.
Step 3: Type regedit and press the Enter key to open Registry Editor.
Ste 4: Then, go to this path – Computer\HKEY_LOCAL_MACHINE\SYSTEM\Setup.
Step 5: Right-click the Setup key, then, choose New and click Key. Name it as LabConfig. Step 6: Click LabConfig and right-click the empty space to select the DWORD (32-bit) Value option. Name it as BypassTPMCheck. Double-click it to change the value data to 1, and press OK.
Step 7: Right-click the empty space to select the DWORD (32-bit) Value option. Name it as BypassCPUCheck. Double-click it to change the value data to 1, and press OK.
Step 8: Right-click the empty space to select the DWORD (32-bit) Value option. Name it as BypassRAMCheck. Double-click it to change the value data to 1, and press OK.
Step 9: Right-click the empty space to select the DWORD (32-bit) Value option. Name it as BypassSecureBootCheck. Double-click it to change the value data to 1, and press OK.

Final Words
Here is how to fix the “This PC can’t run Windows 11 on VirtualBox” issue. Should you have any related issues, you can let us know in the comment.
About The Author

Position: Columnist
Having been an editor at MiniTool since graduating college as an English major, Daisy specializes in writing about data backups, disk cloning, and file syncing as well as general computer knowledge and issues. In her free time, Daisy enjoys running and going with friends to the amusement park.
Windows 11 has raised the bar for minimum system requirements compared to its predecessor, Windows 10. This has led to many users encountering the error message “This PC can’t run Windows 11 – This PC doesn’t meet the minimum system requirements to install this version of Windows” when trying to install it on a virtual machine (VM) using VirtualBox or other VM software such as VMware. In this comprehensive guide, we will delve deeper into the issue and provide an effective solution to bypass the requirement check.
Also see: We couldn’t install Windows 11: Safe_OS with boot operation
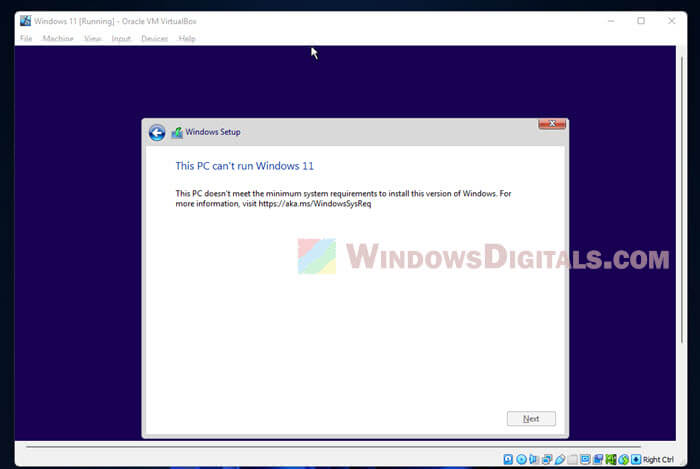
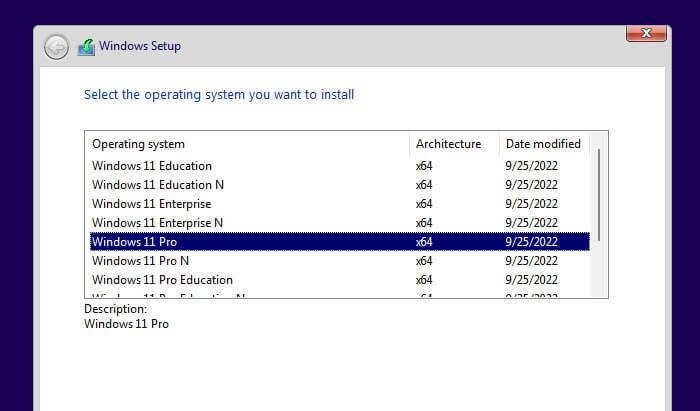
This error occurs right after the “Select the operating system you want to install” screen, for example, when you select Windows 11 Pro and clicks Next. If the PC doesn’t meet the minimum requirements, the error will pop up, preventing you from proceeding with the installation.
Understanding Windows 11 minimum system requirements
Before we proceed with the solution, it’s essential to understand the minimum system requirements for Windows 11. These requirements ensure that your system can run the new OS smoothly and securely. The minimum system requirements include:
- A compatible 64-bit processor with at least 1 GHz clock speed and 2 or more cores
- 4 GB of RAM or more
- 64 GB of storage or more
- DirectX 12 compatible graphics with a WDDM 2.0 driver
- A display with at least 720p resolution and 9″ or larger diagonal screen size
- UEFI firmware with Secure Boot capability
- TPM version 2.0
While these requirements may seem demanding, they serve to provide an optimal user experience with Windows 11. However, they can cause problems when trying to install the OS on a virtual machine using software like VirtualBox or VMware.
Recommended guide: How to Install Windows 11/10 with Digital License from USB
Bypassing the requirement check
The solution we provide in this guide allows you to bypass the minimum system requirements check by creating registry values in the Windows Registry Editor. This method is particularly useful for testing and evaluation purposes. However, it is essential to note that using this method may result in a suboptimal experience, and it may not be suitable for production environments.
Follow the steps below to bypass the system requirements check:
Step 1: Access the Command Prompt on the Windows installation screen
When you encounter the error message, press Win + X on your keyboard. This key combination will open the command prompt, allowing you to access the Registry Editor.
Step 2: Open the Registry Editor
In the command prompt, type regedit and press Enter. The Registry Editor will open, allowing you to modify the registry values.
Step 3: Navigate to the Setup key
Using the left pane of the Registry Editor, navigate to the following location:
Computer\HKEY_LOCAL_MACHINE\SYSTEM\Setup
Step 4: Create the LabConfig key
Right-click the Setup key in the left pane and select New > Key. Name this new key LabConfig.
Step 5: Create the BypassCPUCheck DWORD value
Select the LabConfig key you just created. In the right pane, right-click and choose New > DWORD (32-bit) Value. Name this new value BypassCPUCheck. Double-click the newly created value, set its value data to 1, and click OK.
Step 6: Create additional bypass values
Following the same process as in Step 5, create the following DWORD (32-bit) Values:
BypassRAMCheckBypassSecureBootCheckBypassTPMCheck
For each value, set the value data to 1 and click OK.
Step 7: Close the Registry Editor and Command Prompt
After creating all the necessary values, close the Registry Editor and the command prompt by clicking the X in the top right corner of each window.
You can now proceed with the Windows 11 installation without encountering the error message. The registry values you created will bypass the system requirements check, allowing you to install Windows 11 on your VM via VirtualBox or other VM software.
Related resource: How to Open VMDK File in Windows 11

Potential risks and limitations
While the method described above can help bypass the minimum system requirements check for Windows 11, it is crucial to understand the potential risks and limitations associated with this approach:
- Performance Issues: Bypassing the minimum system requirements may lead to performance issues when running Windows 11 on your VM. The OS may run slower or encounter problems when using specific features or applications.
- Security Vulnerabilities: Some of the minimum system requirements, such as TPM and Secure Boot, are designed to enhance security. Bypassing these checks may expose your VM to potential security risks.
- Limited Support: As this method is not officially supported by Microsoft, you may not receive assistance or updates if you encounter issues while running Windows 11 on your VM.
Please consider these risks and limitations before deciding to bypass the minimum system requirements for Windows 11.
Linked issue: This host supports Intel VT-x, but Intel VT-x is disabled
Summary
Windows 11 has introduced higher minimum system requirements to ensure an optimal user experience. However, these requirements can cause issues for users who wish to install the OS on a virtual machine using VM software such as VirtualBox or VMware. By following the steps outlined in this guide, you can bypass the system requirements check and install Windows 11 on your VM. Remember that this method is intended for testing and evaluation purposes and may result in a suboptimal experience or potential security risks. Always consider the potential risks and limitations before proceeding with this approach.
Table of Contents
In this article, we will learn some general fixes that occur when installing Windows 11 on Virtualbox. “This PC can’t run Windows 11” is the most common error that we get when we install Windows 11 on Virtualbox. So, let’s find all these errors and solve them for you.
The pre-final build of Windows 11 recently became public, and users worldwide were quick to install a new operating system on a virtual machine using tools like Virtualbox.
Windows 11 received a completely redesigned user interface, a minimalistic design, and a more relaxed Start menu. The taskbar in Windows 11 is centered by default, just like in macOS, but you can move it to the left if you want.
If you try to install Windows 11 on a virtual machine (How to install Windows 11 on Virtualbox: {Free Download} Windows 11 ISO File), you may encounter some difficulties. Many users encounter errors when installing a new system in VirtualBox. As a rule, there are errors “This PC can’t run Windows 11”. Fortunately, in most cases, you can quickly resolve the error by using the solutions below.
This PC can’t run Windows 11 on Virtualbox: Step by Step Solutions
Solution 1: Change the Selected Version of Windows
Virtualbox allows you to select the target version of Windows and configure the resources of your virtual machine accordingly. However, since Windows 11 was not officially released, and only an internal test build of the system is available on the network, you will not find Windows 11 in the list of available operating systems. And if you choose the wrong version of Windows, you may encounter errors and failures. Fortunately, this can be easily changed – select “Windows 10” or “Windows 7” in the virtual machine settings, and everything should work.
Solution 2: Choose Your VBoxSVGA Video Adapter
If you select the wrong version of Windows, this option may not be configured correctly. You will need to go to the virtual machine settings and select VBoxSVGA as the video adapter in the display settings. This will allow you to allocate enough graphics resources for your virtual machine for a hassle-free installation of Windows 11.
Solution 3: Enable the TPM
Trusted Platform Module, better known as A TPM, is a microcontroller soldered on a motherboard that stores encryption keys and other essential data that helps verify the identity of your platform. To run virtual machines on any modern system, you need to enable TPM in the UEFI/BIOS settings. TPM is enabled by default on most systems, but if you continue to encounter errors when installing Windows 11, we recommend checking the TPM status on your PC. If it’s off, turn it back on and try again. Once enabled, you can easily install Windows 11 on your virtual machine in VirtualBox.
Here is a complete guide that will help you enable TPM- How to Fix the “This PC can’t run Windows 11” Error: TPM on BIOS
Alternatively, you can install Windows 11 without TPM as well. Here is a complete guide- How to Install Windows 11 without TPM 2.0 and Secure Boot
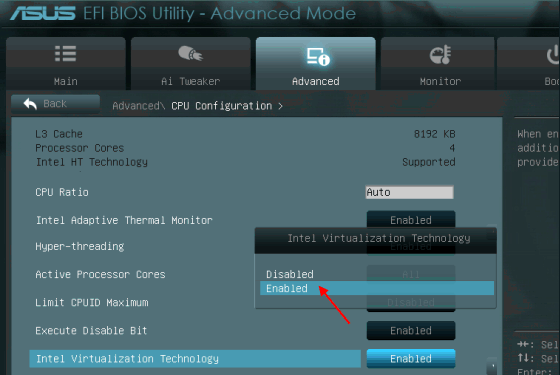
Solution 4: Enable Virtualization Support
Virtualization or VT is another UEFI/BIOS configuration required for virtual machines to function correctly on any system. This option helps and allows your system to virtualize processors for the virtual machine. It can cause the error “This PC can’t run Windows 11”. Restart the system and make sure VT is enabled in your UEFI. If virtualization is disabled, turn it on and try installing Windows 11 again. All virtualization issues must now be fixed.
Here is a complete video walkthrough that will help you enable virtualization.
Solution 5: Replace the appraiserres file.dll
In some cases, problems occur because of the appraiserres.dll file contained in the installation ISO image. If the above fixes did not help you, you could replace this file with the version offered by one of the Reddit users. Extract the ISO image to a directory, and then replace the file in the directory with that or appraiserres.dll – Google Drive. Here is a small guide that will help you Solution 5: Replace the appraiserres file.dll .
- Download and extract the file mentioned above and copy it.
- Now go to your extracted ISO folder and open the ‘Sources’ folder in it.
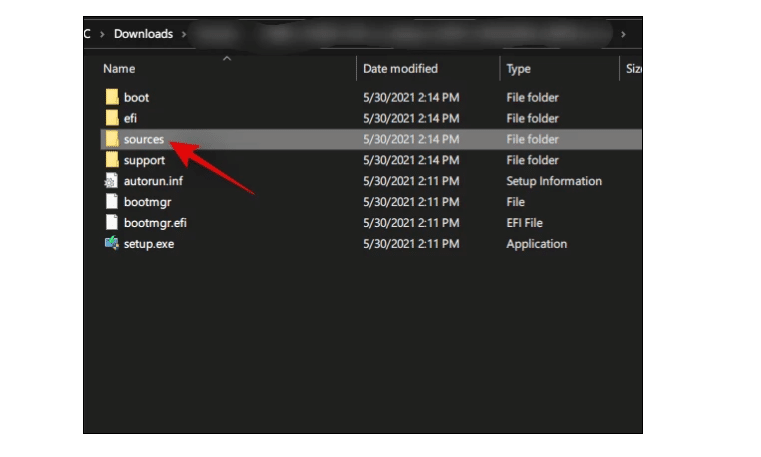
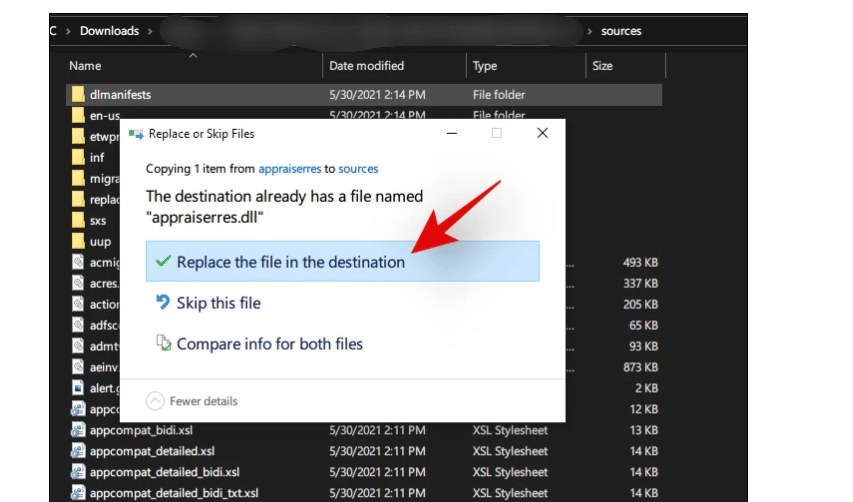
- Now paste the copied file here and click replace the file in the destination.
Conclusion: “This PC can’t run Windows 11” on Virtualbox
Hopefully, these fixes (“This PC can’t run Windows 11” on Virtualbox) helped you install Windows 11 effortlessly in Virtualbox. Did you manage to install Windows 11 in VirtualBox? Share in the comments below.