Deep Rock Galactic has captivated players with its thrilling mining and combat gameplay, and with each new season comes exciting events. One such event that has captured players’ attention is the Rival Communications Router in DRG.
In this article, we delve into the intricacies of this challenging event, providing valuable insights on how to disable the DRG Communications Router and offering tips for success with each dwarf class.
Understanding the Rival Communications Router Event
The Rival Communications Router event in Deep Rock Galactic is a dynamic and challenging event that introduces a new hacking mini-game to disable enemy communications.
Unlike other events, where players can rely on the hacking drone Hack-C, this event requires them to disable the router. It shares similarities with the hacking mini-game encountered when dealing with the Turret Controller Unit.
The Rival Communications Router event offers a unique and intense experience in Deep Rock Galactic. It requires players to think on their feet, manage their time wisely, and adapt to the ever-present threat of enemies.

Success in this event hinges on skillful hacking, efficient enemy suppression, and effective teamwork. By understanding the mechanics and objectives of the Rival Communications Router event, players can approach the challenge with confidence.
With practice, coordination, and the utilization of class-specific abilities, players can disable the Communications Router, secure the Data Core, and emerge victorious in the depths of Hoxxes.
Step-by-Step Guide: Disabling the Communications Router
The Rival Communications Router event in Deep Rock Galactic presents a thrilling challenge that requires players to disable enemy communications by hacking multiple nodes. To complete this event, follow this step-by-step guide:
Step 1: Crack the Router
Begin the Communications Router event through the three corners. This will activate the event and initiate the hacking process.
Step 2: Identify the Targeted Antenna
After cracking the router, a random antenna will turn purple. Pay close attention to identifying the targeted antenna for hacking. This should be the antenna you need to disable to progress through the event.

Step 3: Engage the Hacking Mini-Game
Approach the targeted antenna and prepare to engage in the hacking mini-game. The mini-game involves joining two cables of the same color and then cutting a marked weak point. Quick and precise actions are essential for success.
Step 4: Disable the Antenna
Execute the hacking mini-game within the given time frame of 15 seconds. Completing the mini-game will disable the antenna, allowing you to move on to the next one.
Step 5: Repeat the Process
Once you disable an antenna, a new one will glow shortly afterward. Repeat the hacking process on each antenna, ensuring you complete the mini-game within the allocated time.
Step 6: Watch Out for Enemies
During the Communications Router event, you will come under fire from Patrol Bots and Shredders. Be prepared to fend off these enemies while focusing on the hacking task. Coordinate with your team to ensure effective enemy suppression.
Step 7: Utilize Class Abilities
Using your chosen dwarf class, leverage your unique abilities to disable the router. Consider the following class-specific tips:

1. Engineer
-
Utilize your platform gun to create stable platforms for hacking. This is especially helpful when antennas are positioned at higher locations. -
Deploy engineer turrets strategically to provide cover fire and fend off enemies while you focus on hacking. -
Coordinate with your team to ensure efficient enemy suppression while hacking.
2. Scout
-
Take advantage of the Scout’s high mobility with the Grappling Hook to swiftly move between highlighted antennas. -
Combine your movement abilities with engineer platforms to quickly optimize traversal and reach antennas. -
Communicate with your team to ensure they cover fire while you focus on hacking.
3. Gunner
-
Use your firepower for covering fire for your team during the event. -
Deploy the Shield Generator strategically to grant temporary cover for yourself or other team members during hacking. Remember to use it judiciously due to its limited availability. -
Coordinate with your team to ensure effective enemy suppression while hacking.
4. Driller
-
Utilize the Flamethrower’s heat damage to quickly eliminate Patrol Bots and Shredders that pose a threat during the event. -
Engineer platforms can assist you in reaching antennas efficiently. Coordinate with the Engineer to create platforms as needed. -
Communicate with your team to ensure coordinated enemy suppression while hacking.
Step 8: Teamwork is Key
Cooperate closely with your team throughout the event. Effective communication and coordination will help streamline the hacking process and ensure the safety of all team members. Assign roles and responsibilities to optimize efficiency.

Step 9: Complete the Event
Disable all antennas by successfully hacking each one within the given time frame. Once all antennas are disabled, the Communications Router will be effectively disabled, granting access to the Data Core.
Step 10: Practice Makes Perfect
If you find the mini-game challenging, consider practicing on Turret Controller Units, which do not have a timer. Familiarize yourself with the mechanics and improve your skills through practice sessions.
Solo Play and Team Strategies
Solo players may find the order of dwarf class usefulness more apparent. However, even in solo play, the aid of fellow dwarfs or a coordinated team can expedite the hacking process. Effective communication, positioning, and teamwork are crucial for success.
Practice and Improving Hacking Skills
The hacking game poses the primary challenge in this event. While there are no specific tips for improving this mini-game, practice can enhance your proficiency.
Consider practicing on Turret Controller Units since they lack a timer. Be mindful of the surrounding turrets when attempting to practice on these units.
To enhance your gameplay, here’s more of Deep Rock Galactic tips to try!

Conclusion
The DRG Communications Router event presents an exciting challenge in Deep Rock Galactic, requiring players to disable enemy communications by hacking multiple nodes.
By understanding the mechanics of the event and implementing the strategies outlined for each dwarf class, you can optimize your chances of a successful gameplay [1]. Effective teamwork and practice are essential in mastering the hacking mini-game. Rock and Stone, fellow Dwarfs!
Since the introduction of Deep Rock Galactic’s first season, Rival Incursion, players have encountered a few new season events down in the caves of Hoxxes. One of the more recent and challenging Season Events in Deep Rock Galactic is the Rival Communications Router, which involves multiple hacking nodes to disable enemy communications.
This Seasonal Event is different from fighting the Prospector or defending the Data Deposit. Rather than calling down your hacking assistant drone, Hacksy, you will need to disable it yourself. A new hacking mini-game has been added in DRG’s second season for situations where you encounter a Turret Controller Unit.
For those who haven’t experienced it yet, the Turret Controller Unit is surrounded by various Rival Tech turrets that safeguard an area. If you reach the Turret Controller Unit, you can play a hacking mini-game. That mini-game involves joining two cables of the same color and then cutting a marked weak point. If you successfully cut all the wires quickly, you will disable the surrounding turrets permanently.
The Rival Communications Router in Deep Rock Galactic shares the same new hacking mini-game as the Turret Controller Unit. Yet, it involves a timer, meaning you have very little time to do so. The Communications Router is surrounded by multiple small Antenna Nodes, which you need to disable.
Related Article: All of the Special Beers and Their Effects in Deep Rock Galactic
Walkthrough of the Rival Communications Router Event
You start the Communications Router event by cracking all three corners on the Router, and then one random Antenna will begin to glow purple. When an Antenna radiates purple, it means this is the one you must hack. You will also come under fire by Patrol Bots and Shredders during the event, as usual during any Rival Tech event.
You have under 15 seconds to complete the hacking mini-game on one Antenna. If you are successful, then Antenna will be disabled, and a new one will start to glow shortly afterward. Repeat the disabling process up to five times and the Rival Communications Router will be disabled. After that, the Data Core inside will be yours. However, if you take too long to disable the Rival Communications Router altogether, it will explode. And, as a result, the Data Core inside will be destroyed. Set up and take note of your surroundings before starting the timer on this Seasonal Event.
Tips to Complete with Each Class of Dwarf
Before starting the event, there are some preparations you can start to make the task easier for you. The Antenna Nodes for the Communications Router can be a bit randomized. Sometimes all the Antenna Nodes are spread out or nice and compact in a small room. We will help you take out the rival communications router in Deep Rock Galactic using each of the different classes in the game.
Using the Engineer Class to Take Out the Rival Comm Router in Deep Rock Galactic
Whichever the case is, Engineer’s platform gun can assist you in giving you a stable platform to stand on while the hacking commences. These platforms can be extra helpful if a few Antenna Nodes decide to spawn high up on the ceiling. Engineer’s turrets also help with this event. Since you cannot fire while hacking, the turrets are an excellent tool to keep Shredders off your back while hacking.
Using the Scout Class
Scout is the best class for this Seasonal Event because of his high movement with the Grappling Hook. Scout’s ability to cross large distances makes him the best pick for quickly reaching the different highlighted Antenna Nodes. Combined with Engineer’s platforms that we just mentioned, this setup is a breeze to move between Antenna Nodes.
Beating the Rival Communications Router Event with the Gunner Class
The Gunner is less effective at supporting the hacking process than the other dwarfs we have previously mentioned, but he still has his uses. The gunner can still provide covering fire just like any other dwarf, but if enemies swarm too much, his Shield Generator can completely cover an Antenna Node, giving whoever is hacking complete cover for a short time. Unfortunately, Gunner doesn’t have enough generators to cover every Antenna Node, so use your shields wisely.
How to Use the Driller to Pass this Event
Lastly, Driller also falls into the same situation as Gunner, but he still has his strengths. If you brought the Flamethrower with you, all Heat damage overheats and quickly destroys Patrol Bots and Shredders. However, Antenna Nodes are rarely completely covered. This makes the Engineer’s platforms a better tool for this job.
If you have at least one fellow dwarf, or an entire party watching your back, these Rival Communication Routers will go down fast. However, the order in which we listed these dwarf’s usefulness while hacking can become more noticeable if you are playing solo.
Wrapping Up Our Guide to Completing the Rival Communications Router Event in Deep Rock Galactic
That’s our short guide on disabling the Rival Communications Router in Deep Rock Galactic. While setup, and team management, are the easy parts, the hacking mini-game is where the real difficulty is. Sadly, there aren’t a lot of tips on how to improve the hacking mini-game other than simple practice.
If you struggle with the new variant of the hacking mini-game, you can practice on the Turret Controller Units since they have no timer. The only threat about the Turret Controller Units is getting to them to practice since turrets surround them. That’s all for now, and as always, Rock and Stone, fellow Dwarfs!
| Data Cell | |
|---|---|
| Resource Details | |
| Type | Bonus Resource |
| Hardness | 0 (Not mined directly) |
| Rarity | Extremely rare event |
| Value | |
Data Cells are a bonus item introduced with the Season 01: Rival Incursion update alongside the Performance Pass. When deposited during Season 2, they used to give 1,250 ![]() to the team upon mission completion (350
to the team upon mission completion (350 ![]() if the mission is failed), as well as 500
if the mission is failed), as well as 500 ![]() and 1000
and 1000 ![]() (both multiplied by the Hazard Bonus as usual). As of Season 3, only credits and experience points are rewarded for depositing.
(both multiplied by the Hazard Bonus as usual). As of Season 3, only credits and experience points are rewarded for depositing.
Data cells are obtained by hacking a Prospector Data Deposits, disabling a Rival Communications Router, or destroying a Prospector Drone. These are events that can spawn randomly in any mission other than Industrial Sabotage. Their spawn chance is not affected by Mission length. A maximum of one of any of these events can spawn per mission, meaning you will never ever be able to obtain more than one Data cell per mission related to the machine events.
The first 15 cells collected during Season 2 will give 1 ![]() each. Afterwards, they only provide Performance Points and a small amount of Experience and Credits at the end of a mission. They no longer do that now in season three Plaguefall. Instead, they give you a small amount of credits but a big amount of xp (1000 xp).
each. Afterwards, they only provide Performance Points and a small amount of Experience and Credits at the end of a mission. They no longer do that now in season three Plaguefall. Instead, they give you a small amount of credits but a big amount of xp (1000 xp).
If a mission is failed, as long as the Data Cell was deposited, players will still be able to claim their Scrip bonus, as well as some of the experience and credits they grant.
Seasons Events[ | ]
Prospector Drone[ | ]
| “ | The Prospector Drone is sent by a Rival Company and programmed for curiosity and thorough work, it researches every nook and cranny around areas of Hoxxes for mining potential. If attacked it will call for help from its fellow drones and flee to avoid its precious data being lost in the depths. |
| — Miner’s Manual Description |
A passive roaming Prospector Drone
The rival Prospector Drone is a relatively passive rival tech drone that can be encountered wandering on Hoxxes. The prospector drone is dormant and docile, it goes around prospecting minerals such as: Gold, Nitra, Morkite, Dystrum, Hollomite, Umanite, Magnite, Croppa, Bismor, flower plants, including: Boolo Caps, Apoca Blooms, Alien Fossils, Gunk Seeds, Starch Nut, Yeast Cones, Malt Stars, Barley Bulbs, maybe Fester Fleas,? etc), containers of minerals like the M.U.L.E. (Molly), Loot Bugs ,and strangely enough Cave Leeches, but not Cargo Crates, Jadiz, Enor Pearls, compressed Gold, Bittergems or Error Cubes. The prospector drone also digs holes in search of its beloved treasures, providing clues for miners when it is in the area.
The prospector drone will not attack or flee unless it is damaged, so feel free to get as close to them as you like! The prospector drone will completely ignore physical contact up to and including riding it around. Some dwarves tolerate the company of the prospector drone for long periods of time, using it both as a resource finder and a trampoline. This practice is not recommended as the Glyphids are highly prone to breaking this fragile peace. Many kinds of Glyphid can damage the Prospector while attempting to kill dwavers. They can be splashed by AOE attackers such as the Glyphid Exploder/radioactiveGlyphid Exploder and Glyphid Bulk Detonator/Glyphid Crassus Detonator, caught in the crossfire of ranged attackers like the Glyphid Praetorian, Glyphid Acid Spitter, Mactera Spawns, Mactera Tri-Jaws, and Mactera Goo Bombers, and even hit by stationary threats like Stabber Vines)!
Any source of damage will cause the Prospector to flee in distress and call in Patrol Bots and Shredders. Claims of a Nemesis responding to this call have been denied by Management. Calling for backup is the Prospector’s only defence, otherwise it will simply try to run away from danger. Whenever one of its 3 health segments are depleted (up to twice), the drone will activate an orange shield and become immune to damage for 10 seconds, or up to 20 seconds if spawned Patrol Bots exceed the number of active players. Immediately after this shield is engaged, a wave of Patrol Bots and Shredders will also spawn to protect the Prospector Drone.
If the Prospector Drone manages to escape the dwarves by reaching a safe location several dozen meters away from them, it will return to passive mode and the Drone’s healthbar will fade until reengaged. However, the Drone will now be alerted by detecting nearby dwarves in addition to taking damage. Every time a Prospector Drone is allowed to escape and is reengaged it will spawn an additional wave of Patrol Bots and Shredders.
Prospector Data Deposit[ | ]
| “ | The Hacking Pod has landed! Hook it up to the Prospector Data Deposit, so the hacking can begin! |
| — Mission Control |
A Data Deposit for the Prospector Drone
The Prospector Data Deposit is an obelisk-like structure randomly found inside the caves. A Dwarf can interact with it to call down a Hacking Pod, the same kind that is summoned when interacting with a Power Station during an Industrial Sabotage mission. Once it arrives, players need to create a data link between it and the Deposit using Transmitter Nodes, again in the same way as during said mission type. In-lore, it is the structure in which the Prospector Drone stores its data.
Once the link is established, a button will appear on the Hacking Pod and, when pressed, it will start the hacking sequence. During this time, waves of enemies will spawn near the Hacking Pod, targeting it directly instead of the Dwarves in many cases. As in Sabotage missions, if the drone takes enough damage, it will go back into its housing and have to be restarted again. In addition to normal enemy spawns, a wave of Patrol Bots and Shredders will spawn upon reaching 1/3rd and 2/3rds of the hacking progress bar. Once the hacking is complete, instead of the Prospector Data Deposit looking, being and getting destroyed by the hacker unlike the power station does, the front data Deposit will lift up and the rest of it will open up and expose it’s data cell. Then you can grab the data cell and deposit it into the M.U.L.E for extra performance points. Then Mission Control will say that the data cell has been secured and you will have a huge boost in performance quality and then you can get on with your mission.
- the hack-c unit may be tied similar and be the same company as the BET-C but they do significantly different functions, tasks, things, etc. But still, bet-c vs hack-c.
• The objective is to defend the Hack-C Bot Unit until it’s hacking progress is complete.
Rival Communications Router[ | ]
| “ | You’ve triggered the Rival Comms Router anti-tampering system! The only way to disarm it is to hack each Antenna Node while it back-charges the Router Core. |
| — Mission Control |
A dormant Rival Communications Router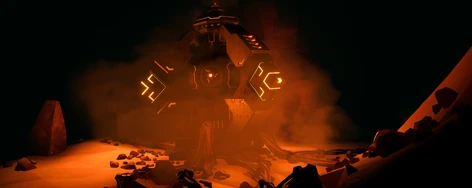
The Rival Communications Router is surrounded by multiple Antenna Nodes. (There are nine antenna nodes in total of each communications router). After disabling all the three battery relays, the comms router will start a self-destruction sequence timer, and then the antenna nodes will all close up from being a four bladed fan to being either a closed umbrella or a stationary projectile. In the allotted time, the Dwarves will then have to spot the blinking blue light antenna node and proceed to hacking them to disable them, however the blinking blue lights will switch to another antenna node every 30 seconds. You can defuse the active antenna node by interacting with it to bring pull out your dwarf’s hacking device which then opens a small hacking minigame, the minigame is played by selecting both sides of one of the two wires displayed on screen and then pinpointing the displayed «weak point» of the wire to cut it. Do this for both of the two wires to successfully hack the node. If the sequence time is over, the dwarf will get electrocuted and booted out, and another node will become active instead. The amount of nodes needed to be hacked to complete the event successfully is dependent on the size of your team, and the amount of time it takes to complete the whole entire event depends on the hazard level. In case of a failed event, the Communications Router will explode in a thirty meter radius, dealing very high damage almost immediately and instantly killing anything and everything in the area. If the event is successful, the self destruct will be aborted and access to the data cell inside the router will be granted.
• The objective is to disable 3-5 Antenna Nodes in the allotted time.
| v · d · eMissions | |
|---|---|
| Mission Types |
|
| Other |
|
| v · d · eThe features of Deep Rock Galactic | |
|---|---|
| Mechanics |
Space Rig • Hoxxes • Resources • Creatures • Missions • Mutators • Hazard Bonus • Deep Dives • Machine Events • Data Cell Common Misconceptions • Health • Difficulty Scaling • Creature Armor • Swarms • Accuracy • Area Damage • Ricochet • Status Effects • Fear • Temperature |
| Player |
Dwarves • Equipment • Perks & Milestones • Assignments • Performance Pass • Experience • Promotion • Accessory Shop • Armor / Pickaxe / Weapon Skins • Interplanetary Miners Union |
| Other |
Achievements • Downloadable Content • Controls • Movement • Heads-up display • Update History • Multiplayer • Old and Unused Content |
Trivia[ | ]
- During the 4 Years in Orbit! Anniversary Stream: Part II: Art Showcase video at 34:52, it was shown how the Prospector Drone was designed to fit the Data Deposit, though no animation had been implemented.
- Season 02: Rival Escalation added the Rival Communications Router encounter.
Data Cells are a bonus item collectable after completing a special event, when deposited it’s reward 1000 ![]() and 500
and 500 ![]() multiplied by the Hazard Bonus.
multiplied by the Hazard Bonus.
Data cells are obtained by hacking a Prospector Data Deposits, disabling a Rival Communications Router, or destroying a Prospector Drone. These are events that can spawn randomly in any mission other than Industrial Sabotage. Their spawn chance is not affected by mission length. A maximum of one of any of these events can spawn per mission, meaning you will never be able to obtain more than one Data cell per mission.
If a mission is failed, as long as the Data Cell was deposited, players will still be able to get some of the experience and credits they grant.
Events
Prospector Drone
| “ | The Prospector Drone is sent by a Rival Company and programmed for curiosity and thorough work, it researches every nook and cranny around areas of Hoxxes for mining potential. If attacked it will call for help from its fellow drones and flee to avoid its precious data being lost in the depths. |

A passive roaming Prospector Drone
The Prospector Drone is a relatively passive rival tech drone that can be encountered wandering on Hoxxes. If attacked it will attempt to flee in distress, and will call in Patrol Bots and Shredders. It has no means of attack other than summoning rival tech bots to attack the Dwarves.
Whenever one of the 3 health segments are depleted, it will summon an orange shield and become immune to damage for 10 seconds, or up to 20 seconds if spawned Patrol Bots exceed number of active players. Immediately after this shield is engaged, a wave of Patrol Bots and Shredders will also spawn to protect the Prospector Drone. This can happen twice.
If the Prospector Drone manages to escape the dwarves by reaching a safe location several dozen meters away from them, it will return to passive mode and the Drone’s healthbar will fade until reengaged. However, the Drone will now become alert on proximity of a nearby dwarf in addition to it also being able to be disturbed by taking damage as normal. Every time a Prospector Drone is allowed to escape and is reengaged it will spawn an additional wave of Patrol Bots and Shredders.
• The objective is to destroy the Prospector Drone.
Prospector Data Deposit
| “ | The Hacking Pod has landed! Hook it up to the Prospector Data Deposit, so the hacking can begin! |
| — Mission Control |

A Data Deposit for the Prospector Drone
The Prospector Data Deposit is an obelisk-like structure randomly found inside the caves. A Dwarf can interact with it to call down a Hacking Pod, the same kind that is summoned when interacting with a Power Station during an Industrial Sabotage mission. Once it arrives, players need to create a data link between it and the Deposit using Transmitter Nodes, again in the same way as during said mission type. In-lore, it is the structure in which the Prospector Drone stores its data.
Once the link is established, a button will appear on the Hacking Pod and, when pressed, it will start the hacking sequence. During this time, waves of enemies will spawn near the Hacking Pod, targeting it directly instead of the Dwarves in many cases. As in Sabotage missions, if the drone takes enough damage, it will go back into its housing and have to be restarted again. In addition to normal enemy spawns, a wave of Patrol Bots and Shredders will spawn upon reaching 1/3rd and 2/3rds of the hacking progress bar.
• The objective is to defend the Hack-C Bot Unit until it’s hacking progress is complete.
Rival Communications Router
| “ | You’ve triggered the Rival Comms Router anti-tampering system! The only way to disarm it is to hack each Antenna Node while it back-charges the Router Core. |
| — Mission Control |

A dormant Rival Communications Router
The Rival Communications Router is surrounded by multiple Antenna Nodes. After disabling the relays, the router will start a self-destruction sequence. In the allotted time, the Dwarves will have to spot the blinking antenna and proceed to disable them, however the blinking will switch to another antenna every 30 seconds. You can defuse the active antenna by interacting with it to bring pull out your dwarf’s hacking device which then opens a small hacking minigame, the minigame is played by selecting both sides of one of the 2 wires displayed on screen and then pinpointing the displayed «weak point» of the wire to cut it. Do this for both of the two wires to successfully hack the node. If the sequence time is over, the dwarf will get electrocuted and booted out, and another node will become active instead. The amount of nodes needed to be hacked to complete the event successfully is dependent on the size of your team. In case of a failed event, the Communications Router will explode in a 30 meter radius, dealing very high damage. If the event is successful, the self destruct will be aborted and access to the data cell inside the router will be granted.
• The objective is to disable 3-5 Antenna Nodes in the allotted time, depending on team size.
Trivia
- Introduced with the Season 01: Rival Incursion, it was used to progress the Performance Pass.
- During the 4 Years in Orbit! Anniversary Stream: Part II: Art Showcase video at 34:52, it was shown how the Prospector Drone was designed to fit the Data Deposit, though no animation had been implemented.
- Season 02: Rival Escalation added the Rival Communications Router encounter.
| v · d · eMissions | |
|---|---|
| Mission Types |
|
| Events |
|
| Other |
|
| v · d · eThe features of Deep Rock Galactic | |
|---|---|
| Mechanics |
Space Rig • Hoxxes • Resources • Creatures • Missions • Mutators • Hazard Bonus • Deep Dives • Machine Events • Data Cell Common Misconceptions • Health • Difficulty Scaling • Creature Armor • Swarms • Accuracy • Area Damage • Ricochet • Status Effects • Fear • Temperature |
| Player |
Dwarves • Equipment • Perks & Milestones • APD-B317 «Bosco» • Assignments • Performance Pass • Experience • Promotion • Accessory Shop • Armor / Pickaxe / Weapon Skins |
| Other |
Achievements • Downloadable Content • Controls • Movement • Heads-up display • Update History • Multiplayer • Old and Unused Content |
If you love online games, then you might even enjoy every type of game, be it solo or in a group. We believe Deep Rock Galactic would be the right choice for you. However, losing connection while playing Deep Rock Galactic has become more frequent these days. Whether it’s a PC, Xbox, PlayStation, or any other gaming console, gamers have been complaining about Deep Rock Galactic Connection issues.
You might be looking for a solution to overcome such a connection issue. If you have connected your gaming device wirelessly, then you can establish a wired connection to check if it makes any difference.
Still, if you are stuck with the connection drama and can’t play your favourite game, then here’s what you need to try:
Reset or Renew Your IP Address
Deep Rock Galactic connection issues are quite common when your PC suffers from IP conflicts. Fortunately, there’s a simple method that can eliminate the issue for you. You can easily reset your network adapter or IP stack using the following steps:
- Move your PC’s cursor to the network icon situated on the Taskbar. Right-click on it and select the option that says, ‘Open Network & Internet Settings’.
- Next, the Settings page will show the current network adapter you are connected to right now. Click the Properties button and deactivate IPv6 when the window opens.
- Afterwards, you have to launch a Command Prompt window. Make sure that you open the Prompt with administrative properties. Search using the text ‘cmd’ and click the ‘Run as administrator’ option when the Command Prompt appears.
- Execute the following commands in the window of Command Prompt. Ensure that you press the Enter key each time you are done with typing the command. Here are the two commands that you have to input:
- netsh int ip
- netsh winsock reset
- Wait for a while and then you can restart your computer.
Check whether the Deep Rock Galactic connection issues are over or not.
Reinstall the Latest Graphics Drivers
The outdated graphics driver turns incompatible with the latest patches of Deep Rock Galactic. If you are a PC gamer, then you can try reinstalling the GPU drivers. Numerous users have supported the fact that you can possibly overcome the Deep Rock Galactic connection issues by reinstalling the graphics drivers. Go through the following steps:
- Search for Device Manager on your Windows computer. Click on the Device Manager when it appears on the search result.
- After that, you need to choose a suitable category to view the devices’ names. In this case, you are here to uninstall and reinstall the GPU driver. Therefore, click on the GPU driver’s icon to expand it.
- Next, right-click the device and select the Uninstall option. You can also press and hold the device’s name and choose the Uninstall option.
- You have to restart your computer when the uninstallation completes.
After restart, your Windows PC will try reinstalling the GPU driver. Attempt exploring the game on the corresponding platform and check if you can experience Deep Rock Galactic connection issues.
Restart your Network Components
What if you play the Deep Rock Galactic game on your PS5 or any other gaming console rather than PCs? Deep Rock Galactic connection issues can be seen in gaming consoles, too. If you are struggling with the server connection again, you can try restarting your network system.
Glitches with the Wi-Fi network are common, and any of your devices can suffer. Check out the following guidelines to restart your home’s router and modem:
- Turn off the router and remove its power plug from the electrical outlet.
- Next, switch off the modem and also remove its power cord.
- Leave them just like that for more or less 10 minutes.
- After that, you can switch on the modem first. Next, you can power on the router.
- Allow the router to connect to the modem automatically.
You can try connecting to the router and check if you can connect to the Deep Rock Galactic game server now.
Disable UPnP on PlayStation Devices
Universal Plug and Play is an interesting feature for smooth wireless communication. Additionally, you can connect your PlayStation console to any Wi-Fi-enabled device automatically with the UPnP feature. However, you can turn off this feature if you don’t want your PlayStation to interfere with other network devices.
Leaving the UPnP feature enabled can create distractions while gaming. Therefore, you can eradicate the Deep Rock Galactic connection issues by disabling the UPnP feature:
- Power on your PlayStation device and navigate to the Settings menu under the Xross Media Bar.
- Scroll down until you see Network Settings.
- You have to choose the Internet Connection Settings. Continuing with the setup will disconnect you from the internet service. This warning shows up, and you have to proceed with OK.
- Afterwards, you need to select the Custom option to modify the settings. You can assign your own network settings.
- Now, you can select the Wired or Wireless connection relying on the connection type. You must verify the WPA or WEP passkey if you use a wireless connection.
- You have to set the Ethernet Operation Mode, including the DHCP, IP Address, DNS, Proxy Server Settings, and MTU. Depending on the network configuration, you can set them manually or automatically.
- Additionally, you have to set the UPnP feature to Disable mode.
Finally, you can execute an Internet Connection Test and check if everything’s working fine.
Additional Fixes to Mitigate Deep Rock Galactic Connection Issues
If you are still suffering from Deep Rock Galactic connection issues, then you can try debugging signs. You can install the Epic Games Launcher and click the black and yellow downward arrow when you open the launcher.
Next, click on Options and check the box next to the ‘Editor symbols for debugging’ option. Furthermore, you can select the Apply option.
Sometimes, the Steam platform might take longer to load the Deep Rock Galactic game. Check if the Steam server is facing issues. Otherwise, you can talk to your ISP if you feel something’s wrong with your internet connection.