Macbook — это ультрапортативное устройство, которое позволяет не только работать и развлекаться, но и использовать его в качестве беспроводного роутера. Если у вас есть Macbook и вы хотите настроить его в режиме роутера, то эта статья поможет вам разобраться в этом процессе.
Во-первых, для того чтобы использовать Macbook в качестве роутера, вам нужно убедиться, что у вас установлены последние версии операционной системы macOS. Обновление операционной системы поможет вам получить доступ ко всем необходимым функциям и настройкам.
Во-вторых, вам нужно зайти в настройки системы и перейти в раздел «Сеть». Здесь вы найдете возможность настроить подключение к Интернету через Ethernet, Wi-Fi и другие сетевые интерфейсы. Для создания беспроводной сети выберите опцию «Создать сеть Wi-Fi».
После этого вам нужно задать имя сети (SSID) и выбрать пароль для доступа к ней. Кроме того, вы можете настроить другие параметры, такие как каналы и шифрование данных. После настройки всех параметров нажмите кнопку «Создать», и ваш Macbook будет работать в качестве роутера.
Содержание
- Установка и настройка Macbook в качестве роутера
- Шаг 1: Проверка возможностей и требования
- Шаг 2: Настройка сети и подключение к интернету
Установка и настройка Macbook в качестве роутера
Шаг 1: Проверьте, подключен ли ваш Macbook к интернету. Если нет, установите соединение Wi-Fi или используйте кабельное подключение.
Шаг 2: Откройте меню «Настройки» на вашем Macbook и выберите «Сеть».
Шаг 3: Нажмите на плюс (+) в нижнем левом углу окна, чтобы добавить новое сетевое подключение.
Шаг 4: В появившемся окне выберите «Wi-Fi» в качестве типа сети.
Шаг 5: Введите имя для вашей новой сети Wi-Fi и выберите подходящий канал.
Шаг 6: Включите опцию «Шифрование» и выберите метод шифрования, который соответствует вашим потребностям безопасности.
Шаг 7: Введите пароль для вашей новой сети Wi-Fi и нажмите на кнопку «Создать».
Шаг 8: Подключите другие устройства к новой сети Wi-Fi, используя введенный пароль.
Шаг 9: Теперь ваш Macbook работает в качестве роутера, предоставляя интернет-соединение другим устройствам в вашей сети.
Обратите внимание, что ваш Macbook должен быть включен и подключен к интернету во время использования в качестве роутера.
Шаг 1: Проверка возможностей и требования
Перед тем, как превратить свой MacBook в роутер, необходимо убедиться, что ваше устройство соответствует определенным требованиям. Вот несколько пунктов, которые стоит проверить:
1. Версия операционной системы: Удостоверьтесь, что ваш MacBook имеет актуальную версию операционной системы macOS. В зависимости от выпуска может потребоваться различное программное обеспечение для использования функции создания точки доступа Wi-Fi.
2. Подключение к интернету: Прежде всего, у вас должно быть надежное подключение к интернету через Ethernet-кабель или другую загрузочную точку доступа Wi-Fi.
3. Аппаратные требования: Проверьте, поддерживает ли ваш MacBook создание точки доступа Wi-Fi. Для этого зайдите в системные настройки и найдите раздел Wi-Fi. Он должен предлагать функцию «Режим точки доступа».
4. Безопасность: Помните, что использование MacBook в качестве роутера может представлять угрозу для вашей личной безопасности. Убедитесь, что вы принимаете все необходимые меры для защиты своей сети и данных.
После проверки этих требований вы готовы перейти к настройке вашего MacBook в качестве роутера.
Шаг 2: Настройка сети и подключение к интернету
После успешной установки программного обеспечения VPN на ваш MacBook, вам необходимо настроить сеть и подключиться к интернету.
Для начала, откройте «Настройки системы» на вашем устройстве, нажав на иконку с изображением шестеренки на панели задач. В открывшемся окне выберите «Сеть».
В разделе «Сеть» вы увидите список доступных сетей Wi-Fi. Выберите сеть, к которой вы хотите подключиться, и нажмите на кнопку «Подключиться».
Если сеть Wi-Fi требует ввода пароля, введите его и нажмите «OK».
Если вы подключаетесь к сети через Ethernet-кабель, вам необходимо подключить кабель к порту Ethernet на вашем MacBook и к порту на роутере или модеме.
После успешного подключения к сети Wi-Fi или Ethernet, ваш MacBook автоматически будет пытаться подключиться к интернету. Если подключение не установлено автоматически, вам может потребоваться задать настройки сети вручную.
Для этого, в разделе «Сеть» выберите «Дополнительно» и введите необходимые настройки IP-адреса, подсети, маршрутизатора и DNS-сервера.
После ввода всех необходимых настроек, нажмите «Применить» и закройте «Настройки системы». Теперь ваш MacBook настроен и подключен к интернету.
| IP-адрес | Подсеть | Маршрутизатор | DNS-сервер |
|---|---|---|---|
| 192.168.1.2 | 255.255.255.0 | 192.168.1.1 | 8.8.8.8 |
Matt Cone February 29, 2012
Tutorials
Mac
Network
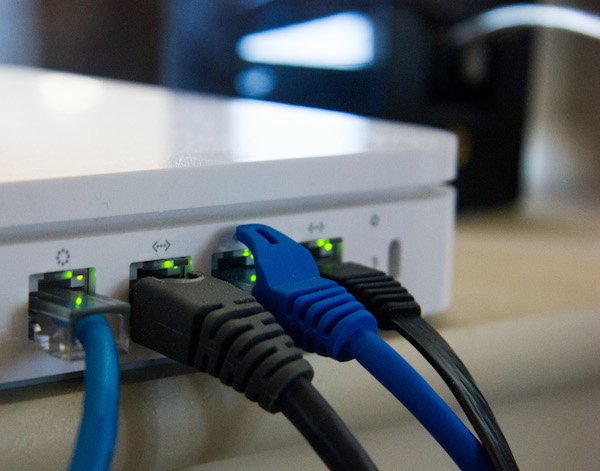
Did you know that you can turn your Mac into a wireless router for your home or office? This is a great option if you have cable or DSL service, but have yet to purchase a wireless router! These instructions will show you how to connect several computers or devices — such as an iPhone or iPad — to the Internet via your Mac’s wireless network. The best part is that you can save big money on expensive devices like the AirPort Extreme and AirPort Express by setting up your Mac to do the same thing!
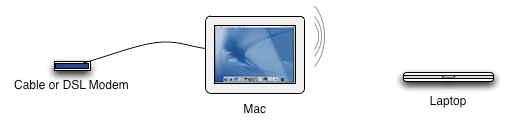
Take a look at the diagram above. You’ll need a cable or DSL modem and a Mac connected to the modem via an ethernet cable. Then you can connect any number of computers and devices to the Mac’s new wireless network.
Here’s how to use your Mac as a wireless router:
-
Connect the ethernet cable from your Mac to the cable or DSL modem, if you haven’t already.
-
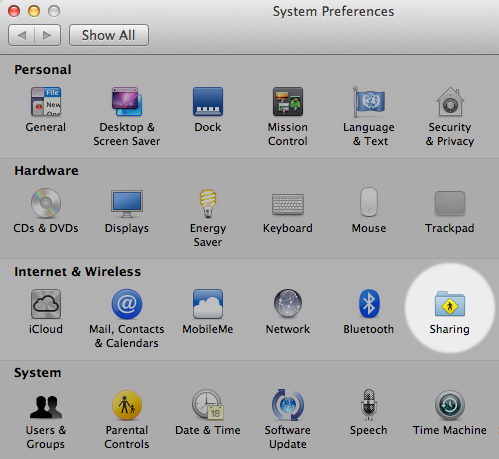
From the Apple menu, select System Preferences. The window shown below appears.

-
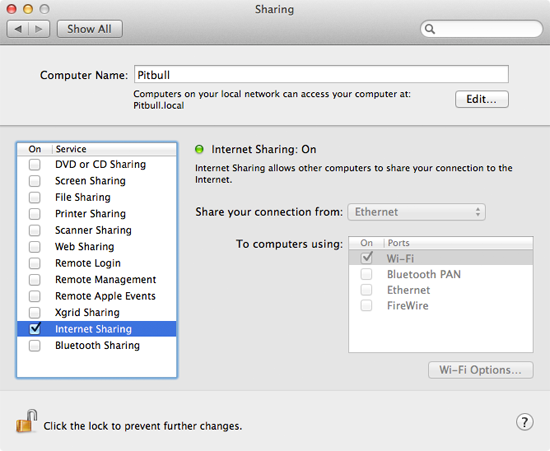
Click Sharing. The window shown below appears.
-
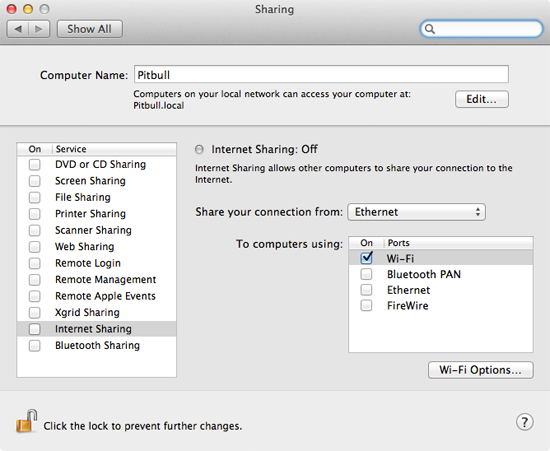
Click the lock icon and authenticate with an administrator account to make changes.
-
From the sidebar, select Internet Sharing. (Don’t select the checkbox yet — you’ll do that later.)
-
From the Share your connection from menu, select Ethernet. Remember, we’re selecting Ethernet here because it’s the primary Internet connection for your Mac.
-
In the To computers using box, select the Wi-Fi checkbox. This tells your Mac to create a wireless network and let any connected computers or devices access the Internet through the ethernet connection.
-
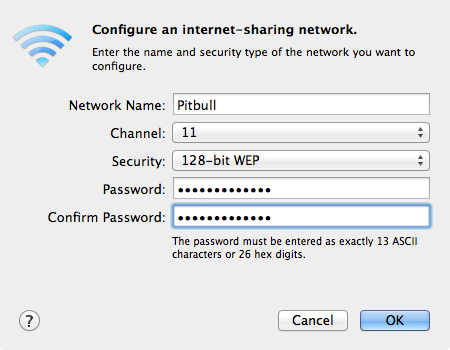
Click Wi-Fi Options. The window shown below appears.
-
Enter a name for the wireless network in the Network Name field. This is the name users will see when they try to connect to your network from another computer or device.
-
Leave the Channel setting alone — your Mac automatically determines the best setting for this.
-
From the Security menu, select 128-bit WEP. This protects your wireless network — and your Mac — from unauthorized access.
-
Enter a 13- or 26-character password in the Password and Confirm Password fields.
-
Click OK. You should see the Sharing window in System Preferences again.
-
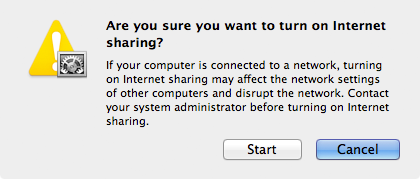
Select the Internet Sharing checkbox. The window shown below appears.
-
Click Start. The window shown below appears.
Now your Mac is acting as a wireless router. You can connect other computers and devices to the new wireless network you just created, and you can also continue to surf the Internet on your Mac. (Remember, your Mac is connected to the Internet via the ethernet connection, and all of the computers and devices are connected to your Mac.)
Related Articles
- How to Set Up the AirPort Extreme
Subscribe to our email newsletter
Sign up and get Macinstruct’s tutorials delivered to your inbox. No spam, promise!

No doubt you know that sharing your internet connection on your Mac is easy. For instance, if want to turn any Mac with a built-in Airport card into a wireless router (e.g. with a cable or DSL modem plugged into the built-in ethernet port), all you have to do is go to the Sharing pane of your System Preferences select it and hit start. However, what if you want to do something a little bit more complicated? In this tutorial I’ll cover some other ways for turning your Mac into a router, including over FireWire and adding a second ethernet port via USB (which can be really tricky).
Introduction
Now before we begin, you might ask: why would I want to do this? Here’s a few possible answers:
-
Like me you’re a cheapskate and you don’t want to drop $180 for an Airport Extreme Base Station (or even $50+ for a third-party 802.11 base station).
-
You have an old Mac (or better yet Mac Mini) that you want to serve as a home server, so why not let it be your router as well?
-
Like me you’ve burned out a cheap consumer router with a high number of connections (think bittorrent) and would rather give the Mac direct access to the net to eliminate NAT errors and/or improve bandwidth.
-
Because you can.
Now there are also some potential downsides to this as well, these include:
-
Security. Connecting your Mac through a NAT router to your cable model or DSL gives you an extra firewall protecting your Mac from the meanies out on the net.
-
Your Mac router has to be on anytime you want to use the Internet from another computer/device.
Okay, with that out of the way let’s look at some of your options. All of the following scenarios assume you have your incoming internet (cable modem, DLS, etc.) connected to your Router Mac’s built-in ethernet port.
Wireless
As I mentioned before, setting up a Mac as a wireless base station is perhaps the easiest option. All you have to do is go to the Internet tab of Sharing Preference Pane and start it (as pictured at the top). You will also, however, want to click on the «AirPort Options…» button and set up some sort of security as follows. Note that if you’re planning to connect with a Windows computer (or some other non-Apple device) you’ll need to stick to 5 or 13 character passwords. If you’re all Apple, the passwords can be whatever you choose.

FireWire
A perhaps little known, and lesser used, networking feature of OS X is IP over Firewire. Macs can both share and receive network traffic through their FireWire ports. Setting it up is pretty much the same as setting up the wireless option. Just select the check box next to «Built-in FireWire,» and you’re good to go.

On the second Mac, you’ll need to a make sure the FireWire networking port is active in the Network Pane of the System Preferences. Generally you’ll just want to keep this set to: «Using DHCP.»

FireWire networking was a bigger deal back before all Macs were shipping with gigabit ethernet. When most Macs were limited to 10/100 ethernet, FireWire was a faster (400Mpbs) option, however, FireWire can still be a good option since portable and consumer Macs (MacBook (Pro)s, iMacs, Mac minis) only have one built-in ethernet port (see the next section). So if you want to set up a wired network between these Macs (or even better, between older Macs) without buying any additional hardware, then FireWire can be a very quick and speedy option.
Adding Another Ethernet Port
Here’s where things get interesting and setup becomes a little more difficult. What if 802.11 or FireWire are not options for whatever reason (e.g. wireless is too slow, you already have a Cat 5 network, etc.)? If you want to have your Mac serve as a router to a ethernet network you’ll need to add a second ethernet interface to connect to that network. If you’re fortunate enough to have a Mac Pro, it has two built-in ethernet ports, so you don’t have to add anything. If you have an older PowerMac without a second ethernet port you can add in a PCI card. However, if you have a portable or a consumer Mac practically the only way to add a second ethernet interface is with a USB to ethernet adapter.
Fortunately, Sustainable Softworks (the makers of Mac router software I’ll discuss later) offers a free Tiger-compatible Universal Binary OS X driver for several popular models of USB to ethernet devices using the Pegasus or AX8817X chipset, including models from D-Link, Linksys, and Netgear.

With this driver you can easily add a second 10/100 ethernet interface to your Mac through a USB 2.0 port (the driver also works with older Macs with only USB 1.1, but of course it will be limited by USB 1.1’s theoretical 12Mbps bandwidth). I had a Netgear FA120 lying around, so that is what I used. Once you install the driver, the new network interface should appear in your Network Preference Pane. On mine you see that it is listed as en4 (because I have Parallels installed it has created two other ethernet interfaces, en2 and en3, en1 is Airport. On your machine, if you have not installed any other interfaces, it is likely that the new USB interface will appear as en2).

Now, you might think that once you’ve gotten this far all you’d have to do is go back to the Internet tab of Sharing Preference Pane, select the interface and start it up. While that may sometimes work (it’s never worked for me, but I’ve found reports of it working), I have found that it’s necessary to set up the network manually when sharing my internet over this interface. My circumstances may be special in part because the device I’m connecting to my Mac is a Xbox 360, but the same holds for some other devices hooked up though this ethernet interface including my MacBook.
Now, in my experience, networking settings often seem sort of like voodoo. I’m perfectly willing to admit that this may be simply because I don’t fully understand what I’m doing. Nonetheless, in what follows I’ll just report my own experiences in getting the interface working, in hopes that it will be useful to others.
So back in the Network Preference Pane, I set up my secondary ethernet interface as follows:

I’ve turned off DHCP and set the address to: 192.168.0.1 and the subnet to 255.255.255.192 In making these choices I was following a hint that appeared at macOSXhints back in 2002. Once this is done I went back to the Internet tab of Sharing Preference Pane, select en4 and start it.
Now on my other device (in this case a Xbox 360) I set it up as follows:
IP address: 192.168.0.2
subnet: 255.255.255.192 (this is the same subnet of the en4 USB interface, above)
gateway/router: 192.168.0.1 (this is the address of the en4 interface)
DNS: 192.168.2.1
(here’s where the voodoo comes in, I have no idea why this DNS setting works. You would think it should be 192.168.0.1, or even the DNS server of my ISP, but those simply do not work. I suspect that it has something to do with sharing over Airport as well).
I’ve also found that this will only work properly if Internet Sharing is active for my Airport interface. If I turn off the Airport interface (en1), the wired interface (en4) also dies. With these settings in place, everything seems to work properly. Keep in mind you may also need to enable certain services (which will vary with your application) in the Services tab of the Sharing Pane:

As well as open certain ports in the Firewall tab of the Sharing Pane:

More Advanced Options
Using OS X’s built-in Internet Sharing is probably good enough for most purposes, but if you have more complex applications you may want to consider some more advanced options. Of course, OS X Server will allow you much more flexibility, but also costs much more. As I mentioned before Sustainable Softworks also offers a free standing router application of OS X (Client) called IPNetRouterX for $100. Both of these options are obviously much more expensive, but also more versatile.
Conclusion
Setting up your Mac as a router is not for everyone, but for some applications it’s mighty convenient. It is sometimes is a bit of a beast to get set up, but if you keep at it (sometimes, sadly, just with trial and error) you can probably get it going. Feel free to share your own experiences in the comments.
Чтобы оставаться продуктивным в наше время интернет нужен практически постоянно. К сожалению, многие современные настольные компьютеры не оснащены модулем WiFi. Наверное их производители считают, что если вам нужен интернет — то вы или купите WiFi-модуль самостоятельно, или раздадите интернет с другого компьютера уже подключенного к интернету.
Второй вариант можно так же использовать и наоборот — подключиться к проводному интернету и раздавать его через WiFi. В данной статье вы узнаете как с подключенного к сети компьютера Mac раздать интернет любому проводному и беспроводному устройству, будь то ПК или XBox.
Зачем это может понадобиться?
Предположим, у вас есть старый ноутбук в котором отсутствует модуль WiFi, но конечно же, есть порт Ethernet. Именно используя этот порт можно подключиться к Mac и обеспечить старый ноутбук интернетом.
Так же, Mac раздающий интернет может служить хорошей заменой роутеру.
Если вы не хотите тратить деньги на роутер, то можно использовать старый Mac mini (хотя не очень много людей найдется у которых завалялся старый миник) или iMac как таковой. Достаточно просто подключить его к интернету через Ethernet и раздавать через встроенный WiFi-модуль. Я, например, так сделал дома у своих родителей — они просто не хотели покупать еще «какую-то коробку».
Вариант 1. Раздаем интернет без проводов
Для беспроводной раздачи интернета обязательно нужен будет WiFi-модуль — либо уже встроенный в Mac, либо подключенный к Mac через USB.
Шаг 1: Открываем Общий доступ в Системных настройках
Запускам Системные настройки и открываем раздел Общий доступ. В левой части окна будет список возможных служб, к которым можно обеспечить общий доступ. Выбираем Общий интернет.
Шаг 2: Настраиваем параметры доступа
Теперь нужно нажать на выпадающее меню Общее подключение и выбрать там Ethernet или Мост Thunderbolt, в зависимости от того, как Mac подключен к интернету. Стоит заметить, если вы работаете через VPN, то в этом выпадающем меню можете выбрать VPN, чтобы весь трафик с компьютеров, которым вы раздадите интернет, тоже проходил через VPN.
Затем ставим флажок напротив WiFi. Чтобы задать пароль для подключения к WiFi и изменить название сети нужно нажать Параметры Wi-Fi…, по умолчанию используется канал 11, но вы можете изменить здесь все что захотите.
Что касается безопасности — единственным вариантом здесь является WPA2. К сожалению, OS X не будет генерировать пароль и вам прийдется задать его самостоятельно — он может состоять из минимум 8 символов и не имеет значения, используете ли вы заглавные буквы и цифры. Когда здесь закончите, то нажмите OK.
Шаг 3. Начинаем раздавать
Может сложиться впечатление, что после всех проведенных шагов интернет уже раздается. Но нет, необходимо сделать еще один шаг — поставить флажок напротив Общий интернет в левой части панели. Появится предупреждение о том, что совместное использование интернета может вызвать проблемы в сети и с сетевыми настройками других компьютеров, но если вы уверены что все будет хорошо — смело жмите Включить.
Вариант 2. Раздаем интернет через проводное соединение
Раздать беспроводной инетернет к устройству подклеенному через провод проще, чем наоборот. После того как Mac соединен с компьютером, на который нужно раздать интернет, остается проделать 7 небольших шагов:
- Запускаем приложение Системные настройки.
- Открываем раздел Общий доступ.
- Кликаем на Общий интернет в левой части панели.
- В выпадающем меню Общее подключение выбираем WiFi.
- В списке Для компьютеров использующих выбираем Ethernet или Мост Thunderbolt, в зависимости от того, как вы подключили компьютер.
- Ставим флажок в левой части напротив Общий интернет.
- Проверяем как все работает на подключаемом компьютере.
Раздаем интернет на XBox 360
Первые версии Xbox 360 выпускались без встроенного адаптера беспроводной сети, а тратить 80$ на покупку этого модуля от Microsoft хочется не многим. Так почему бы не использовать Mac для подключения Xbox 360 к интернету?
На это уйдет всего 5 минут, но будет немного сложнее, чем раздать интернет на старый ноутбук.
- Соединяем Мак и Xbox посредствам Ethernet.
- Повторяем те же шаги для раздачи WiFi через Ethernet, что и выше.
- Дальше нужно кликнуть на кнопку Показать все в Системных настройках и перейти в раздел Сеть.
- Выбираем WiFi в списке слева.
- Нажимаем кнопку Дополнительно…
- Выбираем вкладку DNS и записываем DNS-сервера куда-нибудь, они нам понадобятся позже.
- После жмем OK, выбираем слева Ethernet или Мост Thunderbolt и опять кликаем на кнопку Дополнительно…
- Во вкладке TCP/IP задаем Выкл. в выпадающем меню Конфигурация IPv4.
- Опять OK и после Применить.
- На Xbox заходим в Network Settings, выбираем Wired Network, а потом Configure Network.
- Задаем Manual для IP адресов на вкладке Basic Settings и вводим 192.168.2.2
- В поле Subnet Mask вводим 255.255.255.0, а так же задаем для Gateway адрес 192.168.2.1 Далее Done.
- После этого выбираем DNS Settings и заносим туда адреса из 6-го шага.
- Проверяем что все работает и радуемся.
Оставайтесь в сети
Теперь можно достать старый компьютер из кладовки, поставить на него легковесный дистрибутив Linux (например, Ubuntu) и дать вторую жизнь этой железяке, не тратя деньги на WiFi адаптер или что-то еще.
Кроме того, можно сделать дом полностью беспроводным используя компьютер Mac в качестве роутера — это неплохой вариант, который так же сэкономит вам немного денег.
Если у вас остались какие-либо вопросы, то можете смело задавать их в комментариях или расскажите как вы используете свой Mac для раздачи интернета.
… David Paul Morris/Getty Images News/Getty Images
If you have Internet access on a network that doesn’t have Wi-Fi, you can use a Mac computer as your own makeshift router by sharing its Wi-Fi. This way you can access the Internet from any Wi-Fi device including any smartphone, tablet or even an Apple TV. Setting up Wi-Fi sharing on Mac OS X takes only a minute or two. Remember to set up encryption and choose a strong password to make sure you don’t open your data to nearby hackers.
Explore this article
- Requirements
- Sharing Wi-Fi
- Wi-Fi Security
- Connecting to a Mac’s Wi-Fi
1 Requirements
In order to use a Mac as a Wi-Fi access point for connecting to the Internet, your Mac first needs to be connected to the Internet itself. In most cases, this is most easily done using Ethernet. Most modems and home routers have an Ethernet port, usually located in the back, which can be connected to a Mac with an Ethernet cable. The MacBook Air doesn’t have an Ethernet cable, however you can connect to many modems and routers using a USB cable. Bluetooth can also be an option, if you have an iPhone or other Bluetooth device that can share its Internet access via Bluetooth.
2 Sharing Wi-Fi
Once your Mac has Internet access using any other method besides its Wi-Fi adapter, the adapter is then available for sharing. To share the Mac’s Wi-Fi, click the «Sharing» icon in the Mac’s System Preferences. If the Sharing options are locked, you will need to click the «Lock» icon in the bottom left corner and enter your administrative password first. Once the options are unlocked, select the «Internet Sharing» option in the left menu and then click the «Wi-Fi» check box. The Mac’s Wi-Fi is now available for sharing.
3 Wi-Fi Security
Setting up Wi-Fi on a Mac without adequate security opens your Mac, your network and your Internet service to anyone and can jeopardize your personal data. After selecting Wi-Fi as a sharable resource in your Mac’s system preferences, click the «Wi-Fi Options» button. You can then click the «Security» menu and then select WPA2 Personal» to encrypt the Mac’s Wi-Fi signal. Type a strong password in both «Password text fields. In this same options window, you can also change the network name to anything you want.
4 Connecting to a Mac’s Wi-Fi
After you have made your Mac’s Wi-Fi sharable, you can access it from any computer, tablet, smartphone or other Wi-Fi device like an Apple TV. Use the same method you would normally would to connect to any Wi-Fi router, and select your Mac from the list of available networks. If you have connected the Mac to a campus network or any network that you didn’t set up yourself, make sure you contact the network administrator before using the Mac’s Wi-Fi to access the network. Depending on the network configuration, Internet sharing using this method could disrupt other computers on the network.
About the Author
A published author and professional speaker, David Weedmark has advised businesses and governments on technology, media and marketing for more than 20 years. He has taught computer science at Algonquin College, has started three successful businesses, and has written hundreds of articles for newspapers and magazines throughout Canada and the United States.