From DD-WRT Wiki
Jump to: navigation, search
Contents
- 1 Introduction
- 2 Clock Timing Bug
- 3 Prerequisites
- 4 Installation
- 4.1 TFTP Method:
- 5 Upgrading Firmware
- 6 Resetting Defaults
- 7 Reset Button
- 8 Hardware Notes
- 9 Recovery
- 9.1 Asus Firmware Restoration Utility
- 9.2 Using TFTP on Windows
- 9.3 Using TFTP on Linux
- 10 Making the most out of your router (Deprecated, See Installing Entware)
- 11 VPN + USB Printer server
- 12 External Links
For initial flash use same procedure as All Asus WL-500xx series routers. also see: wl520gu.googlepages.com
WARNING: Don’t flash with any K26 builds, currently it just wont work
[edit] Introduction
The WL-520GU WRT has been supported as of DD-WRT v.24 RC7. USB (e.g. external storage or printer). As of DD-WRT v24 Final Release you are able to use the web-GUI to enable, setup and configure USB support. You MUST use builds that are tagged mini-usb or mini-usb-ftp to do this. Due to the lack of the units flash size (4MB) these builds may not offer the same Web GUI features of the standard builds. Some memory hungry features like Xbox-KAID have been removed in order to provide sufficient space for the USB drivers/modules and FTP functions.
It is also worthy to note that the USB 2.0 aspect of this router is very temperamental. If you bought this router in hopes of using USB 2.0, then you may experience problems with certain applications; albeit those mainly include resource intensive Optware programs like Bittorrent transmission.
The only remedy for this (as of now) is to use the USB 1.1 drivers instead.
[edit] Clock Timing Bug
See this thread about a clock timing bug that affects this model.
[edit] Prerequisites
- Windows Client (TFTP firmware upload techniques when booting the WL-520GU will also work for non-Windows users, but use of the ASUS Firmware Restoration Utility on a Windows client is by far the easiest way to flash the WL-520GU)
- ASUS Firmware Restoration Utility
- Installed as part of the «ASUS WL-520gU wireless router utility program» and is available under «Utilities»
- DD-WRT v.24 TNG (not VINT builds) Link: [1]
- Build suggestions (see Version Features for more information on selecting a version):
- dd-wrt.v24_mini_asus.trx (For intial flash) REQUIRED
- dd-wrt.v24_mini_generic.bin (Recommended if you want to manually add USB support, or need additional JFFS storage space)
- dd-wrt.v24_generic_nokaid.bin (if you want standard features but don’t require X-Box Kai Console Gaming)
- dd-wrt.v24_std_generic.bin
- mini_usb.bin (Built in USB support)
- mini_usb_ftp.bin (Built in USB and FTP support)
- Build suggestions (see Version Features for more information on selecting a version):
Note: The mini_asus.trx build is supposed to be designed to be uploaded as a firmware upgrade through the ASUS stock firmware’s web interface. The stock ASUS firmware rejected this build in the author’s
attempt to do this. For Windows use the Firmware Restoration utility provided with your router to do the initial mini-asus.trx flash. For Vista users, Administrative permissions are required. For Windows 7 users, changing the main executables (.exe) file to Windows XP sp2 compatibility mode is required. For 64bit versions of Windows, make sure the installation path is set to Program Files (x86).
[edit] Installation
[edit] TFTP Method:
- Read the Peacock Announcement, found here: http://www.dd-wrt.com/phpBB2/viewtopic.php?t=51486
- Download this program to flash from Windows: http://www.dd-wrt.com/dd-wrtv2/downloads/others/tornado/Windows-TFTP/tftp.exe
- If you need to flash with Linux, you can use this file: ftp://dd-wrt.com/others/tornado/Linux_Linksys_Tftp/linksys-tftp.tar.bz2
Or [advanced users] can use the tftp utility available through most package managers.
- If you need to flash with Linux, you can use this file: ftp://dd-wrt.com/others/tornado/Linux_Linksys_Tftp/linksys-tftp.tar.bz2
- Download this file for initial flashing: dd-wrt.v24_mini_asus.trx
- Also download this file for LATER flashing: dd-wrt.v24_usb_generic.bin
- Do a proper HARD reset on the router in accordance with note 1 of the peacock. That will be a 30-30-30 reset, followed by a power cycle. Do not confuse the Red ‘EZ Setup’ button with the RECESSED reset button.
- Do a second 30-30-30 reset, but do not power cycle it at the end. This puts the router into restoration mode. Plug a cable in the LAN port of the router, and the ethernet port of your computer. Make sure antivirus and wireless are off in the computer, and nothing else is connected to the computer or the router.
- Set your computer to a static IP address of 192.168.1.7 with a subnet mask of 255.255.255.0.
- Start the tftp.exe and follow the instructions in note 11 of the peacock announcement. Set the server to 192.168.1.1, leave the password blank, set retries to 20, and choose the dd-wrt.v24_mini_asus.trx file you downloaded earlier. Hit upgrade, and the file should upgrade immediately.
- Wait. Set a timer for FIVE FULL EARTH minutes. If you screw this up you could damage your router. WAIT!
- The LAN port will remain lit after the upgrade, but no other lights will light. There is no sign that your firmware has flashed, so you HAVE TO TIME IT.
- Once the time is up, power cycle the router.
- Navigate to 192.168.1.1 and refresh until the router webUI shows up
- Type a username and password in the opening page.
- Power cycle the router
- When you can log back in to the webUI at 192.168.1.1, do ANOTHER hard reset on the router (30-30-30 followed by a power cycle)
- Login to the router and enter a username and password. The router can be used at this point.
- Download this file if you have not already: dd-wrt.v24_usb_generic.bin
- Under the Administration > Firmware Upgrade tab, choose «Reset to default configuration», and pick the dd-wrt.v24_usb_generic.bin file to upgrade the firmware.
- Hit «Upgrade» and wait five full earth minutes.
- If uploading via the web does not work for you (it did not for me), you can upload your file with tftp again. I uploaded the dd-wrt.v24_voip_generic.bin successfully. I did have to increase the timeout for the voip file for it to work.
- Type a username and password in the opening page.
- Power cycle the router
- When you can log back in to the webgui at 192.168.1.1, do ANOTHER hard reset on the router (30-30-30 followed by a power cycle)
- Login to the router and enter a username and password.
- Configure your router
- Set your computer back to auto IP and auto DNS
[edit] Upgrading Firmware
Once DD-WRT has been installed on the WL-520GU, new versions can be installed through web interface (Administration -> Firmware Upgrade). The Asus Firmware Restoration Utility can also be used, but it is no longer necessary when upgrading DD-WRT.
[edit] Resetting Defaults
There are several ways the WL-520GU’s NVRAM can be reset.
- Using the Administration -> Factory Defaults web interface.
- Selecting the option to reset to Default Settings when upgrading the firmware through the Administration -> Firmware Upgrade web interface.
- Pressing the reset button while booting (see the Reset Button section below for ASUS reset button quirks).
- Using telnet enter erase nvram command
- Download this file pack which includes the necessary tools required for the procedure and unrar it. The File pack contains both wl500g-clear-nvram.trx and the wl500g-recover.trx utilities.
If using the #5 procedure, do the following:
- Using the Firmware Restoration utility or TFTP, first put the device into recovery mode by pressing and holding the black reset button WHILE plugging the power in. The power LED should continuously flash.
- Set your network adapter to a static IP of 192.168.1.10 and subnet mask of 255.255.255.0
- Upload wl500g-clear-nvram.trx and wait for the transfer to complete. Unplug the power.
- Put the device into restore mode once again by pressing and holding the black reset button WHILE plugging the power in.
- Upload wl500g-recover.trx and wait for the transfer to complete, then unplug.
- Put the device into restore mode once again by pressing and holding the black reset button WHILE plugging the power in.
- Upload the either the stock firmware (which is found on the Asus website) or uploadmini_asus.trx file if you want to continue using DD-WRT. Wait for file transfer completion.
- Unplug the power, but this time do NOT press the blackreset button. Just plug the power back into the unit and you’re back in business
- Last resort when the unit won’t boot due to a bad setting — see this forum post.
[edit] Reset Button
The ASUS «firmware restoration» mode requires a change to the standard Linksys «hold reset button for 30 seconds» procedure for resetting the WL-520GU to its defaults. The following is how the reset button works on the WL-520GU:
When the WL-520GU is powered on
- Holding the reset button for 15-20 seconds will cause the WL-520GU to reboot.
- Upon reboot, a pressed reset button causes the WL-520GU to go into firmware restoration mode. This does NOT reset the defaults (see the section below for more information on the firmware restoration mode).
- Since there is little to no warning of the exact instant the WL-520GU will reboot when holding the reset button, chances are extremely good that the reset button will still be depressed and cause the WL-520GU to go into firmware restoration mode. Hard booting the WL-520GU will get the WL-520GU back, but settings will NOT be reset.
When the WL-520GU is booting
- Holding the reset button during the boot sequence will reset the unit to its defaults.
- Care must be taken to press the reset button right after the power light turns off immediately after powering on the WL-520GU and not before, to avoid going into firmware restoration mode.
Based on the above, it should be fairly self-evident that the following procedure is recommended for using the reset button on the WL-520GU.
- Unplug the WL-520GU
- Plug in the WL-520GU
- The power light will blink
- As soon as the power light turns off, press and hold the reset button
- Hold the reset button until the power and wireless buttons glow green.
- The WL-520GU should now be reset to its defaults
[edit] Hardware Notes
This section covers observations made about working with the ASUS WL-520GU hardware. Certain behaviors of this device are different than other WRTs (especially the Linksys).
[edit] Recovery
Many Asus WLs have a special pre-boot state that makes it extremely easy to upload new firmware images, even when the current firmware is corrupt (in fact the WL-520GU automatically drops into this mode when a corrupt firmware is detected during boot). Either applying a new firmware through the Asus Firmware Restoration Utility (see section below) or a hard reboot (removing the power) is required to exit this state (Note that entering this state does not negatively effect the current settings or firmware so it is not especially dangerous to accidentally enter firmware restoration mode — although it does get in the way of performing a «reset button» based reset of the WL-520GUs settings as noted in the section above).
[edit] Asus Firmware Restoration Utility
The Asus Firmware Restoration Utility is available from the Asus support site under «Utilities» (installed as part of the ASUS WL-520GU Utility). This is the preferred utility for uploading new firmware distributions since many firmwares reject a different distribution’s firmware if one attempts to use the web interface.
The Asus Recovery Utility can ONLY be used with Windows
- Under Vista and Win7 this utility must be run as administrator by Right-clicking on the .exe and selecting the option.
- In case you have multiple network interfaces, disable all but the one that is connected to your router (i.e your LAN connection).
- You should also turn off your Windows firewall, in order to allow the Asus Recovery Utility to be able to connect and send data from your PC to the Router.
Steps:
1. You will need to manually set the address of your PC’s Network LAN card to 192.168.1.10 and subnet mask 255.255.255.0. Also make sure all other adapters on your PC, except for the main LAN connection are disabled.
2. Remove the power connector of the WL series router.
3. While holding the BLACK reset button down, plug the power connector back in.
4. When the power LED flashes, release the reset button. The router is now in recovery mode.
5. Use the Asus recovery utility to upload the DD-WRT mini-asus.trx file.
6. After the upgrade, the Utility will ask for a router reboot. Give it about a minute to be on the safe side before removing the power. Once plugged back in, you will be able to access the web interface.
7. Return your Net adapter properties to «Automatically Obtain IP»
8. DO NOT use Firefox for upgrading builds! Use Internet Explorer!!!!
9. Type 192.168.1.1 into your browser and set your username as root and pick a password.
10. Navigate to Administration->Firmware Upgrade and upload either the recommended build provided on the main page of the site, or another of your choice.
[edit] Using TFTP on Windows
Windows TFTP client may be downloaded from here. Then all you need to do is to call following command:
tftp.exe -i -v 192.168.1.1 PUT dd-wrt.v24_mini_asus.trx
[edit] Using TFTP on Linux
Linux TFTP client may be downloaded using yum or apt-get. Then all you need to do is to call following command:
tftp -m binary 192.168.1.1 -c dd-wrt.v24_mini_asus.trx
[edit] Making the most out of your router (Deprecated, See Installing Entware)
Please see Optware, the Right Way for detailed information on how to fully utilize the USB port on the WL520gU and add invaluable flexibility to it.
Recommend Firmware link: TBD?
OTRW will recommend an EXT2 partition. The firmware version must support this: [2] The wiki instructions above installs: DD-WRT v24-sp2 (08/12/10) mini-usb-ftp
(SVN revision 14929), which does not support EXT2 despite what the USB UI says.
Potential services that are available:
- Bash instead of shell in busybox (LFS support)
- Automounting and unmounting of storage device partitions
- Network printing
- Watchprinter
- Torrent transmission with watchdog
- Hotmount
- Pre-configured samba share
- Reverse proxy featuring pound
- Service tool
- Xinetd
- Pound
- Asterisk
- Lighttpd
- Vlighttpd
- Countryblock
- AsiaBlock
- Services running as other users than root
- Vim with proper terminal support
- Twonky Media
- News Server
- Other various useful tools
[edit] VPN + USB Printer server
Fraters Optware method listed above will accomplish this and much more. You can use a USB hub to attach multiple devices!
If you would like to use the firmware v24-TNG with openvpn support and usb printing support then follow these steps:
- Download the Eko dd-wrt.v24-12548_NEWD_openvpn_jffs_small.bin
- Install this firmware using the methods used above. TFTP or ASUS Firmware Restoration Utility.
- go to http://192.168.1.1 and setup a USERNAME and a password
- go to administration and enable jffs if it is not enabled already
- go to services and enable sshd
- go to administration and enable SSH Management
- using your favorite ssh client then ssh 192.168.1.1. Log in with the username «root» and your web admin password
- after you login type
mkdir -p /jffs/tmp/ipkg
ipkg update
ipkg -force-depends install kmod-usb-core
ipkg -force-depends install kmod-usb-printer
ipkg -force-depends install kmod-usb-ohci
ipkg install p910nd
- this should download all required packages/modules/software etc. now we need to edit some configuration
mkdir /jffs/etc/config
vi /jffs/etc/config/usb.startup
- inside usb.startup you should have:
insmod /jffs/lib/modules/2.4.30/usbcore.o
insmod /jffs/lib/modules/2.4.30/usb-ohci.o
insmod /jffs/lib/modules/2.4.30/printer.o
/jffs/usr/sbin/p910nd -b -f /dev/usb/lp0 0
- You will need to set the permissions of this file to allow it to execute. Type:
chmod +x /jffs/etc/config/usb.startup
- Next, we need to fix a typo. The fix is described here Printer Sharing. To fix this:
vi /jffs/etc/init.d/p910nd
change ----------> DEFAULT=/etc/default/p910nd
to -------------> DEFAULT=/jffs/etc/default/p910nd
- At this point, you should reboot your router. When it comes back online, to make sure everything is right, do the following:
ls /dev/usb
- If this shows the printer (lp0), you are in good shape. Otherwise, try running the command
./jffs/etc/config/usb.startup
- to manually start the printer server. You should now see the printer if you repeat the preceding ls command.
- Also, try running «dmesg | grep usb» to see if the printer is loaded. if you do not see:
printer.c: usblp0: USB Bidirectional printer dev 2 if 1 alt 0 proto 2 vid 0x04B8 pid 0x0839
then you have an interesting problem.
- Next, verify that the print server is up by running netstat -an and searching for port 9100. If you don’t see anything, try running ps | grep lp0. If you still don’t see anything, try manually starting the print server with this command:
/jffs/usr/sbin/p910nd -b -f /dev/usb/lp0 0
[edit] External Links
- Asus WL-520GU Product Website
- Asus Support Page for WL-520GU
- Factory firmware available under «firmware»
- Asus Firmware Restoration Utility available under «utilities»
- Other firmware for WL-520GU
- Oleg’s Custom Firmware
- Asus WL-520GU Stock Firmware
- OpenWRT
Роутер Asus с прошивкой DD-WRT предоставляет множество дополнительных функций и возможностей, не доступных в стандартной прошивке. DD-WRT является альтернативной прошивкой, которая позволяет расширить функциональность роутера и настроить его работу под свои конкретные потребности. В этой статье мы расскажем, как установить и настроить DD-WRT на роутере Asus.
Установка прошивки DD-WRT на роутер Asus несложна, но требует некоторых навыков и внимательности. Сначала необходимо проверить совместимость модели роутера с DD-WRT. Затем нужно скачать актуальную версию прошивки с официального сайта DD-WRT. После этого следует подключиться к панели управления роутера и выполнить процедуру установки новой прошивки.
После успешной установки DD-WRT на роутер Asus, открываются широкие возможности настройки сетевых соединений, управления мощностью сигнала Wi-Fi, настройки VPN-сервера и многое другое. В статье будет рассказано о ключевых настройках и функциях DD-WRT, которые могут пригодиться вам при использовании роутера Asus с этой прошивкой. Отметим, что некоторые функции DD-WRT могут потребовать дополнительной настройки и опыта в работе с роутерами.
Содержание
- Выбор правильной прошивки
- Подготовка роутера к прошивке
- Установка прошивки Asus DD-WRT
- Настройка роутера после прошивки
- Преимущества прошивки Asus DD-WRT
- Частые проблемы и их решение
Выбор правильной прошивки
Перед тем как начать прошивку, необходимо определиться с двумя основными вариантами прошивок: оригинальной и сторонней (custom firmware).
Оригинальная прошивка, предоставляемая производителем, обычно имеет стандартные функции и ограничения. Она проста в использовании и настройке, но может быть ограничена в функциональности и возможностях.
Сторонняя прошивка, такая как DD-WRT, является альтернативной версией прошивки, которая предоставляет дополнительные функции и возможности. Она позволяет пользователю больше контроля над роутером и расширяет его функциональность.
Выбор между оригинальной и сторонней прошивкой зависит от ваших потребностей и требований. Если вы ищете простую и надежную прошивку, оригинальная версия может быть лучшим вариантом. Если вам нужны дополнительные функции и больше контроля над роутером, сторонняя прошивка может быть отличным выбором.
Перед установкой сторонней прошивки, убедитесь, что ваш роутер совместим с выбранной версией. Некорректная установка прошивки может привести к неработоспособности роутера или потере гарантии.
Необходимо также учитывать, что установка сторонней прошивки может потребовать дополнительные шаги и навыки. Вам может понадобиться знание основных принципов сетевых настроек и некоторые технические навыки.
Имейте в виду, что установка сторонней прошивки может быть неподдерживаемой и может привести к потере гарантии производителя. Поэтому, если вы неуверены в своих навыках и опыте, лучше выбрать оригинальную прошивку, предоставляемую производителем.
Подготовка роутера к прошивке
Перед тем как приступить к прошивке роутера Asus DD-WRT, необходимо выполнить несколько шагов подготовки:
| Шаг 1: | Загрузите последнюю стабильную версию прошивки DD-WRT для вашей модели роутера с официального сайта проекта. Обратите внимание на версию прошивки и убедитесь, что она совместима с вашим устройством. |
| Шаг 2: | Подключите компьютер к роутеру с помощью сетевого кабеля. Убедитесь, что оба устройства включены. |
| Шаг 3: | Откройте веб-браузер и введите IP-адрес роутера в строке адреса. Обычно адрес состоит из комбинации цифр и точек, например, 192.168.1.1. |
| Шаг 4: | Введите имя пользователя и пароль, если они были установлены. Если вы не знаете эти данные, проверьте документацию к устройству или обратитесь к поставщику интернет-услуг. |
| Шаг 5: | Откройте раздел «Настройки» или «Управление роутером» и найдите секцию «Обновление прошивки» или «Прошивка». |
| Шаг 6: | Нажмите на кнопку «Обзор» или «Выбрать файл» и выберите загруженный ранее файл прошивки DD-WRT. |
| Шаг 7: | Нажмите на кнопку «Загрузить» или «Обновить» и дождитесь завершения процесса прошивки. Это может занять несколько минут. |
| Шаг 8: | После завершения прошивки роутер автоматически перезагрузится. Подождите, пока он не подключится к сети снова. |
После выполнения этих шагов ваш роутер Asus будет готов к дальнейшей настройке с использованием прошивки DD-WRT.
Установка прошивки Asus DD-WRT
Прошивка Asus DD-WRT представляет собой альтернативную версию прошивки для роутеров Asus, которая отличается расширенным функционалом и улучшенными возможностями настройки.
Для установки прошивки Asus DD-WRT на роутер необходимо выполнить следующие шаги:
- Скачайте последнюю версию прошивки Asus DD-WRT с официального сайта разработчиков.
- Подключите компьютер к роутеру посредством сетевого кабеля и запустите браузер.
- Введите IP-адрес роутера в адресную строку браузера и нажмите Enter. Обычно адрес роутера указан на самом устройстве или может быть найден в документации к роутеру.
- В открывшемся окне авторизации введите логин и пароль для доступа к настройкам роутера.
- В меню роутера найдите раздел «Обновление прошивки» или аналогичный раздел, который отвечает за обновление и установку новой прошивки.
- Выберите загруженный файл прошивки Asus DD-WRT на вашем компьютере и нажмите кнопку «Обновить» или аналогичную.
- Подождите, пока процесс установки прошивки завершится. Во время установки не отключайте питание роутера и не выполняйте другие действия, чтобы не повредить устройство.
- После завершения установки прошивки роутер автоматически перезагрузится.
После перезагрузки роутера прошивка Asus DD-WRT будет установлена и готова к настройке.
Важно помнить, что установка прошивки Asus DD-WRT удалит все настройки и данные, хранящиеся на роутере. Поэтому перед установкой рекомендуется создать резервную копию настроек и данных, чтобы восстановить их после установки новой прошивки.
Теперь вы готовы использовать новую прошивку Asus DD-WRT и настраивать роутер в соответствии с вашими потребностями и предпочтениями.
Настройка роутера после прошивки
После успешной прошивки роутера Asus с использованием DD-WRT, необходимо выполнить несколько настроек, которые позволят вам полностью использовать его функциональность. Вот несколько шагов, которые помогут вам осуществить настройку роутера:
1. Вход в веб-интерфейс
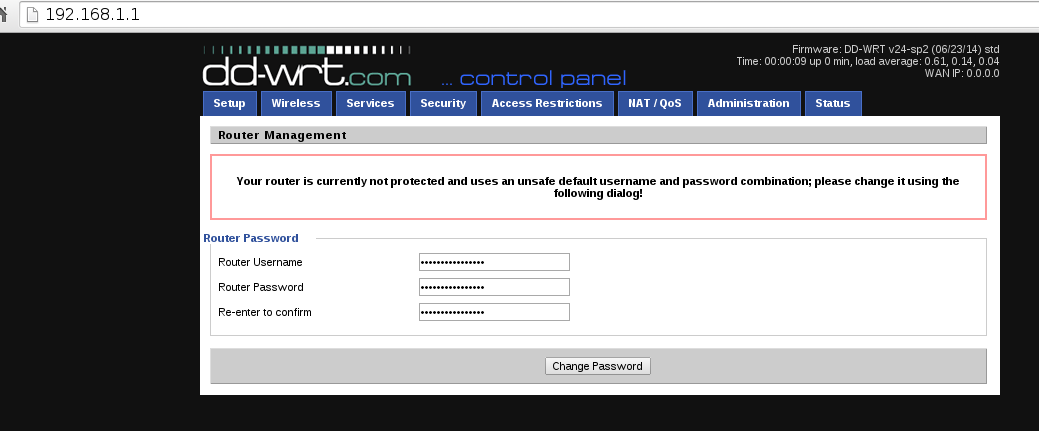
Подключите компьютер к роутеру с помощью Ethernet-кабеля и введите IP-адрес роутера в адресную строку браузера. Обычно по умолчанию это 192.168.1.1, но в зависимости от версии DD-WRT прошивки может быть изменен. Введите имя пользователя и пароль, если они были установлены во время прошивки.
2. Изменение пароля
Прежде чем приступить к настройке роутера, рекомендуется изменить пароль администратора для повышения безопасности устройства. Это можно сделать в разделе настроек безопасности веб-интерфейса.
3. Настройка беспроводной сети
DD-WRT предлагает большой набор функций и настроек для беспроводной сети. Вы можете настроить имя сети (SSID), тип шифрования, пароль, уровень мощности сигнала и многое другое. Установите параметры, которые соответствуют вашим потребностям и обеспечат безопасность вашей беспроводной сети.
4. Расширенные настройки
DD-WRT также предлагает множество расширенных настроек, которые могут быть полезными для опытных пользователей. Вы можете настроить VPN, доступ к FTP-серверу, управление трафиком, фильтры контента и многое другое. Исследуйте различные вкладки и настройки веб-интерфейса, чтобы максимально использовать функциональность DD-WRT.
5. Сохранение настроек
После завершения настройки роутера рекомендуется сохранить текущие настройки. Это позволит вам восстановить роутер в случае сбоя или сброса настроек. Вы можете сохранить файл конфигурации на своем компьютере или на удаленном сервере.
Следуя этим простым шагам, вы сможете успешно настроить роутер Asus с прошивкой DD-WRT и получить все преимущества, которые она предлагает.
Преимущества прошивки Asus DD-WRT
Прошивка Asus DD-WRT предлагает ряд значительных преимуществ, которые делают роутер более гибким и функциональным:
- Расширенные возможности настройки сети: DD-WRT позволяет управлять роутером на более глубоком уровне, позволяя настраивать такие параметры, как маршрутизация трафика, управление портами и VLAN.
- Улучшенная безопасность: Данная прошивка предлагает множество функций, которые повышают безопасность вашей сети, включая VPN-серверы и возможность настройки фаервола.
- Расширенные функции медиасервера: С DD-WRT вы сможете настроить ваш роутер как мультимедийный сервер, что позволит использовать его для просмотра фильмов, прослушивания музыки и прочих мультимедийных потоков на ваших устройствах.
- Управление трафиком: DD-WRT предлагает возможность контроля и управления трафиком в вашей сети. Вы можете ограничить скорость отдельных устройств, установить приоритеты для определенных приложений и многое другое.
Это только некоторые из преимуществ, которые предлагает прошивка Asus DD-WRT. Она позволяет превратить обычный роутер в мощный инструмент управления вашей сетью, добавляя новые функции и возможности. При этом стоит помнить о возможных рисках, связанных с установкой прошивки, и следовать инструкциям с официального сайта DD-WRT, чтобы успешно прошить роутер и настроить его по своим потребностям.
Частые проблемы и их решение
Установка и настройка прошивки DD-WRT на роутер Asus может иногда вызывать некоторые проблемы. В этом разделе мы рассмотрим часто встречающиеся проблемы и предложим возможные решения.
-
Роутер не загружается после установки DD-WRT. Если ваш роутер не загружается после установки прошивки DD-WRT, попробуйте сбросить настройки до заводских настроек и повторите процесс установки снова.
-
Отключение Wi-Fi после установки DD-WRT. Если Wi-Fi перестал работать после установки прошивки DD-WRT, проверьте настройки беспроводной сети и убедитесь, что они настроены правильно. Также убедитесь, что вы используете последнюю версию прошивки DD-WRT.
-
Проблемы с подключением к интернету. Если у вас возникли проблемы с подключением к интернету после установки DD-WRT, проверьте настройки сетевого подключения и убедитесь, что они корректно настроены. Также убедитесь, что вы правильно настроили параметры подключения к вашему провайдеру интернет-услуг.
-
Проблемы с портами. Если у вас возникли проблемы с работой определенных портов после установки DD-WRT, проверьте настройки файрвола и убедитесь, что порты, которые вам необходимы, открыты и настроены правильно.
-
Проблемы с VPN. Если у вас возникли проблемы с установкой и настройкой VPN после установки DD-WRT, убедитесь, что вы правильно настроили параметры VPN и используете поддерживаемый протокол.
Если вы так и не смогли решить свою проблему, рекомендуется обратиться за помощью к специалистам или обратиться к сообществу пользователей DD-WRT для получения дополнительной информации и поддержки.
Решил перепрошить свой wi-fi роутер ASUS RT-N16 альтернативной прошивкой DD-WRT.
Почему, именно DD-WRT ?
Все просто, она обладает огромным функционалом при этом достаточно проста в установке и настройке.
Я знаю, что есть и другие альтернативные прошивки, которые позволяют «выжать» больше из моего девайса, но у меня просто не стоит такой цели, т.к. скорость инета у меня пока не так и велика (до 70 Мбит/с). Да и разница не так уж и велика…
Предупреждение: Все манипуляции вы делаете на свой страх и риск. Автор статьи не несет никакой ответственности в случае возникновения проблем. Данная заметка является просто памяткой для себя.
Прежде чем приступить к перепрошивке, советую подготовиться на все случаи :):
— Ознакомиться с офф. руководством по установке.
— Прочитать инструкцию приведенную ниже, как откатиться на «родную прошивку» в случае возникновения проблем. (взято с офф. форума ASUS)
— Скачать последнюю стабильную официальную прошивку для вашего роутера с офф.сайта ASUS.
— Скачать утилиты для роутера с офф.сайта ASUS(только для Windows)
— Сохранить настройки с вашего роутера.
Процедура аварийного восстановления прошивки ASUS RT-N16:
Предупреждение: обязательно подготовить всё к восстановлению, если у Вас что-то не получится!
1. Скачайте и разархивируйте последнюю официальную прошивку от Asus.
2. Установите утилиту Firmware Restoration с диска из комплекта. Иногда возникают проблемы с установкой при использовании этой утилиты, поэтому рекомендую сразу скачать и утилиту tftpd32. С помощью её можно будет напрямую залить прошивку по tftp (рекомендую использовать именно такой способ)
3. Настройте сетевые параметры компьютера (в свойствах TCP/IP):
вручную использовать IP-адрес 192.168.1.2 маска 255.255.255.0
4. Подключите компьютер кабелем к любому из LAN портов роутера.
5. Выключите питание на роутере, нажмите кнопку Restore и удерживая ее, включите питание,
кнопку удерживайте в течении 10-15сек, пока индикатор питания Power не начнет постоянно мигать.
6. Желательно проверить, запустилась ли система восстановления или нет. Можно проверит следующим образом. Пуск -> Выполнить (или Win+R), написать cmd, нажать Enter. В появившемся окне написать ping 192.168.1.1. Понаблюдать за выводом. Адрес должен отвечать и TTL = 100. Если так, то активна система восстановления прошивки и можно продолжать дальше, если нет то снова проделать пункт 5
6. Запустите утилиту Firmware Restoration, укажите путь до прошивки и загрузите ее в роутер.
Если использовать tftpd32, то нужно выбрать вкладку tftp client, в поле Host указать 192.168.1.1, Port 69, Local File — выбираем путь к нашей прошивке и нажимаем Put.
7. На экране должны отображаться процесс загрузки прошивки в роутер.
8. После загрузки прошивки и перезагрузки роутера войти в меню http://192.168.1.1
Процедура установки прошивки dd-wrt на ASUS RT-N16:
Т.к. роутер имеет флеш больше 4МБ(32МБ), то можно установить прошивку с максимальными возможностями — Mega
1. Скачиваем последнюю прошивку dd-wrt.v24-18024_NEWD-2_K2.6_mega.bin
Устанавливаем с диска от роутера
прилагаемое ПО или скачиваем с утилиты для роутера с офф.сайта ASUS и устанавливаем.
Примечание: новую прошивку можно найти на ftp следующим образом:
ftp://dd-wrt.com/others/eko/BrainSlayer-V24-preSP2/год/мм-дд-гг-номер_версии/broadcom_K26/прошивка
2. Сделайте сброс в Asus GUI. Перезагрузите маршрутизатор. Отключите все кабели (WAN, USB и т.д.) и подключите кабель Ethernet от компьютера в LAN1 порт на маршрутизаторе.
Примечание: не знаю зачем, но в офф. руководстве было указано выполнить сброс настроек.
3. Для того чтобы обновиться на DD-WRT, необходимо перевести роутер в режим
восстановления прошивки.
Перед этим необходимо подготовиться –
подключаем к нему единственный компьютер через LAN, вытаскиваем все USB
устройства из роутера.
Прописываем на компьютере сетевой адрес 192.168.1.2 и адрес шлюза 192.168.1.1,
хотя, если ранее компьютеру этим роутером был автоматически выдан выдан
IP адрес, этого можно не делать.
4. «Сброс 30/30/30»
Далее необходимо выключить роутер, затем ручкой или
другим тонким предметом нажать черную кнопку «Reset» и удерживайте ее. (Если питание маршрутизатора
было выключено — включите его до нажатия на кнопку.)
Через 30 секунд
выключите питание, не отпуская кнопку Reset.
Ещё через 30 секунд
включите питание, опять-таки не отпуская Reset.
Подождите еще 30 секунд и
отпустите Reset.
При этом на роутере начинает
мигать индикатор питания на передней панели.
5. После этого запускаем
программу Firmware Restoration из папки ASUS Utility, предварительно
полностью выключив все брандмауеры, в т.ч. встроенный в Windows.
Указываем в программе какой файл является прошивкой и нажимаем UPLOAD
Обновление прошивки DD-WR:
1. Скачайте последнюю версию прошивки
Mini -dd-wrt.v24-18024_NEWD-2_K2.6_mini_RT-N16.trx R18024.
Mega -dd-wrt.v24-18024_NEWD-2_K2.6_mega.bin R18024.
2. Откройте веб интерфейс DD-WRT в вашем браузере (по-умолчанию http://192.168.1.1/ )
3. Выбираем Administration tab -> кнопка «Firmware Upgrade»
4. Кликнуть по кнопке «Browse» -> выбрать новую прошивку. Кликнуть на кнопку «Upgrade»
Процесс обновления может длиться 2-5 минуты.
Примечание: рекомендуется после обновления сбрость настройки в настроки по-умолчанию
Для этого выбрать вкладку Firmware Upgrade и в ней выбрать «Reset to Default settings».
Ссылки:
Документация DD-WRT (RU)
Asus RT-N16 (Wiki eng)
Альтернативные прошивки на современных роутерах
Asus RT-N16 (hub.ru)
I recently upgraded my EnGenius ESR-750H wireless N router to an Asus RT-AC66U wireless AC router. The EnGenius router has been pretty good for me but basic and no support for other firmware. The Asus RT-AC66U not only has a number of added features and support for 802.11ac, it also doesn’t seem to be plagued with the port 32764 bug or the Linksys “TheMoon” virus that’s been going around on select Linksys models, but the Asus also has a number of firmware options that can be used with this router such as Merlin, Tomato, and DD-WRT.
I’ve used DD-WRT in the past with other routers and had great success and decided to go that route with my new AC66U router as well.
How to install DD-WRT on Asus RT-AC66U
To get started we need to download a few files first:
- The most recent .TRX file from DD-WRT: ftp://ftp.dd-wrt.com/others/eko/BrainSlayer-V24-preSP2/ (mirror), currently dd-wrt release r25648
- You also need a Telnet client if you don’t already have one. I’ll be using the one built into Windows 7.
Now lets get started…
- I like to start with nothing attached to the router except for the machine I’ll be using to update the router so disconnect all other connections including WAN. Then log into the router Admin Panel (usually 192.168.1.1)
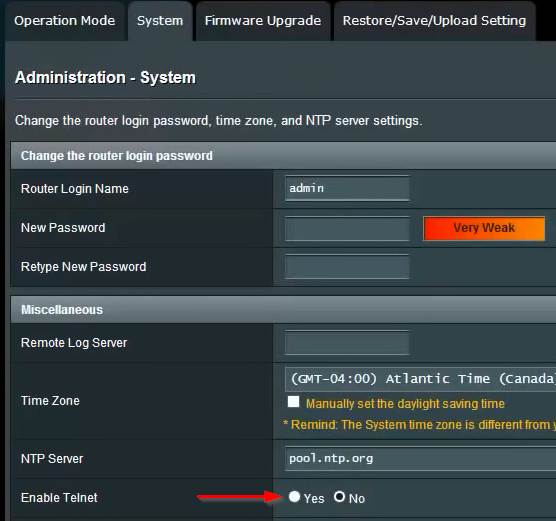
- Enable Telnet by going to Advanced Settings > Administration > System > Enable Telnet and click on “Apply“

- Open a command prompt, and type:
telnet 192.168.1.1Then enter your username and password for the router admin panel.
- Now clear NVRAM by typing:
mtd-erase -d nvram - Reboot the router now by typing:
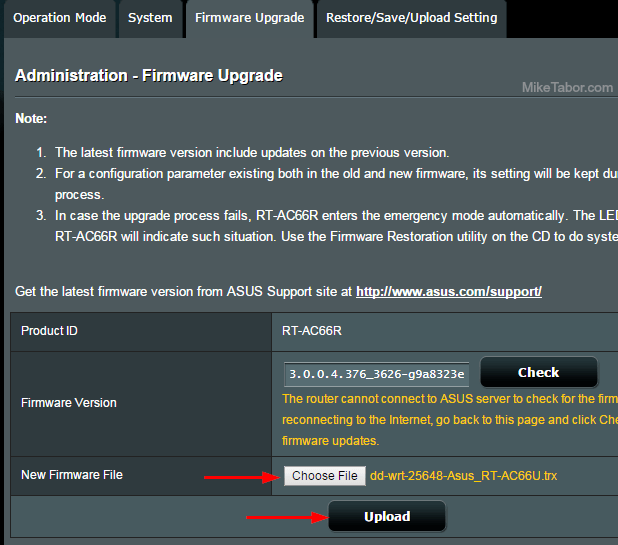
reboot - Once the router has rebooted log back into the admin panel (default login is admin/admin) and navigate to: Administration > Firmware Upgrade > New Firmware File and click on Choose File and select the .TRX file you downloaded (for me dd-wrt-25648-Asus_RT-AC66U.trx) and click on “Upload“
 Note: This step can take several minutes. Once completed you should see the DD-WRT page.
 - Open a command prompt again and telnet into the router (192.168.1.1) but this time for the username type in root for the username for the password use the one you chose when setting up the initial DD-WRT page.
- Again clear NVRAM by typing:
erase nvram - Reboot the router now by typing:
reboot
 Note: This step can take several minutes. Once completed you should see the DD-WRT page.
At this point it’s just a matter of setting up the router to your liking, such as username/password, wireless networks, security settings, etc.
How to get Port Forwarding working on DD-WRT
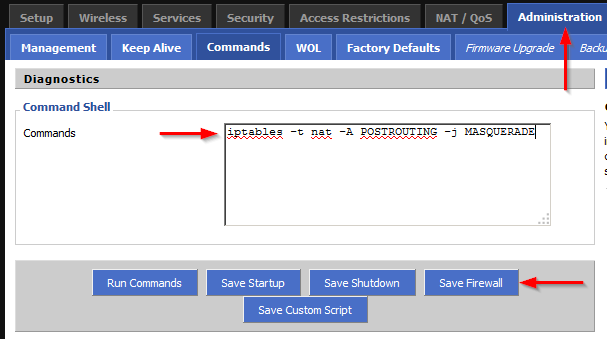
After upgrading my Asus RT-AC66U I noticed that for some reason port forwarding was not working. Apparently this is a known “bug” and is easily remedied by logging into the DD-WRT admin panel and navigating to: Administration > Commands then typing:
iptables -t nat -A POSTROUTING -j MASQUERADEand click on “Save Firewall“.
Immediately port forwarding started working and no other bugs have been found so far. Glad to be back on DD-WRT and the new Asus router seems to be performing just fine!
UPDATED: Updated instructions using the latest DD-WRT build as of 12/18/2014. Also removed parts detailing installing a KONG build as development for the builds have been merged into the standard DD-WRT image.
Got myself a new router, didn’t really need one, but got one just for the heck of it. So of course the first thing I did is put DD-WRT on it.
DD-WRT Firmware for the ASUS RT-AC68U
Looking over the following thread, it looks like at the time of writing (Nov 1st 2014) the 24461 firmware seems pretty stable.
With the ASUS router it’s a two step process to get DD-WRT on it, first we flash it with the BrainSlayer Firmware (.trx file) and then we update to the lastest Kong Build of DD-WRT (.bin file). For the Kong DD-WRT build I grabbed the 25015M version (other people had luck with it) .
DD-WRT Install Process
There is a pretty good youtube video on how to install DD-WRT on the RT-AC66U Router. The process they went through was like this:
- Enable Telnet on the Router
- Telnet into the router
- Flash the NVRAM –
mtd-erase -d nvram - Then reboot the router –
reboot - Re-open the admin page (http://192.168.1.1)
- Upload the initial dd-wrt firmware (Brainslayer) Administration -> Firmware Upgrade upload the trx file
- Enable telnet in dd-wrt
- Telnet back into the router, flash the nvram –
clear nvram / erase nvram - Reboot –
reboot - Upload the K3 Firmware bin file under Administration -> Firmware upgrade
There are also good instructions here and there is also a reddit page on it as well.
Flash the NVRAM on the ASUS Router
Here is what I did to clear the NVRAM on the Stock Install:
elatov@crbook:~$telnet 192.168.1.1
Trying 192.168.1.1...
Connected to 192.168.1.1.
Escape character is '^]'.
RT-AC68U login: admin
Password:

ASUSWRT RT-AC68U_3.0.0.4 Tue Jul 15 09:23:33 UTC 2014
admin@RT-AC68U:/tmp/home/root# df -Ph
Filesystem                Size      Used Available Capacity Mounted on
/dev/root                26.4M     26.4M         0 100% /
devtmpfs                124.7M         0    124.7M   0% /dev
tmpfs                   124.9M      3.9M    121.0M   3% /tmp
/dev/mtdblock4           62.8M      1.7M     61.1M   3% /jffs
admin@RT-AC68U:/tmp/home/root# uname  -a
Linux RT-AC68U 2.6.36.4brcmarm #1 SMP PREEMPT Tue Jul 15 17:34:10 CST 2014 armv7l GNU/Linux
admin@RT-AC68U:/tmp/home/root# mtd-erase2 nvram
admin@RT-AC68U:/tmp/home/root# reboot
admin@RT-AC68U:/tmp/home/root# Connection closed by foreign host
We can see that the router actually runs AsusWRT, I actually ran into a custom version of AsusWRT, it’s called AsusWRT Merlin:
- asuswrt-merlin Git
- Asuswrt-Merlin Download
- Asuswrt-Merlin — custom firmware for Asus routers
It looks pretty cool and a lot of people prefer to run that on the ASUS routers, cause the firmware is so close to the manufacturer one (the performance seems good). If I ever get tired of DD-WRT, I will definitely give AsusWRT Merlin a try.
Flash the Router with the BrainSlayer Firmware
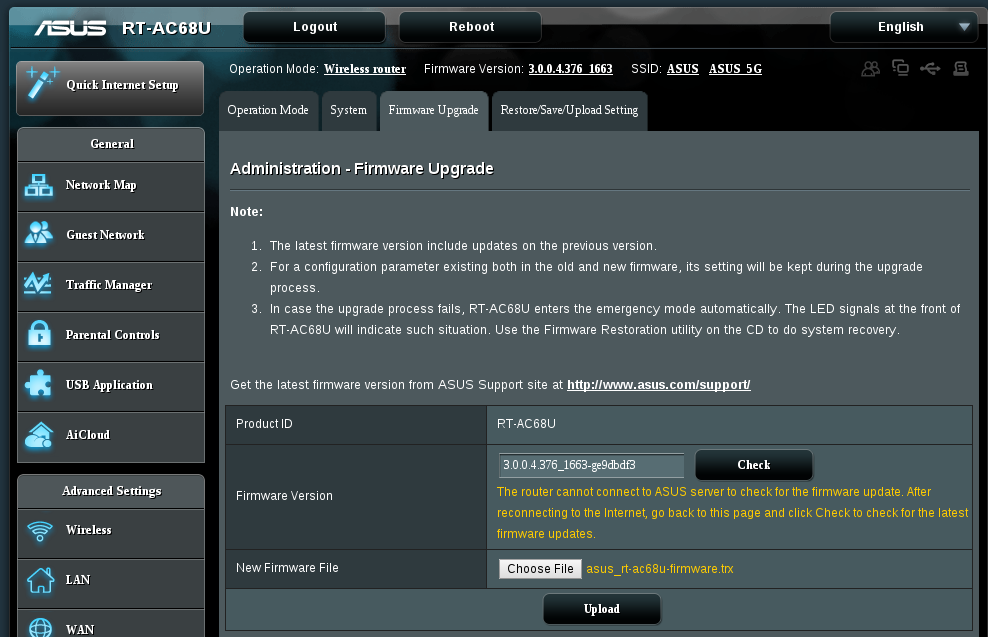
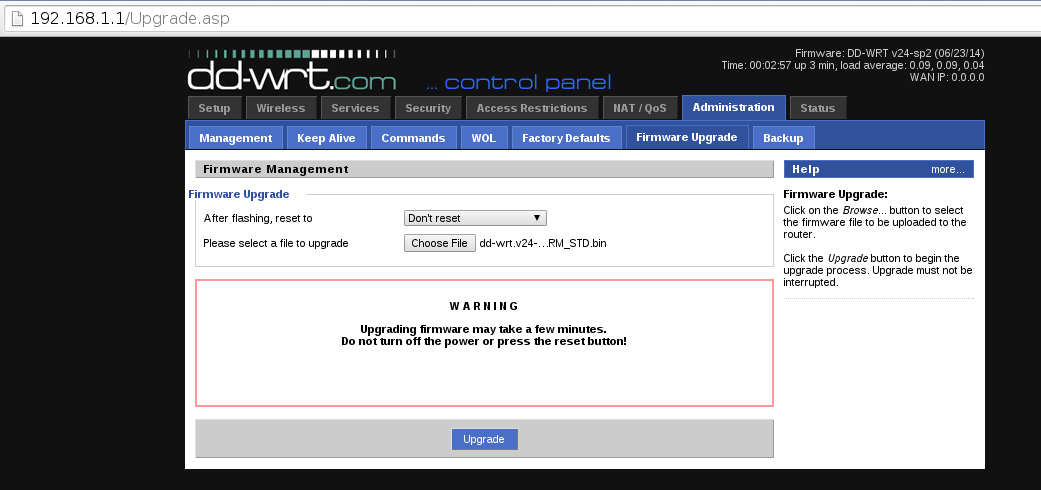
After the router rebooted (after I flashed the NVRAM), I went back to the Management console (http://192.168.1.1) and navigated to Administration -> Firmware Upgrade and uploaded the asus_rt-ac68u-firmware.trx file:
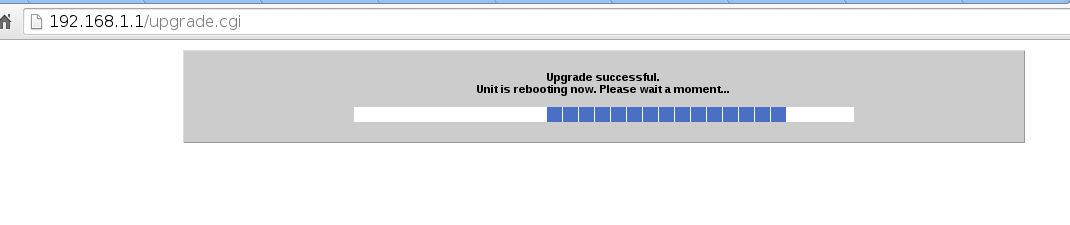
Upon hitting upload the upgrade will start and after it’s done you will see the following:

As I saw the firmware upgrade is finished, I telnet‘ed into the router and saw that dd-wrt is already installed (so I went ahead and rebooted the router):
elatov@fed:~$telnet 192.168.1.1
Trying 192.168.1.1...
Connected to 192.168.1.1.
Escape character is '^]'.

DD-WRT v24-sp2 std (c) 2014 NewMedia-NET GmbH
Release: 06/23/14 (SVN revision: 24461)

DD-WRT login: root
Password:
==========================================================

 ____  ___    __        ______ _____         ____  _  _
 | _ \| _ \   \ \      / /  _ \_   _| __   _|___ \| || |
 || | || ||____\ \ /\ / /| |_) || |   \ \ / / __) | || |_
 ||_| ||_||_____\ V  V / |  _ < | |    \ V / / __/|__   _|
 |___/|___/      \_/\_/  |_| \_\|_|     \_/ |_____|  |_|

					   DD-WRT v24-sp2
				   http://www.dd-wrt.com

==========================================================


BusyBox v1.22.1 (2014-06-23 04:49:23 CEST) built-in shell (ash)
Enter 'help' for a list of built-in commands.

root@DD-WRT:~# reboot
root@DD-WRT:~# Connection closed by foreign host.
Clear the NVRAM in DD-WRT
After it rebooted, I pointed my browser to 192.168.1.1 and saw the initial DD-WRT set password page:
I set the password, telnet‘ed again into the router, and cleared the NVRAM:
elatov@fed:~$telnet 192.168.1.1
Trying 192.168.1.1...
Connected to 192.168.1.1.
Escape character is '^]'.

DD-WRT v24-sp2 std (c) 2014 NewMedia-NET GmbH
Release: 06/23/14 (SVN revision: 24461)

DD-WRT login: root
Password:
==========================================================

 ____  ___    __        ______ _____         ____  _  _
 | _ \| _ \   \ \      / /  _ \_   _| __   _|___ \| || |
 || | || ||____\ \ /\ / /| |_) || |   \ \ / / __) | || |_
 ||_| ||_||_____\ V  V / |  _ < | |    \ V / / __/|__   _|
 |___/|___/      \_/\_/  |_| \_\|_|     \_/ |_____|  |_|

					   DD-WRT v24-sp2
				   http://www.dd-wrt.com

==========================================================


BusyBox v1.22.1 (2014-06-23 04:49:23 CEST) built-in shell (ash)
Enter 'help' for a list of built-in commands.

root@DD-WRT:~# df -Ph
Filesystem                Size      Used Available Capacity Mounted on
rootfs                   25.0M     25.0M         0 100% /
/dev/root                25.0M     25.0M         0 100% /
root@DD-WRT:~# uname -a
Linux DD-WRT 3.10.44 #2763 SMP Sun Jun 22 04:03:42 CEST 2014 armv7l GNU/Linux
root@DD-WRT:~# erase nvram
erase[1572864]
root@DD-WRT:~# reboot
root@DD-WRT:~# Connection closed by foreign host.
Install the Kong DD-WRT Build
After the rebooted finished, I went back to the Admin Console (http://192.168.1.1) and navigated to Administration -> Firmware Upgrade to apply the DD-WRT Kong Build. I uploaded the dd-wrt.v24-K3_AC_ARM_STD.bin file and I chose Don’t Reset:
After I hit upgrade the uploaded started and after it finished I saw the “Upgrade Successful” message:
After it rebooted (after applying the new dd-wrt build), I logged into router one more time and reset the NVRAM just for good measure:
elatov@fed:~$telnet 192.168.1.1
Trying 192.168.1.1...
Connected to 192.168.1.1.
Escape character is '^]'.

DD-WRT v24-sp2 kongac (c) 2014 NewMedia-NET GmbH
Release: 09/13/14 (SVN revision: 25015M)

DD-WRT login: root
Password:
==========================================================

 ____  ___    __        ______ _____         ____  _  _
 | _ \| _ \   \ \      / /  _ \_   _| __   _|___ \| || |
 || | || ||____\ \ /\ / /| |_) || |   \ \ / / __) | || |_
 ||_| ||_||_____\ V  V / |  _ < | |    \ V / / __/|__   _|
 |___/|___/      \_/\_/  |_| \_\|_|     \_/ |_____|  |_|

					   DD-WRT v24-sp2
				   http://www.dd-wrt.com

==========================================================


BusyBox v1.22.1 (2014-09-13 23:35:28 CEST) built-in shell (ash)
Enter 'help' for a list of built-in commands.

root@DD-WRT:~# erase nvram
erase[1572864]
root@DD-WRT:~# reboot
root@DD-WRT:~# Connection closed by foreign host.
After it was done, here is what I saw on the system settings page of DD-WRT:

Install a Later Version of iproute2
I was using fwbuilder to push my firewall to the DD-WRT router (check out my previous post on the setup) and I wanted to keep that. I realized the ip utility (which is part of iproute2 software) is limited, I could only get routes from the utility and nothing else:
root@DD-WRT:~# /usr/sbin/ip addr show
root@DD-WRT:~# /usr/sbin/ip rule ls
root@DD-WRT:~# /usr/sbin/ip route ls
default via 10.10.10.1 dev vlan2
10.0.0.0/24 dev vlan3  proto kernel  scope link  src 10.0.0.1
10.10.0/23 dev vlan2  proto kernel  scope link  src 10.10.10.1
127.0.0.0/8 dev lo  scope link
192.168.1.0/24 dev br0  proto kernel  scope link  src 192.168.1.1
But the fwbuilder script actually uses the ip addr functionality for some of it’s components. There are actually a bunch of forums on this:
- Does ‘ip rule’ work in latest DD-WRT builds?
- Dual WAN, selected traffic over second WAN (help needed!)
- /usr/sbin/ip not working in 18777
- ‘ip rule’ command broken in 21676 mega
- WZR-HP-G450H iproute2 tools
One of them provides an ip binary but it’s built for MIPS architecture and this new router runs on ARM. So I started to look elsewhere. At first I checked out the Optware on K3-AC-ARM and that recommended using an openwrt repository:
“builds >23453 will use openwrt packages”. The repository now in use is the OpenWRT imx6 repository, http://downloads.openwrt.org/snapshots/trunk/imx6/packages/
After trying that repository I wasn’t able to run the opkg binary. I then ran into Kong 24500 for Arm Routers and from that forum:
The build is based on 24500 but I added a few patches which show up in svn in later revisions. I just didn’t want to sync anything from >24500 since I did all my testing with 24500 and only added fixes for things I found. This time I tested a lot more services and features.
No uClibc anymore, thus any app that has been compiled for uClibc won’t work now. A new repo with apps compiled against musl is up and you can install them through opkg. I removed ipkg and added a script that installs opkg for you. Before it was required to have one partition mounted to /jffs and one to /opt, now /opt is enough (/jffs is still recommended as it is the default location for override configs and storage space for things like webserver etc.).
Bootstrap script will install opkg to /opt. Thus, if you already have a partition that is mounted to /opt, run the script “bootstrap”.
It looks there was a recent move to MUSL-ARM based packages and away from uClibc. More information on
that here as well. So when I used this repository:
http://downloads.openwrt.org/snapshots/trunk/imx6/
It wouldn’t run cause they are build against the uClibc library. There is also a bootstrap file on the router to setup the right repository. Here is what I did to install the right version of optware on the Asus RT-AC68U Router:
root@DD-WRT:~# mkdir /jffs/opt
root@DD-WRT:~# mount --bind /jffs/opt /opt
root@DD-WRT:~# bootstrap
Bootstrap is checking prerequisites...

You did not enable USB automount.
Echo optpart /dev/mtdblock/4 on /opt type jffs2 (rw,relatime)
Found a valid partition: /opt.

Proceed with download and install of opkg? (y/n) [default=n]: y
Connecting to www.desipro.de (82.165.77.220:80)
opkg.ipk             100% |**********************************************************| 56268   0:00:00 ETA
Bootstrap complete. You can now use opkg to install additional packages.
root@DD-WRT:~# which opkg
/opt/bin/opkg
root@DD-WRT:~# opkg update
Downloading http://www.desipro.de/bcm53xx-musl/packages/Packages.gz.
Updated list of available packages in /opt/var/opkg-lists/kongac.
And here is what I ran to install the iproute2 package:
root@DD-WRT:~# opkg -f /opt/etc/opkg.conf install ip
Installing ip (3.15.0-1) to root...
Downloading http://www.desipro.de/bcm53xx-musl/packages/ip_3.15.0-1_bcm53xx.ipk.
Installing libc (1.1.3-1) to root...
Downloading http://www.desipro.de/bcm53xx-musl/packages/libc_1.1.3-1_bcm53xx.ipk.
Installing libgcc (4.9-linaro-1) to root...
Downloading http://www.desipro.de/bcm53xx-musl/packages/libgcc_4.9-linaro-1_bcm53xx.ipk.
Installing libnl-tiny (0.1-3) to root...
Downloading http://www.desipro.de/bcm53xx-musl/packages/libnl-tiny_0.1-3_bcm53xx.ipk.
Configuring libgcc.
Configuring libc.
Configuring libnl-tiny.
Configuring ip.
After I installed the right one I saw the binary point to the /lib/ld-musl-arm.so.1 file:
root@DD-WRT:~# /opt/usr/bin/readelf -l /opt/usr/sbin/ip

Elf file type is EXEC (Executable file)
Entry point 0xa8b4
There are 6 program headers, starting at offset 52

Program Headers:
  Type           Offset   VirtAddr   PhysAddr   FileSiz MemSiz  Flg Align
  PHDR           0x000034 0x00008034 0x00008034 0x000c0 0x000c0 R E 0x4
  INTERP         0x0000f4 0x000080f4 0x000080f4 0x00016 0x00016 R   0x1
	  [Requesting program interpreter: /lib/ld-musl-arm.so.1]
  LOAD           0x000000 0x00008000 0x00008000 0x283dc 0x283dc R E 0x8000
  LOAD           0x0283dc 0x000383dc 0x000383dc 0x01d3b 0x045e8 RW  0x8000
  DYNAMIC        0x0283e4 0x000383e4 0x000383e4 0x000f0 0x000f0 RW  0x4
  GNU_STACK      0x000000 0x00000000 0x00000000 0x00000 0x00000 RW  0x10
While the non-working ones pointed to the uClibc:
$readelf -l opkg

Elf file type is EXEC (Executable file)
Entry point 0x12c00
There are 6 program headers, starting at offset 52

Program Headers:
  Type           Offset   VirtAddr   PhysAddr   FileSiz MemSiz  Flg Align
  PHDR           0x000034 0x00010034 0x00010034 0x000c0 0x000c0 R E 0x4
  INTERP         0x0000f4 0x000100f4 0x000100f4 0x00014 0x00014 R   0x1
	  [Requesting program interpreter: /lib/ld-uClibc.so.0]
  LOAD           0x000000 0x00010000 0x00010000 0x1d9c8 0x1d9c8 R E 0x10000
  LOAD           0x01e000 0x0003e000 0x0003e000 0x00a60 0x00c48 RW  0x10000
  DYNAMIC        0x01e008 0x0003e008 0x0003e008 0x00100 0x00100 RW  0x4
  GNU_STACK      0x000000 0x00000000 0x00000000 0x00000 0x00000 RW  0x10
Just for reference here are the repository settings for the MUSL-ARM packages:
root@DD-WRT:~# cat /opt/etc/opkg.conf
src/gz kongac http://www.desipro.de/bcm53xx-musl/packages
dest root /opt
dest ram /tmp
lists_dir ext /opt/var/opkg-lists
option overlay_root /overlay
After installing a newer version of iproute2, here is the output of ip:
root@DD-WRT:~# /opt/usr/sbin/ip -4 a
1: lo: <LOOPBACK,MULTICAST,UP,LOWER_UP> mtu 65536 qdisc noqueue state UNKNOWN group default
	inet 127.0.0.1/8 brd 127.255.255.255 scope host lo
	   valid_lft forever preferred_lft forever
5: vlan2@eth0: <BROADCAST,MULTICAST,UP,LOWER_UP> mtu 1500 qdisc pfifo_fast state UP group default qlen 1000
	inet 10.10.10.1/23 brd 10.10.10.255 scope global vlan2
	   valid_lft forever preferred_lft forever
8: vlan3@eth0: <BROADCAST,MULTICAST,UP,LOWER_UP> mtu 1500 qdisc noqueue state UP group default
	inet 10.0.0.1/24 brd 10.0.0.255 scope global vlan3
	   valid_lft forever preferred_lft forever
9: br0: <BROADCAST,MULTICAST,UP,LOWER_UP> mtu 1500 qdisc noqueue state UP group default
	inet 169.254.255.1/16 brd 169.254.255.255 scope global br0:0
	   valid_lft forever preferred_lft forever
	inet 192.168.1.1/24 brd 192.168.1.255 scope global br0
	   valid_lft forever preferred_lft forever
Then on the fwbuilder side, I just pointed to the correct path of the ip utility:
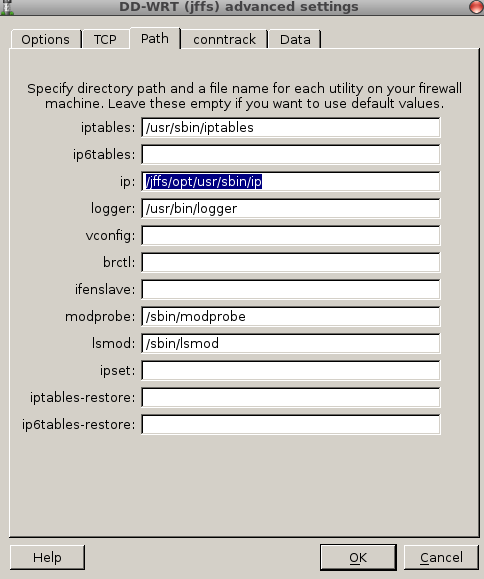
And then fwbuilder pushed the same settings without any issues.
VLAN configs
For some reason I had some issues with this one. In my previous post I ended using the t flag to signify that a VLAN will be tagged on a specific port (I basically ran this):
nvram set vlan1ports="4t 3 2 1 8*"
nvram set vlan3ports="4t 8"
nvram set port4vlans="1 3 18 19"
But that didn’t work on this version of the router/dd-wrt. Here were the defaults, before I made any changes:
root@DD-WRT:~# nvram show | grep vlan.port
size: 30373 bytes (35163 left)
vlan2ports=0 5u
vlan1ports=1 2 3 4 5*
root@DD-WRT:~# nvram show | grep port.vlan
size: 30373 bytes (35163 left)
port5vlans=1 2 16
port3vlans=1
port1vlans=1
port4vlans=1
port2vlans=1
port0vlans=2
root@DD-WRT:~# nvram show | grep vlan.hw
size: 30373 bytes (35163 left)
vlan2hwname=et0
vlan1hwname=et0
I then read over the following pages:
- Creating VLANs in DD-WRT (Part 1)
- Asus RT-AC66U, VLAN & WLAN
- DD-WRT heading two seperate networks
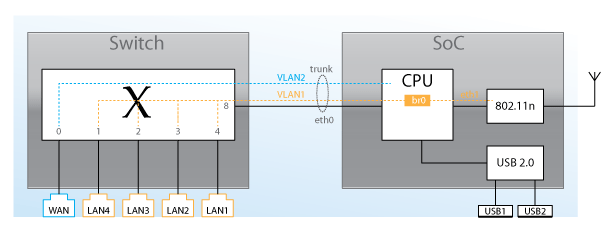
The last one has a nice picture to remind me how the networking worked on the dd-wrt Router:
But the first two links used the 16 parameter on the (portvlans setttings), which is the equivilant of the tagged option checked on the GUI. So in the end, I ended up with the following config (notice I didn’t even set the vlan3ports… but it still worked out):
root@DD-WRT:~# cat /proc/vlan* | grep VID
vlan1  VID: 1	 REORDER_HDR: 1  dev->priv_flags: 4001
vlan2  VID: 2	 REORDER_HDR: 1  dev->priv_flags: 1
vlan3  VID: 3	 REORDER_HDR: 1  dev->priv_flags: 1
root@DD-WRT:~# nvram show | grep vlan.ports
size: 34420 bytes (31116 left)
vlan2ports=0 5u
vlan1ports=1 2 3 4 5*
root@DD-WRT:~# nvram show | grep port.vlan
size: 34420 bytes (31116 left)
port5vlans=1 2 3 16
port3vlans=1
port1vlans=1
port4vlans=1 3 16
port2vlans=1
port0vlans=2
root@DD-WRT:~# nvram show | grep vlan3
mdhcpd=vlan3>On>100>50>3600
size: 34420 bytes (31116 left)
vlan3_netmask=255.255.255.0
vlan3_txq=0
vlan3_ipaddr=10.0.0.1
vlan3_mtu=1500
vlan3_multicast=0
vlan3_nat=1
vlan3_bridged=0
and that allowed me to use tagged vlans (trunk port) on the 4th port, just like before.