Openwrt Telegram Bot
Telegram bot for router with firmware Lede/Openwrt.
Implemented functions (Commands via Telegram message)
- /memory return RAM info
- /clients connected clients
- /wll_list wifi clients
- /wifi_list wifi info
- /reboot reboot the device
- /wol <mac_address> wake on lan over the Internet
- /wanip WAN ip address
- /<script_name> any scripts in the
pluginsdirectory
Prerequisites
Telegram bot run under Lede or Openwrt firmware than the first prerequisite is to have Lede/Openwrt installed.
Second prerequisite is to have curl package installed. You can do this with command opkg update && opkg install curl.
Installation Steps
Step one:
-
Get your chat_id of Telegram. If you don’t know what is your chat_id you can use bot @get_id_bot.
-
Get a bot token and start your bot. If you don’t know how get it you can use bot @BotFather. Send him /newbot command , name of your new bot and a username. Get the returned string «Use this token to access the HTTP API:»
Step two:
Copy the files of this repo under / directory of your Lede/Openwrt system.
Set files as executable with commands:
chmod +x -R /usr/lib/telegram-bot/* /usr/lib/telegram-bot/functions/*
chmod +x /etc/init.d/telegram_bot
service telegram_bot enable
Step three:
Set your variables (bot token and chat id) in telegram_bot file under /etc/config/ dir.
uci set telegram_bot.config.bot_token='[PUT YOUR BOT TOKEN HERE]'
uci set telegram_bot.config.chat_id='[PUT YOUR CHAT ID HERE]'

uci commit telegram_bot
Start telegram_bot service with commands:
service telegram_bot restart
Enjoy your bot!
One feature I really liked from my old Xfinity router were the push notifications it sent when new devices first joined my wireless network. In this post we’re recreating that functionality on an OpenWRT access point/router with the Telegram API.
Create a Telegram bot
Creating a bot is super simple. First, start a converation with BotFather. He will guide you through creating a new bot!
Josh:       /newbot
BotFather:  Pick a name.
Josh:       My Bot
BotFather:  Pick a nickname.
Josh:       myBot
BotFather:
            Done! Congratulations on your new bot, t.me/myBot.
            Use this token to access the HTTP API:
            <YOUR_API_KEY_HERE>
            Keep your token secure, it can be used to control your bot.
Now create a group chat in the Telegram app and invited my new bot. To retrieve that group chat’s telegram “ID”, you can invoke getUpdates to see all active chats your bot is in (which should just be the single one you added it to). I use jq to parse the returned JSON.
NOTE: if this is a group chat you’ll need to do some extra steps — see this StackOverflow post
[UPDATE] An even easier way to get the chat id is by signing into the web version of telegram and looking for the chat id query parameter!
Replace $APIKEY with your api key.
curl https://api.telegram.org/bot$APIKEY/getUpdates| jq
The response will look someting like this.
{
  "ok": true,
  "result": [
    {
      "update_id": 999999999,
      "message": {
        "message_id": 1,
        "from": {
          "id": XXXXXXXXXXX,
          "is_bot": false,
          "first_name": "Josh",
          "language_code": "en"
        },
        "chat": {
          "id": XXXXXXXXXXX,
          "first_name": "Josh",
          "type": "private"
          ...
          ...
          ...
You’ll want to take note of the value you see in place of XXXXXXXXXX, which represents the $CHATID below.
We then make a simple GET request formatted like below. Note the word “bot” preceding your API key.
Replace $APIKEY, $CHATID, and $MSG appropriately.
curl https://api.telegram.org/bot$APIKEY/sendMessage?chat_id=$CHATID&text=$MSG
The $MSG field can be anything url encoded. That’s the message you’ll receive in the telegram group chat from your bot.
Configure Your OpenWRT router
Install hostapd-utils
Thanks to this post, I found a really elegant way to to only run my script on an association (connect/disconnect) from my access point.
On your router, install the package hostapd-utils and configure it to run our script on each interface you’d like it to watch. For example if you have a guest SSID on the 2.4GHz band and your “main” SSID on both bands, you’ll have three interfaces you need to set up. Make sure to install hostapd-utils. The rest we will be wrapping into a script to run on each boot.
opkg install hostapd-utils

hostapd_cli -a/root/alert.sh -B -iwlan0
hostapd_cli -a/root/alert.sh -B -iwlan0-1
hostapd_cli -a/root/alert.sh -B -iwlan1
Scripts
I have three scripts in total. (1) A script I run on each boot, (2) a script run on an association event to my access point, and (3) a script to manually run through all active associations. These scripts can be anywhere on your router. For this example, i’m placing the script in /root, naming them event_alert.sh and boot_alert.sh, and manual_alert.sh.
Boot Script
The boot script is run once on boot. We’re going to invoke our boot script from /etc/rc.local.
/etc/rc.local
/root/boot_alert.sh
exit 0
This script alerts us that our router has restarted, and also sets up the connection events to listen for. Due to a race condition, I just simply sleep for 20 seconds before setting up the events. I then run manual_alert.sh to catch any associations i’ve missed in that 20 seconds.
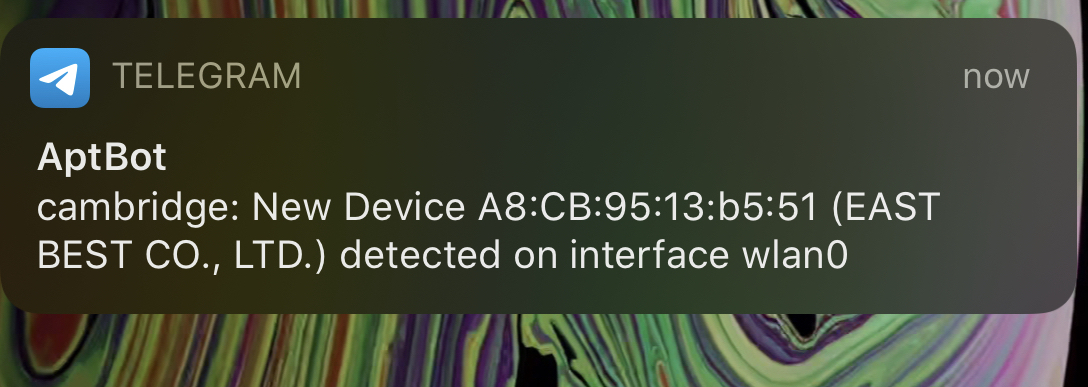
Manual Script
This script simply loops through and fetches every MAC address currently associated with the AP. Then it checks against a local cache of “seen” MAC addresses. If the grep fails on that file, we first make an API call to macvendors.com to get a rough idea of the device. The first half of a (non-spoofed) MAC address indicates the device vendor! It will then send a Telegram message to my phone with the device’s information.
Event Script
This script will run when a device associates (or dissociates) with the access point. It is automatically called by hostapd through the setup we did in the boot script above. If it finds a match, it works just like the script above, logging the MAC in the shared cache and sending a Telegram message.
The script will now run each time a device starts talking with your AP. While not resiliant to MAC spoofing, it is a quick and easy way to keep an eye on new devices joining your networks 
A simple, barebones template to script telegram message can be seen below.
#!/bin/bash

# Sends a telegram message to your bot!

MESSAGE="$1"

API_TOKEN=''
CHAT_ID=''

TELEGRAM="https://api.telegram.org/bot$API_TOKEN/sendMessage?chat_id=$CHAT_ID&text="

/usr/bin/curl "$TELEGRAM$MESSAGE"
Usage: ./telegram.sh "Hello World!"
|
|
#1 |
|
Senior Member |
Наткнулся на полезный проект — Сначала создаем группу, потом узнаем ее ID, прописываем его в конфиг бота, перезапускаем, после этого можно добавлять бота в группу. в папке usr/bin — примеры скриптов, можно редактировать для собственных целей.
Последний раз редактировалось solalex; 02.12.2017 в 18:51.
|

|
|


|
|
#2 |
|
Junior Member Регистрация: 06.01.2018 Адрес: Петербург Сообщений: 4 Вес репутации: 0
|
Отпишусь пожалуй тут. |
|
|
|

|
|
#3 |
|
Administrator
|
Цитата: Если кому-то нужно могу подсказать что к чему. Подскажи. Можешь выложить подправленный скрипт? |
|
|
|

|
|
#4 |
|
Junior Member Регистрация: 06.01.2018 Адрес: Петербург Сообщений: 4 Вес репутации: 0
|
Вот подправленный скрипт. Все вместе, весь проект, zip-архиве telegram_bot.zip или отдельно только скрипт бота — Развернуть для просмотраКод: #!/bin/sh
#
PATH='/usr/bin:/usr/sbin:/bin:/sbin'
token=`uci get telegram.bot.token`
rupor=`uci get telegram.bot.rupor`
start=`uci get telegram.bot.start`
api="https://api.telegram.org/bot$token"
offset_file=/tmp/telegram_offset
if [ "$start" == "0" ]; then
echo "Launch of the Telegram_bot is not allowed." | logger -t "telegram_bot" -p daemon.info
exit 1
fi
sleep 10
#keyboard='{"keyboard": [["/snap \uD83D\uDCF7","/guard \uD83D\uDC6E","/relay \uD83D\uDCA1"],["/system \uD83D\uDCCA","/reboot \uD83D\uDCA9","/menu \uD83D\uDD25"]],"resize_keyboard":true,"one_time_keyboard":false}'
curl -k -s -X POST -H "Charset: UTF-8" $api/sendMessage -d chat_id=$rupor -d parse_mode=Markdown --data-urlencode text="Router started." >/dev/null 2>&1
curl -k -s -X POST -H "Charset: UTF-8" $api/sendMessage -d chat_id=$rupor -d "text=Please insert command:" >/dev/null 2>&1
curl -k -s -X POST -H "Charset: UTF-8" $api/sendMessage -d chat_id=$rupor -d "text=/guard /menu /reboot" >/dev/null 2>&1
curl -k -s -X POST -H "Charset: UTF-8" $api/sendMessage -d chat_id=$rupor -d "text=/relay /snap /system" >/dev/null 2>&1
#-d \"reply_markup=${keyboard}\"
offset=0
if [ -f "$offset_file" ]; then
offset=$( cat $offset_file )
else
echo $offset > $offset_file
fi
reply_to_msg () {
msg_id=$1
origin=$2
eval toReturn="$3"
curl -k -s -X POST -H "Charset: UTF-8" $api/sendMessage -d reply_to_message_id=$msg_id -d chat_id=$origin -d parse_mode=HTML --data-urlencode text="$toReturn" >/dev/null 2>&1
}
while [ true ]
do
updates=$(curl -s -k -X GET $api/getUpdates?offset=$offset)
status=$(jsonfilter -s "$updates" -e '$.ok')
if [ $status = 'true' ]; then
update_ids=$(jsonfilter -s "$updates" -e '$.result[*].update_id')
for update_id in $update_ids
do
offset=$((update_id+1))
echo $offset > $offset_file
origin=$(jsonfilter -s "$updates" -e '$.result[@.update_id='$update_id'].channel_post.chat.id')
msg_id=$(jsonfilter -s "$updates" -e '$.result[@.update_id='$update_id'].channel_post.message_id')
command=$(jsonfilter -s "$updates" -e '$.result[@.update_id='$update_id'].channel_post.text')
is_a_cmd=$(jsonfilter -s "$updates" -e '$.result[@.update_id='$update_id'].channel_post.entities[*].type')
query_ans=$(jsonfilter -s "$updates" -e '$.result[@.update_id='$update_id'].callback_query.id')
origin_ans=$(jsonfilter -s "$updates" -e '$.result[@.update_id='$update_id'].callback_query.channel_post.chat.id')
if [[ "$origin" != "$rupor" && "$origin_ans" != "$rupor" ]];then
curl -k -s -X POST -H "Charset: UTF-8" $api/sendMessage -d reply_to_message_id=$msg_id -d chat_id=$origin -d parse_mode=Markdown --data-urlencode text="This is a Private bot." >/dev/null 2>&1
curl -k -s -X POST $api/leaveChat -d chat_id=$origin >/dev/null 2>&1
else
if [ "$is_a_cmd" == "bot_command" ]; then
cmd=$(echo $command | awk '{print $1}')
DATE=`date +%Y-%m-%d_%H:%M:%S`
case "$cmd" in
("/guard")
echo "[ $DATE ] Run /guard command !" | logger -t "telegram_bot" -p daemon.info
informex_guard=$("tg_guard.sh")
reply_to_msg $msg_id $origin "\${informex_guard}"
;;
("/menu")
echo "[ $DATE ] Run /menu command !" | logger -t "telegram_bot" -p daemon.info
curl -k -s -X POST -H "Charset: UTF-8" $api/sendMessage -d chat_id=$rupor -d "text=Please insert command:" >/dev/null 2>&1
curl -k -s -X POST -H "Charset: UTF-8" $api/sendMessage -d chat_id=$rupor -d "text=/guard /menu /reboot" >/dev/null 2>&1
curl -k -s -X POST -H "Charset: UTF-8" $api/sendMessage -d chat_id=$rupor -d "text=/relay /snap /system" >/dev/null 2>&1
#-d "reply_markup=${keyboard}"
;;
("/reboot")
echo "[ $DATE ] Run /reboot command !" | logger -t "telegram_bot" -p daemon.info
informex_reboot=$("tg_reboot.sh")
reply_to_msg $msg_id $origin "\${informex_reboot}"
;;
("/relay")
echo "[ $DATE ] Run /relay command !" | logger -t "telegram_bot" -p daemon.info
informex_relay=$("tg_relay.sh")
reply_to_msg $msg_id $origin "\${informex_relay}"
;;
("/snap")
echo "[ $DATE ] Run /snap command !" | logger -t "telegram_bot" -p daemon.info
informex_system=$("tg_snap.sh")
reply_to_msg $msg_id $origin "\${informex_system}"
;;
("/system")
echo "[ $DATE ] Run /system command !" | logger -t "telegram_bot" -p daemon.info
informex_system=$("tg_system.sh")
reply_to_msg $msg_id $origin "\${informex_system}"
;;
(*)
echo "[ $DATE ] $cmd command not enabled" | logger -t "telegram_bot" -p daemon.info
informex_unknown="This command is not enabled."
reply_to_msg $msg_id $origin "\${informex_unknown}"
;;
esac
else
curl -k -s -X POST -H "Charset: UTF-8" $api/sendMessage -d reply_to_message_id=$msg_id -d chat_id=$origin -d parse_mode=Markdown --data-urlencode text="Is not a command." >/dev/null 2>&1
fi
fi
done
fi
sleep 1
done &
[свернуть] |
|
|
|
|
|
#5 |
|
Junior Member Регистрация: 06.01.2018 Адрес: Петербург Сообщений: 4 Вес репутации: 0
|
Так еще стоит отметить что в данном случае у меня бот привязан к каналу и соответственно слушает и отвечает всем в канале. Оффтоп: |
|
|
|
|
|
#6 |
|
Junior Member Регистрация: 06.01.2018 Адрес: Петербург Сообщений: 4 Вес репутации: 0
|
Пожалуй перепишу клавиатуру под InlineKeyboardMarkup будет выводить в канале, но не снизу, а там-же где основные сообщения. Так вроде должно работать. |
|
|
|
|
|
#7 |
|
Administrator
|
Спасибо! |
|
|
|
|
|
#8 |
|
Junior Member Регистрация: 27.01.2018 Сообщений: 3 Вес репутации: 0
|
Цитата:
Сообщение от DotBob Так еще стоит отметить что в данном случае у меня бот привязан к каналу и соответственно слушает и отвечает всем в канале. Оффтоп: Отличная идея с управлением шлагбаумом! наше еще web интерфейс для настройки этого бота от того же автора ссылка
Последний раз редактировалось 3km; 27.01.2018 в 01:42.
|
|
|
|

|
|
#9 |
|
Junior Member Регистрация: 22.02.2018 Сообщений: 1 Вес репутации: 0
|
У меня мой телеграм работает нормально и на телефоне и на компьютере. |
|
|
|
Telegram Scripts for OpenWrt
This is a set of scripts with a plugins API written in bash, you can use it to manage and get informations on OpenWRT Routers.
How its works ?
First of all,
Make a bot for you !
https://core.telegram.org/bots/api#authorizing-your-bot
With the bot created, you need to replace «[PUT YOUR BOT KEY HERE]» in the telegramopenwrt config file with your bot key.
Second, you need to send a initial message to your bot in Telegram App.
After you send the message, in the OpenWRT run this:
curl -s -k -X GET https://api.telegram.org/bot<YOUR BOT ID>/getUpdates | grep -oE "\"id\":[[:digit:]]+" | head -n1 | awk -F : '{print $2}'
Get the number and replace «[PUT ID OF THE CHAT THAT YOU START WITH BOT]» in the telegramopenwrt config.
Directory structure
├── etc
│   ├── config
│   │   └── telegramopenwrt
│   └── init.d
│       ├── hosts_scan
│       ├── lanports
│       └── telegram_bot
├── LICENSE
├── README.md
├── sbin
│   ├── camkeyboard
│   ├── hosts_scan
│   ├── lanports
│   ├── proxy
│   ├── telebot
│   ├── telegram_bot
│   ├── telegram_sender
│   ├── telekeyboard
│   └── typing
└── usr
    └── lib
        └── telegramopenwrt
            └── plugins
                ├── actions
                │   ├── cam_mv
                │   ├── fw_delete
                │   ├── fw_disable
                │   ├── fw_enable
                │   ├── fwr_disable
                │   ├── fwr_enable
                │   ├── light_control
                │   ├── proc_restart
                │   ├── proc_start
                │   ├── proc_stop
                │   ├── proxy_disable
                │   ├── proxy_enable
                │   ├── wifi_disable
                │   ├── wifi_enable
                │   └── wifi_restart
                ├── cam_movie
                ├── cam_mv
                ├── cam_shot
                ├── cam_vdo
                ├── ctx
                │   ├── cam_kbd
                │   ├── fw_list
                │   ├── fwr_list
                │   ├── light_list
                │   ├── proxy
                │   ├── reboot
                │   ├── service_list
                │   └── wifi_list
                ├── fw_add
                ├── fw_delete
                ├── fw_disable
                ├── fw_enable
                ├── fw_list
                ├── fwr_disable
                ├── fwr_enable
                ├── fwr_list
                ├── fw_unblock
                ├── get_ip
                ├── get_mac
                ├── get_ping
                ├── get_uptime
                ├── help
                │   ├── cam_movie
                │   ├── cam_mv
                │   ├── cam_shot
                │   ├── cam_vdo
                │   ├── fw_add
                │   ├── fw_delete
                │   ├── fw_disable
                │   ├── fw_enable
                │   ├── fw_list
                │   ├── fwr_disable
                │   ├── fwr_enable
                │   ├── fwr_list
                │   ├── fw_unblock
                │   ├── get_ip
                │   ├── get_mac
                │   ├── get_ping
                │   ├── get_uptime
                │   ├── hst_list
                │   ├── lights
                │   ├── msg_tv
                │   ├── netstat
                │   ├── proc_list
                │   ├── proc_restart
                │   ├── proc_start
                │   ├── proc_stop
                │   ├── proxy_disable
                │   ├── proxy_enable
                │   ├── proxy_list
                │   ├── reboot
                │   ├── start
                │   ├── swports_list
                │   ├── wifi_disable
                │   ├── wifi_enable
                │   ├── wifi_list
                │   ├── wifi_restart
                │   └── wll_list
                ├── hst_list
                ├── lights
                ├── msg_tv
                ├── netstat
                ├── proc_list
                ├── proc_restart
                ├── proc_start
                ├── proc_stop
                ├── proxy_disable
                ├── proxy_enable
                ├── proxy_list
                ├── reboot
                ├── start
                ├── swports_list
                ├── wifi_disable
                ├── wifi_enable
                ├── wifi_list
                ├── wifi_restart
                └── wll_list

11 directories, 110 files
lanports file
This file reads the router logs with the logread -f command, and sends messages via bot telegram if a router port is turned off / on or the router delivers an IP address via DHCP.
init.d directory
Contains the necessary files for the scripts to be started at the router boot, just move them to the /etc/init.d/ of the router and run:
/etc/init.d/lanports enable
/etc/init.d/telegram_bot enable
And then:
/etc/init.d/lanports start
/etc/init.d/telegram_bot start
plugins directory
This is the main directory, it contains all the commands that the telegram bot can execute.
There are some pre-built commands, which are:
- cam_movie: Record 25 seconds of a camIP and send it.
- cam_mv: Move the camera arround.
- cam_shot: Get a Pic from the camera.
- cam_vdo: Get a 25 seconds record from a camIP.
- fw_add: Block a hostname using a deny rule in firewall, if append time to command will block from 23:00 to 8:00
- fw_delete: Remove a hostname from a deny firewall rule, if hostname is empty, will remove all rules created by this bot.
- fw_disable: Disable a firewall rule.
- fw_enable: Enable a firewall rule.
- fw_list: List all fw rules.
- fwr_disable: Disable a redirect firewall rule.
- fwr_enable: Enable a redirect firewall rule.
- fwr_list: List all redirect fw rules.
- fw_unblock: Remove a hostname from a deny firewall rule, if hostname is empty, will remove all rules created by this bot.
- get_ip: Get WAN IPAddress.
- get_mac: Get the Organization that onwer the MacAddr.
- get_ping: Ping a address or host, return Up or Down.
- get_uptime: Return the uptime from this Device.
- hst_list: Get hosts in the dhcp Leases. If a hostname is present, search only for this hostname.
- lights: Turn On or Off house Lights.
- msg_tv: Send Message to Samsung TV
- netstat: Prints netstat table in ESTABLISHED, CLOSED and TIME_WAIT State.
- proc_list: List all process in execution
- proc_restart: Restart a process in init.d
- proc_start: Start a process in init.d
- proc_stop: Stop a process in init.d
- proxy_disable: Disable HTTP and HTTPS or HTTP or HTTPS proxy.
- proxy_enable: Enable HTTP and HTTPS or HTTP or HTTPS proxy.
- proxy_list: List proxy rules that is enabled.
- reboot: Reboot the router.
- start: This menu help!
- swports_list: Switch ports list with states.
- wifi_disable: Disable a wireless device radio.
- wifi_enable: Enable a wireless device radio.
- wifi_list: List all wireless devices.
- wifi_restart: Restart a wireless device radio.
- wll_list: Get a wifi clients list that is connected to this devices.
help directory inside plugins
This is the directory containing the help files, with the same name as the command, to be displayed by the start command.
telebot file
This file sends the telegram bot messages generated by lanports
telegram_bot
The telegram_bot script is a loop that receives the updates every second and checks to see if there is a command to execute. If there is a command, the script checks to see if there is a file with the same name as the command inside the plugins directory and runs it, if it exists. The output of the executed script is sent as a response message from the command.
Inside the plugins directory, there is the special command «start», which returns a message with the commands and a brief help on each command.
For this command to work properly, you need to create a file inside the plugins / help directory, with the name equal to the command.
License
See LICENSE file.
Package Guidelines
See CONTRIBUTING.md file.
Open Source Agenda is not affiliated with «Telegramopenwrt» Project. README Source: alexwbaule/telegramopenwrt
For the past 5 years or so, I have been using a single ISP at home and mobile data for backup when it went down. But since last few months, the ISP service became a bit unreliable – this is more related to the rainy season. Mobile data doesn’t give fiber like constant speeds I get on the wire. It’s very annoying to browse at < 10 Mbps on mobile data when you are used to 100 Mbps on the wire.
I decided to get another fiber pipe from a local ISP. One needs to be very unlucky to have both going down at the same time – I hope that never happens. Now the question is how to monitor the two connections: Why do I need monitoring? – so that I can inform the ISP when it goes down, with the fail-over happening automatically thanks to OpenWRT’s mwan3 package, I won’t ever know when I am using which ISP (unless I am checking the public IP address, of course).
The solution: A custom API and a Telegram bot. For those not aware about Telegram, it is an amazing messaging app just like Whatsapp with way more features (bots, channels), and does away with some idiosyncrasies of Whatsapp such as restricting you to always have the phone connected.
A Telegram bot is fairly simple to write, you just have to use their API. Now this bot is just going to send me messages, I am never going to send any to it, so implementing my WAN monitor bot was very easy.
My router is a TP Link WR740N which has 4 MB flash – so it is not possible to have curl with SSL support which is required by the API. I wrote a custom script which can be called over HTTP and plays well with the default wget. The script is present on a cloud server which can, obviously, do the SSL stuff.
A custom wrapper to Telegram API to send message in PHP:
<?php

$key = '<a random key>';

if ($_REQUEST['key'] != $key) {
    die("Access Denied");
}

$interface = $_REQUEST['interface'];
$status = $_REQUEST['status'];

$interface_map = array(
    'wan1' => 'ISP1',
    'wan2' => 'ISP2'
);

$status_map = array(
    'ifdown' => 'Down',
    'ifup' => 'Up'
);

$message = "TRIGGER: ${interface_map[$interface]} is ${status_map[$status]}";

$ch = curl_init("https://api.telegram.org/bot<bot ID>/sendMessage");

curl_setopt($ch, CURLOPT_POST, true);
curl_setopt($ch, CURLOPT_POSTFIELDS, array(
    'chat_id' => '<your chat id>',
    'text' => $message
));
curl_exec($ch);
The <your chat id> part needs to be discovered once you send a /start command to your bot and use Telegram’s getUpdates method. You will get it in API’s response JSON. $key is just a security check to prevent external attacks on the script.
And this script is called on interface events by mwan3 (/etc/mwan3.user ):
wget -O /dev/null "http://<server ip address>/wanupdate.php?interface=$INTERFACE&status=$ACTION&key=<your random key>" >/dev/null 2>/dev/null &
Shell script to monitor connections by cron directly from the server:
#!/bin/bash

nc -w 2 -z <ip address> <port number>
isp1_status=$?

nc -w 2 -z <ip address> <port number>
isp2_status=$?

sendmsg() {
    curl https://api.telegram.org/bot<bot id>/sendMessage -d chat_id=<chat id> -d text="$1" &> /dev/null
}

if [[ $isp1_status -ne 0 ]]; then
    sendmsg "MONITOR: ISP1 is Down"
fi

if [[ $isp2_status -ne 0 ]]; then
    sendmsg "MONITOR: ISP2 is Down"
fi
The above script uses netcat to do the link test using a TCP connection to a port number which is port forwarded to a server because I found ping was doing some false positives. I couldn’t reproduce it when I was trying it manually but I used to get DOWN messages even though the connection was working.
One must wonder though, how will the message reach me via Telegram when both ISPs go down at the same time – well I leave that job to Android and mobile data. Android switches to mobile data as soon as it finds WiFi doesn’t have internet access.